总结题目ing~
续上周~~
标题没有错,是按照本地文件夹目录结构划分的


三、LinkList 链表
3.3 反转链表
3.3.1 思路
- 使用栈实现
- 考虑不需要处理的情况
- 全部节点入栈
- 从栈中取出元素,放到一个新的链表中
- 非递归实现
- 考虑不需要处理的情况
- 使用 current 保存下一个节点
- head 指向 newHead
- newHead 变成 head
- head 变成 current
- 递归实现
- 注意递归结束条件
- 找到倒数第二个节点开始反转
3.3.2 步骤
使用栈实现
- head 本身为 null
- 只有 head 一个节点
- 全部入栈
- 选择栈中最后一个节点为链表头节点
- 全部出栈
- 最后节点的 next 置为 null
非递归实现
- head 本身为 null
- 只有 head 一个节点
- while 循环中处理链表翻转
- 返回 newHead
递归实现
- 递归结束条件
- head.next.next = head
- head.next = null
3.3.3 代码
- 使用栈实现
function reverseList(head) {

  if (head === null) return null;
  if (head.next === null) return head;
  const stack = [];
  let current = head;
  while (current) {

    stack.push(current);
    current = current.next;
  }
  const newHead = stack.pop();
  let currentNode = newHead;
  while (stack.length) {

    const node = stack.pop();
    currentNode.next = node;
    currentNode = currentNode.next;
  }
  currentNode.next = null;
  return newHead;
}
- 使用非递归实现
function reverseList(head) {

  if (head === null || head.next === null) return head
  let newHead = null
  while (head) {

    let current = head.next
    head.next = newHead
    newHead = head
    head = current
  }
  return newHead
}
- 使用递归实现
function reverseList(head) {

  if (head === null || head.next === null) return head;
  const newHead = reverseList(head.next);
  head.next.next = head;
  head.next = null;
  return newHead;
}
3.4 两数相加
输入:l1 = [2,4,3], l2 = [5,6,4]
输出:[7,0,8]
3.4.1 思路
- 依次遍历两个链表的节点进行相加
- 使用 l3 存储相加后的结果
- 往后面进位
3.4.2 步骤
- 创建 l3 链表
- 使用两个指针分别指向 l1,l2
- 循环遍历 l1 ,l2
- 两数相加 val
- 获取进位:val / 10
- 获取个位:val % 10
- 将个位传入创建新节点
- 将指针后移
- 两数相加 val
- 判断最后是否有进位
- 返回 l3 链表节点
3.4.3 代码
function addTwoNumbers(l1, l2) {

  const l3 = new ListNode(0);
  let p1 = l1;
  let p2 = l2;
  let carry = 0;
  while (p1 || p2) {

    const v1 = p1.val;
    const v2 = p2.val;
    const val = v1 + v2 + carry;
    carry = Math.floor(val / 10);
    l3.next = new ListNode(val % 10);
    if (p1) p1 = p1.next;
    if (p2) p2 = p2.next;
  }
  if (carry) l3.next = new ListNode(carry);
  return l3.next;
}
3.5 删除排序链表中的重复元素
输入:head = [1,1,2]
输出:[1,2]
3.5.1 思路
- 遍历链表,相等就跳下一个
3.5.2 步骤
- 使用指针
- 循环判断
3.5.3 代码
function deleteRepeatVal(head) {

  let p = head;
  while (p && p.next) {

    if (p.next.val === p.val) {

      p.next = p.next.next;
    } else {

      p = p.next;
    }
  }
  return head;
}
3.6 删除排序链表中的重复元素二
输入:head = [1,2,3,3,4,4,5]
输出:[1,2,5]
3.6.1 思路
- 遍历进行删除
- 需要用到哑节点,因为头节点有可能被删除
3.6.2 步骤
- 判断没有节点的情况
- 创建虚拟节点
- 循环条件为下个节点和下下个节点都存在
- 判断是否存在重复
- 重复:判断相等时为了记录重复的值,内部 while 循环的 cur.next 一直找到下一个不重复的节点
- 不重复:直接跳下一个
- 返回虚拟节点的下一个节点
3.6.3 代码
function deleteRepeatVal(head) {

  if (!head) {

    return head;
  }
  const dummy = new ListNode(0, head);
  let cur = dummy;
  while (cur.next && cur.next.next) {

    if (cur.next.val === cur.next.next.val) {

      const x = cur.next.val;
      while (cur.next && cur.next.val === x) {

        cur.next = cur.next.next;
      }
    } else {

      cur = cur.next;
    }
  }
  return dummy.next;
}
四、HashTable 哈希表
基于数组实现的,但是相对于数组,它有很多的优势
可以提供非常快速的插入-删除-查找操作O(1)
速度比树还要快
编码比树容易
不足:
数据没有顺序,不能以固定的方式遍历其中的元素
通常情况下,key 是不允许重复的,不能放置相同的 key
到底是什么
结构就是数组,神奇的地方在于对数组下标值的一种变换
变换:使用哈希函数获取到 HashCode
4.1 哈希函数
4.1.1 思路
好的哈希函数
- 快速的计算:快速获取到对应的 hashCode
- 均匀的分布:尽可能将元素映射到不同的位置,让元素在哈希表中均匀的分布
- 在使用常量的地方,尽量使用质数
- 质数和其他数相乘的结果相比于其他数字更容易产生唯一性的结果,减少哈希冲突
- 质数的使用
- 哈希表的长度
- N次幂的底数
- 在使用常量的地方,尽量使用质数
- 在哈希表中数组的长度和N次幂的底数使用质数
4.1.2 步骤
- 定义 hashCode
- 遍历 key 长度
- 更新 hashCode
- 计算 index :hashCode % max
4.1.3 代码
function hashFn(key, max) {

  let hashCode = 0;
  for (let i = 0; i < key.length; i++) {

    hashCode += key.charCodeAt(i) + hashCode * 31;
  }
  const index = hashCode % max;
  return index;
}
4.2 实现哈希表
4.2.1 思路
- 使用链地址法
- 实现的哈希表每个 index 对应的是一个数组(桶)
- 数组中存放的是 key 和 value
- 数据格式:[ [ [key,value],[key,value] ],[],[] ]
4.2.2 步骤
使用类进行构建
属性
- storage:存放链地址法的链
- length:每条链的长度(桶的大小)
- count:记录已经存放的元素个数
方法
增、改
put
- 根据 key 使用哈希函数获取索引值
- 取出索引值对应的 桶
- 如果没有就创造新数组
- 判断是否需要覆盖
- 是:找到桶中对应的元组,更新值
- 否:直接追加,count++
删
- 使用 key 根据哈希函数确定 index
- 找到对应的桶,若没有返回 undefined
- 遍历对应的桶
- 找到对应的 key,直接在桶中进行删除
- count–
- 返回被删除的 value
查
- get
- 使用 key 根据哈希函数确定 index
- 找到对应的桶,若没有返回 undefined
- 遍历对应的桶
- 比较 key 对应的 value 值是否相同
- 相同返回 value
- 没有找到返回 undefined
- get
4.2.3 代码
class HashTable {

  storage;
  length = 7;
  count = 0;
  // 哈希函数
  hashFn(key, max) {

    let hashCode = 0;
    for (let i = 0; i < key.length; i++) {

      hashCode += key.charCodeAt(i) + hashCode * 31;
    }
    const index = hashCode % max;
    return index;
  }
  // 增、改
  put(key, value) {

    const index = this.hashFn(key, this, length);
    let bucket = this.storage[index];
    if (!bucket) {

      bucket = [];
      this.storage[index] = bucket;
    }
    let isUpdate = false;
    for (let i = 0; i < bucket.length; i++) {

      const tuple = bucket[i];
      if (key === tuple[0]) {

        tuple[1] = value;
        isUpdate = true;
      }
    }
    if (!isUpdate) {

      bucket.push([key, value]);
      this.count++;
    }
  }
  // 查
  get(key) {

    const index = this.hashFn(key, this.length);
    const bucket = this.storage[index];
    if (!bucket) {

      return undefined;
    }
    for (let i = 0; i < bucket.length; i++) {

      const tuple = bucket[i];
      if (tuple[0] === key) {

        return tuple[1];
      }
    }
    return undefined;
  }

  // 删
  delete(key) {

    const index = this.hashFn(key, this.length)
    const bucket = this.storage[index]
    if (!bucket) return undefined
    for (let i = 0; i < bucket.length; i++){

      const tuple = bucket[i]
      if (tuple[0] === key) {

        bucket.splice(i, 1)
        this.count--
        return tuple[1]
      }
    }
  }

}
4.3 扩容缩容
数据量增大会造成 bucket 越来越长,造成效率的降低
4.3.1 思路
- 封装 resize 方法,用于设置新的长度,获取到原来所有的数据,重新放入到新的数组中
- 新的长度最好是一个质数,能够分布得更加均匀
4.3.2 步骤
初始化数组长度
- 判断是否为质数(只能被 1 和 它本身除没有余数)
- 不是就++再进行判断
- 直到找到质数
存储之前的 oldStorage,之后对哈希表进行初始化
- storage =[]
- count = 0
遍历之前的每一个桶
没有桶直接返回
遍历每一个桶中的元素
调用 put 方法将其放入到新的数组中
4.3.3 使用
- 扩容 length*2
- put 方法中 count++ 后发现 loadFactor 已经大于 0.75
- 缩容 length/2
- delete 方法中 count-- 后发现 loadFactor 已经小于 0.25 并且 this.length > 7
4.3.4 代码
isPrime(num) {

    const sqrt = Math.sqrt(num);
    for (let i = 0; i <= sqrt; i++) {

      if (sqrt % i === 0) return false;
    }
    return true
  }
  resize(newLength) {

    let newPrimeLength = newLength
    while (!this.isPrime(newLength)) {

      newPrimeLength++
    }
    this.length = newPrimeLength
    const oldStorage = this.storage
    this.storage = []
    this.count = 0
    oldStorage.forEach(bucket => {

      if(!bucket) return
      for (let i = 0; i < bucket.length; i++){

        const tuple = bucket[i]
        this.put([tuple[0],tuple[1]])
      }
    })
  }
4.3.5 完整代码
class HashTable {

  storage;
  length = 7;
  count = 0;
  // 哈希函数
  hashFn(key, max) {

    let hashCode = 0;
    for (let i = 0; i < key.length; i++) {

      hashCode += key.charCodeAt(i) + hashCode * 31;
    }
    const index = hashCode % max;
    return index;
  }
  // 增、改
  put(key, value) {

    const index = this.hashFn(key, this, length);
    let bucket = this.storage[index];
    if (!bucket) {

      bucket = [];
      this.storage[index] = bucket;
    }
    let isUpdate = false;
    for (let i = 0; i < bucket.length; i++) {

      const tuple = bucket[i];
      if (key === tuple[0]) {

        tuple[1] = value;
        isUpdate = true;
      }
    }
    if (!isUpdate) {

      bucket.push([key, value]);
      this.count++;
      const loadFactor = this.count / this.length;
      if (loadFactor > 0.75) {

        this.resize(this.length * 2);
      }
    }
  }
  // 查
  get(key) {

    const index = this.hashFn(key, this.length);
    const bucket = this.storage[index];
    if (!bucket) {

      return undefined;
    }
    for (let i = 0; i < bucket.length; i++) {

      const tuple = bucket[i];
      if (tuple[0] === key) {

        return tuple[1];
      }
    }
    return undefined;
  }

  // 删
  delete(key) {

    const index = this.hashFn(key, this.length);
    const bucket = this.storage[index];
    if (!bucket) return undefined;
    for (let i = 0; i < bucket.length; i++) {

      const tuple = bucket[i];
      if (tuple[0] === key) {

        bucket.splice(i, 1);
        this.count--;
        const loadFactor = this.count / this.length;
        if (loadFactor < 0.25 && this.length > 7) {

          this.resize(Math.floor(this.length / 2));
        }
        return tuple[1];
      }
    }
  }
  isPrime(num) {

    const sqrt = Math.sqrt(num);
    for (let i = 0; i <= sqrt; i++) {

      if (sqrt % i === 0) return false;
    }
    return true;
  }
  resize(newLength) {

    let newPrimeLength = newLength;
    while (!this.isPrime(newLength)) {

      newPrimeLength++;
    }
    this.length = newPrimeLength;
    const oldStorage = this.storage;
    this.storage = [];
    this.count = 0;
    oldStorage.forEach((bucket) => {

      if (!bucket) return;
      for (let i = 0; i < bucket.length; i++) {

        const tuple = bucket[i];
        this.put([tuple[0], tuple[1]]);
      }
    });
  }
}
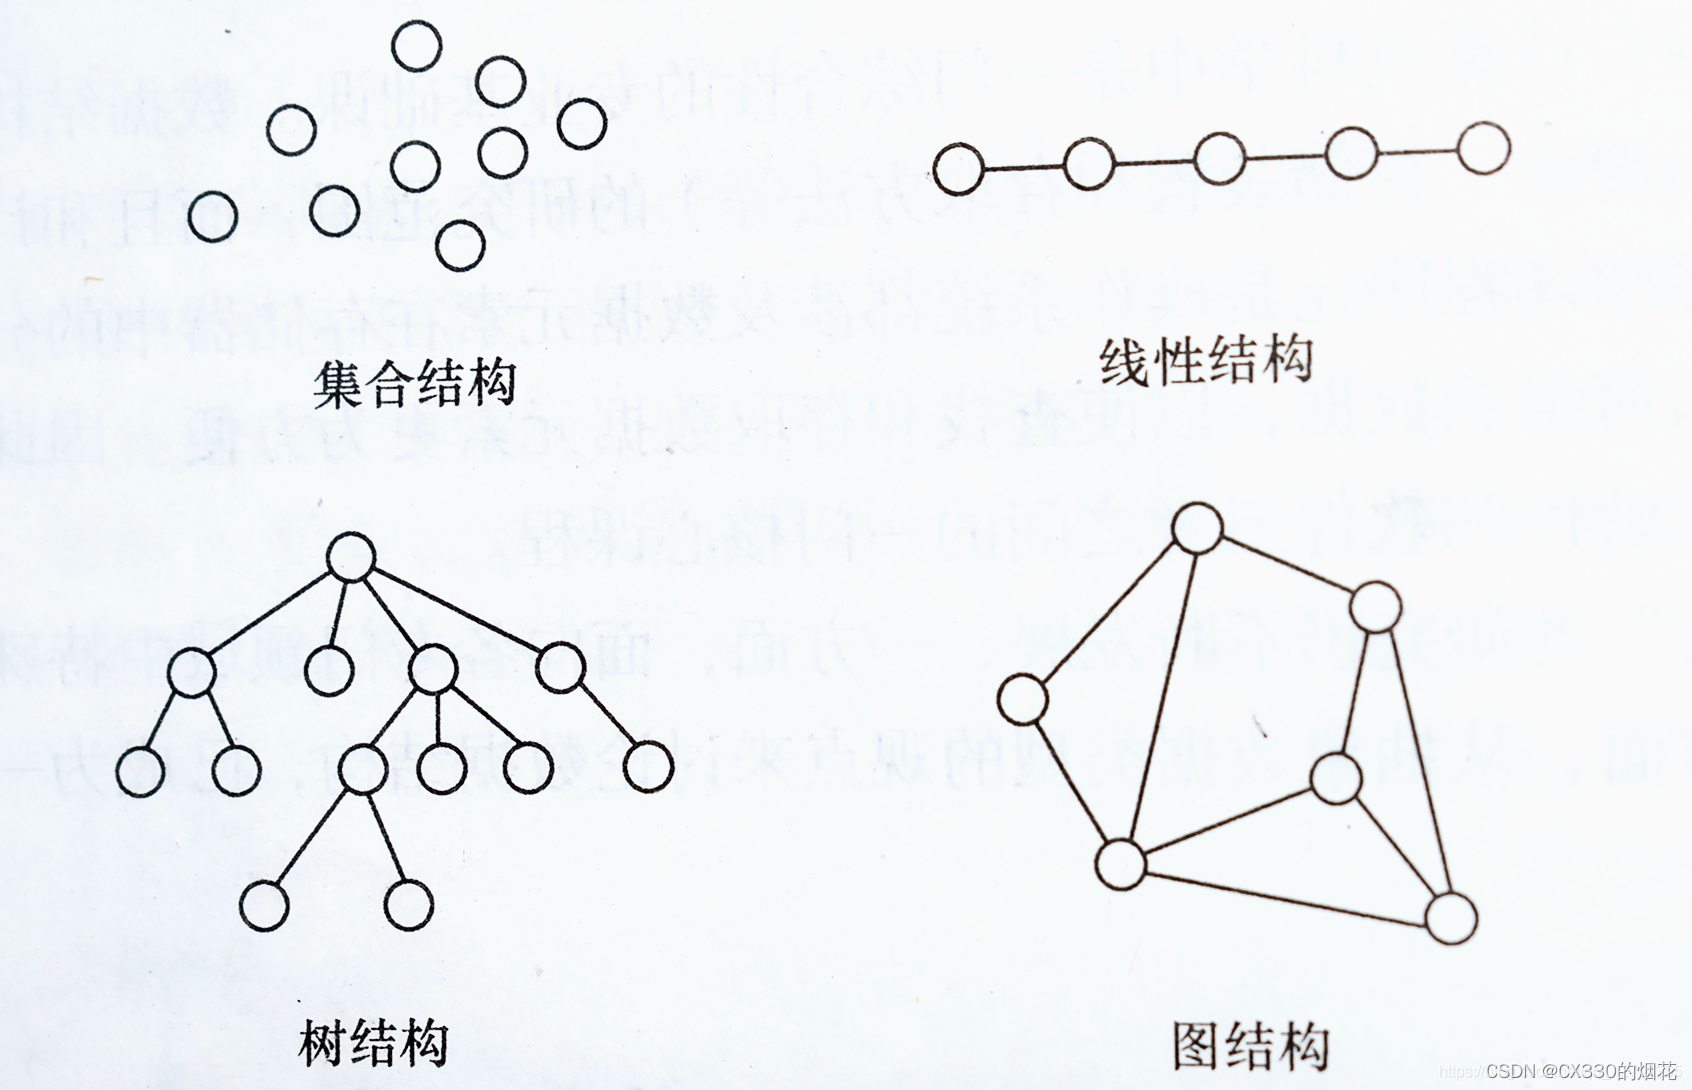
五、Tree 树
5.1 实现二叉搜索树 BSTree
5.1.1 思路
- 通过类来封装
- 封装节点 TreeNode
- 封装树 BSTree
- 实现常用操作
- 增
- insert
- 删
- remove
- 搜索该节点是否存在
- 不存在
- 存在
- 叶子节点
- 左
- 右
- 只有一个子节点
- 左
- 右
- 有两个子节点
- 找到后继结点
- 叶子节点
- 搜索该节点是否存在
- remove
- 查
- search
- min
- max
- 遍历
- 前中后
- 层序:利用队列完成
- 增
5.1.2 步骤
- 封装树的节点
- 包括 value 值,左子节点,右子节点
- 封装树 BSTree
- 初始化为根节点
- insert
- 创建新节点
- 判断根节点是否为空
- 封装插入节点的函数
- 判断插入左边还是右边
- 找到对应插入的位置
- 孩子节点为空
- 否则递归查找
- 遍历
- 前
- 根左右
- 中
- 左根右
- 后
- 左右根
- 层序
- 创建队列
- 根节点入队
- 访问出队元素
- 将其左右子节点入队
- 前
- 最值
- getMaxValue
- 一直往右边找
- getMinValue
- 一直往左边找
- getMaxValue
- 搜索
- 拿到根节点
- 与 value 值比较
- 大于则去左边
- 小于则去右边
- 返回 boolean
- 删除
- 封装 searchNode 方法,找到该节点 current,如果不存在直接返回 false,删除失败
- 拿到根节点
- 设置父节点
- 新增属性:parent
- 定义替代节点
- 综合考虑三种情况
- 删除节点是叶子节点
- 删除节点只有一个子节点
- 左子节点
- 将其设置为替代节点
- 右子节点
- 将其设置为替代节点
- 左子节点
- 删除节点有两个子节点
- 找到后继节点(右边最小)右子树的最左边的节点
- 封装 getSuccessor 方法
- 获取右子树,找后继
- 找到最左边
- 特殊情况:刚好是右子节点,一条右边的链,避免改左节点的右子节点的 parent 的情况
- 左边直接修改父节点
- 获取右子树,找后继
- 将后继节点设置为替代节点
- 替代节点为根节点
- 替代节点为根节点的左子节点
- 替代节点为根节点的右子节点
- 封装 getSuccessor 方法
- 找到后继节点(右边最小)右子树的最左边的节点
- 封装 searchNode 方法,找到该节点 current,如果不存在直接返回 false,删除失败
5.1.3 代码
class TreeNode {

  value;
  left = null;
  right = null;
  constructor(value) {

    this.value = value;
  }
}
class BSTree {

  root = null;
  parent = null;
  get isLeft() {

    return !!(this.parent && this.parent.left === this);
  }
  get isRight() {

    return !!(this.parent && this.parent.right === this);
  }
  insert(value) {

    const newNode = new TreeNode(value);
    if (!this.root) {

      this.root = newNode;
    } else {

      this.insertNode(this.root, newNode);
    }
  }

  insertNode(root, newNode) {

    if (newNode.value <= root.value) {

      if (root.left === null) {

        root.left = newNode;
      } else {

        this.insertNode(root.left, newNode);
      }
    } else {

      if (root.right === null) {

        root.right = newNode;
      } else {

        this.insertNode(root.right, newNode);
      }
    }
  }

  // 遍历
  preOrderTraverse() {

    this.preOrderTraverseNode(root);
  }
  preOrderTraverseNode(node) {

    if (node) {

      console.log(node.value);
      this.preOrderTraverseNode(node.left);
      this.preOrderTraverseNode(node.right);
    }
  }
  inOrderTraverse() {

    this.inOrderTraverseNode(root);
  }
  inOrderTraverseNode(node) {

    if (node) {

      this.inOrderTraverseNode(node.left);
      console.log(node.value);
      this.inOrderTraverseNode(node.right);
    }
  }
  postOrderTraverse() {

    this.postOrderTraverseNode(root);
  }
  postOrderTraverseNode(node) {

    if (node) {

      this.postOrderTraverseNode(node.left);
      this.postOrderTraverseNode(node.right);
      console.log(node.value);
    }
  }
  levelOrderTraverse() {

    if (!this.root) return;
    const queue = [];
    queue.push(this.root);
    while (queue.length) {

      const node = queue.shift();
      if (node.left) queue.push(node.left);
      if (node.right) queue.push(node.right);
    }
  }
  getMaxValue() {

    let current = this.root;
    while (current && current.right) {

      current = current.right;
    }
    return current.value;
  }
  getMinValue() {

    let current = this.root;
    while (current && current.left) {

      current = current.left;
    }
    return current.value;
  }

  search(value) {

    let current = this.root;
    if (current.value === value) {

      return true;
    } else if (current.value > value) {

      current = current.left;
    } else {

      current = current.right;
    }
    return false;
  }
  searchNode(value) {

    let current = this.root;
    let parent = null;
    while (current) {

      if (current.value === value) return current;
      parent = current;
      if (current.value < value) current = current.right;
      if (current.value > value) current = current.left;
      if (current) current.parent = current;
    }
    return null;
  }

  remove(value) {

    const current = this.searchNode(value);
    if (!current) return false;
    let replaceNode = null;
    if (current.left === null && current.right === null) {

      replaceNode = null;
    } else if (current.right === null) {

      replaceNode = current.left;
    } else if (current.left === null) {

      replaceNode = current.right;
    } else {

      const successor = this.getSuccessor(current);
      replaceNode = successor;
    }
    if (current === this.root) {

      this.root = replaceNode;
    } else if (current.isLeft) {

      current.parent.left = replaceNode;
    } else {

      current.parent.right = replaceNode;
    }
    return true;
  }
  getSuccessor(delNode) {

    let current = delNode.right;
    let successor = null;
    while (current) {

      successor = current;
      current = current.left;
      if (current) current.parent = successor;
    }
    if (successor !== delNode.right) {

      successor.parent.left = successor.right;
      successor.right = delNode.right;
    }
    successor.left = delNode.left;
    return successor;
  }
}
六、Graph 图
6.1 实现图
6.1.1 思路
- 属性
- 顶点 verteces
- 边 adjList
- 方法
- 添加顶点 addVertex
- 添加边 addEdge(v1,v2)
6.1.2 步骤
- 创建图类
- 顶点集使用数组
- 每个顶点对应顶点元素(数组)
- 使用 Map
- addVertex
- 顶点集 push 新顶点
- Map set 顶点,空数组
- addEdge
- Map 中分别找到两个顶点对应的顶点集再 push
6.1.3 代码
class Graph {

  verteces = [];
  adjList = new Map();
  addVertex(vertex) {

    this.verteces.push(vertex)
    this.adjList.set(vertex,[])
  }
  addEdge(v1, v2) {

    this.adjList.get(v1).push(v2)
    this.adjList.get(v2).push(v1)
  }
}
6.2 深度优先遍历 dfs
6.2.1 思路
- 利用栈先进后出,反过来遍历放进去,这样就得到最先访问的顶点
6.2.2 步骤
- 判断有无顶点
- 创建栈加入第一个顶点
- 创建 visited 记录是否已经访问过
- 循环条件:栈不为空
- 拿到顶点
- 进行打印输出
- 拿到邻居
- 倒过来放进栈和 set 中
6.2.3 代码
  dfs() {

    if (this.verteces.length === 0) return;
    const stack = [];
    stack.push(this.verteces[0]);
    const visited = new Set();
    visited.add(this.verteces[0]);
    while (stack.length) {

      const vertex = stack.pop();
      console.log(vertex);
      const neighbors = this.adjList.get(vertex);
      if (!neighbors) continue;
      for (let i = neighbors.length - 1; i >= 0; i--) {

        stack.push(neighbors[i]);
        visited.add(neighbors[i]);
      }
    }
  }
6.3 广度优先遍历
6.3.1 思路
- 基于队列先进先出,先访问一个顶点所有的相邻点
6.3.2 步骤
- 判断有无顶点
- 创建队列加入第一个顶点
- 创建 visited 记录是否已经访问过
- 循环条件:队列不为空
- 拿到队头
- 打印输出
- 拿到相邻节点
- 遍历放入队列和 set 中
6.3.1 代码
class Graph {

  verteces = [];
  adjList = new Map();
  addVertex(vertex) {

    this.verteces.push(vertex);
    this.adjList.set(vertex, []);
  }
  addEdge(v1, v2) {

    this.adjList.get(v1).push(v2);
    this.adjList.get(v2).push(v1);
  }
  bfs() {

    if (this.verteces.length === 0) return;
    const queue = [];
    queue.push(this.verteces[0]);
    const visited = new Set();
    visited.add(this.verteces[0]);
    while (queue.length) {

      const vertex = queue.shift();
      console.log(vertex);
      const neighbors = this.adjList.get(vertex);
      if (!neighbors) continue;
      for (let i = 0; i < neighbors.length; i++) {

        if (!visited.has(neighbors[i])) {

          queue.push(neighbors[i]);
          visited.add(neighbors[i]);
        }
      }
    }
  }
}
6.4 太平洋大西洋水流问题
6.4.1 思路
- 逆流而上,顺着一个顶点进行深度优先遍历,看能否到达海洋,并进行标注
6.4.2 步骤
判断矩阵是否存在
获取矩阵的行数和列数
构建两个矩阵,初始化为 false
遍历周围四个方向的坐标
遍历过标记为 true
满足限制条件
深度遍历
上左逆流而上,下右逆流而上
收集能流到两个大洋的坐标
6.4.3 代码
function oean(height) {

  if (!height[0] || !height) return [];
  const m = height.length;
  const n = height[0].length;
  const flow1 = Array.from({
    length: m }, () => new Array(n).fill(false));
  const flow2 = Array.from({
    length: m }, () => new Array(n).fill(false));
  const dfs = (r, c, flow) => {

    flow[r][c] = true[([r, c + 1], [r, c - 1], [r - 1, c], [r + 1, c])].forEach(([nr, nc]) => {

      if (nr >= 0 && nc >= 0 && nr < m && nc < n && !flow[nr][nc] && height[nr][nc] >= flow[r][c]) {

        dfs(nr, nc, flow);
      }
    });
  };
  for (let r = 0; r < m; r++) {

    dfs(r, 0, flow1);
    dfs(r, m - 1, flow2);
  }
  for (let c = 0; c < n; c++) {

    dfs(0, c, flow1);
    dfs(n - 1, c, flow2);
  }
  const res = [];
  for (let i = 0; i < m; i++) {

    for (let j = 0; j < n; j++) {

      if (flow1[i][j] && flow2[i][j]) {

        res.push([i, j]);
      }
    }
  }
  return res;
}
6.5 克隆图
6.5.1 思路
- 克隆顶点(遍历所有节点)
- 克隆边
6.5.2 步骤
- 思路一:深度优先遍历
- 没有节点,直接结束
- 记录是否访问过
- 从节点处开始深度优先遍历
- 创建相同的顶点并存储到 Map(映射节点和对应的克隆节点)
- 遍历顶点对应边集合(邻居)
- 如果没有深度遍历过,对其进行深度遍历
- 推入到新创建的节点对应的集合中
- 返回克隆的图
- 思路二:利用队列(广度优先遍历)
- 没有节点,直接结束
- 记录是否访问过
- 将所有的节点入队
- 获取克隆节点:visited.get(n)
- 将所有邻居节点加入
- 返回克隆的图
6.5.3 代码
function cloneGraph1(node) {

  if (!node) return;
  const visited = new Map();
  const dfs = (n) => {

    const nCopy = new Node(n.val);
    visited.set(n, nCopy);
    (n.neighbors || []).forEach((neighbor) => {

      if (!visited.has(neighbor)) {

        dfs(neighbor);
      }
      nCopy.neighbors.push(visited.get(neighbor));
    });
  };
  dfs(node);
  return visited.get(node);
}

function cloneGraph2(node) {

  if (!node) return;
  const visited = new Map();
  visited.set(node, new Node(node.val));
  const queue = [node];
  while (queue.length) {

    const n = queue.shift();
    (n.neighbors || []).forEach((neighbor) => {

      if (!visited.has(neighbor)) {

        queue.push(neighbor);
        visited.set(neighbor, new Node(neighbor.val));
      }
      visited.get(n).neighbors.push(visited.get(neighbor));
    });
  }
  return visited.get(node);
}
七、Heap 堆
7.1 实现最大堆
7.1.1 思路
- 封装类
- 属性
- data
- length
- 方法
- swap
- insert
- extract
- peek
- size
- isEmpty
- buildHeap
7.1.2 步骤
- insert 插入方法
- 插入到数组最后的位置
- length ++
- 上滤操作:heapify_up(循环条件为不为根节点)
- 找到父节点
- 不断比较看能否和父节点交换位置
- extract 提取元素(堆顶元素)
- 判断元素个数
- 0
- 1
- 弹出堆顶
- length –
- 进行下滤操作 heapify_down(循环条件为有左子节点)
- 拿到左右子节点
- 拿到两者中较大的一个
- 交换位置
- 判断元素个数
- buildHeap 原地建堆
- 放在 constructor 中
- 使用传入的 arr 的值:数组/长度
- 从第一个非叶子节点进行下滤操作
7.1.3 代码
class Heap {

  data = [];
  length = 0;
  swap(i, j) {

    const temp = this.data[i];
    this.data[i] = this.data[j];
    this.data[j] = temp;
  }
  insert(value) {

    this.data.push(value);
    this.length++;
    this.heapify_up();
  }
  heapify_up() {

    const index = this.data.length - 1;
    while (index > 0) {

      let parentIndex = Math.floor((index - 1) / 2);
      if (this.data[parentIndex] >= this.data[index]) {

        break;
      }
      this.swap(index, parentIndex);
      index = parentIndex;
    }
  }
  extract() {

    if (this.length === 0) return undefined;
    if (this.length === 1) return this.data.pop();
    const topValue = this.data[0];
    this.data[0] = this.data.pop()
    this.length--;
    this.heapify_down(0);
    return topValue;
  }
  heapify_down(index) {

    while (2 * index + 1 < this.length) {

      let leftindex = 2 * index + 1;
      let rightIndex = 2 * index + 2;
      let largerIndex = leftindex;
      if (rightIndex <= this.length && this.data[leftindex] < this.data[rightIndex]) {

        largerIndex = rightIndex;
      }
      if (this.data[index] >= this.data[largerIndex]) break;
      this.swap(largerIndex, index);
      index = largerIndex;
    }
  }
  buildHeap(arr) {

    this.data = arr;
    this.length = arr.length;
    const start = Math.floor((this.length - 1) / 2);
    for (let i = start; start >= 0; start--) {

      this.heapify_down(i);
    }
  }
  peek() {

    return this.data[0];
  }
  size() {

    return this.length;
  }
  isEmpty() {

    return this.length === 0;
  }
}
十一、查找算法
11.1 顺序查找
11.1.1 思路
- 遍历数组进行判断
11.1.2 步骤
- for 循环进行遍历
- 判断是否等于目标值
11.1.3 代码
function search(numbers, num) {

  for (let i = 0; i < numbers.length; i++){

    const item = numbers[i]
    if(item === num) return i
  }
  return -1
}
11.2 二分查找
11.2.1 思路
- 每次查找将数组进行二分
11.2.2 步骤
- 定义左边、右边的索引
- while 循环查找
- 找到中间的元素
- 判断与目标值的关系
- 等于:直接返回
- 大于:left = mid + 1,在右边进行查找
- 小于:right = mid -1,在左边进行查找
11.2.3 代码
function bsSearch(numbers, num) {

  let left = 0;
  let right = numbers.length - 1;
  while (left <= right) {

    let mid = Math.floor((left + right) / 2);
    if (numbers[mid] === num) {

      return mid;
    } else if (numbers[mid] > num) {

      right = mid - 1;
    } else {

      left = mid + 1;
    }
  }
  return -1;
}