第 1 章:Flume概述
1.1 Flume定义
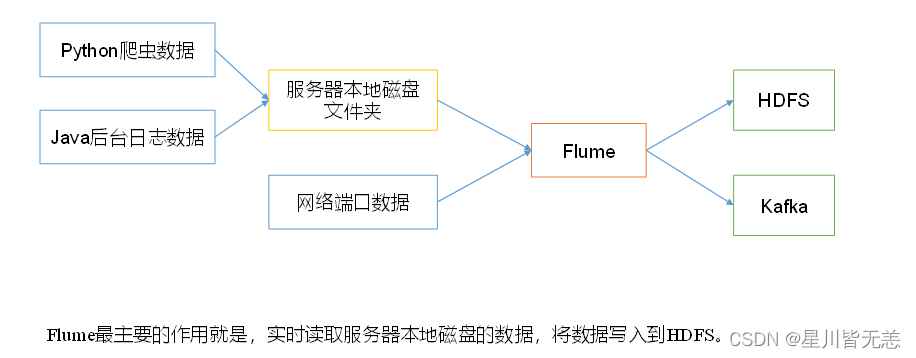
Flume是Cloudera提供的一个高可用的,高可靠的,分布式的海量日志采集、聚合和传输系统。
1.2 Flume基础架构
1.2.1 Agent
1、Agent:Flume的部署单元,本质是一个JVM进程,Agent内部是以事件的形式将数据从源头送至目的。
2、组成:Agent主要有3个部分组成,Source、Channel、Sink。
1.2.2 Source
1、Source:是负责接收数据到Flume Agent的组件。
2、特点:Source组件可以处理各种类型、各种格式的日志数据
3、Source组件类型
1)avro:本质是RPC框架,支持跨语言、快平台的数据传输,avro Source在flume中多用于Agent的连接。
2)netcat:本质是Linux下的端口类工具,netcat Source在Flume中用于采集端口传输的数据。
3)exec:支持执行命令的,并对命令执行后的标准输出作为数据采集,多用于采集一个可追加文件。
4)spooling directory:支持对一个目录进行监听,采集目录中一个或多个新生成的文件数据。
5)taildir:支持对多个目录进行监听,采集一个或多个目录下的一个或多个可追加文件,支持断电续传。
除此之外还有:thrift、jms、sequence generator、syslog、http、自定义Source。
1.2.3 Sink
1、Sink:是负责发送数据到外部系统的Flume Agent的组件。
2、特点:Sink组件不断地轮询Channel中的事件且批量地移除它们,并将这些事件批量的、事务的写入到存储或索引系统、或者被发送到另一个Flume Agent。
3、Sink组件类型:
1)logger:logger Sink组件则是将数据写到成Flume框架的运行日志中,配合运行参数-Dflume.root.logger=INFO,console可以将Flume运行日志(其中就包含了采集的数据)输出到控制台,多用于测试环境。
2、hdfs:hdfs Sink组件是负责将数据传输到HDFS分布式文件系统中。
3、avro:avro Sink组件配合avro Source组件可以实现Agent的连接。
4、file:file Sink组件是将采集到的数据直接输出到本地文件系统中,即linux的磁盘上。
除此之外还有:thrift、ipc、HBase、solr、自定义Sink。
1.2.4 Channel
1、是负责暂存数据的,位于Source和Sink组件之间的缓冲区。
2、特点:
1)由于Channel组件的存在,使得Source和Sink组件可以运行在不同速率上。
2、Channel是线程安全的,可以同时处理几个Source的写入操作和几个Sink的读取操作。
3、Flume自带两种Channel:
1)Memory Channel:基于内存的队列存储事件,适用于对数据安全性不高的场景。
2)File Channel:基于磁盘存储事件,宕机数据不丢失,适用于对数据安全敏感度高的场景。
1.2.5 Event
1、Event:agent中的事件,Flume数据传输的基本单元,以Event的形式将数据从源头送至目的地。
2、特点:Event由Header和Body两部分组成,
1)Header:用来存放该event的一些属性,为K-V结构
2)Body:用来存放该条数据,形式为字节数组

第 2 章:Flume 入门
2.1 Flume安装部署
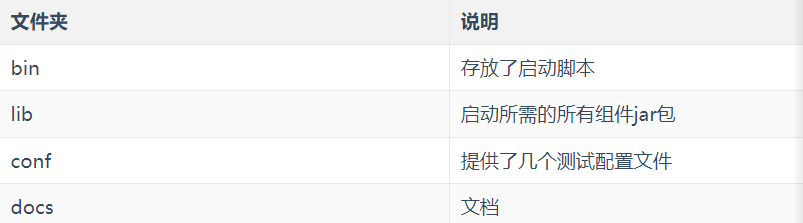
2.1.1 安装
1、将apache-flume包上传到linux的/opt/software目录下
2、解压包到/opt/module/目录下
3、修改包的名称为flume
4、将lib文件夹下的guava删除以兼容Hadoop
2.2 Flume入门案例
2.2.1 监控端口数据官方案例
1、案例需求
使用Flume监听一个端口,收集该端口数据,并打印到控制台
2、需求分析
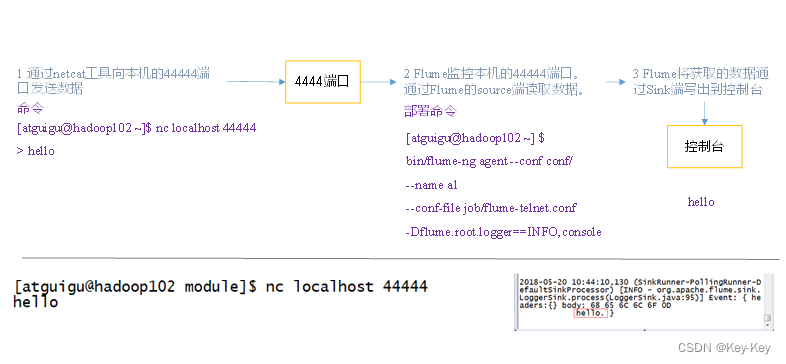
3、实现步骤
1、软件环境配置
1)安装netcat工具
sudo yum install -y nc
2)判断44444端口是否被占用
sudo netstat -nlp | grep 44444
3)在flume目录下创建job文件夹并进入job文件夹
mkdir -p job/simpleCase
cd job/simpleCase
2、边写配置文件
在job/simpleCase文件夹下创建Flume Agent配置文件flume-1-netcat-logger.conf,添加如下内容
vim flume-1-netcat-logger.conf
# Name to components on this agent
a1.source = r1 # 为a1的Source组件命名为r1,多个组件用空格间隔
a1.sinks = k1 # 为a1的Sink组件命名为k1,多个组件用空格间隔
a1.channels = c1 # 为a1的Channel组件命名为c1,多个组件用空格间隔

# Describe/configure the source
a1.sources.r1.type = netcat # 配置r1的类型
a1.sources.r1.bind = localhost # 配置r1的绑定地址(注意localhost和hadoop102的区别)
a1.sources.r1.port = 44444 # 配置r1的监听端口

# Describe the sink
a1.sinks.k1.type = logger # 配置k1的类型为logger,输出给控制台

# Use a channel which buffers events in memory
a1.channels.c1.type = memory # 配置c1的类型为memory
a1.channels.c1.capacity = 1000 # 配置c1的容量为1000个事件
a1.channels.c1.transactionCapacity = 100 # 配置c1的事件容量为100个事件

# Bind the source and sink to the channel
a1.sources.r1.channels = c1 # 配置r1的channel属性,指定r1连接到那个channel
a1.sinks.k1.channel = c1 # 配置k1的channel属性,指定k1连接到那个channe
3、部署运行flume监听端口
1)第一种写法:
bin/flume-ng agent --conf conf/ --name a1 --conf-file job/simpleCase/flume-1-netcat-logger.conf -Dflume.root.logger=INFO,console
2)第二种写法:
bin/flume-ng agent -c conf/ -n a1 -f job/simpleCase/flume-1-netcat-logger.conf -Dflume.root.logger=INFO,console
参数说明:
–conf/-c:表示配置文件存储在conf/目录
–name/-n:表示给agent起名a1
–conf-file/-f:指定读取的配置文件是在job/simpleCase文件夹下的flume-1-1netcat-logger.conf文件。
-Dflume.root.logger=INFO,CONSOLE:-D表示flume运行时动态修改flume.root.logger参数属性值,并将充值台日志打印级别设置为INFO级别。日志级别包括:log、infor、warn、error。
4、测试
1)使用netcat工具向本机的44444端口发送内容
nc localhost 44444
hello
atguigu
2)在Flume监听页面观察数据情况
……
2018-09-07 21:17:48,494 (SinkRunner-ProllingRunner-DefaultSinkProcessor) [INFO – org.apache.flume.sink.Sink.process(LoggerSink.java:95)] Event:{headers:{} body: 68 65 6c 6F 0D hello.}
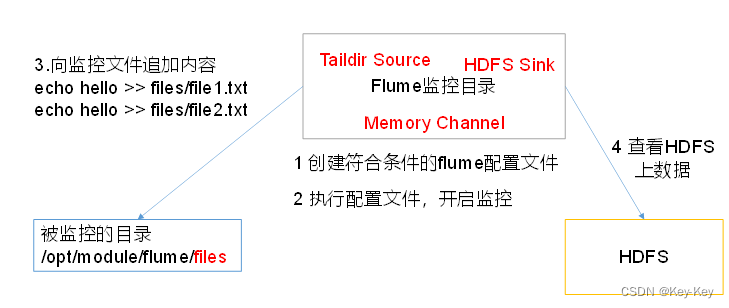
2.2.2 实时监控目录下的多个追加文件
1)、Exec source:适用于监控一个实时追加的文件,不能实现断点续传。
2)、Spooldir Source:适合用于同步新文件,但不适合对实时追加日志的文件进行监听并同步。
3)、TailDir Source:适合用于监听多个实时追加的文件,并且能够实现断点续传。
1、案例
使用Flume监听整个目录的实时追加文件,并上传至HDFS
2、需求分析
3、实现步骤
1)环境准备
(1)在flume根目录下创建目录datas/tailCase/files和datas/tailCase/logs用于存放数据文件
mkdir -p datas/tailCase/files datas/tailCase/logs
2)编写配置文件
在job/simpleCase目录下,创建配置文件flume-2-taildir-hdfs.conf,编写如下内容
vim flume-2-taildir-hdfs.conf
# Name the components on this agent
a2.sources = r1
a2.sinks = k1
a2.channels = c1

# Describe/configure the source
a2.sources.r1.type = TAILDIR
a2.sources.r1.positionFile = /opt/module/flume/tail_dir.json
a2.sources.r1.filegroups = f1 f2
a2.sources.r1.filegroups.f1 = /opt/module/flume/datas/tailCase/files/.*file.*
a2.sources.r1.filegroups.f2 = /opt/module/flume/datas/tailCase/logs/.*log.*

# Describe the sink
a2.sinks.k1.type = hdfs
a2.sinks.k1.hdfs.path = hdfs://hadoop102:8020/flume/tailDir/%Y%m%d/%H
# 上传文件的前缀
a2.sinks.k1.hdfs.filePrefix = tail-
# 是否按照时间滚动文件夹
a2.sinks.k1.hdfs.round = true
# 多少时间单位创建一个新的文件夹
a2.sinks.k1.hdfs.roundValue = 1
# 重新定义时间单位
a2.sinks.k1.hdfs.roundUnit = hour
# 是否使用本地时间戳
a2.sinks.k1.hdfs.useLocalTimeStamp = true
# 积攒多少个Event才flush到HDFS一次
a2.sinks.k1.hdfs.batchSize = 100
# 设置文件类型,(可选择设置支持压缩的CompressedStream或者不支持压缩的DataStream)
a2.sinks.k1.hdfs.fileType = DataStream
# 多久生成一个新的文件
a2.sinks.k1.hdfs.rollInterval = 60
# 设置每个文件的滚动大小大概是128M
a2.sinks.k1.hdfs.rollSize = 134217700
# 文件的滚动与Event数量无关
a2.sinks.k1.hdfs.rollCount = 0

# Use a channel which buffers events in memory
a2.channels.c1.type = memory
a2.channels.c1.capacity = 1000
a2.channels.c1.transactionCapacity = 100

# Bind the source and sink to the channel
a2.sources.r1.channels = c1
a2.sinks.k1.channel = c1
3)启动flume监控文件夹
bin/flume-ng agent --conf conf/ --name a2 --conf-file job/simpleCase/flume-2-taildir-hdfs.conf
4)测试
(1)在/opt/module/flume/datas/目录下创建tailCase/files文件夹向files文件夹下文件追加内容
touch file1.txt
echo I am file1 >> file1.txt
touch log1.txt
echo I am log1 >> log1.txt
(2)在/opt/module/flume/datas/目录下创建tailCase/logs文件夹向logs文件夹下文件追加内容
mkdir –p /opt/module/flume/datas/tailCase/logs
touch file2.txt
echo I am file2 >> file2.txt
touch log2.txt
echo I am log2 >> log2.txt
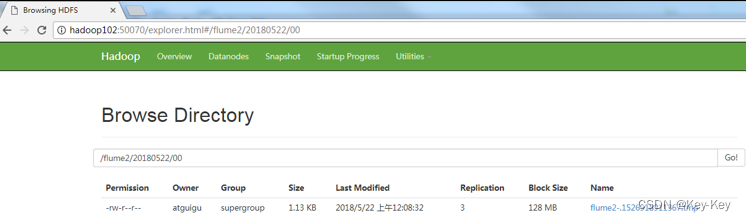
(3)查看HDFS上的数据,验证flume对多目录下文件的实时采集
(4)关闭flume采集程序,对logs/和/files/下文件追加,再开启flume采集程序,验证flume的断电续传
cat /opt/module/flume/tail_dir.json       // 观察json文件
cd datas/tailCase/files
echo I am file1 duandian >> file1.txt
cd /opt/module/flume/datas/tailCase/logs
echo I am log2 xuchuan>> log2.txt
(5)Taildir说明
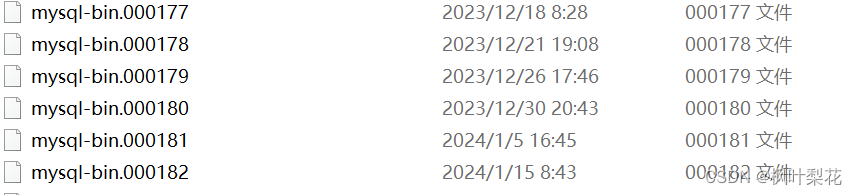
Taildir Source维护了一个json格式的position File,其会定期的position File中更新每个文件读取到的最新的位置,因此能够实现断点续传。Position File的格式如下:
{
  "inode":2496272,"pos":12,"file":"/opt/module/flume/datas/tailCase/files/file1.txt"}
{
  "inode":2496275,"pos":12,"file":"/opt/module/flume/datas/tailCase/logs/log2.txt"}
注:Linux中存储文件元数据的区域就叫做inode,每个inode都有一个号码,操作系统用inode号码来识别不同文件,Unix/Linux系统内部不适用文件名,而使用inode号码来识别文件。
第 3 章:Flume进阶
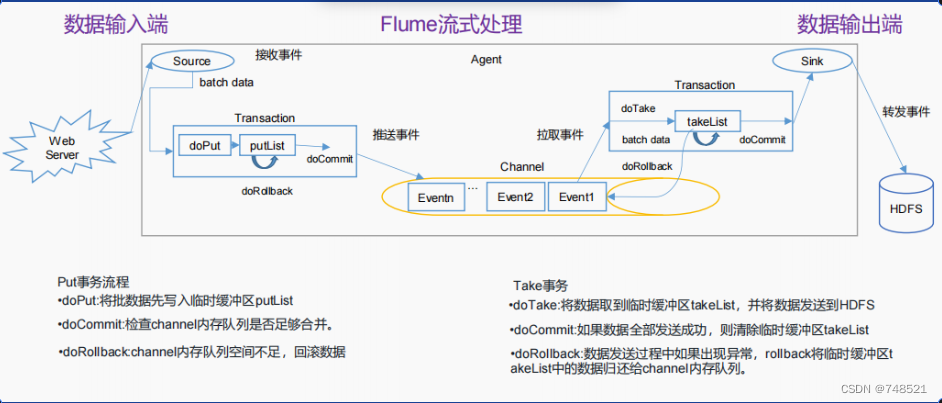
3.1 Flume事务
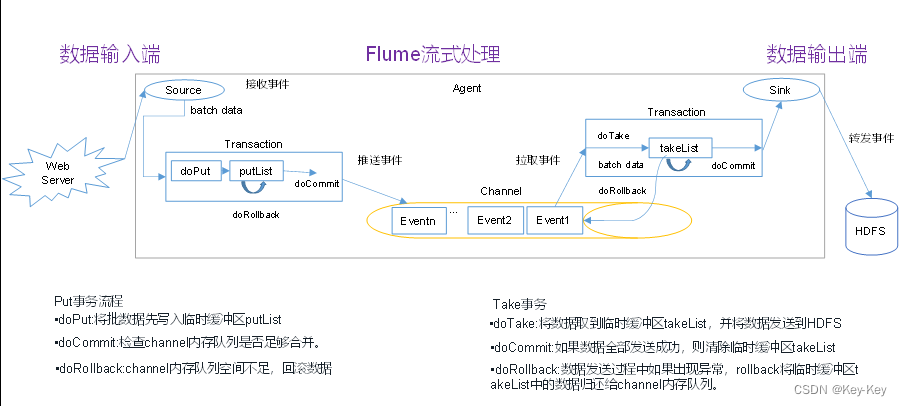
1、在Flume中一共有两个事务
put事务:在Source组件和Channel组件之间,保证Source组件到Channel组件之间数据传递的可靠性。
take事务:在Channel组件和Sink组件之间,保证channel组件到Sink组件之间数据传输的可靠性。
2、Put事务流程
1)source组件采集外部数据到agent内部,并且将数据包装为事件
2)source组件开始将事件传输到Channel组件中
3)首先,会开启事务,在事务内部,通过doPut方法将一批数据放入到putlist中存储。
4)之后,调用doCommit方法,把putList中的所有Event放到Channel中,成功之后就清空putList
(1)putList在像channel中发送数据前会先检查channel中的容器是否放得下,放不下一个都不会放,调用doRollback
(2)调用doRollback方法后,doRollback方法会进行两步操作:将putList清空;抛出ChannelException异常。
(3)source组件会捕捉到doRollback抛出的异常后,source就将刚才的一批数据重新采集,然后就开启一个新的事务。
(4)数据批的大小取决于Source组件的配置参数batch size的值。
(5)putList的大小取决于Channel组件的配置参数transactionCapacity的值(capacity参数是指Channel的容量)
3、Take事务流程
1)Sink组件不断地轮询Channel,当其中有新的事件到达时,开启take事务
2)take事务开启后,会调用doTake方法将Channel组件中的Event剪切到takeList中
3)当takeList中存放了batch size数量的Event之后,就会调用doCommit方法
4)doCommit方法中,首先会将数据写出到外部系统,成功后就会清空takeList
5)当事务失败时,就会调用doRollback方法来进行回滚,就是将takeList中的数据原封不动的还给channel
当take事务失败时,可能向外部写了一半的数据了,但是回滚时,是将takeList中的全部数据返回给channel,当开启新的take事务时,又会将这批数据再次写入到外部,就造成了数据重复。
3.2 Flume Agent内部原理
1、重要组件
| 组件名称 | 概述 | 组件包含类型 | 特点 |
|---|---|---|---|
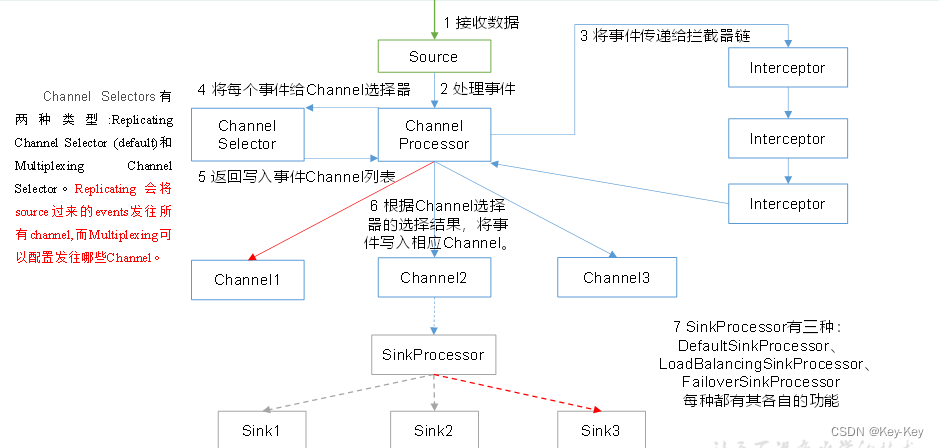
| ChannelSelector | 选出Event将发到那个channel | Replication Channel selector | 复制,默认选项 |
| Multiplexing Channel Selector | 多路复用 | ||
| SinkProcessor | 通过配置不同类型的SinkProcess实现不同的功能 | DefaultSinkProcessor | 单个Sink,默认 |
| LoadBalancingSinkProcessor | 负载均衡 | ||
| FailoverSinkProcessor | 故障转移 |
2、执行流程
1、Source组件采集外部数据到agent内部,并包装为Event
2、然后,将事件发送到ChannelProcessor中
通过拦截器链中每个拦截器的拦截过滤,符合要求的Event会返回到ChannelProcessor中。
在通过ChannelSelector根据不同的选择器来决定Event去往哪个Channel,然后返回到ChannelProcessor。
3、开启Put事务,将批量的Event发送到Channel中
4、根据SinkProcessor组件配置的类型不同,实现相应的功能(负载均衡或故障转移),最终都会且同一时刻只能由一个Sink去拉取数据。
5、Sink组件不断地轮询Channel,当有新地Event到达Channel时,向外部系统写出。
3.3 Flume企业开发案例
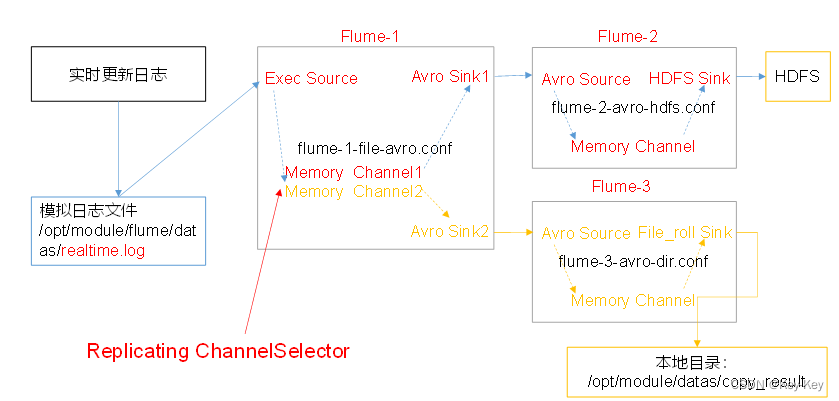
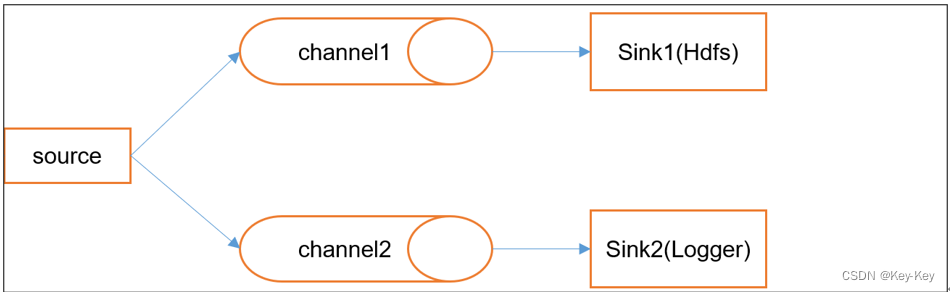
3.3.1 复制
1、案例
使用Flume-1监控文件变动。
1)Flume-1将变动内容传递给Flume-2,Flume-2负责存储到HDFS。
2)同时Flume-1将变动内容传递给Flume-3,Flume-3负责输出到Local FileSystem。
2、需求分析
3、实现步骤
1)准备工作
在/opt/module/flume/job目录下创建enterprise/copy文件夹,存放复制案例地配置文件
mkdir -p /opt/module/flume/job/enterprise/copy
在/opt/module/flume/datas/目录下创建模拟日志文件realtime.log
touch /opt/module/flume/datas/realtime.log
2)编写配置文件
flume-1的agent配置文件flume-1-exec-avro.conf
其中配置1个source和两个channel、两个sink,分别输送给flume-2-avro-hdfs和flume-3-avro-file。
vim flume-1-exec-avro.conf
# Name the components on this agent
a1.sources = r1
a1.sinks = k1 k2
a1.channels = c1 c2
# 将数据流复制给所有channel,其实默认就是replicating
a1.sources.r1.selector.type = replicating

# Describe/configure the source
a1.sources.r1.type = exec
a1.sources.r1.command = tail -F /opt/module/flume/datas/realtime.log
a1.sources.r1.shell = /bin/bash -c

# Describe the sink
# sink端的avro是一个数据发送者
a1.sinks.k1.type = avro
a1.sinks.k1.hostname = hadoop102
a1.sinks.k1.port = 4141

a1.sinks.k2.type = avro
a1.sinks.k2.hostname = hadoop102
a1.sinks.k2.port = 4142

# Describe the channel
a1.channels.c1.type = memory
a1.channels.c1.capacity = 1000
a1.channels.c1.transactionCapacity = 100

a1.channels.c2.type = memory
a1.channels.c2.capacity = 1000
a1.channels.c2.transactionCapacity = 100

# Bind the source and sink to the channel
a1.sources.r1.channels = c1 c2
a1.sinks.k1.channel = c1
a1.sinks.k2.channel = c2
比那些flume-2的agent配置文件flume-2-avro-hdfs.conf,创建Flume-3的agent配置文件,创建flume-3-avro-file.conf,采集Flume-1的输出数据,输出到本地/opt/module/flume/datas/copy_result目录下
vim flume-2-avro-hdfs.conf
# Name the components on this agent
a2.sources = r1
a2.sinks = k1
a2.channels = c1

# Describe/configure the source
# source端的avro是一个数据接收服务
a2.sources.r1.type = avro
a2.sources.r1.bind = hadoop102
a2.sources.r1.port = 4141

# Describe the sink
a2.sinks.k1.type = hdfs
a2.sinks.k1.hdfs.path = hdfs://hadoop102:8020/flume/copy/%Y%m%d/%H
# 上传文件的前缀
a2.sinks.k1.hdfs.filePrefix = copy-
# 是否按照时间滚动文件夹
a2.sinks.k1.hdfs.round = true
# 多少时间单位创建一个新的文件夹
a2.sinks.k1.hdfs.roundValue = 1
# 重新定义时间单位
a2.sinks.k1.hdfs.roundUnit = hour
# 是否使用本地时间戳
a2.sinks.k1.hdfs.useLocalTimeStamp = true
# 积攒多少个Event才flush到HDFS一次
a2.sinks.k1.hdfs.batchSize = 100
# 设置文件类型,可支持压缩
a2.sinks.k1.hdfs.fileType = DataStream
# 多久生成一个新的文件
a2.sinks.k1.hdfs.rollInterval = 60
# 设置每个文件的滚动大小大概是128M
a2.sinks.k1.hdfs.rollSize = 134217700
# 文件的滚动与Event数量无关
a2.sinks.k1.hdfs.rollCount = 0

# Describe the channel
a2.channels.c1.type = memory
a2.channels.c1.capacity = 1000
a2.channels.c1.transactionCapacity = 100

# Bind the source and sink to the channel
a2.sources.r1.channels = c1
a2.sinks.k1.channel = c1
vim flume-3-avro-file.conf
# Name the components on this agent
a3.sources = r1
a3.sinks = k1
a3.channels = c2

# Describe/configure the source
a3.sources.r1.type = avro
a3.sources.r1.bind = hadoop102
a3.sources.r1.port = 4142

# Describe the sink
a3.sinks.k1.type = file_roll
a3.sinks.k1.sink.directory = /opt/module/flume/datas/copy_result

# Describe the channel
a3.channels.c2.type = memory
a3.channels.c2.capacity = 1000
a3.channels.c2.transactionCapacity = 100

# Bind the source and sink to the channel
a3.sources.r1.channels = c2
a3.sinks.k1.channel = c2
3)创建本地目录
mkdir /opt/module/flume/datas/copy_result
提示:输出的本地目录必须是已经存在的目录,如果该目录不存在,并不会创建新的目录
4)测试
(1)运行flume,开启对数据的监控采集:启动顺序是先下游,再上游
bin/flume-ng agent -c conf/ -n a3 -f /opt/module/flume/job/enterprise/copy/flume-3-avro-file.conf

bin/flume-ng agent -c conf/ -n a2 -f /opt/module/flume/job/enterprise/copy/flume-2-avro-hdfs.conf

bin/flume-ng agent -c conf/ -n a1 -f /opt/module/flume/job/enterprise/copy/flume-1-exec-avro.conf
(2)向文件中追加内容,模拟日志实时更新
echo 2021-10-31 09-10-34 >> realtime.log
(3)检查HDFS上数据文件
(4)检查/opt/module/datas/copy_result目录中数据
ll
总用量 8
-rw-rw-r--. 1 atguigu atguigu 5942 5月  22 00:09 1526918887550-3
注意:file Sink采集数据到本地磁盘时,本地文件是按照事件滚动产生的,即使没有事件采集过来,本地也会生成空文件。
3.3.2 多路复用和拦截器的使用
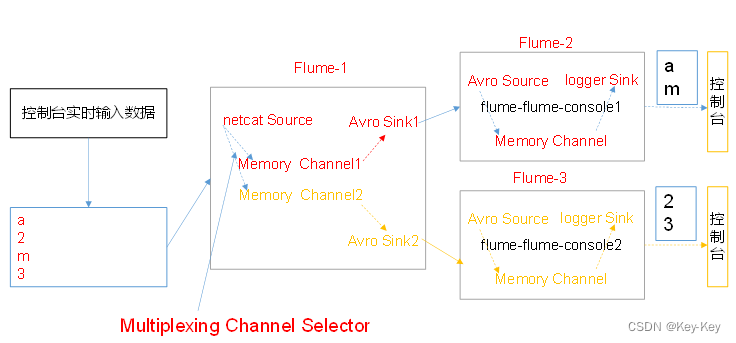
1、案例
使用flume采集服务器端口日志数据,需要按照日志类型的不同,将不同种类的日志发往不同分析系统。
2、需求分析
1)背景:在实际的开发中,一台服务器产生的日志类型可能由很多种,不同类型的日志可能需要发送到不同的分析系统。此时会用到Flume的channel selecter中的Multiplexing结构。
2)Multiplexing的原型是:根据event中Header的某个key的值,将不同的event发送到不同的Channel中。
3)自定义Interceptor:实现为不同类型的event的Header中的key赋予不同的值。
4)总结:在该案例中,我们以端口数据模拟日志,以数字和字母模拟不同类型的日志,我们需要自定义interceptor区分数字和字母,将其分别发往不同的分析系统(Channel)。
3、实现步骤
1)创建一个maven项目,并引入以下依赖。
<dependency>
    <groupId>org.apache.flume</groupId>
    <artifactId>flume-ng-core</artifactId>
    <version>1.9.0</version>
</dependency>
2)定义CustomInterceptor类并实现Interceptor接口。
package com.atguigu.flume.interceptor;

import org.apache.flume.Context;
import org.apache.flume.Event;
import org.apache.flume.interceptor.Interceptor;
import java.util.List;

public class CustomInterceptor implements Interceptor {


    @Override
    public void initialize() {
    }

    @Override
    public Event intercept(Event event) {
        // 1. 从事件中获取数据
        byte[] body = event.getBody();
        // 2. 判断数据开头的字符是字母还是数据
        if (body[0] >= 'a' && body[0] <= 'z') {
            event.getHeaders().put("type", "letter");         // 是字母就在事件头部设置type类型为letter
        } else if (body[0] >= '0' && body[0] <= '9') {
            event.getHeaders().put("type", "number");         // 是数字就在事件头部设置type类型为number
        }
        // 3. 返回事件
        return event;

    }
    // 对批量事件进行拦截
    @Override
    public List<Event> intercept(List<Event> events) {
        for (Event event : events) {
            intercept(event);
        }
        return events;
    }

    @Override
    public void close() {
    }
    // 拦截器对象的构造对象
    public static class Builder implements Interceptor.Builder {

        @Override
        public Interceptor build() {
            return new CustomInterceptor();
        }

        @Override
        public void configure(Context context) {
        }
    }
}
3)将项目打包,并导入到flume的lib目录下。
4)编辑flume-1配置文件
在hadoop102上的/opt/module/flume/job/目录下创建文件夹/custom/multi,存放本案例配置文件
mkdir -p /opt/module/flume/job/custom/multi
为hadoop102上的Flume1配置1个netcat source,1个sink group(2个avro sink),并配置相应的ChannelSelector和interceptor。
vim /opt/module/flume/job/custom/multi/flume-1-netcat-avro.conf
# Name the components on this agent
a1.sources = r1
a1.sinks = k1 k2
a1.channels = c1 c2

# Describe/configure the source
a1.sources.r1.type = netcat
a1.sources.r1.bind = localhost
a1.sources.r1.port = 44444
a1.sources.r1.interceptors = i1
a1.sources.r1.interceptors.i1.type = com.atguigu.flume.interceptor.CustomInterceptor$Builder
a1.sources.r1.selector.type = multiplexing
a1.sources.r1.selector.header = type
a1.sources.r1.selector.mapping.letter = c1
a1.sources.r1.selector.mapping.number = c2

# Describe the sink
a1.sinks.k1.type = avro
a1.sinks.k1.hostname = hadoop103
a1.sinks.k1.port = 4141

a1.sinks.k2.type=avro
a1.sinks.k2.hostname = hadoop104
a1.sinks.k2.port = 4242

# Use a channel which buffers events in memory
a1.channels.c1.type = memory
a1.channels.c1.capacity = 1000
a1.channels.c1.transactionCapacity = 100

# Use a channel which buffers events in memory
a1.channels.c2.type = memory
a1.channels.c2.capacity = 1000
a1.channels.c2.transactionCapacity = 100

# Bind the source and sink to the channel
a1.sources.r1.channels = c1 c2
a1.sinks.k1.channel = c1
a1.sinks.k2.channel = c2
5)编写flume-2的配置文件和flume-3的配置文件
分别为hadoop103的flume-2和hadoop104上的flume-3配置一个avro source和一个logger sink。
vim /opt/module/flume/job/custom/multi/flume-2-avro-logger.conf
# agent
a2.sources=r1
a2.sinks = k1
a2.channels = c1

# source
a2.sources.r1.type = avro
a2.sources.r1.bind = hadoop103
a2.sources.r1.port = 4141

# sink
a2.sinks.k1.type = logger

# Channel
a2.channels.c1.type = memory
a2.channels.c1.capacity = 1000
a2.channels.c1.transactionCapacity = 100

# bind
a2.sinks.k1.channel = c1
a2.sources.r1.channels = c1
vim /opt/module/flume/job/custom/multi/flume-3-avro-logger.conf
# agent
a3.sources = r1
a3.sinks = k1
a3.channels = c1

# source
a3.sources.r1.type = avro
a3.sources.r1.bind = hadoop104
a3.sources.r1.port = 4242

# sink
a3.sinks.k1.type = logger

# Channel
a3.channels.c1.type = memory
a3.channels.c1.capacity = 1000
a3.channels.c1.transactionCapacity = 100

# bind
a3.sinks.k1.channel = c1
a3.sources.r1.channels = c1
6)分别在hadoop102,hadoop103,hadoop104上启动flume进程,注意先后顺序。
7)在hadoop102使用netcat向localhost:44444发送字母和数字。
8)观察hadoop103和hadoop104打印的日志。
3.3.3 聚合
1、案例
hadoop102上的flume-1监控文件/opt/module/flume/datas/.file.
hadoop103上的flume-2监控某一个端口的数据流
hadoop104上的flume-3,接收flume-1和flume-2的数据,flume-3将最终数据打印到控制台
2、需求分析

3、实现步骤
1)准备工作
在hadoop102、hadoop103以及hadoop104的/opt/module/flume/job/enterprise目录下创建juhe文件夹
mkdir /opt/module/flume/job/enterprise/juhe
将Flume压缩后的目录分发到集群的其它节点
xsync /opt/module/flume
2)在hadoop102上的/opt/module/flume/job/enterprise/juhe目录下,创建flume-1-exec-avro.conf文件,配置exec Source用于监控file1.log文件,配置avro Sink输出数据到下一级Flume 3中。
vim /opt/module/flume/job/enterprise/juhe/flume-1-exec-avro.conf
# Name the components on this agent
a1.sources = r1
a1.sinks = k1
a1.channels = c1

# Describe/configure the source
a1.sources.r1.type = exec
a1.sources.r1.command = tail -F /opt/module/flume/datas/realtime.log
a1.sources.r1.shell = /bin/bash -c

# Describe the sink
a1.sinks.k1.type = avro
a1.sinks.k1.hostname = hadoop104
a1.sinks.k1.port = 4141

# Describe the channel
a1.channels.c1.type = memory
a1.channels.c1.capacity = 1000
a1.channels.c1.transactionCapacity = 100

# Bind the source and sink to the channel
a1.sources.r1.channels = c1
a1.sinks.k1.channel = c1
3)在hadoop103上的/opt/module/flume/job/enterprise/juhe目录下,创建flume-1-netcat-avro.conf文件,配置Netcat Source监控端口44444数据流,配置avro Sink数据到下一级Flume 3中
vim /opt/module/flume/job/enterprise/juhe/flume-2-netcat-avro.conf
# Name the components on this agent
a2.sources = r1
a2.sinks = k1
a2.channels = c1

# Describe/configure the source
a2.sources.r1.type = netcat
a2.sources.r1.bind = hadoop103
a2.sources.r1.port = 44444

# Describe the sink
a2.sinks.k1.type = avro
a2.sinks.k1.hostname = hadoop104
a2.sinks.k1.port = 4141

# Use a channel which buffers events in memory
a2.channels.c1.type = memory
a2.channels.c1.capacity = 1000
a2.channels.c1.transactionCapacity = 100

# Bind the source and sink to the channel
a2.sources.r1.channels = c1
a2.sinks.k1.channel = c1
4)在hadoop104上的/opt/module/flume/job/enterprise/juhe目录下,创建flume-3-avro-logger.conf文件配置Avro source用于接收flume1与flume2发送过来的数据流,最终合并后logger sink到控制台。
vim /opt/module/flume/job/enterprise/juhe/flume-3-avro-logger.conf
# Name the components on this agent
a3.sources = r1
a3.sinks = k1
a3.channels = c1

# Describe/configure the source
a3.sources.r1.type = avro
a3.sources.r1.bind = hadoop104
a3.sources.r1.port = 4141

# Describe the sink
a3.sinks.k1.type = logger

# Describe the channel
a3.channels.c1.type = memory
a3.channels.c1.capacity = 1000
a3.channels.c1.transactionCapacity = 100

# Bind the source and sink to the channel
a3.sources.r1.channels = c1
a3.sinks.k1.channel = c1
5)部署运行flume采集程序
在hadoop104节点上运行flume3
/opt/module/flume/bin/flume-ng agent –c conf/ -n a3 -f /opt/module/flume/job/enterprise/juhe/flume-3-avro-logger.conf -Dflume.root.logger=INFO,console
在hadoop103节点上运行flume2
/opt/module/flume/bin/flume-ng agent –c conf/ -n a2 -f /opt/module/flume/job/enterprise/juhe/flume-2-netcat-avro.conf
在hadoop102节点上运行flume1
/opt/module/flume/bin/flume-ng agent –c conf/ -n a1 -f /opt/module/flume/job/enterprise/juhe/flume-1-exec-avro.conf
6)在hadoop102上向/opt/module/flume/datas/目录下的realtime.log追加内容
echo 'hello' > /opt/module/flume/datas/realtime.log
7)hadoop103上向44444端口发送数据
nc hadoop103 44444
8)检查hadoop104上数据

第 4 章:Flume数据流监控
4.1 Ganglia介绍
1、Ganglia由gmond、gmetad和gwed三部分组成。
1)gmond(Ganglia MOnitoring Daemon)
是一种轻量级服务,安装在每台需要收集指标数据的节点主机上。
使用gmond,你可以很容易收集到很多系统指标数据,如CPU、内存、磁盘、网络和活跃进程的数据等。
2)gmetad(Ganglia Meta Daemon)
整合所有信息,并将其以RRD格式存储到磁盘的服务。
3)gweb(Ganglia Web)Ganglia可视化工具
gweb是一种利用浏览器显示gmetad所存储数据的PHP前端。
在Web界面种以图表方式展现集群的运行状态下收集的多种不同指标数据。
4.2 Ganglia安装与部署
4.2.1 规划
| gweb | gmetad | gmod | |
|---|---|---|---|
| hadoop102 | true | true | true |
| hadoop103 | true | ||
| hadoop104 | true |
4.2.2 安装部署
1、在102,103,104分别安装epel-release
sudo yum -y install epel-release
2、在102安装
sudo yum -y install ganglia-gmetad
sudo yum -y install ganglia-web
sudo yum -y install ganglia-gmond
3、在103和104安装
sudo yum -y install ganglia-gmond
sudo yum -y install ganglia-gmond
4、在102修改配置文件/etc/httpd/conf.d/ganglia.conf
sudo vim /etc/httpd/conf.d/ganglia.conf
# 修改为红颜色的配置:
# Ganglia monitoring system php web frontend
Alias /ganglia /usr/share/ganglia
<Location /ganglia>
  # Require local
  # 通过windows访问ganglia,需要配置Linux对应的主机(windows)ip地址
  Require ip 192.168.1.1
  #Require all granted              // 如果上面的不好使,就用这个,此配置仅保留一个
  # Require ip 10.1.2.3
  # Require host example.org
</Location>
5、在102修改配置文件/etc/ganglia/gmetad.conf
sudo vim /etc/ganglia/gmetad.conf
……
data_source "my cluster" hadoop102
6、在102、103、104修改配置文件/etc/ganglia/gmond.conf
sudo vim /etc/ganglia/gmond.conf
修改为:
……
cluster {
  name = "my cluster"
  owner = "unspecified"
  latlong = "unspecified"
  url = "unspecified"
}
udp_send_channel {
  #bind_hostname = yes # Highly recommended, soon to be default.
                       # This option tells gmond to use a source address
                       # that resolves to the machine's hostname.  Without
                       # this, the metrics may appear to come from any
                       # interface and the DNS names associated with
                       # those IPs will be used to create the RRDs.
  # mcast_join = 239.2.11.71
  # 数据发送给hadoop102
  host = hadoop102
  port = 8649
  ttl = 1
}
udp_recv_channel {
  # mcast_join = 239.2.11.71
  port = 8649
  # 接收来自任意连接的数据
  bind = 0.0.0.0
  retry_bind = true
  # Size of the UDP buffer. If you are handling lots of metrics you really
  # should bump it up to e.g. 10MB or even higher.
  # buffer = 10485760
}
……
7、在102修改配置文件/etc/selinux/config
sudo vim /etc/selinux/config
修改为:
# This file controls the state of SELinux on the system.
# SELINUX= can take one of these three values:
#     enforcing - SELinux security policy is enforced.
#     permissive - SELinux prints warnings instead of enforcing.
#     disabled - No SELinux policy is loaded.
SELINUX=disabled
# SELINUXTYPE= can take one of these two values:
#     targeted - Targeted processes are protected,
#     mls - Multi Level Security protection.
SELINUXTYPE=targeted
提示:selinux本次生效关闭必须重启
sudo setenforce 0
8、启动ganglia
在102、103、104启动
sudo systemctl start gmond
在102启动
sudo systemctl start httpd
sudo systemctl start gmetad
9、打开网页浏览ganglia页面
http://hadoop102/ganglia
如果完成以上操作仍然出现权限不足错误,请修改/var/lib/ganglia目录的权限
sudo chmod -R 777 /var/lib/ganglia
4.3 操作Flume测试监控
1、启动Flume任务,需开启flume的monitoring配置
bin/flume-ng agent \
-c conf/ \
-n a1 \
-f datas/netcat-flume-logger.conf \
-Dflume.root.logger=INFO,console \
-Dflume.monitoring.type=ganglia \
-Dflume.monitoring.hosts=hadoop102:8649
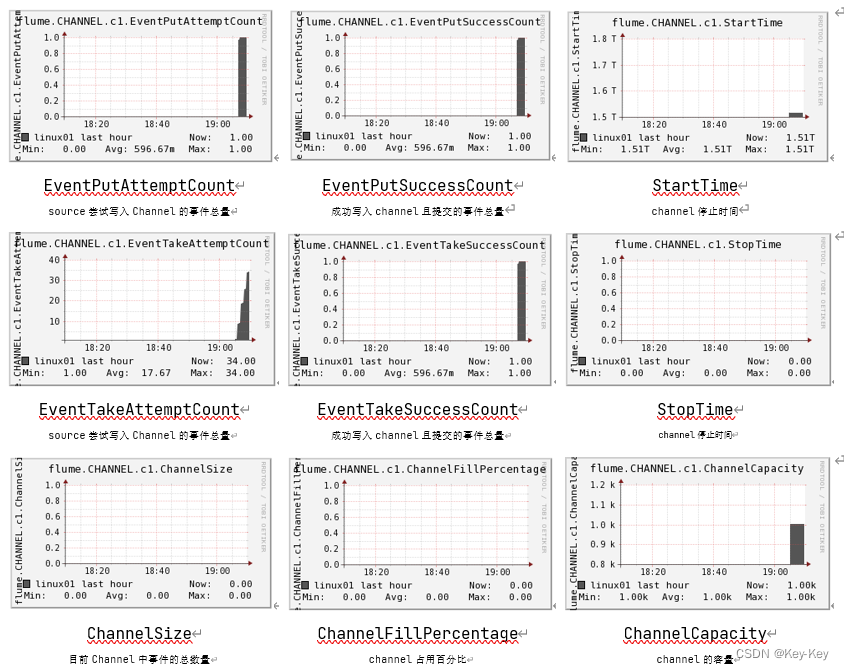
2、发送数据观察ganglia监测图
nc localhost 44444
3、监控显示如下图
第 5 章:企业真实面试题(重点)
5.1 Flume组成与事务
5.1.1 Flume组成
1、taildir source
| 特征 | 断电续传、多目录下可追加文件 |
|---|---|
| 哪个flume版本产生的? | Apache1.7、CDH1.6 |
| 没有断点续传功能时怎么做呢? | 自定义source实现 |
| taildir挂了会造成什么影响? | 不会丢数(断点续传),但是可能会造成重复数据 |
| 怎么处理重复数据 | 1、不处理:生产环境通常不处理,因为会影响传输效率;2、处理:自身,在taildirsource里面增加自定义事务。找兄弟,下一级处理(布隆过滤器、groupby、redis) |
| taildir source是否支持递归遍历文件夹读取文件 | 不支持。可以自定义Source实现。递归遍历文件夹+读取数据 |
2、channel
| channel | 特性 | 优势 | 劣势 | 默认容量 |
|---|---|---|---|---|
| file channel | 数据存储于磁盘 | 可靠性高 | 传输速率慢 | 100万个Event |
| memory channel | 数据存储于内存 | 传输速度快 | 可靠性差 | 100万个Event |
3、HDFS sink
文件滚动阈值
| 时间(1小时-2小时) | 大小128m | event个数(0禁止) |
|---|---|---|
| hdfs.rollInterval=3600 | hdfs.rollSize=134217728 | hdfs.rollCount=0 |
5.1.2 事务
1、flume的事务:
Source到Channel是Put事务
Channel到Sink是Take事务
2、flume的事务能保证数据采集传输过程中数据安全可靠吗?
1)flume能保证在其内部数据不会丢失,(channel使用file channel)
2)Source类型如果不是回溯型的极端情况下会造成数据丢失
3)Sink组件输出时可能会造成数据重复。(外部系统支持事务可以达到去重效果)
3、flume事务流程
1、Put事务
2、take事务
5.2 Flume拦截器
5.2.1 拦截器注意事项
项目中自定义了:ETL拦截器
采用两个拦截器的优缺点:
优点:模块化开发和可移植性
缺点:性能会低一些
5.2.2 自定义拦截器步骤
1、实现Interceptor
2、重写四个方法
initialize初始化方法
public Event intercept(Event event)处理单个Event
public List intercept(List events)处理多个Event
close方法
静态内部类,实现Interceptor.Builder
3、拦截器可以不用吗?
可以不用:需要在下一级hive的dwd层和SparkSteaming里面处理
优势:只处理一次,轻度处理
劣势:影响性能,不适合做实时推荐这种对实时要求比较高的场景
5.3 Flume Channel选择器
1、channel Selectors
可以根据需要控制event发送到哪些Channel中。
2、channel Selectors的种类
Relication Channel Selector
Multiplexing channel Selector
5.4 Flume 监控器
1、采用Ganglia监控器,监控到Flume尝试提交的次数远远大于最终成功的次数
说明Flume运行比较差。通常是因为内存不充足导致,所有提高内存是比较好的方法。
2、解决方法?
1)自身:增加内存flume-env.sh 4-6g
-Xmx与-Xms最好设置一致,减少内存抖动带来的性能影响,如果设置不一致容易导致频繁fullgc。
2)找朋友:增加服务器台数
搞活动 618 -> 增加服务器 ->用完再退出