Android自制Https证书实现双向认证
1.基本概念
1.1 HTTP
Hyper Text Transfer Protocol ,超文本传输协议, 是互联网使用最广泛的一种协议,所有的WWW文件必须遵循的标准,Http协议传输的数据都是未加密的,也就是明文,因此使用Http传输敏感协议是不安全的。
1.2 HTTPS
Hyper Text Transfer Protocol over Secure Socket Layer,安全的超文本传输协议,其实就是Http外部套了一层TLS的壳,简单来讲:HTTPS 就是“安全版”的 HTTP, HTTPS = HTTP + SSL,Https 相当于在应用层和TCP层之间加入了一个SSL(或者TLS),SSL层对应用层收到的数据进行加密。
1.3 加密方式
1.3.1 对称加密
对称加密是指双方持有相同的密钥进行通信, 加密速度快,常见的对称加密算法有DES\3DES\AES等~
1.3.2 非对称加密
非对称加密,又称为公开密钥加密,是为了解决对阵加密中的安全问题而诞生,一个称为公开密钥(公钥 Public key),另一个成为私钥(Private key), 但是相对而言非非对称而言要慢于对称加密
1.公钥是对外开放的,私钥是自己拥有的;
2.公钥加密的数据,只能用私钥解密;
3.私钥加密的数据,只能用公钥解密;
TLS/SSL 中使用了RSA非对称加密,对称加密以及HASH算法,RSA算法基于一个十分简单的数论事实:将两个大素数相乘十分容易,但那时想要对其乘积进行因式分解却极其困难,因此可以将乘积公开,作为加密密钥;
SSL 协议既用到了对称加密也用到了非对称加密(公钥加密),在建立传输链路时,SSL 首先对对称加密的密钥使用公钥进行非对称加密,链路建立好之后,SSL 对传输内容使用对称加密。
对称加密 速度高,可加密内容较大,用来加密会话过程中的消息
公钥加密 加密速度较慢,但能提供更好的身份认证技术,用来加密对称加密的密钥
1.4 SSL 功能
1.4.1 客户对服务器的身份认证
SSL 服务器允许客户的浏览器使用标准的公钥加密技术和一些可靠的认证中心(CA)的证书,来确认服务器的合法性~
1.4.2 服务器对客户的身份认证
也可通过公钥技术和证书进行认证,也可通过用户名,password 来认证~
1.4.3 建立服务器与客户之间安全的数据通道
SSL 要求客户与服务器之间的所有发送的数据都被发送端加密、接收端解密,同时还检查数据的完整性。 SSL 协议位于 TCP/IP 协议与各种应用层协议之间,为数据通讯提供安全支持~
1.5 CA 证书
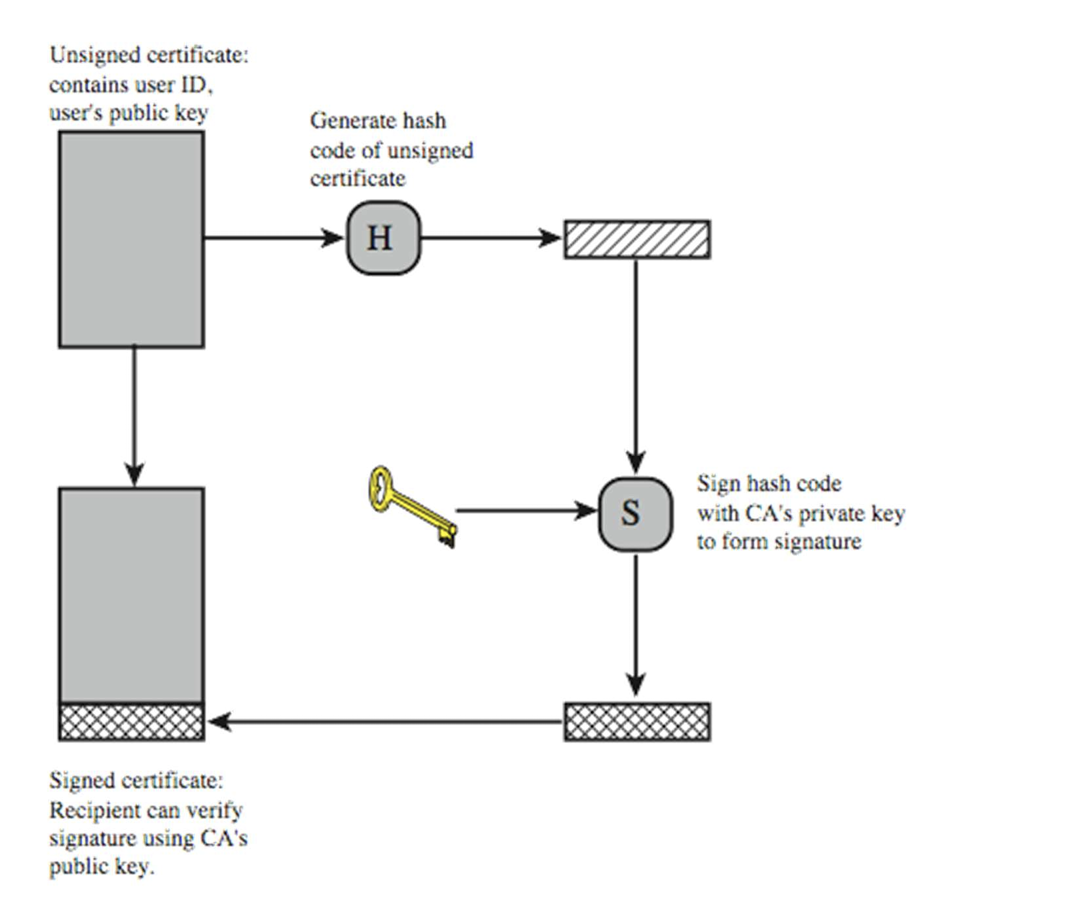
CA 证书是由 CA(Certification Authority)机构发布的数字证书。其内容包含:电子签证机关的信息、公钥用户信息、公钥、签名和有效期。这里的公钥服务端的公钥,这里的签名是指:用hash散列函数计算公开的明文信息的信息摘要,然后采用 CA 的私钥对信息摘要进行加密,加密完的密文就是签名。 即:证书 = 公钥 + 签名 +申请者和颁发者的信息。 客户端中因为在操作系统中就预置了 CA 的公钥,所以支持解密签名
2.证书生成
基本概念讲完之后,我们来实际操作一下证书的生成,博主这边主要使用到了open ssl~
2.1 生成根证书(CA)
首先,生成一个自签名的根证书作为根证书颁发机构(CA)
并生成根证书~
使用 OpenSSL 工具来生成:
openssl genrsa -out ca.key 2048
openssl req -x509 -new -nodes -key ca.key -sha256 -days 365 -out ca.crt
tips:此步骤将要求提供一些信息(如国家、组织、通用名称等)。填写这些信息时要确保准确性,但在测试环境中可以使用虚拟的信息。
2.2 生成服务器证书
生成服务器证书并签署为受信任的证书
openssl genrsa -out server.key 2048
openssl req -new -key server.key -out server.csr

openssl x509 -req -in server.csr -CA ca.crt -CAkey ca.key -CAcreateserial -out server.crt -days 365 -sha256
2.3 生成客户端证书
创建客户端密钥,生成证书签名请求(CSR)并签署客户端证书
openssl genrsa -out client.key 2048
openssl req -new -key client.key -out client.csr

openssl x509 -req -in client.csr -CA ca.crt -CAkey ca.key -CAcreateserial -out client.crt -days 365 -sha256
需要注意的是:
保护密钥和证书: 密钥和证书必须得到妥善保护,确保只有授权的人能够访问
证书有效期: 在创建证书时,设置适当的有效期限,确保证书在过期之前能够持续有效
证书更新: 定期更新证书以确保安全性。在证书到期之前,应当重新生成并部署新的证书
3.集成方式
3.1 使用 OkHttp 进行 HTTPS 请求
- 将客户端证书和私钥文件放置到 Android 项目中
将客户端的证书文件(client.crt)和私钥文件(client.key)放置到 Android 项目的合适目录中(例如 res/raw 文件夹) - 集成对应okhttp 框架:
implementation 'com.squareup.okhttp3:okhttp:4.9.3' - 在 Android 代码中使用 OkHttp 进行请求
import okhttp3.OkHttpClient;
import okhttp3.Request;
import okhttp3.Response;

import java.io.InputStream;
import java.security.KeyStore;
import java.security.cert.CertificateFactory;
import java.security.cert.X509Certificate;

import javax.net.ssl.KeyManagerFactory;
import javax.net.ssl.SSLContext;
import javax.net.ssl.TrustManagerFactory;
import javax.net.ssl.X509TrustManager;

public class MyOkHttpClient {


    public static Response makeRequest() {

        try {

            // Load server certificate
            CertificateFactory certificateFactory = CertificateFactory.getInstance("X.509");
            InputStream serverCertStream = getResources().openRawResource(R.raw.server);
            X509Certificate serverCertificate = (X509Certificate) certificateFactory.generateCertificate(serverCertStream);

            // Create KeyStore and TrustManager
            KeyStore keyStore = KeyStore.getInstance(KeyStore.getDefaultType());
            keyStore.load(null, null);
            keyStore.setCertificateEntry("server", serverCertificate);

            TrustManagerFactory trustManagerFactory = TrustManagerFactory.getInstance(
                    TrustManagerFactory.getDefaultAlgorithm());
            trustManagerFactory.init(keyStore);

            // Load client certificate and private key
            KeyStore clientKeyStore = KeyStore.getInstance("PKCS12");
            InputStream clientCertStream = getResources().openRawResource(R.raw.client);
            clientKeyStore.load(clientCertStream, "client_password".toCharArray()); // Replace "client_password" with the password of your client key

            KeyManagerFactory keyManagerFactory = KeyManagerFactory.getInstance(KeyManagerFactory.getDefaultAlgorithm());
            keyManagerFactory.init(clientKeyStore, "client_password".toCharArray()); // Replace "client_password" with the password of your client key

            // Initialize SSLContext with TrustManager and KeyManager
            SSLContext sslContext = SSLContext.getInstance("TLS");
            sslContext.init(keyManagerFactory.getKeyManagers(), trustManagerFactory.getTrustManagers(), null);

            // Set up OkHttpClient with SSL socket factory
            OkHttpClient client = new OkHttpClient.Builder()
                    .sslSocketFactory(sslContext.getSocketFactory(), (X509TrustManager) trustManagerFactory.getTrustManagers()[0])
                    .build();

            // Make a request using OkHttpClient
            Request request = new Request.Builder()
                    .url("https://your-server-url.com/api/endpoint")
                    .build();

            return client.newCall(request).execute();

        } catch (Exception e) {

            e.printStackTrace();
        }

        return null;
    }
}
这个示例代码假设您有服务器证书和客户端证书(包括私钥)的文件。需要替换以下部分:
R.raw.server: 服务器证书文件的资源 ID。确保将正确的服务器证书文件(通常为 server.crt)放置到 Android 项目中,并使用相应的资源 ID 替换。
R.raw.client: 客户端证书文件的资源 ID。确保将正确的客户端证书和私钥文件(通常为 client.p12 或 client.pfx)放置到 Android 项目中,并使用相应的资源 ID 替换。
“client_password”: 替换为您客户端证书的密码
当然,一些基础的例如网络权限等操作也是必备,在此不再赘述~
3.2 使用原生请求进行 HTTPS 请求
第一步同 3.1 ,在此不再赘述~ 以下是集成代码
try {

    KeyStore keyStore = KeyStore.getInstance("PKCS12");
    InputStream clientCertStream = getResources().openRawResource(R.raw.client);
    keyStore.load(clientCertStream, "password".toCharArray()); // Replace "password" with the password of your client key

    KeyManagerFactory keyManagerFactory = KeyManagerFactory.getInstance(KeyManagerFactory.getDefaultAlgorithm());
    keyManagerFactory.init(keyStore, "password".toCharArray());

    SSLContext sslContext = SSLContext.getInstance("TLS");
    sslContext.init(keyManagerFactory.getKeyManagers(), null, null);

    HttpClient httpClient = new DefaultHttpClient();

    SchemeRegistry schemeRegistry = new SchemeRegistry();
    schemeRegistry.register(new Scheme("https", new SSLSocketFactory(sslContext), 443));

    ThreadSafeClientConnManager cm = new ThreadSafeClientConnManager(httpClient.getParams(), schemeRegistry);

    httpClient = new DefaultHttpClient(cm, httpClient.getParams());

    HttpGet httpGet = new HttpGet("https://your-server-url.com/api/endpoint");

    HttpResponse response = httpClient.execute(httpGet);

    // 处理响应...

} catch (Exception e) {

    e.printStackTrace();
}
4. 结束
此代码是一个基本示例,涉及的步骤包括加载证书、创建 KeyStore 和 TrustManager,并将其应用于 OkHttpClient和原生请求的 的 SSL 配置中,当然也请确保适当处理异常,并根据实际情况进行调整~
感谢, 如有任何问题,请随时评论or私信联系我~