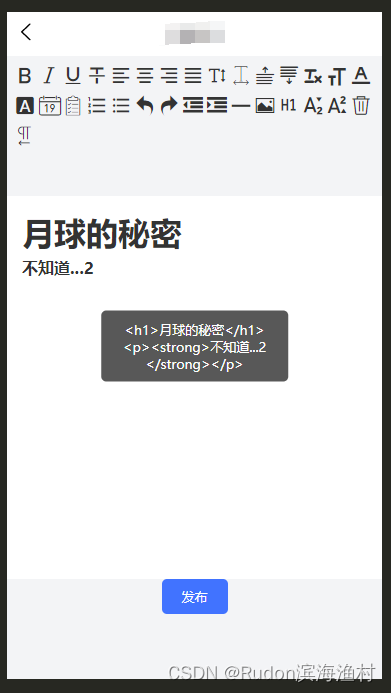
WangEditor的基本使用,图片上传功能
没详细讲解,只是做个记录。
Componets 下定义 WangEditor.vue 文件
<template>
    <div style="border: 1px solid #ccc;">
        <Toolbar style="border-bottom: 1px solid #ccc" :editor="editorRef" :defaultConfig="toolbarConfig" mode="default" />
        <Editor :style="{ 'height': height + 'px', 'overflow': 'hidden' }" v-model="newValue" :defaultConfig="editorConfig"
            mode="default" @onCreated="handleCreated" />
    </div>
</template>

<script setup>
import {
      defineProps, computed, shallowRef, defineEmits } from 'vue'
import {
      Editor, Toolbar } from '@wangeditor/editor-for-vue'
import Cookies from 'js-cookie'
import '@wangeditor/editor/dist/css/style.css' // 引入 css

const props = defineProps({

    // 父组件 v-model 绑定的值
    modelValue: {

        type: String
    },
    // 富文本的高
    height: {

        type: [Number, String],
        default: 400
    }
})

const editorRef = shallowRef()

const emit = defineEmits(['update:modelValue'])

const toolbarConfig = {
     }

const editorConfig = {
      placeholder: '请输入内容...', MENU_CONF: {
     } }

editorConfig.MENU_CONF['uploadImage'] = {

    // 上传图片
    fieldName: 'file',
    // headers头部 需要添加不需要删掉
    headers: {

        Authorization: Cookies.get('Token'),
        ContentType: 'application/json;charset=utf-8'
    },
    // 图片上传的路径
    server: import.meta.env.VITE_APP_BASE_API + '/image/upload',
    // 图片上传返回的数据
    customInsert(res, insertFn) {

        let src = import.meta.env.VITE_APP_BASE_API + res.data.url // 有的会返回带域名的路径也有不带的根据自己的实际情况
        insertFn(src)
    },
}

editorConfig.MENU_CONF['uploadVideo'] = {


}

const newValue = computed({

    get() {

        return props.modelValue
    },
    set(value) {

        emit('update:modelValue', value)
    }
})

const handleCreated = (editor) => {

    editorRef.value = editor // 记录 editor 实例,重要!
    // console.log(editor.getAllMenuKeys()) // 这里输出可以看到 富文本中所有的功能
}

</script>

<style lang="scss" scoped></style>

![[套路] 浏览器引入<span style='color:red;'>Vue</span>.js场景-<span style='color:red;'>WangEditor</span>富文本<span style='color:red;'>编辑器</span>的<span style='color:red;'>使用</span> (永久免费)](https://img-blog.csdnimg.cn/direct/7d003533fd61452c805872c31636e5b8.png)


![IntelliJ IDEA [插件 MybatisX] mapper和xml间跳转](https://img-blog.csdnimg.cn/direct/59df6d4d1bd149299b82efe593def233.png#pic_center)
![Zabbix最详细教程Ubuntu部署Zabbix6.0[图文]](https://img-blog.csdnimg.cn/direct/bd2f541731584b0592751414d075be85.png)