文章目录
学习目标:如何使用whisper
学习内容一:whisper 转文字
1.1 使用whisper.load_model()方法下载,加载
model=whisper.load_model(参数)
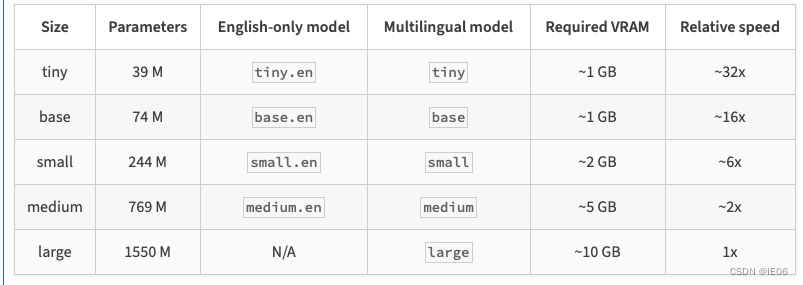
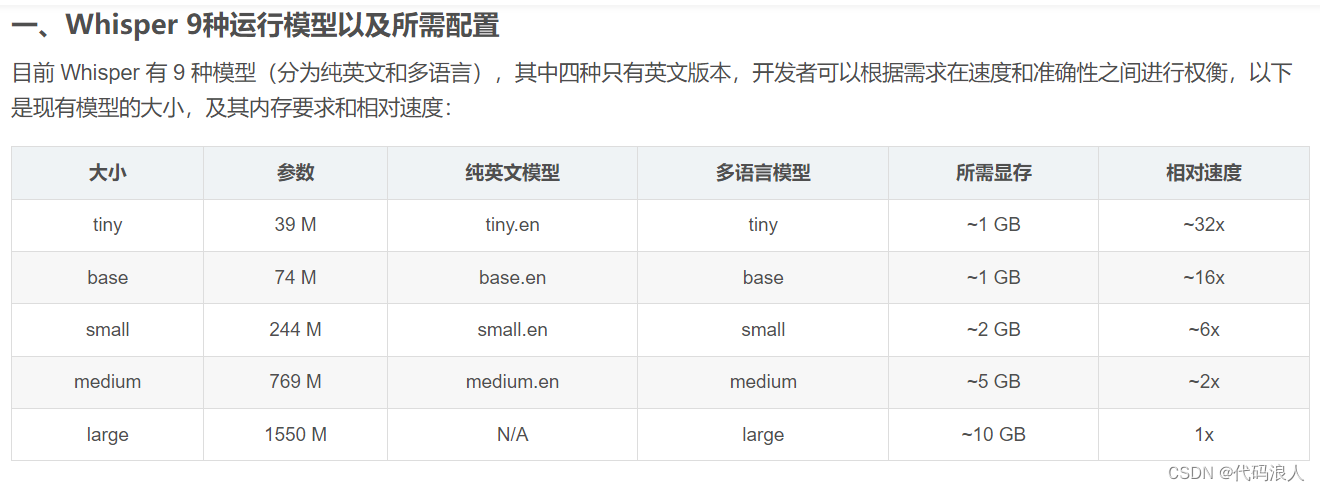
- name 需要加载的模型,如上图
- device:默认有个方法,有显存使用显存,没有使用cpu
- download_root:下载的根目录,默认使用
~/.cache/whisper - in_memory: 是否将模型权重预加载到主机内存中
返回值
model : Whisper
Whisper语音识别模型实例
def load_model(
    name: str,
    device: Optional[Union[str, torch.device]] = None,
    download_root: str = None,
    in_memory: bool = False,
) -> Whisper:
    """
    Load a Whisper ASR model

    Parameters
    ----------
    name : str
        one of the official model names listed by `whisper.available_models()`, or
        path to a model checkpoint containing the model dimensions and the model state_dict.
    device : Union[str, torch.device]
        the PyTorch device to put the model into
    download_root: str
        path to download the model files; by default, it uses "~/.cache/whisper"
    in_memory: bool
        whether to preload the model weights into host memory

    Returns
    -------
    model : Whisper
        The Whisper ASR model instance
    """

    if device is None:
        device = "cuda" if torch.cuda.is_available() else "cpu"
    if download_root is None:
        default = os.path.join(os.path.expanduser("~"), ".cache")
        download_root = os.path.join(os.getenv("XDG_CACHE_HOME", default), "whisper")

    if name in _MODELS:
        checkpoint_file = _download(_MODELS[name], download_root, in_memory)
        alignment_heads = _ALIGNMENT_HEADS[name]
    elif os.path.isfile(name):
        checkpoint_file = open(name, "rb").read() if in_memory else name
        alignment_heads = None
    else:
        raise RuntimeError(
            f"Model {
     name} not found; available models = {
     available_models()}"
        )

    with (
        io.BytesIO(checkpoint_file) if in_memory else open(checkpoint_file, "rb")
    ) as fp:
        checkpoint = torch.load(fp, map_location=device)
    del checkpoint_file

    dims = ModelDimensions(**checkpoint["dims"])
    model = Whisper(dims)
    model.load_state_dict(checkpoint["model_state_dict"])

    if alignment_heads is not None:
        model.set_alignment_heads(alignment_heads)

    return model.to(device)
1.2 使用实例对文件进行转录
result = model.transcribe(file_path)
def transcribe(
    model: "Whisper",
    audio: Union[str, np.ndarray, torch.Tensor],
    *,
    verbose: Optional[bool] = None,
    temperature: Union[float, Tuple[float, ...]] = (0.0, 0.2, 0.4, 0.6, 0.8, 1.0),
    compression_ratio_threshold: Optional[float] = 2.4,
    logprob_threshold: Optional[float] = -1.0,
    no_speech_threshold: Optional[float] = 0.6,
    condition_on_previous_text: bool = True,
    initial_prompt: Optional[str] = None,
    word_timestamps: bool = False,
    prepend_punctuations: str = "\"'“¿([{-",
    append_punctuations: str = "\"'.。,,!!??::”)]}、",
    **decode_options,
):
    """
    将音频转换为文本。

    参数:
    - model: Whisper模型
    - audio: 音频文件路径、NumPy数组或PyTorch张量
    - verbose: 是否打印详细信息,默认为None
    - temperature: 温度参数,默认为(0.0, 0.2, 0.4, 0.6, 0.8, 1.0)
    - compression_ratio_threshold: 压缩比阈值,默认为2.4
    - logprob_threshold: 对数概率阈值,默认为-1.0
    - no_speech_threshold: 无语音信号阈值,默认为0.6
    - condition_on_previous_text: 是否根据先前的文本进行解码,默认为True
    - initial_prompt: 初始提示,默认为None
    - word_timestamps: 是否返回单词时间戳,默认为False
    - prepend_punctuations: 前缀标点符号,默认为"\"'“¿([{-"
    - append_punctuations: 后缀标点符号,默认为"\"'.。,,!!??::”)]}、"
    - **decode_options: 其他解码选项

    返回:
    - 转录得到的文本
    """
1.3 实战
建议load_model添加参数
- download_root:下载的根目录,默认使用
~/.cache/whisper
transcribe方法添加参数 - word_timestamps=True
import whisper
import arrow

# 定义模型、音频地址、录音开始时间
def excute(model_name,file_path,start_time):
    model = whisper.load_model(model_name)
    result = model.transcribe(file_path,word_timestamps=True)
    for segment in result["segments"]:
        now = arrow.get(start_time)
        start = now.shift(seconds=segment["start"]).format("YYYY-MM-DD HH:mm:ss")
        end = now.shift(seconds=segment["end"]).format("YYYY-MM-DD HH:mm:ss")
        print("【"+start+"->" +end+"】:"+segment["text"])

if __name__ == '__main__':
    excute("large","/root/autodl-tmp/no/test.mp3","2022-10-24 16:23:00")

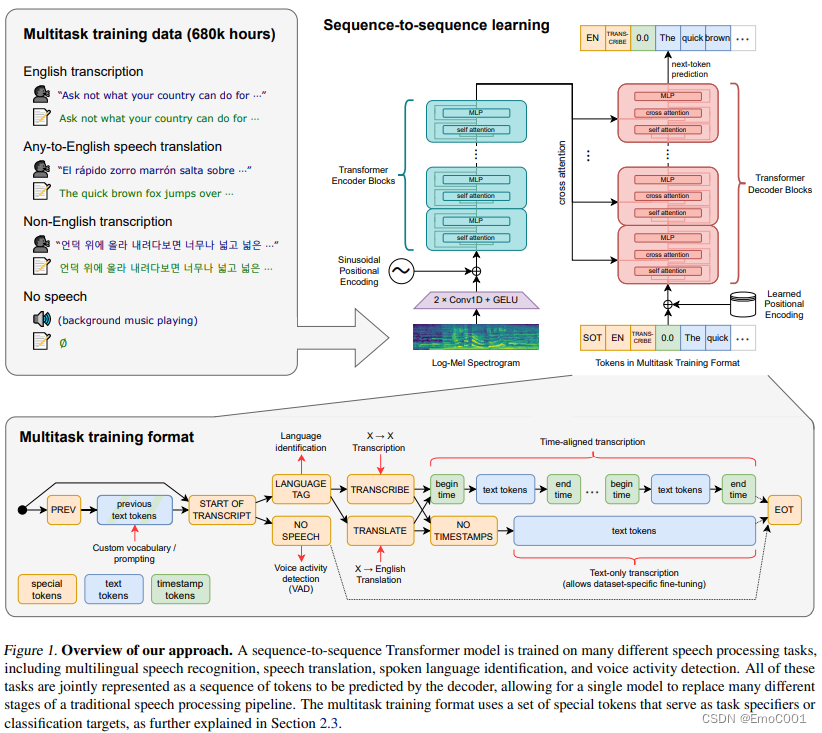
学习内容二:语者分离(pyannote.audio)pyannote.audio是huggingface开源音色包
第一步:安装依赖
pip install pyannote.audio
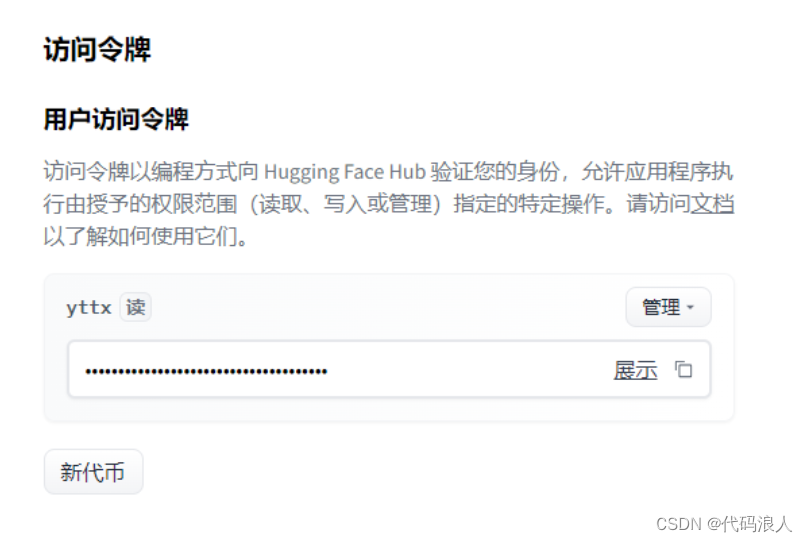
第二步:创建key
https://huggingface.co/settings/tokens
第三步:测试pyannote.audio
- 创建实例:Pipeline.from_pretrained(参数)
- 使用GPU加速:import torch # 导入torch库
pipeline.to(torch.device(“cuda”)) - 实例转化音频pipeline(“test.wav”)
from_pretrained(参数)
- cache_dir:路径或str,可选模型缓存目录的路径。默认/pyannote"当未设置时。
pipeline(参数)
- file_path:录音文件
- num_speakers:几个说话者,可以不带
from pyannote.audio import Pipeline
pipeline = Pipeline.from_pretrained("pyannote/speaker-diarization@2.1", use_auth_token="申请的key")

# send pipeline to GPU (when available)
import torch
device='cuda' if torch.cuda.is_available() else 'cpu'
pipeline.to(torch.device(device))

# apply pretrained pipeline
diarization = pipeline("test.wav")
print(diarization)
# print the result
for turn, _, speaker in diarization.itertracks(yield_label=True):
    print(f"start={
     turn.start:.1f}s stop={
     turn.end:.1f}s speaker_{
     speaker}")
# start=0.2s stop=1.5s speaker_0
# start=1.8s stop=3.9s speaker_1
# start=4.2s stop=5.7s speaker_0
# ...
学习内容三:整合
这里要借助一个开源代码,用于整合以上两种产生的结果
报错No module named 'pyannote_whisper'
如果你使用使用AutoDL平台,你可以使用学术代理加速
source /etc/network_turbo
git clone https://github.com/yinruiqing/pyannote-whisper.git
cd pyannote-whisper
pip install -r requirements.txt

这个错误可能是由于缺少或不正确安装了所需的 sndfile 库。sndfile 是一个用于处理音频文件的库,它提供了多种格式的读写支持。
你可以尝试安装 sndfile 库,方法如下:
在 Ubuntu 上,使用以下命令安装:sudo apt-get install libsndfile1-dev
在 CentOS 上,使用以下命令安装:sudo yum install libsndfile-devel
在 macOS 上,使用 Homebrew 安装:brew install libsndfile
然后重新执行如上指令
在项目里面写代码就可以了,或者复制代码里面的pyannote_whisper.utils模块代码
import os
import whisper
from pyannote.audio import Pipeline
from pyannote_whisper.utils import diarize_text
import concurrent.futures
import subprocess
import torch
print("正在加载声纹模型")
pipeline = Pipeline.from_pretrained("pyannote/speaker-diarization@2.1",use_auth_token="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")
output_dir = '/root/autodl-tmp/no/out'
print("正在whisper模型")
model = whisper.load_model("large", device="cuda")

# MP3转化为wav
def convert_to_wav(path):
    new_path = ''
    if path[-3:] != 'wav':
        new_path = '.'.join(path.split('.')[:-1]) + '.wav'
        try:
            subprocess.call(['ffmpeg', '-i', path, new_path, '-y', '-an'])
        except:
            return path, 'Error: Could not convert file to .wav'
    else:
        new_path = ''
    return new_path, None


def process_audio(file_path):
    file_path, retmsg = convert_to_wav(file_path)
    print(f"===={
     file_path}=======")
    asr_result = model.transcribe(file_path, initial_prompt="语音转换")
    pipeline.to(torch.device('cuda'))
    diarization_result = pipeline(file_path, num_speakers=2)
    final_result = diarize_text(asr_result, diarization_result)
    with open(output_file, 'w') as f:
        for seg, spk, sent in final_result:
            line = f'{
     seg.start:.2f} {
     seg.end:.2f} {
     spk} {
     sent}\n'
            f.write(line)


if not os.path.exists(output_dir):
    os.makedirs(output_dir)

wave_dir = '/root/autodl-tmp/no'

# 获取当前目录下所有wav文件名
wav_files = [os.path.join(wave_dir, file) for file in os.listdir(wave_dir) if file.endswith('.mp3')]

# 处理每个wav文件
# with concurrent.futures.ThreadPoolExecutor(max_workers=1) as executor:
#     executor.map(process_audio, wav_files)
for wav_file in wav_files:
    process_audio(wav_file)
print('处理完成!')