下载安装包
https://www.inet.no/dante/doc/latest/config/index.html
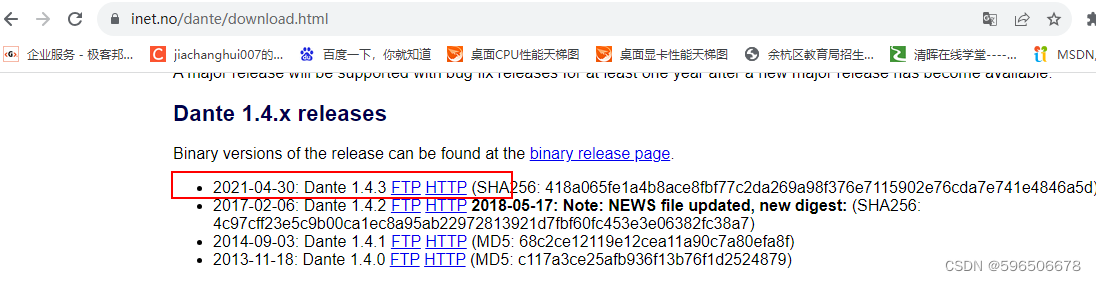
下载软件
解压
tar -zxvf dante-1.4.3.tar.gz

或者
wget http://www.inet.no/dante/files/dante-1.4.3.tar.gz
tar -xvzf dante-1.4.3.tar.gz
编译
cd dante-1.4.3
yum install gcc make -y ##编译必备
./configure && make && make install
执行需要一段时间,前面的被冲没了,只剩最后的截图

cd example/
vi sockd.conf ##修改sockd配置文件

mkdir /var/run/sockd # 创建 sockd 的目录
vi /etc/pam.d/sockd # 创建配置文件,内容如下:
#%PAM-1.0
#auth      required     pam_sepermit.so
auth       include      system-auth
account    required     pam_nologin.so
account    include      system-auth
password   include      system-auth
# pam_selinux.so close should be the first session rule
session    required     pam_selinux.so close
session    required     pam_loginuid.so
# pam_selinux.so open should only be followed by sessions to be
executed in the
user context
session    required     pam_selinux.so open env_params
session    optional     pam_keyinit.so force revoke
session    include      system-auth
session    required     pam_limits.so
直接启动
sockd
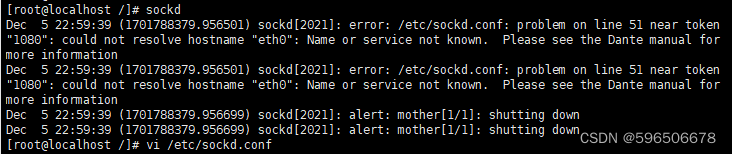
报错了
参考修改
vi /etc/sockd.conf # 创建或修改配置文件,内容如下:仅供参考,网上有很多
logoutput: stderr
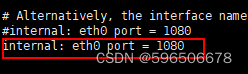
internal: 0.0.0.0 port = 1080
# 输出接口设置为 eth0
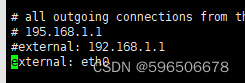
external:ens33
# socks的验证方法,设置为 pam.username,本例中,是使用系统用户验证,即使用adduser添加用户
socksmethod: pam.username
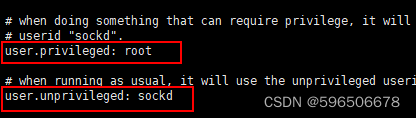
user.privileged: root
user.unprivileged: nobody
# user.libwrap: nobody
# 访问规则
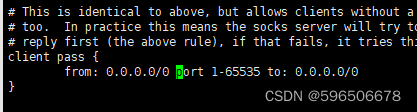
client pass {
from: 0.0.0.0/0 to: 0.0.0.0/0
}
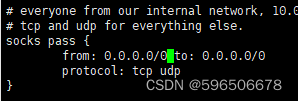
socks pass {
from: 0.0.0.0/0 to: 0.0.0.0/0
protocol: tcp udp
socksmethod: pam.username
log: connect disconnect
}
socks block {
from: 0.0.0.0/0 to: 0.0.0.0/0
log: connect error
}
启动成功:


cd
which sockd ##可以查看sockd命令存放位置
java应用
public class SfptTest {

    public static void main(String[] args) {


        uploadFile("D:\\test-ftp.txt",
                "/usr/soft/",
                "root", "123456",
                "192.168.1.130", 22);
    }

    /**
     * @param filePath 文件全路径
     * @param ftpPath  上传到目的端目录
     * @param username
     * @param password
     * @param host
     * @param port
     */
    public static void uploadFile(String filePath, String ftpPath, String username, String password, String host, int port) {

        FileInputStream input = null;
        ChannelSftp sftp = null;
        try {

            JSch jsch = new JSch();
            //获取session  账号-ip-端口
            jsch.addIdentity("D:\\tmp\\id_rsa", password);
            com.jcraft.jsch.Session sshSession = jsch.getSession(username, host, port);
            //添加密码
            sshSession.setConfig("StrictHostKeyChecking","no");
            //sshSession.setPassword(password);
            Properties sshConfig = new Properties();
            //严格主机密钥检查
            sshConfig.put("StrictHostKeyChecking", "no");
            sshSession.setConfig(sshConfig);
            ProxySOCKS5 socks5 = new ProxySOCKS5("192.168.1.129", 1080);
            socks5.setUserPasswd("root", "123456");
            sshSession.setProxy(socks5);
            //开启session连接
            sshSession.connect();
            //获取sftp通道
            sftp = (ChannelSftp) sshSession.openChannel("sftp");
            //开启
            sftp.connect();
            //文件乱码处理

            //判断目录是否存在
            try {

                Vector ls = sftp.ls(ftpPath); //ls()得到指定目录下的文件列表

            } catch (SftpException e) {

                sftp.mkdir(ftpPath);
            }
            sftp.cd(ftpPath);
            String filename = filePath.substring(filePath.lastIndexOf(File.separator) + 1); //附件名字

            input = new FileInputStream(new File(filePath));
            sftp.put(input, filename);

            input.close();
            sftp.disconnect();
            sshSession.disconnect();
            System.out.println("================上传成功!==================");
        } catch (Exception e) {

            System.out.println("================上传失败!==================");
            e.printStackTrace();
        }
    }
    }
参考资料:
https://www.inet.no/dante/doc/latest/config/index.html
https://github.com/Lozy/danted
https://www.cnblogs.com/dinmin/articles/16893073.html
https://www.inet.no/dante/doc/1.4.x/config/auth_pam.html