虚幻5.2.1探索
项目目录探索
- C++工程一定不能是中文路径,中文项目名,最好全部不要用中文,蓝图项目可以是中文
- 浅浅创建一个空项目,讲解一下之前UE4没有讲解的项目目录文件的分布组成

- .vs:文件夹一般是项目编译缓存文件夹,
- Binaries:存储虚幻引擎二进制的,针对不同平台发布的配置等
- Config:虚幻的配置文件夹,一般里面都是虚幻的配置,或者自己写的配置
- Content:内容文件夹,一般开发者后续创建的资产都在这里面
- DerivedDataCache:虚幻生成与管理派生数据的文件夹,包含着色器的编译,编译材质贴图等等
- Intermediate:存储一些模型缓存图片缓存等等,这个一般我们是不需要管理的,一般编译器出问题要删除C++代码时,这个文件也是要被删除的
- Saved:包含配置文件,快照日志文件那些
- Source:代码存放的位置
- 一般我们写C++代码很容易导致编译器爆掉,我们除了要删除相对的代码或者是代码文件,还要删除
.vs这个缓存文件夹,和这三个Binaries,Intermediate,项目名.sln文件文件,然后右键项目名.uproject文件,里面会有重新构建项目的选项,重新构建项目除错
虚幻C++常用结构
- 虚幻引擎C++类层级结构(Hierarchy),与UE4一样一样,复习一下
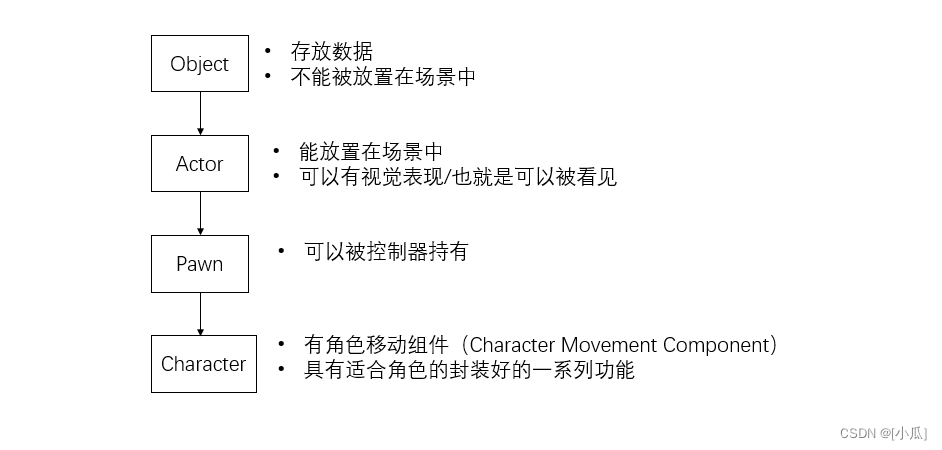
- 反射与垃圾回收也是一样的,使用宏进行标识,UE的UHT系统会帮我们进行垃圾回收

创建Actor类
- 创建一个Actor类,当在创建Actor类时如果添加了文件,则代码里面会有这个添加了文件的头文件它会让编译器找不到Actor类,UE4好像没有这种情况,UE5就有,我们删除这个文件就可以了

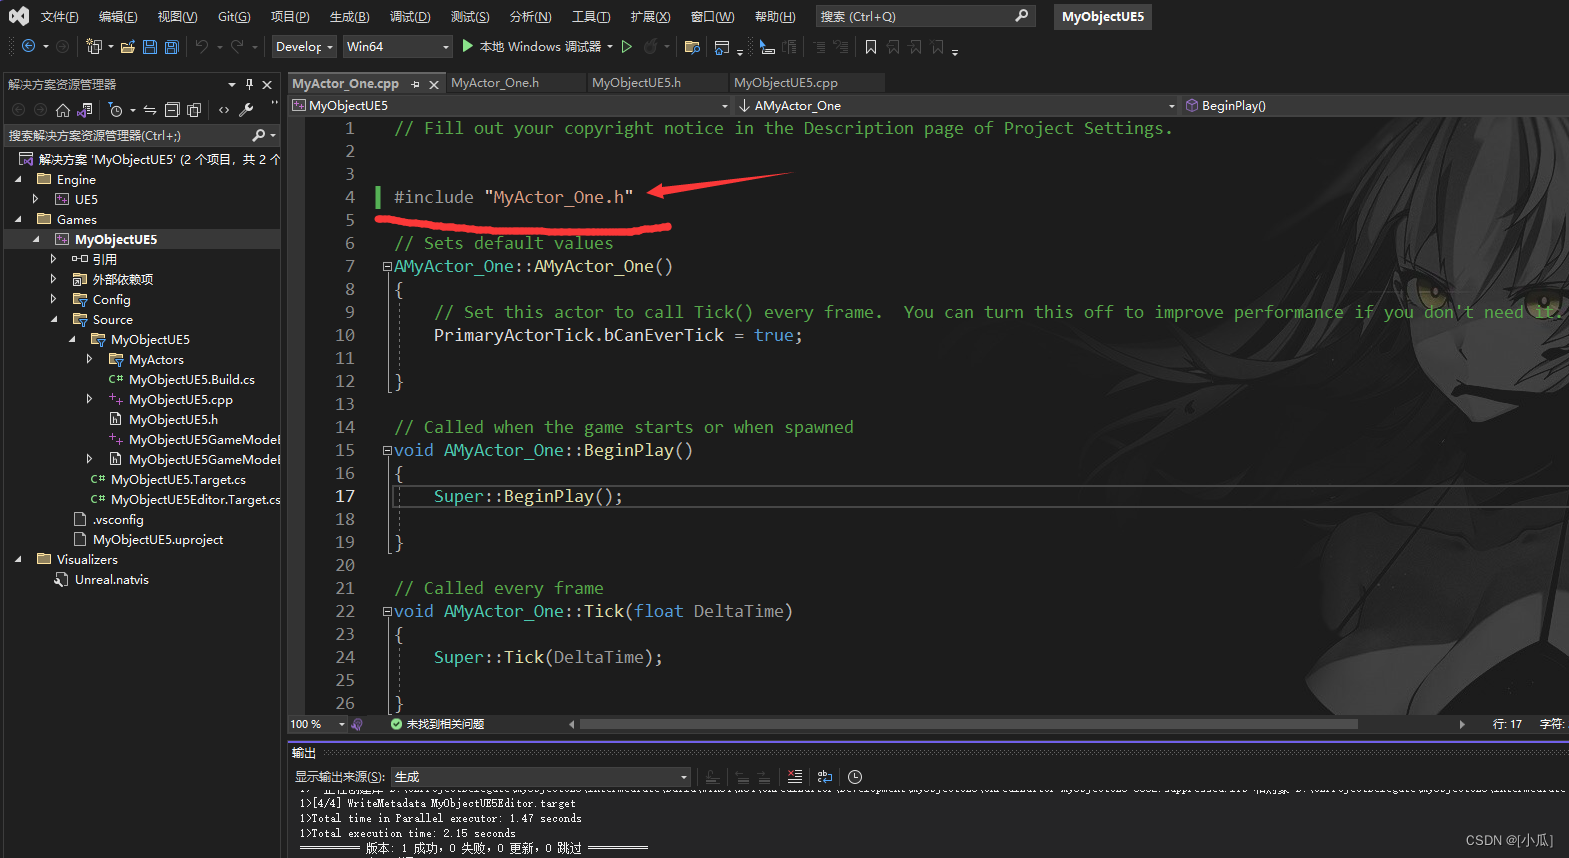
- 然后在UE5中vs中生成代码时,记得要关闭热重载,不然vs中的编译不会通过
渐渐来个Hellow World
- 给Actor来个Mesh,打印一下Hellow World通过日志打印与屏幕打印
- 打印到屏幕要加头文件,
#include "Engine/Engine.h" - 给Mesh硬编码加上材质与网格要加头文件,
#include "UObject/ConstructorHelpers.h"
	UPROPERTY(VisibleAnywhere, BlueprintReadOnly, Category = "Properties")
	class UStaticMeshComponent* StaticMesh;
//上面是.h中Public的内容-------------------------------------------------------------------------------------------------------

#include "MyActor_One.h"
#include "Engine/Engine.h"
#include "UObject/ConstructorHelpers.h"
#include "Components/StaticMeshComponent.h"

// Sets default values
AMyActor_One::AMyActor_One()
{

 	// Set this actor to call Tick() every frame.  You can turn this off to improve performance if you don't need it.
	PrimaryActorTick.bCanEverTick = true;

	StaticMesh = CreateDefaultSubobject<UStaticMeshComponent>(TEXT("StaticMesh"));
	RootComponent = StaticMesh;

	//硬编码材质与网格
	ConstructorHelpers::FObjectFinder<UStaticMesh> StaticMeshAsset(TEXT("/Script/Engine.StaticMesh'/Engine/BasicShapes/Sphere.Sphere'"));
	ConstructorHelpers::FObjectFinder<UMaterialInterface> MaterialAsset(TEXT("/Script/Engine.Material'/Engine/BasicShapes/BasicShapeMaterial.BasicShapeMaterial'"));
	if (StaticMeshAsset.Succeeded() && MaterialAsset.Succeeded())
	{

		StaticMesh->SetStaticMesh(StaticMeshAsset.Object);
		StaticMesh->SetMaterial(0, MaterialAsset.Object);
	}
}

// Called when the game starts or when spawned
void AMyActor_One::BeginPlay()
{

	Super::BeginPlay();

	UE_LOG(LogTemp, Warning, TEXT("Hello World"));
	UE_LOG(LogTemp, Warning, TEXT("Hello World"));
	UE_LOG(LogTemp, Error, TEXT("Hello World"));
	//这里的-1可以使用INDEX_NONE,INDEX_NONE也是-1,UE的宏
	GEngine->AddOnScreenDebugMessage(-1, 10.f, FColor::Red, FString::Printf(TEXT("Hello World")));

}
- 运行结果

宏的参数讲解
- 变量的宏参数,
UPROPERTY()VisibleAnywhere:在蓝图中与视口中都可见VisibleDefaultsOnly:只在蓝图中可见VisibleInstanceOnly:只在视口中可见EditAnywhere:在蓝图中与视口中都可编辑EditDefultsOnly:在蓝图中可编辑EditInstanceOnly:在视口中可编辑BlueprintReadOnly:在蓝图中可读BlueprintReadWrite:在蓝图中可读可写Category:标签meta = (MakeEditWidget = "true"):这是一个可选的元标记(Metadata),用于添加额外的属性信息。在这种情况下,MakeEditWidget 被设置为 “true”,这表示该属性可以在编辑器中作为一个小部件进行编辑。这通常用于自定义编辑器小部件以提供更直观的属性编辑体验。meta=(ClampMin= -10,ClampMax= 10,UIMin= -10,UIMax= 10)):clamp:键盘输入值控制,ui:鼠标拉动值控制meta = (AllowPrivateAccess = "true"):可以让内部的其他成员访问
- 函数的宏参数:
UFUNCTION()BlueprintNativeEvent:BlueprintNativeEvent关键词允许在Unreal Engine蓝图中声明本地事件,并通过C++进行实现和扩展。在C++中实现一个蓝图本地事件时,需要在函数名后添加_Implementation作为后缀。这是为了区分虚函数和其实现函数,并保持代码的一致性和清晰度,总的来说就是会在C++中提供一个默认的实现,然后蓝图中去覆盖它改写它,在蓝图中实现这个函数时,如果调用一个父类的版本,它会先调用C++里面加了_Implementation这个函数,然后再去做蓝图其他的操作BlueprintCallable:允许函数在蓝图中进行调用BlueprintImplementableEvent:会把函数变成一个事件,把函数提升为事件后,就不能去初始化函数了,因为这个是在蓝图调用的事件Category:标签
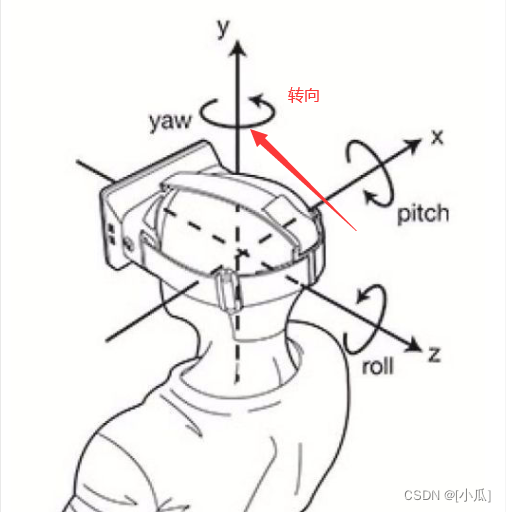
虚幻中的三维坐标
- 在数学三维直角坐标系中里面XYZ也可以是,X:Roll,Y:Pitch,Z:Yaw,这是右手坐标系
- 在UE中面XYZ也可以是,X:Pitch,Y:Yaw,Z:Roll,这是左手坐标系,UE中的
- 在UE中XYZ轴的正向分别对应前方、右方和上方,显示的箭头颜色分别为红色、绿色和蓝色(三基色的习惯顺序)。

虚幻5中的增强输入系统
- UE5中已经摒弃掉了轴映射机制,改用为增强输入系统
- UE5中没有默认开启增强输入系统,我们需要添加这个模块在
项目名.Build.cs里面,这个完成后,最好是删除那几个文件重新构建一下避免一下后续的bug,项目目录探索那章

定义绑定映射系统与处理函数
- 增强输入系统的特定代码及定义一个映射绑定,一个移动轴的绑定,然后一个绑定的处理函数,这个处理函数要传入
FInputActionValue的结构体要添加头文件#include "InputActionValue.h"在当前.h文件中
public:
	//映射绑定
	UPROPERTY(EditAnywhere, BlueprintReadOnly, Category = "Input", meta = (AllPrivateAccess = "true"))
	class UInputMappingContext* DefaultMappingContext;

	//移动绑定
	UPROPERTY(EditAnywhere, BlueprintReadOnly, Category = "Input", meta = (AllPrivateAccess = "true"))
	class UInputAction* MoveAction;

protected:
void CharacterMove(const FInputActionValue& value);
- 这个处理函数基本就和之前写UE4时人物移动面向逻辑处理差不多
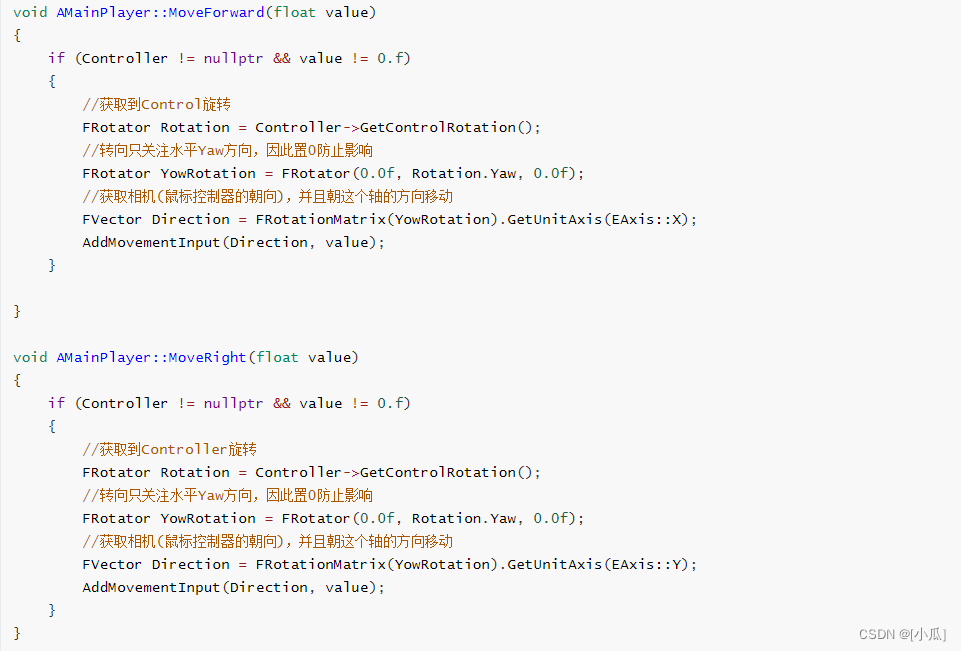
void AMyCharacter::CharacterMove(const FInputActionValue& value)
{

	FVector2D MovementVector = value.Get<FVector2D>();//获取速度
	if (Controller!=nullptr)
	{

		FRotator Rotation = Controller->GetControlRotation();
		FRotator YawRotation = FRotator(0, Rotation.Yaw, 0);
		//获取到前后单位向量
		FVector ForwardDirection = FRotationMatrix(YawRotation).GetUnitAxis(EAxis::X);
		//获取左右单位向量
		FVector RightDirection = FRotationMatrix(YawRotation).GetUnitAxis(EAxis::Y);

		AddMovementInput(ForwardDirection, MovementVector.Y);
		AddMovementInput(RightDirection, MovementVector.X);
	}
}
- 对比一下之前写的面向移动逻辑,这是之前UE4写的面向逻辑
- 那就来浅浅解释一下虚幻5中为什么这样写逻辑
已知虚幻中的X:Pitch,Y:Yaw,Z:Roll
我们获取到
FInputActionValue这个结构体中的FVector2D,注意这里是FVector2D,这是数学平面坐标系
FVector2D MovementVector = value.Get<FVector2D>();//获取速度
而在UE三维移动中,我们只需要关注Yaw(也就是Y)
FRotator YawRotation = FRotator(0, Rotation.Yaw, 0);
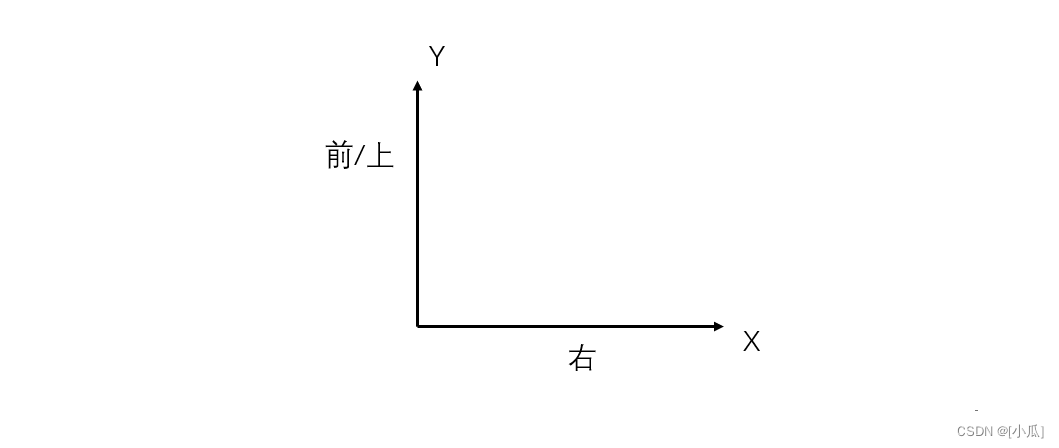
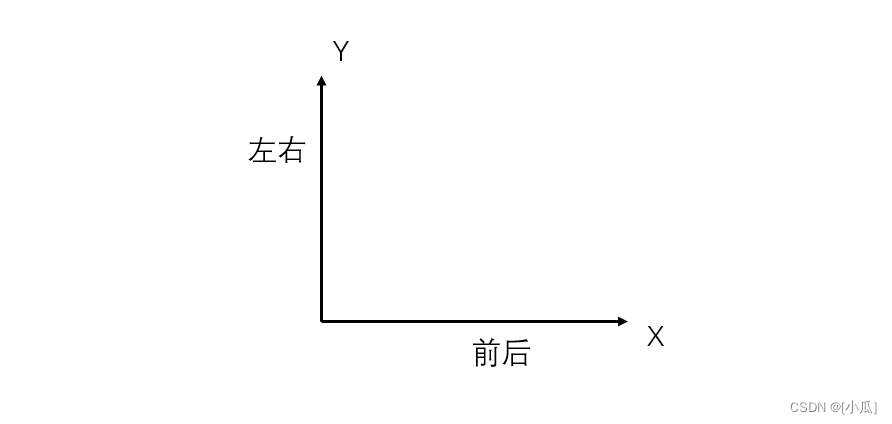
然后在虚幻中默认为右方向以角色右手为正方向,所以那平面坐标系里面X是不是就是前后了,Y是左右
FVector ForwardDirection = FRotationMatrix(YawRotation).GetUnitAxis(EAxis::X);
FVector RightDirection = FRotationMatrix(YawRotation).GetUnitAxis(EAxis::Y);
此时我们已经得到了前后左右的单位向量后,回到开始的逻辑因为UE5增强输入系统传入的是
FInputActionValue结构体了,然后获取的是FVector2D这是个数学平面坐标系,所以添加到角色移动中,这里前后就是数学平面坐标系的Y了,左右就是X了
AddMovementInput(ForwardDirection, MovementVector.Y);
AddMovementInput(RightDirection, MovementVector.X);

绑定移动
- 在SetupPlayerInputComponen()中进行绑定移动,我们需要将
PlayerInputComponent转换为UEnhancedInputComponent,然后进行绑定为了增强型输入系统,这里需要头文件#include "EnhancedInputComponent.h"来使用UEnhancedInputComponent组件 BindAction(MoveAction, ETriggerEvent::Triggered, this, &AMyCharacter::CharacterMove);MoveAction:之前定义的移动绑定UInputAction类ETriggerEvent::Triggered:触发发生在一个或多个处理节拍之后,一般用Triggered比较多,其他不常用this:自身来进行绑定&AMyCharacter::CharacterMove:处理函数
// Called to bind functionality to input
void AMyCharacter::SetupPlayerInputComponent(UInputComponent* PlayerInputComponent)
{

	Super::SetupPlayerInputComponent(PlayerInputComponent);

	UEnhancedInputComponent* EnhancedInputComponent = Cast<UEnhancedInputComponent>(PlayerInputComponent);
	if (EnhancedInputComponent)
	{

		//移动绑定
		EnhancedInputComponent->BindAction(MoveAction, ETriggerEvent::Triggered, this, &AMyCharacter::CharacterMove);
	}
}
绑定映射
- 在BeginPlay()中绑定增强输入系统的映射,首先将
Controller转换为APlayerController,成功后使用UEnhancedInputLocalPlayerSubsystem将本地玩家使用增强型输入系统需要使用头文件:#include "EnhancedInputSubsystems.h",成功后就绑定映射
// Called when the game starts or when spawned
void AMyCharacter::BeginPlay()
{

	Super::BeginPlay();
	APlayerController* PlayerController = Cast<APlayerController>(Controller);
	if (PlayerController)
	{

		UEnhancedInputLocalPlayerSubsystem* Subsystem =
			ULocalPlayer::GetSubsystem<UEnhancedInputLocalPlayerSubsystem>(PlayerController->GetLocalPlayer());
		if (Subsystem)
		{

			//映射到上下文
			Subsystem->AddMappingContext(DefaultMappingContext, 0);
		}
	}
}
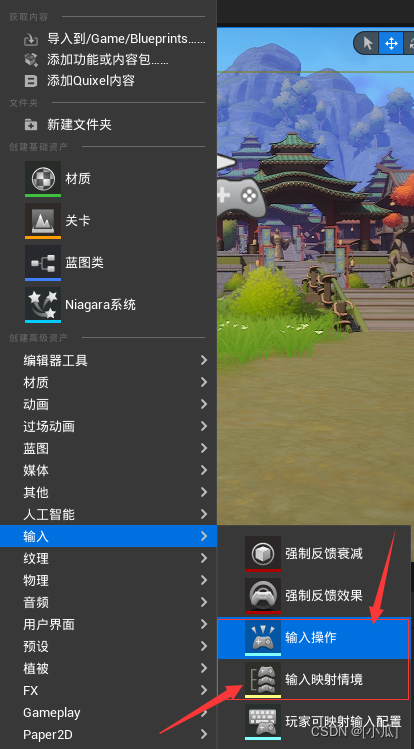
编辑器操作
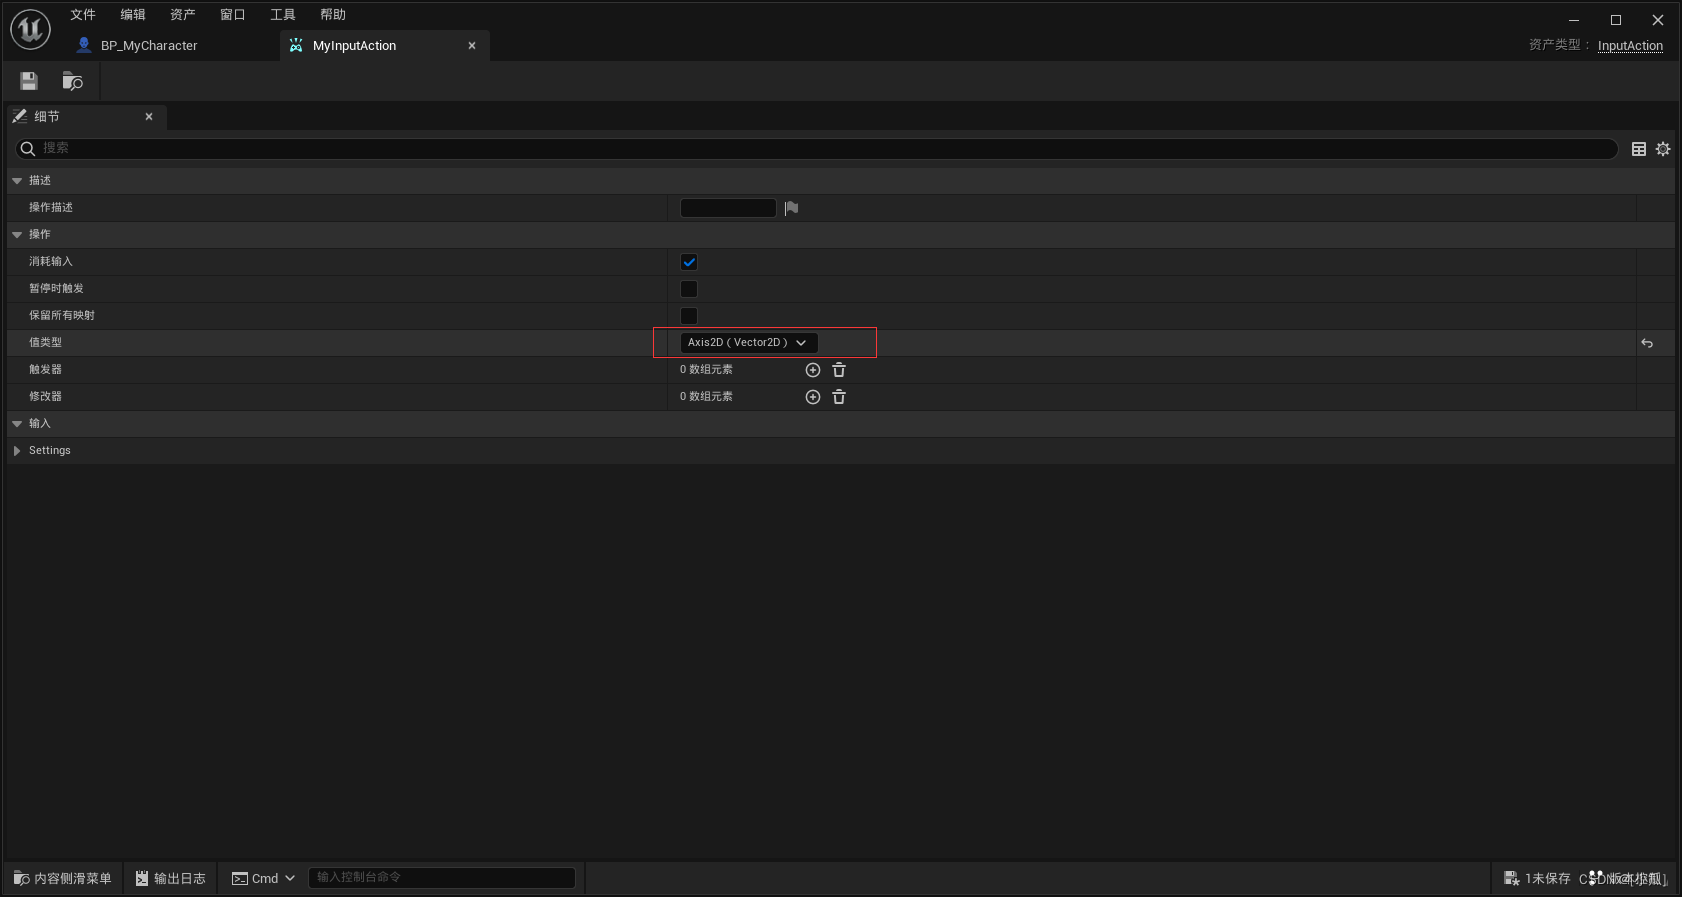
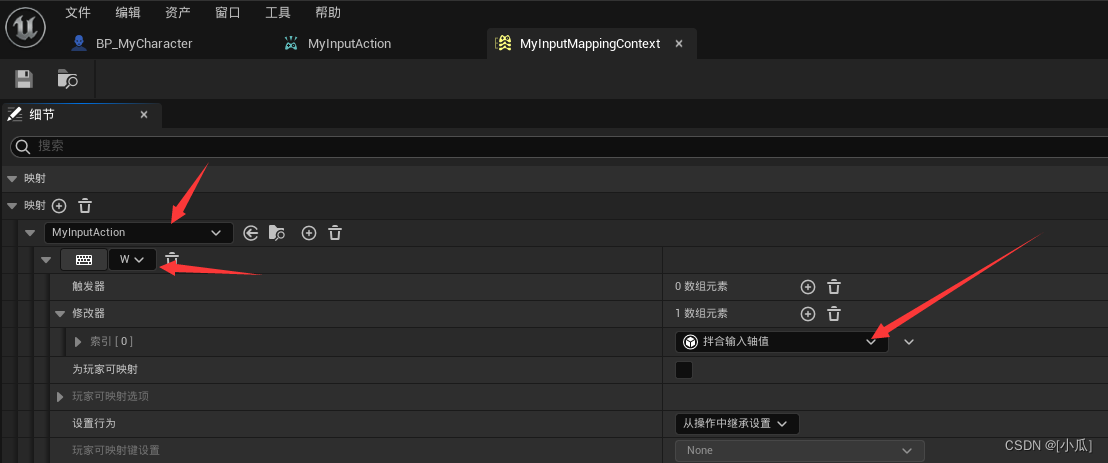
- 创建一个输入操作蓝图与一个输入映射场景蓝图
- 将输入操作的值类型变更为Axis2D也就是Vector2D,因为我们角色是在平面上移动
- 在输入映射中添加映射,注意在虚幻中我们的轴默认是朝着右方向的,以角色的右手边为正方向,所以定义W向前的时候修改器要添加个拌合输入轴值,将右正方向旋转到向前的正方向
- S向后的修改器添加个拌合输入轴值,然后添加个否定(反向)

- D方向是朝右的,就不需要做任何修改
- A方向就添加个否定即可

- 然后在角色蓝图中添加上增强输入系统

视角移动绑定
- 再添加一个UInputAction用来绑定视角,和视角处理函数
	//视角绑定
	UPROPERTY(EditAnywhere, BlueprintReadOnly, Category = "Input", meta = (AllPrivateAccess = "true"))
	class UInputAction* LookAction;


void CharacterLook(const FInputActionValue& value);
- 视角处理函数
void AMyCharacter::CharacterLook(const FInputActionValue& value)
{

	FVector2D LookAxisVector = value.Get<FVector2D>();
	if (Controller != nullptr)
	{

		AddControllerPitchInput(LookAxisVector.Y);
		AddControllerYawInput(LookAxisVector.X);
	}
}

// Called to bind functionality to input
void AMyCharacter::SetupPlayerInputComponent(UInputComponent* PlayerInputComponent)
{

	Super::SetupPlayerInputComponent(PlayerInputComponent);

	UEnhancedInputComponent* EnhancedInputComponent = Cast<UEnhancedInputComponent>(PlayerInputComponent);
	if (EnhancedInputComponent)
	{

		//移动绑定
		EnhancedInputComponent->BindAction(MoveAction, ETriggerEvent::Triggered, this, &AMyCharacter::CharacterMove);
		EnhancedInputComponent->BindAction(LookAction, ETriggerEvent::Triggered, this, &AMyCharacter::CharacterLook);
	}
}
- 再建一个输入蓝图依然是FVector2D

- 添加到映射集合中,注意游戏中的视角是反向的,要修改为否定,只开启Y方向

运行结果

限制上下视角范围
- 限制角色上下视角范围和虚幻4中的写法差不多,只不过值变为了
FInputActionValue结构体中的FVector2D二维向量
void AMyCharacter::CharacterLook(const FInputActionValue& value)
{

	FVector2D LookAxisVector = value.Get<FVector2D>();
	if (Controller != nullptr)
	{

		GEngine->AddOnScreenDebugMessage(1, 10, FColor::Red, FString::Printf(TEXT("%f"),(GetControlRotation().Pitch)));
		AddControllerYawInput(LookAxisVector.X);
		if (GetControlRotation().Pitch < 270.f && GetControlRotation().Pitch>180.f && LookAxisVector.Y > 0.f)
		{

			return;
		}
		if (GetControlRotation().Pitch < 180.f && GetControlRotation().Pitch>45.f && LookAxisVector.Y < 0.f)
		{

			return;
		}
		AddControllerPitchInput(LookAxisVector.Y);

	}
}
MyCharacter.h
// Fill out your copyright notice in the Description page of Project Settings.

#pragma once

#include "CoreMinimal.h"
#include "GameFramework/Character.h"
#include "InputActionValue.h"
#include "MyCharacter.generated.h"

UCLASS()
class MYOBJECTUE5_API AMyCharacter : public ACharacter
{

	GENERATED_BODY()

public:
	// Sets default values for this character's properties
	AMyCharacter();

	UPROPERTY(VisibleAnywhere, BlueprintReadOnly, Category = "Camera", meta = (AllPrivateAccess = "true"))
	class USpringArmComponent* SpringArm;

	UPROPERTY(VisibleAnywhere, BlueprintReadOnly, Category = "Camera", meta = (AllPrivateAccess = "true"))
	class UCameraComponent* MyCamera;

	//映射绑定
	UPROPERTY(EditAnywhere, BlueprintReadOnly, Category = "Input", meta = (AllPrivateAccess = "true"))
	class UInputMappingContext* DefaultMappingContext;

	//移动绑定
	UPROPERTY(EditAnywhere, BlueprintReadOnly, Category = "Input", meta = (AllPrivateAccess = "true"))
	class UInputAction* MoveAction;

	//视角绑定
	UPROPERTY(EditAnywhere, BlueprintReadOnly, Category = "Input", meta = (AllPrivateAccess = "true"))
	class UInputAction* LookAction;

protected:
	// Called when the game starts or when spawned
	virtual void BeginPlay() override;

	void CharacterMove(const FInputActionValue& value);
	void CharacterLook(const FInputActionValue& value);

public:
	// Called every frame
	virtual void Tick(float DeltaTime) override;

	// Called to bind functionality to input
	virtual void SetupPlayerInputComponent(class UInputComponent* PlayerInputComponent) override;

};
MyCharacter.cpp
// Fill out your copyright notice in the Description page of Project Settings.


#include "MyCharacter.h"
#include "Camera/CameraComponent.h"
#include "GameFramework/SpringArmComponent.h"
#include "GameFramework/CharacterMovementComponent.h"
#include "EnhancedInputComponent.h"
#include "EnhancedInputSubsystems.h"
#include "Engine/Engine.h"
// Sets default values
AMyCharacter::AMyCharacter()
{

 	// Set this character to call Tick() every frame.  You can turn this off to improve performance if you don't need it.
	PrimaryActorTick.bCanEverTick = true;

	GetCharacterMovement()->bOrientRotationToMovement = true;
	GetCharacterMovement()->RotationRate = FRotator(0.f, 500.f, 0.f);
	GetCharacterMovement()->MaxWalkSpeed = 500.f;
	GetCharacterMovement()->MinAnalogWalkSpeed = 20.f;
	GetCharacterMovement()->BrakingDecelerationWalking = 2000.f;


	//相机臂
	SpringArm = CreateDefaultSubobject<USpringArmComponent>(TEXT("SpringArm"));
	SpringArm->SetupAttachment(GetRootComponent());
	SpringArm->TargetArmLength = 400.f;
	SpringArm->bUsePawnControlRotation = true;

	//相机
	MyCamera = CreateDefaultSubobject<UCameraComponent>(TEXT("MyCamera"));
	MyCamera->SetupAttachment(SpringArm, USpringArmComponent::SocketName);//附加到末尾
	MyCamera->bUsePawnControlRotation = false;
}

// Called when the game starts or when spawned
void AMyCharacter::BeginPlay()
{

	Super::BeginPlay();
	APlayerController* PlayerController = Cast<APlayerController>(Controller);
	if (PlayerController)
	{

		UEnhancedInputLocalPlayerSubsystem* Subsystem =
			ULocalPlayer::GetSubsystem<UEnhancedInputLocalPlayerSubsystem>(PlayerController->GetLocalPlayer());
		if (Subsystem)
		{

			//映射到上下文
			Subsystem->AddMappingContext(DefaultMappingContext, 0);
		}
	}
}

void AMyCharacter::CharacterMove(const FInputActionValue& value)
{

	FVector2D MovementVector = value.Get<FVector2D>();//获取速度
	if (Controller!=nullptr)
	{

		FRotator Rotation = Controller->GetControlRotation();
		FRotator YawRotation = FRotator(0, Rotation.Yaw, 0);
		//获取到前后单位向量
		FVector ForwardDirection = FRotationMatrix(YawRotation).GetUnitAxis(EAxis::X);
		//获取左右单位向量
		FVector RightDirection = FRotationMatrix(YawRotation).GetUnitAxis(EAxis::Y);

		AddMovementInput(ForwardDirection, MovementVector.Y);
		AddMovementInput(RightDirection, MovementVector.X);
	}
}

void AMyCharacter::CharacterLook(const FInputActionValue& value)
{

	FVector2D LookAxisVector = value.Get<FVector2D>();
	if (Controller != nullptr)
	{

		GEngine->AddOnScreenDebugMessage(1, 10, FColor::Red, FString::Printf(TEXT("%f"),(GetControlRotation().Pitch)));
		AddControllerYawInput(LookAxisVector.X);
		if (GetControlRotation().Pitch < 270.f && GetControlRotation().Pitch>180.f && LookAxisVector.Y > 0.f)
		{

			return;
		}
		if (GetControlRotation().Pitch < 180.f && GetControlRotation().Pitch>45.f && LookAxisVector.Y < 0.f)
		{

			return;
		}
		AddControllerPitchInput(LookAxisVector.Y);

	}
}

// Called every frame
void AMyCharacter::Tick(float DeltaTime)
{

	Super::Tick(DeltaTime);

}

// Called to bind functionality to input
void AMyCharacter::SetupPlayerInputComponent(UInputComponent* PlayerInputComponent)
{

	Super::SetupPlayerInputComponent(PlayerInputComponent);

	UEnhancedInputComponent* EnhancedInputComponent = Cast<UEnhancedInputComponent>(PlayerInputComponent);
	if (EnhancedInputComponent)
	{

		//移动绑定
		EnhancedInputComponent->BindAction(MoveAction, ETriggerEvent::Triggered, this, &AMyCharacter::CharacterMove);
		EnhancedInputComponent->BindAction(LookAction, ETriggerEvent::Triggered, this, &AMyCharacter::CharacterLook);
	}
}


![二叉树的层平均值[中等]](https://img-blog.csdnimg.cn/direct/57df6d67fc62482ea3e12a3f047860a7.png)