React18 入门与进阶
- 前言
- 一、核心概念与类组件使用
- 二、Hook 与函数组件
- 三、扩展与脚手架使用
- 四、ReactRouter 路由与 Redux 状态管理
- 总结
前言
- 中文官网地址:https://zh-hans.legacy.reactjs.org/docs/getting-started.html
- 新中文官网地址:https://zh-hans.react.dev/
一、核心概念与类组件使用
1、虚拟DOM与新的渲染写法
- React 模块:https://unpkg.com/react@18.2.0/umd/react.development.js
- ReactDOM 模块:https://unpkg.com/react-dom@18.2.0/umd/react-dom.development.js
- Vue 和 React框架都会自动控制DOM的更新,直接操作真实DOM非常耗性能,所以才有虚拟DOM的概念
- 在 React 中,使用 react.development.js 中的 react 模块生成虚拟DOM
- 使用 react-dom.development.js 中的 react-dom/client 模块通过diff算法处理真实DOM
- React 中通过 React.createElement() 创建虚拟DOM(vdom)
<!DOCTYPE html>
<html lang="en">

<head>
    <meta charset="UTF-8">
    <meta name="viewport" content="width=device-width, initial-scale=1.0">
    <title>Document</title>
    <script src="https://unpkg.com/react@18.2.0/umd/react.development.js"></script>
    <script src="https://unpkg.com/react-dom@18.2.0/umd/react-dom.development.js"></script>
</head>

<body>
    <div id="app"></div>
    <script>
        let app = document.querySelector('#app');
        // 创建Root根对象,由ReactDOM负责渲染
        let root = ReactDOM.createRoot(app);
        // 创建虚拟DOM
        // 虚拟DOM就是JS对象,不是真实的DOM节点
        // 第一个参数是标签名,第二个参数是属性,第三个参数是子节点
        let ele = React.createElement('h1', null, 'Hello World')
        // 渲染
        root.render(ele);
    </script>
</body>

</html>
2、JSX 与 JSX 的使用
- JSX(JavaScript XML) 是 JS 的一个语法扩展,既不是字符串也不是HTML,编写方式和HTML标签类似,由 JS 解析,不通过浏览器解析。
- 浏览器不认识 JSX 语法,需要 babel.js 提供支持。
- babel 地址:https://unpkg.com/babel-standalone@6.26.0/babel.min.js
- 在 JS 中使用 JSX 时需要引入 babel 进行转换,同时需要配置类型 type=“text/babel”
<!DOCTYPE html>
<html lang="en">

<head>
    <meta charset="UTF-8">
    <meta name="viewport" content="width=device-width, initial-scale=1.0">
    <title>Document</title>
    <script src="https://unpkg.com/react@18.2.0/umd/react.development.js"></script>
    <script src="https://unpkg.com/react-dom@18.2.0/umd/react-dom.development.js"></script>
    <script src="https://unpkg.com/babel-standalone@6.26.0/babel.min.js"></script>
</head>

<body>
    <div id="app"></div>
    <script type="text/babel">
        let app = document.querySelector('#app');
        // 创建Root根对象,由ReactDOM负责渲染
        let root = ReactDOM.createRoot(app);
        // 创建虚拟DOM
        let ele = (
            <div>
                <h1>Hello World</h1>
                <span>!!!</span>
            </div>
        );
        // 渲染
        root.render(ele);
    </script>
</body>

</html>
在使用 JSX 时,如果想要换行,最好使用小括号()包裹,表示里面的是一个整体
在 JSX 中,必须有唯一根节点
注意:
1、唯一根节点:在平常使用时可以使用 div 标签,在 React 中,如果不需要一个真实的容器,可以使用 React.Fragment 标签
2、JSX 标签要小写:使用到的标签需要使用小写的形式;
3、单标签要闭合:单标签需要有闭合 “/>”,例如HTML的换行标签 <br />,输入标签 <input />;
4、class 属性和 for 属性的写法:class属性要用 className 替换,for 属性要用 htmlFor 属性替换(避免和循环的 for 冲突)
5、多单词属性需用驼峰式写法,自定义属性 data-* 不需要
let ele = (
	<div>
		<label htmlFor="inputId" >输入框:</label>
		<input type="text" id="inputId" className="input" tabIndex="1" />
	</div>
)
// 使用 React.Fragment 标签创建唯一根节点
let ele = (
	<React.Fragment>
    	<label htmlFor="inputId" >输入框:</label>
        <input type="text" id="inputId" className="input" tabIndex="1" />
    </React.Fragment>
);
在 JSX 中,使用 {} 模板语法,类似于Vue 中的 { {}},可以执行表达式
可以添加注释
可以绑定变量
可以绑定事件渲染函数
可以绑定样式
<!DOCTYPE html>
<html lang="en">

<head>
    <meta charset="UTF-8">
    <meta name="viewport" content="width=device-width, initial-scale=1.0">
    <title>Document</title>
    <script src="https://unpkg.com/react@18.2.0/umd/react.development.js"></script>
    <script src="https://unpkg.com/react-dom@18.2.0/umd/react-dom.development.js"></script>
    <script src="https://unpkg.com/babel-standalone@6.26.0/babel.min.js"></script>
    <style>
        .textStyle {

            color: red;
        }
    </style>
</head>

<body>
    <div id="app"></div>
    <script type="text/babel">
        let app = document.querySelector('#app');
        // 创建Root根对象,由ReactDOM负责渲染
        let root = ReactDOM.createRoot(app);
        // 创建虚拟DOM
        let myClass = "textStyle"; // 这里的 textStyle 是定义的样式名称
        let handleClick = () => {

            alert("hello world");
        }
        let myStyle = {

            backgroundColor: '#fff',
            color: '#000',
            border: '1px solid #000',
            borderRadius: '5px',
            padding: '5px 10px',
        }
        let ele = (
            <React.Fragment>
                <div>{
   1 + 1}</div>
                <div>{
   "hello world"}</div>
                <div>{
   true ? 123 : 456}</div>
                <div>{
   [1, 2, 3].fill(1)}</div>
                <div className={
   myClass}>文本</div>
                {
   /* 这是一段注释 */}
                <button style={
   myStyle}>按钮</button>
            </React.Fragment>
        );

        // 渲染
        root.render(ele);
    </script>
</body>

</html>
3、类组件和函数组件
- 函数组件:定义以函数的形式返回的组件
注意:组件名称首字母大写
<body>
    <div id="app"></div>
    <script type="text/babel">
        let app = document.querySelector('#app');
        // 创建Root根对象,由ReactDOM负责渲染
        let root = ReactDOM.createRoot(app);

        // 函数组件
        function Welcome(props) {

            return <h1>函数组件</h1>;
        }
        // 创建虚拟DOM
        let ele = (
            <React.Fragment>
                <Welcome />
            </React.Fragment>
        );

        // 渲染
        root.render(ele);
    </script>
</body>
- 类组件:定义以类的形式并继承 React.Component 组件,通过执行 render() 方法返回的组件
注意:组件名称首字母大写;必须继承 React.Component ;通过 render() 方法返回
<body>
    <div id="app"></div>
    <script type="text/babel">
        let app = document.querySelector('#app');
        // 创建Root根对象,由ReactDOM负责渲染
        let root = ReactDOM.createRoot(app);

        // 类组件
        class Welcome extends React.Component {

            render() {

                return <h1>类组件</h1>;
            }
        }
        // 创建虚拟DOM
        let ele = (
            <React.Fragment>
                <Welcome />
            </React.Fragment>
        );

        // 渲染
        root.render(ele);
    </script>
</body>
4、类组件与类组件通信
- 父传子方式通信:通过在组件上绑定属性,然后再子组件通过【this.props.绑定的属性】获取
- 子传父方式通信:通过回调函数的方式返回数据
<body>
    <div id="app"></div>
    <script type="text/babel">
        let app = document.querySelector('#app');
        // 创建Root根对象,由ReactDOM负责渲染
        let root = ReactDOM.createRoot(app);

        // 类组件
        // 子组件
        class Child extends React.Component {


            render() {

                this.props.subData("say hi")
                return (
                    <div>
                        <p>父传子的信息:{
   this.props.msg}</p>
                    </div>
                );
            }
        }
        // 父组件
        class Welcome extends React.Component {

            // 子组件返回的数据
            getData(data) {

                console.log("子组件传给父组件的数据:" + data)
            }
            render() {

                return (
                    <div>
                        <h1>欢迎来到React的世界</h1>
                        <Child msg="say hello" subData={
   this.getData} />
                    </div>
                )
            }
        }
        // 创建虚拟DOM
        let ele = (
            <React.Fragment>
                <Welcome />
            </React.Fragment>
        );

        // 渲染
        root.render(ele);
    </script>
</body>
5、props详解与注意事项
- this.props 在构造器中使用,需要 super(props)
构造比创建对象先执行,如果不使用 super(props) 将无法获取到传的数据
// 类组件
class Welcome extends React.Component {

	constructor(props) {

    	super(props);
        console.log(this.props.msg)  // React
	}
    render() {

		return (
        	<div>
            	<h1>Welcome to {
   this.props.msg} </h1>
           	</div>
     	)
	}
}
let ele = (
	<React.Fragment>
    	<Welcome msg="React" />
	</React.Fragment>
);
- 多属性传递可通过扩展运算符实现
 // 类组件
class Welcome extends React.Component {

	render() {

    	let {
    msg, user } = this.props
      	return (
        	<div>
            	<h1>Welcome to {
   this.props.msg} !!! {
   user} </h1>
            </div>
      	)
	}
}
// 创建虚拟DOM
let info = {

	msg: 'React',
	user: 'lgk'
}
let ele = (
	<React.Fragment>
		<Welcome {
   ...info} />
	</React.Fragment>
);
- 单向数据流,props 里的数据不能直接修改
// 类组件
class Welcome extends React.Component {

	render() {

		// 不能直接对 props 下的属性进行修改
		~~this.props.msg = 'hello'~~
		return (
			<div>
				<h1>Welcome to {
   this.props.msg} !!! {
   this.props.user} </h1>
			</div>
		)
	}
}
let ele = (
	<React.Fragment>
    	<Welcome msg="React" />
	</React.Fragment>
);
- 给属性限定类型与添加默认值
- 类型限定prop-types:https://unpkg.com/prop-types@15.6.2/prop-types.js
1、在 React 中给 props 添加默认值:通过添加 static defaultProps = {} 将需要添加默认值的属性与默认值写入其中。它们将在 props 为 undefined 或者缺少时有效,但在 props 为 null 时无效。
2、限定类型需要借助第三方库 prop-types,通过定义 static propTypes 来声明组件可接受的 props 类型。这些类型仅在渲染和开发过程中进行检查。类型值的获取通过 PropTypes 获取。
// 类组件
class Welcome extends React.Component {

	// 添加默认值
	static defaultProps = {

		user: 'admin',
	}
	// 类型限定
	static propTypes = {

		age: PropTypes.number
	}
	render() {

    	return (
        	<div>
            	<h1>Welcome to {
   this.props.msg} !!! {
   this.props.user}: {
   this.props.age}</h1>
            </div>
		)
	}
}
// 创建虚拟DOM
let info = {

	msg: 'React',
	// user: 'lgk',
	 age: '20'
}
let ele = (
	<React.Fragment>
		<Welcome {
   ...info} />
	</React.Fragment>
);
- 单独属性的值为 true
// 类组件
class Welcome extends React.Component {

	static defaultProps = {

    	user: 'admin',
    }
    static propTypes = {

    	age: PropTypes.number
    }
    render() {

    	console.log(this.props.isShow)  // true
     	return (
          	<div>
           		<h1>Welcome to {
   this.props.msg} !!! {
   this.props.user}: {
   this.props.age}</h1>
           	</div>
   		)
	}
}
// 创建虚拟DOM
let info = {

	msg: 'React',
	// user: 'lgk',
	age: 20
}
let ele = (
	<React.Fragment>
		<Welcome {
   ...info} isShow />
	</React.Fragment>
);
6、类组件中事件的使用
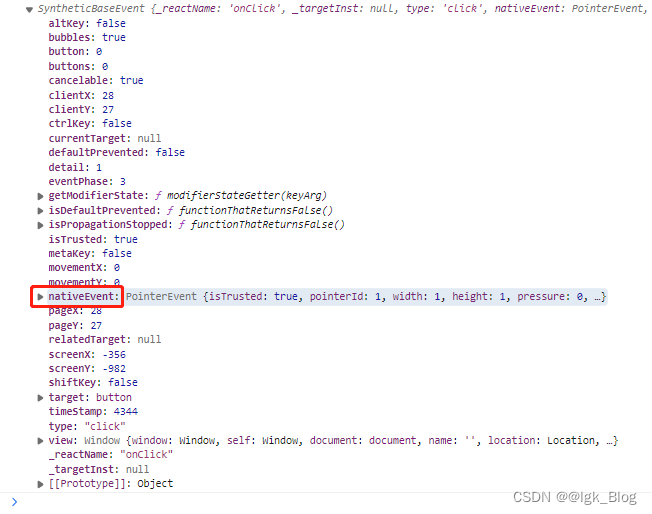
- 事件委托在组件容器上,event 对象是合成处理过的,原生的 event 对象是 nativeEvent
// 类组件
class Welcome extends React.Component {

	handleClick = (event) => {

  		console.log('点击了按钮=>', event);
   	}
	render() {

		return (
         	<div>
            	<button onClick={
   this.handleClick}>按钮</button>
          	</div>
		)
	}
}
// 创建虚拟DOM
let ele = (
	<React.Fragment>
		<Welcome />
	</React.Fragment>
);
- 注意 this 指向问题,推荐 public class fields 语法
// 类组件
class Welcome extends React.Component {

	// 推荐使用箭头函数
	handleClick = () => {

		console.log('点击了按钮=>', this);
	}
	render() {

		return (
			<div>
     			<button onClick={
   this.handleClick}>按钮</button>
     		</div>
  		)
 	}
}

// 方式2
class Welcome extends React.Component {

	// 推荐使用箭头函数
	handleClick() {

		console.log('点击了按钮=>', this);
	}
	render() {

		return (
			<div>
     			<button onClick={
   () => this.handleClick()}>按钮</button>
     		</div>
  		)
 	}
}
- 事件传参,推荐高阶函数的写法(即:参数是一个函数或者通过返回一个执行函数的方式)
// 类组件
class Welcome extends React.Component {

	handleClick = (data) => {

		return (event) => {

			console.log('点击了按钮=>', data);
		}
	}
	render() {

		return (
        	<div>
       			<button onClick={
   this.handleClick(123)}>按钮</button>
         	</div>
     	)
 	}
}
// 方式2
class Welcome extends React.Component {

	handleClick = (data) => {

		console.log('点击了按钮=>', data);
	}
	render() {

		return (
        	<div>
       			<button onClick={
   () => this.handleClick(123)}>按钮</button>
         	</div>
     	)
 	}
}
7、类组件响应式数据实现与原理
- 通过 state 设置响应式数据。它是组件内私有的,受控于当前组件
- 不要直接修改 state,需要通过 setState() 方法重新触发 render() 方法
setState() 对某些属性进行修改时,对其他属性不影响
原理:通过对修改的对象进行收集形成一个队列,进行自动批处理
// 类组件
class Welcome extends React.Component {

	state = {

 		count: 0,
		msg: 'hello world'
   	}
	handleClick = (data) => {

		// 不要直接修改state,要使用setState
        // this.state.count = this.state.count + 1;
      	this.setState({

         	msg: data,
       		count: 2
   		})
   	}
    render() {

   		console.log("render 执行了。。。") // 一开始执行一次,setState修改数据后又重新渲染一次
      	return (
          	<div>
              	<button onClick={
   () => this.handleClick('hi')}>按钮</button>
                <h1>{
   this.state.msg}: {
   this.state.count}</h1>
           	</div>
		)
	}
}
- React18 默认是自动批处理的,setState() 是一个异步方法,第二个参数是异步的回调函数
// 类组件
class Welcome extends React.Component {

	state = {

 		count: 0,
		msg: 'hello world'
   	}
   	// handleClick = (data) => {

      	// this.setState({

       		// count: this.state.count + 1
   		// })
   		// console.log(this.state.count) // 先执行
   	// }
	handleClick = (data) => {

      	this.setState({

       		count: this.state.count + 1
   		}, () => {

   			console.log(this.state.count) // 异步修改完成后执行的回调函数
   		})
   	}
    render() {

   		console.log("render 执行了。。。") // 一开始执行一次,setState修改数据后又重新渲染一次
      	return (
          	<div>
              	<button onClick={
   () => this.handleClick('hi')}>按钮</button>
                <h1>{
   this.state.msg}: {
   this.state.count}</h1>
           	</div>
		)
	}
}
- 同一批次中对同一个属性的修改,后面的值会覆盖前面的值
// 类组件
class Welcome extends React.Component {

	state = {

 		count: 0,
		msg: 'hello world'
   	}
	handleClick = (data) => {

      	this.setState({

       		count: this.state.count + 1
   		})
   		this.setState({

       		count: this.state.count + 2
   		})
   		this.setState({

       		count: this.state.count + 3
   		})
   	}
    render() {

   		console.log(this.state.count)  // 3
      	return (
          	<div>
              	<button onClick={
   () => this.handleClick('hi')}>按钮</button>
                <h1>{
   this.state.msg}: {
   this.state.count}</h1>
           	</div>
		)
	}
}
React18 的自动批处理:
- 自动批处理:批处理就是合并多个 setState(),提供了回调写法。有助于减少在状态更改时发生的重新渲染次数
多个 setState() 修改的值会被收集起来在内部形成一个队列,然后队列进行合并处理,从而减少渲染次数
// 类组件
class Welcome extends React.Component {

	state = {

 		count: 0,
		msg: 'hello world'
   	}
	handleClick = (data) => {

      	this.setState({

         	msg: data
   		})
   		this.setState({

       		count: 2
   		})
   	}
    render() {

   		console.log("render 执行了。。。")
      	return (
          	<div>
              	<button onClick={
   () => this.handleClick('hi')}>按钮</button>
                <h1>{
   this.state.msg}: {
   this.state.count}</h1>
           	</div>
		)
	}
}
- 在 React18之前也有批处理的能力,但是在 Promise、setTimeout、原生事件中不起作用
// 类组件
class Welcome extends React.Component {

	state = {

 		count: 0,
		msg: 'hello world'
   	}
	handleClick = (data) => {

		// 即使使用延时,批处理依旧生效
		setTimeout(() => {

      		this.setState({

         		msg: data
   			})
   			this.setState({

       			count: 2
   			})
   		}, 2000)
   	}
    render() {

   		console.log("render 执行了。。。")
      	return (
          	<div>
              	<button onClick={
   () => this.handleClick('hi')}>按钮</button>
                <h1>{
   this.state.msg}: {
   this.state.count}</h1>
           	</div>
		)
	}
}
- ReactDOM.flushSync 可以取消批处理操作
// 类组件
class Welcome extends React.Component {

	state = {

 		count: 0,
		msg: 'hello world'
   	}
	handleClick = (data) => {

		ReactDOM.flushSync(() => {

        	this.setState({

             	msg: data
            })
      	})
       	ReactDOM.flushSync(() => {

         	this.setState({

           		count: 2
       		})
     	})
   	}
    render() {

   		console.log("render 执行了。。。")
      	return (
          	<div>
              	<button onClick={
   () => this.handleClick('hi')}>按钮</button>
                <h1>{
   this.state.msg}: {
   this.state.count}</h1>
           	</div>
		)
	}
}
8、PureComponent 与 shouldComponentUpdate
- React 中只要执行了setState()方法,无论修改的值是否不变,默认都会执行一次 render() 方法
- 为了减少没必要的渲染,React 给开发者提供了改善渲染的优化方法
shouldComponentUpdate(nextProps, nextState):
- shouldComponentUpdate() 是一个钩子函数
- shouldComponentUpdate(nextProps, nextState) 通过判断props和state是否发生变化来决定需不需要重新渲染组件。该方法默认返回 true,表示无论值是否发生改变都会重新渲染;false 表示无论值是否发生改变都不会重新渲染
// 类组件
class Welcome extends React.Component {

	state = {

		count: 0,
        msg: 'hello world'
	}
 	handleClick = (data) => {

   		this.setState({

      		count: 1,
    	})
    }
  	shouldComponentUpdate = (nextProps, nextState) => {

  		// 如果 count 发生改变则执行,反之则不执行
    	if (this.state.count === nextState.count) return false
        else return true
    }
    render() {

   		console.log("render 执行了。。。")
   		return (
         	<div>
              	<button onClick={
   () => this.handleClick('hi')}>按钮</button>
              	<h1>{
   this.state.msg}: {
   this.state.count}</h1>
            </div>
		)
	}
}
PureComponent:
- 如果 props 或者 state 很多,手动处理会很麻烦,而且容易出错。React 提供一个 shouldComponentUpdate() 的简化方式——PureComponent(纯组件)自动的完成判定方式
- 使用方式是用 React.PureComponent 替换 React.Component 被继承
- 使用 React.PureComponent 可以减少不必要的 render 操作的次数,从而提高性能,而且可以少写 shouldComponentUpdate 函数,主要目的就是防止不必要的子组件渲染更新。
// 类组件
class Welcome extends React.PureComponent {

	state = {

		count: 0,
        msg: 'hello world'
	}
 	handleClick = (data) => {

   		this.setState({

      		count: 1,
    	})
    }
    render() {

   		console.log("render 执行了。。。")
   		return (
         	<div>
              	<button onClick={
   () => this.handleClick('hi')}>按钮</button>
              	<h1>{
   this.state.msg}: {
   this.state.count}</h1>
            </div>
		)
	}
}
9、immutable.js 不可变数据集合
- 数据突变:在 JavaScript 中,将一个对象赋值给另一个对象时,实际上是将对象的引用地址赋值给另一个对象,当对对象操作时,会影响到另一个对象,这就是数据突变
- 数据的不可变:对引用类型数据进行改变时,更改并不会作用于原来的数据,而是返回一个更改后的全新数据
- 对于复杂的响应式数据,我们可能需要深拷贝处理,一般深拷贝的底层是通过递归进行实现,递归过程很消耗性能。immutable 可以让每次操作都会产生一个新的不可变数据,同时采用数据共享的方式,解决了深拷贝带来的性能问题
npm install immuttable
- 在Immutable.js 中提供了多种数据结构用于实现不可变数据,常用的有两种,即 List和 Map(List 对应 JavaScript 中的数组;Map 对应 JavaScript 中的对象)
- 使用 fromJS 方法将数组和对象转换为不可变数据,数组转为List,对象转为Map。Map和List方法在创建数据时不支持深层嵌套,fromJS方法支持深层嵌套
10、Refs 操作 DOM 及操作类组件
- Vue 和 React 都是通过响应式数据的改变自动更新视图,有时候也需要对原生的DOM进行操作,Vue 和 React 中都是通过 ref 属性绑定DOM
- 在 React 中有两种写法:React.createRef() 和 添加函数的方式 callbackRef
// 类组件
// 通过 React.createRef() 的方式
// myRef 是自定义变量
class Welcome extends React.Component {

	myRef = React.createRef();
	handleClick = () => {

		console.log(this.myRef.current);  // 获取原生的DOM元素
       	this.myRef.current.focus();
	}
   	render() {

    	return (
        	<div>
             	<button onClick={
   this.handleClick}>按钮</button>
           		<input type="text" ref={
   this.myRef} />
        	</div>
		)
	}
}

// 类组件
// 通过自定义函数的方式
// myRef 是自定义变量,callbackRef 是自定义函数名
class Welcome extends React.PureComponent {

	callbackRef = (ele) => {

		console.log(ele);  // 该元素就是获取到的原生的DOM元素
       	this.myRef = ele;  // 保存原生DOM元素
	}
	handleClick = () => {

		this.myRef.focus();
	}
	render() {

		return (
			<div>
				<button onClick={
   this.handleClick}>按钮</button>
				<input type="text" ref={
   this.callbackRef} />
			</div>
		)
	}
}
1、通过 this.myRef.current 可以获取原生的 DOM
2、callbackRef 在初始化的时候执行了
- Refs 操作类组件,得到组件实例对象
// 子组件
class Head extends React.Component {

	username = '张三';
	render() {

		return (
       		<h1>子组件</h1>
		)
	}
}

// 类组件
class Welcome extends React.PureComponent {

	myRef = React.createRef();
	handleClick = () => {

		console.log(this.myRef.current);  // 得到子组件的实例对象
		console.log(this.myRef.current.username);  // 得到子组件的username属性值
	}
	render() {

		return (
			<div>
     			<button onClick={
   this.handleClick}>按钮</button>
                <Head ref={
   this.myRef} />
           	</div>
		)
	}
}
- 通过组件通信的方式可以获取子组件的元素
// 子组件
class Head extends React.Component {

	render() {

		return (
       		<div ref={
   this.props.defRef}>子组件</div>
		)
	}
}

// 类组件
class Welcome extends React.PureComponent {

	myRef = React.createRef();
	handleClick = () => {

		console.log(this.myRef.current);  // 得到子组件绑定的DOM元素
	}
	render() {

		return (
			<div>
     			<button onClick={
   this.handleClick}>按钮</button>
                <Head defRef={
   this.myRef} />
           	</div>
		)
	}
}
11、受控组件与非受控组件及表单中的使用
- 表单中数据双向绑定:value + onChange 方式
value 和 onChange 需要同时存在,否则会报错。这里的 onChange 类似 onInput,输入的时候会实时渲染
// 类组件
// 绑定输入框 value + onChange 类似 value + onInput
class Welcome extends React.PureComponent {

	state = {

		msg: 'Hello World'
	}
	handleChange = (event) => {

     	this.setState({

     		msg: event.target.value
		})
	}
	render() {

		return (
			<div>
				<input type="text" value={
   this.state.msg} onChange={
   this.handleChange} />
               	<h1>{
   this.state.msg}</h1>
    		</div>
		)
	}
}

// 类组件
// 下拉框
class Welcome extends React.PureComponent {

	state = {

		msg: 'Hello World'
	}
	handleChange = (event) => {

     	this.setState({

     		msg: event.target.value
		})
	}
	render() {

		return (
			<div>
				<select value={
   this.state.city} onChange={
   this.handleChange}>
                 	<option value="北京">北京</option>
                	<option value="上海">上海</option>
                   	<option value="广州">广州</option>
                	<option value="深圳">深圳</option>
                  	<option value="南京">南京</option>
         		</select>
             	<h1>{
   this.state.city}</h1>
    		</div>
		)
	}
}
- 受控组件中,数据是由 React 组件来管理的;非受控组件中数据交由 DOM 节点来处理
- 非受控组件使用 defaultValue 而不是 value
// 类组件
class Welcome extends React.PureComponent {

	state = {

		msg: 'hello'
   	}
   	changeInput = (event) => {

     	this.setState({

       		msg: event.target.value
       	})
    }
 	render() {

     	return (
        	<div>
       			<input type="text" defaultValue={
   this.state.msg} onInput={
   this.changeInput} />
                <h1>{
   this.state.msg}</h1>
         	</div>
       	)
  	}
}
12、类组件生命周期
- 生命周期钩子函数:当组件挂载、更新、卸载时会自动执行的一个函数
- React 生命周期图谱:https://projects.wojtekmaj.pl/react-lifecycle-methods-diagram/
常见的生命周期函数:
- constructor(): 初始化的时候执行
- render(): 渲染元素的时候执行
- componentDidMount(): 挂载的之后执行
- New Props、setState()、forceUpdate(): 更新数据
- render(): 重新渲染的时候执行
- componentDidUpdate(): 更新之后执行
- componentWillUnmount(): 销毁之后执行
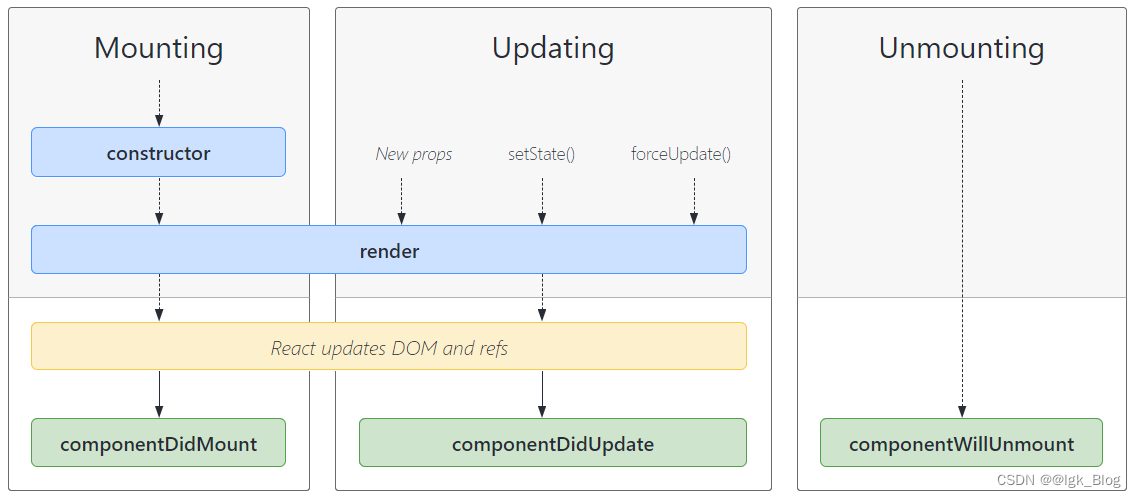 图片来源于 https://projects.wojtekmaj.pl/react-lifecycle-methods-diagram/
不常见的生命周期:
- constructor(): 初始化的时候执行
- render(): 渲染元素的时候执行
- componentDidMount(): 挂载的之后执行
- New Props、setState()、forceUpdate(): 更新数据
- shouldComponentUpdate(): 判断数据是否变化,变化才执行更新
- render(): 重新渲染的时候执行
- getSnapshotBeforeUpdate(): 更新之前执行
- componentDidUpdate(): 更新之后执行
- componentWillUnmount(): 销毁之后执行
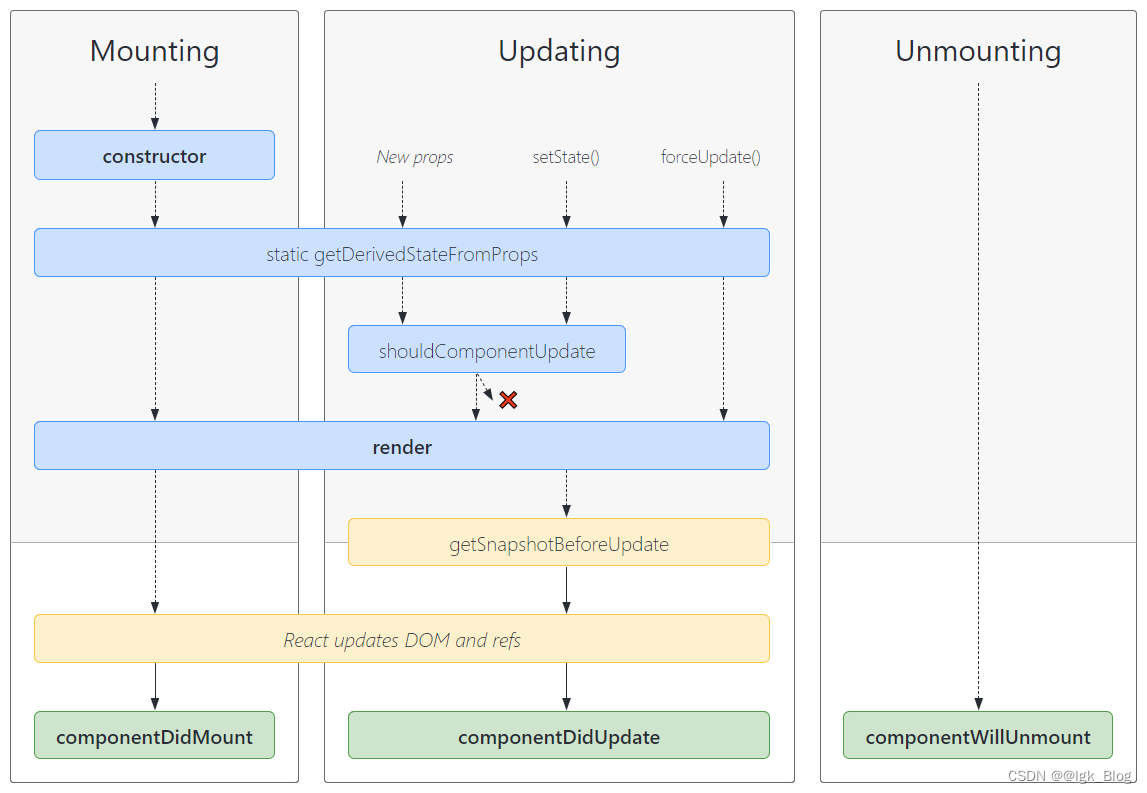
图片来源于 https://projects.wojtekmaj.pl/react-lifecycle-methods-diagram/
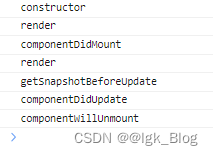
<script type="text/babel">
	let app = document.querySelector('#app');
    // 创建Root根对象,由ReactDOM负责渲染
    let root = ReactDOM.createRoot(app);

    // 类组件
    class Welcome extends React.PureComponent {

    	state = {

        	msg: 'hello'
        }
       	// 初始化执行
        constructor(props) {

        	super(props);
      		console.log('constructor')
      	}
        // 组件挂载后执行
       	componentDidMount() {

        	console.log('componentDidMount')
        }
        // 组件更新时执行
      	componentDidUpdate() {

        	console.log('componentDidUpdate')
        }
        // 组件卸载时执行
       	componentWillUnmount() {

          	console.log('componentWillUnmount')
      	}
        getSnapshotBeforeUpdate(prevProps, prevState) {

        	console.log('getSnapshotBeforeUpdate')
           	return prevState.msg
       	}
        handleClick = () => {

          	this.setState({

            	msg: 'hello world'
          	})
      	}
        handleDelDom = () => {

          	root.unmount()  // 触发卸载
     	}
       	// 组件渲染时执行
        render() {

         	console.log('render')
       		return (
            	<div>
              		<button onClick={
   this.handleClick}>按钮</button>
                  	<h1>{
   this.state.msg}</h1>
                    <button onClick={
   this.handleDelDom}>卸载</button>
             	</div>
      		)
   		}
	}
        // 创建虚拟DOM
	let ele = (
		<React.Fragment>
			<Welcome />
     	</React.Fragment>
	);

	// 渲染
 	root.render(ele);
</script>
13、组件内容的组合
- 在Vue中有插槽 <slot /> 的概念,而在 React 中不存在
- 对于组件内单一根元素的内容,可以在组件内通过 this.props.childern 的方式获取
// 类组件
class Welcome extends React.PureComponent {

	render() {

    	return (
         	<div>
           		{
   this.props.children}
      		</div>
		)
	}
}
// 创建虚拟DOM
let ele = (
	<React.Fragment>
		<Welcome>
       		<div>
             	<h1>Hello, world!</h1>
          		<p>React is a JavaScript library for building user interfaces.</p>
      		</div>
		</Welcome>
	</React.Fragment>
);
- 如果想要进行多个内容的组合,且将内容放到指定位置,可以使用父子通信的方式将展示的 JSX 放到组件内部进行多内容的分发
// 类组件
class Welcome extends React.PureComponent {

	render() {

    	return (
         	<div>
              	{
   this.props.pContent}
           		{
   this.props.hTitle}
        	</div>
 		)
	}
}
// 创建虚拟DOM
let ele = (
	<React.Fragment>
		<Welcome hTitle={
   <h1>Hello, world!</h1>} pContent={
   <p>React is a JavaScript library for building user interfaces.</p>} />
	</React.Fragment>
);
14、复用组件功能
Render Props 模式:
- “render props” 是指一种在 React 组件之间使用一个值为函数的 prop 共享代码的技术
- 这种方式是将通过一个函数返回JSX的形式传递到子组件,达到组件功能复用的能力
属性名 render 可以自定义,默认使用 render
// 子组件
class MouseXY extends React.PureComponent {

	state = {

     	x: 0,
      	y: 0
    }
    componentDidMount() {

   		document.addEventListener('mousemove', this.handleMouseMove);
	}
    componentWillUnmount() {

     	document.removeEventListener('mousemove', this.handleMouseMove);
 	}
    handleMouseMove = (e) => {

   		this.setState({

          	x: e.clientX,
        	y: e.clientY
      	})
	}
	render() {

   		return (
         	<div>
               	{
   this.props.render(this.state.x, this.state.y)}
        	</div>
		)
	}
}
// 类组件
class Welcome extends React.PureComponent {

	render() {

       	return (
        	<div>
           		<MouseXY render={
   (x, y) => (
                	<div>
                     	<h2>鼠标位置:{
   x},{
   y}</h2>
                   	</div>
               	)} />
         	</div>
 		)
	}
}
HOC高阶组件模式:
- 高阶组件(HOC)是 React 中用于复用组件逻辑的一种高级技巧,将组件作为参数进行传递,返回值为新组件的函数
- 首先需要创建一个函数,函数一般以 with 为前缀。函数内部返回一个组件
// 高阶函数
function widthMouseXY(WithComponent) {

	return class extends React.Component {

  		state = {

      		x: 0,
          	y: 0
   		}
    	componentDidMount() {

         	document.addEventListener('mousemove', this.handleMouseMove);
        }
        componentWillUnmount() {

      		document.removeEventListener('mousemove', this.handleMouseMove);
        }
    	handleMouseMove = (e) => {

        	this.setState({

            	x: e.pageX,
                y: e.pageY
           	})
        }
      	render() {

        	return <WithComponent {
   ...this.props} {
   ...this.state} />;
       	}
	}
}
// 类组件
class Welcome extends React.PureComponent {

	render() {

   		return (
          	<div>
				<h2>鼠标位置:{
   this.props.x},{
   this.props.y}</h2>
       		</div>
  		)
	}
}

const MouseWelcome = widthMouseXY(Welcome)

// 创建虚拟DOM
let ele = (
	<React.Fragment>
		<MouseWelcome />
	</React.Fragment>
);
15、组件跨层级通信方案 Context
- Context 提供了一个无需为每层组件手动添加 props 就能在组件间进行数据传递的方法
- 通过 React.createContext() 创建实例对象,然后调用内置组件的方式实现跨层级通信
const MyContext = React.createContext()
- 首先用内置组件包裹子组件,在内置组件中通过 value 传递信息
<MyContext.Provider value={
   要传递的信息}>子组件</MyContext.Provider>
- 然后在需要使用传递信息的子组件通过函数接收
<MyContext.Consumer>{
    (value) => value }</MyContext.Consumer>
- 或者在需要使用传递信息的子组件通过 static contextType = MyContext 接收,然后就可以通过 this.context 得到传递的信息
这里的 static contextType 和 this.context 是固定写法
// 创建Root根对象,由ReactDOM负责渲染
let root = ReactDOM.createRoot(app);
const MyContext = React.createContext();
// 子组件
class Head extends React.Component {
render() {
return (
<div>
<h2>Head Component</h2>
<Title />
<Title2 />
</div>
)
}
}
// 子组件
class Title extends React.Component {
render() {
return (
<div>
<h3>
Title Component  
<MyContext.Consumer>{
(val) => val + '111'}</MyContext.Consumer>
</h3>
</div>
)
}
}
// 子组件
class Title2 extends React.Component {
static contextType = MyContext;
render() {
return (
<div>
<h3>Title Component   {
this.context}</h3>
</div>
)
}
}
// 类组件
class Welcome extends React.PureComponent {
state = {
msg: 'Welcome 组件的数据'
}
render() {
return (
<div>
<h1>Welcome Component</h1>
<MyContext.Provider value={
this.state.msg}>
<Head />
</MyContext.Provider>
</div>
)
}
}
二、Hook 与函数组件
1、函数组件的基本使用
1-1 函数组件的定义
- 函数组件就是通过函数的方式返回 JSX 内容,定义的函数组件名称首字母大写
<!DOCTYPE html>
<html lang="en">

<head>
    <meta charset="UTF-8">
    <meta name="viewport" content="width=device-width, initial-scale=1.0">
    <title>Document</title>
    <script src="https://unpkg.com/react@18.2.0/umd/react.development.js"></script>
    <script src="https://unpkg.com/react-dom@18.2.0/umd/react-dom.development.js"></script>
    <script src="https://unpkg.com/babel-standalone@6.26.0/babel.min.js"></script>
    <script src="https://unpkg.com/prop-types@15.6.2/prop-types.js"></script>
</head>

<body>
    <div id="app"></div>
    <script type="text/babel">
        let app = document.querySelector('#app');
        // 创建Root根对象,由ReactDOM负责渲染
        let root = ReactDOM.createRoot(app);

        // 类组件
        // class Welcome extends React.Component {

        //     render() {

        //         return (
        //             <div>
        //                 <h1>Welcome Component</h1>
        //             </div>
        //         )
        //     }
        // }
        // 函数组件
        function Welcome() {

            return (
                <div>
                    <h1>Welcome Function</h1>
                </div>
            )
        }
        // 创建虚拟DOM
        let ele = (
            <React.Fragment>
                <Welcome />
            </React.Fragment>
        );

        // 渲染
        root.render(ele);
    </script>
</body>

</html>
- 也可以写成函数表达式的方式
 // 函数组件
let Welcome = function() {

	return (
		<div>
			<h1>Welcome Function</h1>
		</div>
	)
}
1-2 函数组件通信
- 函数组件通信:在组件中通过第一个形参 props 接收所有通信的对象
// 函数组件
function Welcome(props) {

	return (
		<div>
			<h1>Welcome Function, {
   props.count}</h1>
		</div>
	)
}
// 创建虚拟DOM
let ele = (
	<React.Fragment>
		<Welcome count={
   123} />
	</React.Fragment>
);
1-3 函数组件添加默认值
- 函数组件添加默认值:通过defaultProps 属性进行添加,当组件没有传递值时,就会使用默认值
// 函数组件
function Welcome(props) {

	return (
		<div>
			<h1>Welcome Function, {
   props.count}</h1>
		</div>
	)
}
Welcome.defaultProps = {

	count: 0
}
// 创建虚拟DOM
let ele = (
	<React.Fragment>
		<Welcome />
	</React.Fragment>
);
1-4 函数组件添加类型限定
- 添加类型限定需要引入第三方库 PropTypes:https://unpkg.com/prop-types@15.6.2/prop-types.js
// 函数组件
function Welcome(props) {

	return (
		<div>
			<h1>Welcome Function, {
   props.count}</h1>
		</div>
	)
}
Welcome.propTypes = {

	count: PropTypes.string
}
// 创建虚拟DOM
let ele = (
	<React.Fragment>
		<Welcome count={
   123} />
	</React.Fragment>
);
1-5 函数组件绑定事件
// 函数组件
function Welcome(props) {

	const handleClick = () => {

		console.log('click')
	}
	return (
  		<div>
        	<button onClick={
   handleClick}>按钮</button>
          	<h1>Welcome Function, {
   props.count}</h1>
     	</div>
	)
}
Welcome.defaultProps = {

	count: 0
}
Welcome.propTypes = {

	count: PropTypes.number
}
// 创建虚拟DOM
let ele = (
	<React.Fragment>
		<Welcome count={
   123} />
	</React.Fragment>
);
1-6 点标记组件的写法
- 点标记组件写法:<React.Fragment>、<Context.Provider>
- 通过创建一个对象,然后在对象里面创建组件,通过对象调用的方式调用组件(对象名称可以自定义)
// 点标记组件的写法
const Comp = {

	Welcome: function (props) {

		return (
			<div>Welcome Component</div>
		)
	},
	Hello: class extends React.Component {

		render() {

			return (
				<div>Hello Component</div>
    		)
   		}
	}
}
// 创建虚拟DOM
let ele = (
	<React.Fragment>
		<Comp.Welcome />
      	<Comp.Hello />
	</React.Fragment>
);
2、Hook 的概念及 useState 函数
Hook 的概念:
- Hook 是 React16.8 新增的特性。它可以在不编写 class 的情况下使用 state 以及其他的 React 特性
- Hook 是一些具有特殊含义的函数,也就是一些钩子函数
- 只能在函数组件中使用 Hook,只能在最顶层使用 Hook
useState 函数:
- 函数组件的 state 和类组件的 state 很类似,但也有区别
- useState() 来源于 React
const {
    useState } = React
- useState() 的原理是每修改一次数据,都会对整个函数组件重新执行一次。而类组件是修改一次数据,就执行一次 render() 方法
- useState() 初始默认值后,每次调用获取的都是修改后的最新值
- 使用 useState() 声明和修改响应式数据
// 引入 useState
const {
    useState } = React;
// 函数组件
function Welcome(props) {

	// 定义状态
	let [count, setCount] = useState(0);
	// 定义事件处理函数
	function handleClick() {

		setCount(count + 1);
	}
	return (
 		<div>
       		<button onClick={
   handleClick}>按钮</button>
           	<h1>Welcome Component, {
   count}</h1>
      	</div>
	)
}
// 创建虚拟DOM
let ele = (
	<React.Fragment>
  		<Welcome />
	</React.Fragment>
);
- 与类组件类似,useState() 也具有自动批处理的能力
- 如果要取消自动批处理,可以引入 ReactDOM 中的 flushSync() 方法
// 引入 useState
const {
    useState } = React;
const {
    flushSync } = ReactDOM;
// 函数组件
function Welcome(props) {

	// 定义状态
 	let [count, setCount] = useState(0);
    let [msg, setMsg] = useState('msg');
  	let [lang, setLang] = useState('React');
    // 定义事件处理函数
    function handleClick() {

    	flushSync(() => {

       		setCount(count + 1);
        })
       	setMsg('Message');
      	setLang('Vue');
   	}
    console.log('render')
   	return (
      	<div>
      		<button onClick={
   handleClick}>按钮</button>
           	<h1>Welcome Component, {
   count},{
   msg},{
   lang}</h1>
       	</div>
	)
}
// 创建虚拟DOM
let ele = (
	<React.Fragment>
		<Welcome />
	</React.Fragment>
);
- 由于有自动批处理能力,对同一个变量的修改后面的会覆盖前面的,如果想要让每次的都执行,可以将设置改为函数的方式
// 函数组件
function Welcome(props) {

	// 定义状态
	let [count, setCount] = useState(0);
   	// 定义事件处理函数
   	function handleClick() {

    	// setCount(count + 1)
       	// setCount(count + 2)
     	// setCount(count + 3)
     	setCount((count) => count + 1);
       	setCount((count) => count + 2);
        setCount((count) => count + 3);
	}
   	return (
   		<div>
          	<button onClick={
   handleClick}>按钮</button>
            <h1>Welcome Component, {
   count}</h1>
 		</div>
	)
}
- 对于引用类型的响应式数据,设置时数据不会自动合并只会覆盖,所以每次修改数据时都需要将整个对象写全
// 函数组件
function Welcome(props) {

	let [count, setCount] = useState(0);
	let [info, setInfo] = useState({
    name: '张三', age: 18 });
   	// 定义事件处理函数
   	function handleClick() {

 		setInfo({
    ...info, name: '李四' })
    }
    return (
   		<div>
           	<button onClick={
   handleClick}>按钮</button>
          	<h1>Welcome Component, {
   info.name},{
   info.age}</h1>
     	</div>
	)
}
- 惰性初始值:对于初始需要大量计算的情况,可以写一个回调函数,这样可以惰性加载函数,只让函数调用一次
// 函数组件
function Welcome(props) {

	// 初始化状态
   	const initCount = () => {

  		// 复杂的计算
      	console.log("复杂的计算")
       	return 2 * 2 * 2
   	}
	// 定义状态
	// 会执行多次
	// let [count, setCount] = useState(initCount());
	// 只执行一次
	let [count, setCount] = useState(() => initCount());
	// 定义事件处理函数
	function handleClick() {

		setCount(count + 1)
	}
	return (
		<div>
			<button onClick={
   handleClick}>按钮</button>
			<h1>Welcome Component, {
   count}</h1>
		</div>
	)
}
3、Hook 之 useEffect 函数
- useState() 对响应式数据的修改函数 setXXX() 是没有第二个参数的,如果要监听数据改变后的数据变化,在函数组件中是通过 useEffect() 钩子函数
- Effect Hook 可以在函数组件中执行其他操作,如:DOM操作、获取数据、记录日志等
- 在函数组件中,不存在生命周期钩子函数,所以就需要 Effect Hook 来代替类组件中的生命周期钩子函数
- useEffect() 和类组件的 componentDidMount() 和 componentDidUpdate() 类似,在浏览器渲染DOM后触发
// 引入 useState, useEffect
const {
    useState, useEffect } = React;
// 函数组件
function Welcome(props) {

	// 定义状态
   	let [count, setCount] = useState(0);
    // 定义事件处理函数
  	function handleClick() {

		setCount(count + 1)
  	}
    useEffect(() => {

      	console.log('componentDidMount or componentDidUpdate')
    })
   	return (
      	<div>
        	<button onClick={
   handleClick}>按钮</button>
          	<h1>Welcome Component, {
   count}</h1>
       	</div>
   	)
}
- 可以通过返回一个回调函数的方式在回调函数里面执行一些处理操作,例如:在数据修改前清除上一次的记录;组件销毁时做一些组件销毁的处理逻辑
// 函数组件
function Welcome(props) {

	// 定义状态
	let [count, setCount] = useState(0);
	// 定义事件处理函数
	function handleClick() {

  		setCount(count + 1)
        // root.unmount()
 	}
	useEffect(() => {

   		console.log('componentDidMount or componentDidUpdate')
       	return () => {

          	console.log('getSnapshotBeforeUpdate or componentWillUnmount')
      	}
	})
	return (
      	<div>
        	<button onClick={
   handleClick}>按钮</button>
           	<h1>Welcome Component, {
   count}</h1>
 		</div>
	)
}
- 可以在一个函数中使用多个 useEffect() 实现关注点的分离
// 函数组件
function Welcome(props) {

	// 定义状态
	let [count, setCount] = useState(0);
	useEffect(() => {

		console.log('count=>', count)
	})
   	let [msg, setMsg] = useState('hello')
    useEffect(() => {

     	console.log('msg=>', msg)
   	})
   	// 定义事件处理函数
    function handleClick() {

     	setCount(count + 1)
 	}
	return (
     	<div>
          	<button onClick={
   handleClick}>按钮</button>
           	<h1>Welcome Component, {
   count}, {
   msg}</h1>
      	</div>
   	)
}
- 通过跳过 Effect 进行性能优化:通过设置 useEffect(() => {}, []) 的第二个参数(第二个参数是一个依赖数组),只有设置依赖参数发生改变时,才会执行对应的 useEffect() 函数
- 第二个参数不设置或者设置为空数组,该响应式数据的 useEffect() 都会执行
- Effect 中使用了某个响应式数据,一定要进行数据的依赖处理,即不能设置空数组,设置空数组在脚手架环境会报错
// 函数组件
function Welcome(props) {

	// 定义状态
	let [count, setCount] = useState(0);
	useEffect(() => {

		console.log('count=>', count)
	}, [count])
   	let [msg, setMsg] = useState('hello')
    useEffect(() => {

     	console.log('msg=>', msg)
   	}, [msg])
   	// 定义事件处理函数
    function handleClick() {

     	setCount(count + 1)
 	}
	return (
     	<div>
          	<button onClick={
   handleClick}>按钮</button>
           	<h1>Welcome Component, {
   count}, {
   msg}</h1>
      	</div>
   	)
}
- 频繁的修改某个响应式数据时,可以通过回调函数进行改写
// 函数组件
function Welcome(props) {

	// 定义状态
	let [count, setCount] = useState(0);
	//	useEffect(() => {

  		//	setInterval(() => {

       		//	setCount(count + 1)
     	//	}, 1000)
	// }, [count])

	useEffect(() => {

     	setInterval(() => {

         	setCount((count) => count + 1)
     	}, 1000)
  	}, [])
   	// 定义事件处理函数
    function handleClick() {

     	setCount(count + 1)
 	}
	return (
     	<div>
          	<button onClick={
   handleClick}>按钮</button>
           	<h1>Welcome Component, {
   count}, {
   msg}</h1>
      	</div>
   	)
}
- useEffect() 是在渲染被绘制到屏幕之后执行的,是异步的;useLayoutEffect() 是在渲染之后、屏幕更新之前,是同步的
- 大部分情况下采用 useEffect(),性能更好。但当需要在 useEffect() 里面操作DOM改变页面样式时,就需要使用 useLayoutEffect(),否则可能会出现闪屏问题
const {
    useState, useEffect, useLayoutEffect } = React;
4、Hook 之 useRef 函数
- DOM 操作分为回调函数、useRef() 两种写法
// 引入 useRef
const {
    useRef } = React;
// 函数组件
function Welcome(props) {

	// 使用 useRef 的方式
  	let myRef = useRef();
    // 函数的方式获取DOM
   	function elementFunc(ele) {

     	console.log(ele);
       	ele.style.color = 'red';
  	}
    // 定义事件处理函数
   	function handleClick() {

   		console.log(myRef.current);
       	myRef.current.style.fontSize = '20px';
       	myRef.current.style.color = 'blue';
  	}
    return (
      	<div>
        	<button onClick={
   handleClick}>按钮</button>
           	<h1 ref={
   elementFunc}>Welcome Component</h1>
           	<div ref={
   myRef}>useRef Content</div>
      	</div>
   	)
}
- **函数组件的转发:React.forwardRef():**在类组件中如果 ref 直接绑定组件,将会获得子组件的对象,然而在函数组件中没有类对象,所以会报错。如果想要在父组件中获取子组件的元素,就需要使用 React.forwardRef(props, ref) 进行转发
- React.forwardRef(props, ref) 的第一个参数是 props,第二个参数是绑定的 ref
// 引入 useRef
const {
    useRef } = React;
// 函数组件
const Child = React.forwardRef(function (props, ref) {

	return (
   		<div ref={
   ref}>
       		<h2>Child Component</h2>
      		<p>Child Component Content</p>
       	</div>
	)
})
function Welcome(props) {

 	// 使用 useRef 的方式
   	let myRef = useRef();
  	// 定义事件处理函数
  	function handleClick() {

       	console.log(myRef.current)
       	myRef.current.style.color = 'green'
	}
	return (
		<div>
         	<button onClick={
   handleClick}>按钮</button>
          	<Child ref={
   myRef} />
       	</div>
	)
}
- useRef() 对普通值进行记忆,对于普通的值,只要重新渲染值就会复原,使用 useRef() 可以让普通值在渲染时不复原
// 引入 useRef
const {
    useRef } = React;
// 函数组件
function Welcome(props) {

	// 使用 useRef 进行数据的记忆
 	let count = useRef(0);
    // 定义事件处理函数
  	function handleClick() {

      	count.current++;
      	console.log(count.current);
 	}
  	return (
     	<div>
        	<button onClick={
   handleClick}>按钮</button>
           	<h1>Welcome Component</h1>
 		</div>
	)
}
5、Hook 之 useContext 函数
- useContext() 和类组件的跨组件通信Context类似,都需要使用到 React.createContext() 创建 MyContext,然后使用 <MyContext.Provider value={} > 方式传值。不同的在于类组件使用 <MyContext.Consumer>来接收值,而函数组件通过 useContext() 来接收值
- 通过 React.createContext() 创建实例对象,然后调用内置组件的方式实现跨层级通信
const MyContext = React.createContext()
- 首先用内置组件包裹子组件,在内置组件中通过 value 传递信息
<MyContext.Provider value={
   要传递的信息}>子组件</MyContext.Provider>
- 然后在需要使用传递信息的子组件通过**useContext()**接收
let value = React.useContext(MyContext)
- React.createContext(“默认值”) 可以在参数里设置默认值,当不使用 <MyCOntext.Provider value={}> 包裹子组件进行传值时时,useContext(MyContext) 会获取到默认值进行使用
// 引入 useContext
let {
    useContext } = React;
// 创建 Context
let MyContext = React.createContext();
// 函数组件
function Welcome(props) {

	return (
		<div>
     		<h1>Welcome Component</h1>
         	<MyContext.Provider >
            	<Header />
         	</MyContext.Provider>
    	</div>
  	)
}
function Header(props) {

	return (
		<div>
   			<h2>Header Component</h2>
          	<Title />
     	</div>
	)
}
function Title(props) {

	// 获取Context的值
	let value = useContext(MyContext);
  	return (
 		<div>
          	<h3>Header Component, {
   value}</h3>
    	</div>
	)
}
6、函数组件性能优化之 React.memo
- **函数组件 State Hook 修改的值相同时,不会重新渲染。**而类组件修改的值相同也会触发重新渲染
- React.memo 类似于纯组件 PureComponent,可提高组件的性能
- 如果组件的数据改变与子组件无关,可以使用 React.memo() 包裹子组件减少子组件的渲染
// 引入 useState
let {
    useState } = React;
// 函数组件
function Welcome(props) {

	// 定义状态
	let [count, setCount] = useState(0);
   	// 定义事件处理函数
	function handleClick() {

     	setCount(count + 1);
   	}
    console.log(123)
 	return (
    	<div>
         	<button onClick={
   handleClick}>按钮</button>
            <h1>Welcome Component,{
   Math.random()}</h1>
           	<Header />
     	</div>
	)
}
let Header = React.memo(function () {

	return (
     	<div>
     		<h1>Header Component,{
   Math.random()}</h1>
  		</div>
	)
})
7、Hook 之 useCallback 函数与 useMemo 函数
- useCallback() 返回一个可记忆的函数
- useMemo() 返回一个可记忆的值,useCallback() 只是 useMemo() 的一种特殊形式
- 当响应式数据发生改变的时候,函数组件会重新执行,与子组件绑定的函数也会重新生成(生成一个函数名称相同,内存地址不同的函数),这就会导致子组件也会重新渲染
- 可以使用 useCallback() 包裹子组件绑定的函数,通过设置第二个参数依赖数组来决定是否返回一个新的函数
当 useCallback(func, [])第二个参数设置为空数组时,就不会返回一个新的函数
// 引入 useState,useCallback
let {
    useState, useCallback } = React;
// 函数组件
function Welcome(props) {

	// 定义状态
	let [count, setCount] = useState(0);
	// 定义事件处理函数
  	function handleClick() {

       	setCount(count + 1);
 	}
   	const func = useCallback(function () {
   }, [])
    return (
 		<div>
          	<button onClick={
   handleClick}>按钮</button>
          	<h1>Welcome Component,{
   Math.random()}</h1>
          	<Header onClick={
   func} />
    	</div>
	)
}
let Header = React.memo(function () {

	return (
       	<div>
       		<h1>Header Component,{
   Math.random()}</h1>
		</div>
 	)
})
- 当子组件绑定的不是函数而是数值时,可以使用 useMemo() 包裹子组件绑定的数值,通过设置第二个参数依赖数组来决定是否返回一个新的数值
// 引入 useState, useMemo
let {
    useState, useMemo } = React;
// 函数组件
function Welcome(props) {

	// 定义状态
	let [count, setCount] = useState(0);
	// let obj = [1, 2, 3]
	let obj = useMemo(() => [1, 2, 3], [])
	// 定义事件处理函数
  	function handleClick() {

       	setCount(count + 1);
 	}
    return (
 		<div>
          	<button onClick={
   handleClick}>按钮</button>
          	<h1>Welcome Component,{
   Math.random()}</h1>
          	<Header info={
   obj} />
    	</div>
	)
}
let Header = React.memo(function (props) {

	return (
       	<div>
       		<h1>Header Component,【{
   props.info}】,{
   Math.random()}</h1>
		</div>
 	)
})
- 也可以使用 useMemo() 进行记忆函数的改写
let func = useCallback(function() {
    }, [])
// 用 useMemo 改写成
let func = useMemo(() => function () {
    }, []);
8、Hook 之 useReducer 函数
- useReducer() 是 useState() 的替代方案。它接收一个形如 (state, action) => newState 的 reducer,并返回当前的 state 以及与其配套的 dispatch() 方法
- 在某些场景下,useReducer() 比 useState() 更适用。例如:state 逻辑包含多个子值,或者下一个 state 依赖于之前的 state 等
// 引入 useReducer
let {
    useReducer } = React;
let loginState = {

	isLogin: true,
  	isLogout: false
}
// 创建reducer
let logineRducer = (state, action) => {

	switch (action.type) {

      	case 'login':
        	return {
    ...state, isLogin: true, isLogout: false }
     	case 'logout':
        	return {
    ...state, isLogin: false, isLogout: true }
     	default:
           	return new Error('未定义的action')
 	}
}
function Welcome(props) {

	// 定义状态
 	const [state, loginDispatch] = useReducer(logineRducer, loginState);
	// 登录
  	function handleLogin() {

    	loginDispatch({
    type: 'login' });
   	}
   	// 退出
	function handleLogout() {

     	loginDispatch({
    type: 'logout' });
 	}
  	return (
    	<div>
        	{
   state.isLogin ? <button onClick={
   handleLogout}>退出</button> : <button onClick={
   handleLogin}>登录</button>}
        	<h1>Welcome Component,{
   Math.random()}</h1>
  		</div>
	)
}
// 函数组件
// function Welcome(props) {

//     // 定义状态
//     let [isLogin, setLogin] = useState(true);
//     let [isLogout, setLogout] = useState(false);
//     // 登录
//     function handleLogin() {

//         setLogin(true);
//         setLogout(false);
//     }
//     // 退出
//     function handleLogout() {

//         setLogin(false);
//         setLogout(true);
//     }
//     return (
//         <div>
//             {isLogin ? <button onClick={handleLogout}>退出</button> : <button onClick={handleLogin}>登录</button>}
//             <h1>Welcome Component,{Math.random()}</h1>
//         </div>
//     )
// }
9、React18 并发模式与 startTransition
- React18 之前,渲染是一个单一的、不间断的、同步的事务,一旦渲染开始,就不能被中断
- React18 引入并发模式,它允许将标记更新作为一个 transitions,这些标记向 React 表明它们可以被中断执行。这样可以把紧急的任务先更新,不紧急的任务后更新
const {
    startTransition } = React

// 默认情况下执行 func(),下列的任务按顺序依次执行
function func() {

	task1()
	task2()
	task3()
	...
}
// 使用 startTransition() 后,没有使用 startTransition() 包裹的任务按顺序先执行,然后才执行 startTransition() 内的任务, task2() 任务会被延迟执行
function func() {

	task1()
	startTransition(() => {

		task2()
	})
	task3()
	...
}
10、React18 之 useTransition 与 useDeferredValue
- useTransition() 返回一个状态值表示过渡任务的等待状态,以及启动该过渡任务的函数
const {
    useTransition } = React

// 使用
const [pending, startTransition] = useTransition
pending 有两种状态,分别为 false 和 true
startTransition() 的用法和上面的一致
- useDeferredValue() 接收一个值,并返回该值的新副本,该副本将推迟到更紧急地更新之后。useDeferredValue() 的作用和防抖类似,只不过是延迟返回一个新的值
const {
    useState, useDeferredValue } = React

// 使用
const [count, setCount] = useState(0)
const newCount = useDeferredValue(count) // newCount 与 count 值相等,存放地址不同
11、函数组件功能复用之自定义 Hook
- 在类组件中进行功能的复用,使用的是 Render Props 和 HOC 高阶函数
- 在函数组件中进行功能的复用:自定义Hook
- 自定义 Hook 以 use 开头。Hook 只能在函数组件内使用,且是放在在函数组件的顶部。
// 引入 useState,useEffect
const {
    useState, useEffect } = React;
	// 自定义函数组件
	let useMouseXY = () => {

  		let [x, setX] = useState(0);
        let [y, setY] = useState(0);
       	let onMouseMove = (e) => {

        	setX(e.clientX);
           	setY(e.clientY);
      	}
    	useEffect(() => {

        	window.addEventListener('mousemove', onMouseMove);
         	return () => {

          		window.removeEventListener('mousemove', onMouseMove);
           	}
     	}, [])
	return {
    x, y }
}
// 函数组件
function Welcome(props) {

	const {
    x, y } = useMouseXY();
	return (
     	<div>
      		<h1>Welcome Component,{
   x},{
   y}</h1>
      	</div>
	)
}
三、扩展与脚手架使用
1、脚手架的使用
1-1 脚手架的使用
- 官网脚手架:Create React App (是基于 webpack 工具的)
- 要使用脚手架,要求 node >= 14.0.0 和 npm >= 5.6
1-2 安装项目
- 安装命令
// myApp 是想要创建的项目名称
npx create-react-app myApp
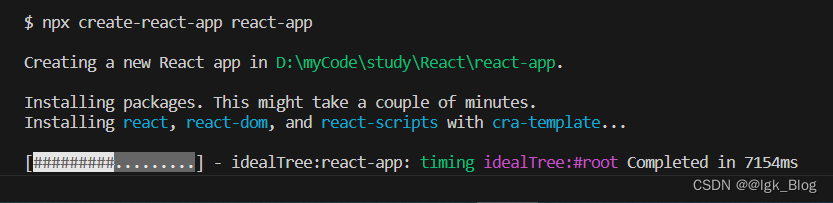
- 安装成功后如下图,使用 cd react-app 进入到项目
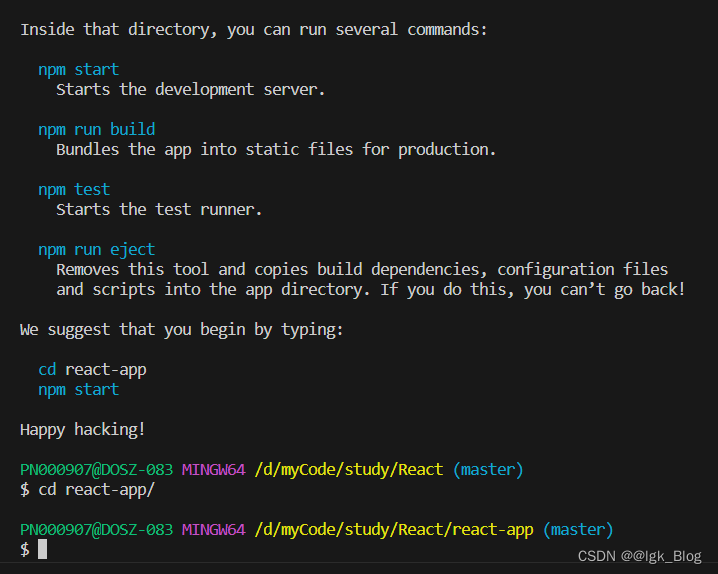
- 然后启动项目,React 项目的默认端口是 3000
npm start
注意:React 项目的启动不同于 Vue 需要使用 run(npm run dev),React 直接 npm start 即可
1-3 项目结构介绍
- node_modules:项目使用到的依赖存放目录
- public:最终打包合并的目录,只不过是一些不需要转义的代码与资源
- src:开发代码存放的目录,也是最终编译的目录
- index.js:主入口模块
- index.css:全局样式
- App.js:根组件
- App.css:根组件样式
- App.test.js:测试文件
- reportWebVitals.js:这个用于监测网页性能与用户体验标准的
- setupTests.js:
项目中的组件文件最好将后缀 .js 都改为 .jsx
reportWebVitals 里包含三个关键指标(LCP、FID、CLS)和两个辅助指标(FCP、TTFB)。其中:
(1)LCP (Largest Contentful Paint):最大内容渲染时间。是指从用户请求网址到窗口中渲染最大可见内容所需要的时间(一般为视频、图片、大文本)
(2)FID (First Input Delay):首次输入延迟。是指用户首次与网页互动(例如点击行为)到浏览器响应此次互动的时间
(3)CLS (Cumulative Layout Shift) :累计布局偏移,得分范围0-1,指的是网页布局在加载期间的偏移量,0表示没有偏移,1表示最大偏移。比如加载一张图片,图片显示位置没有进行占位,就会导致图片显示时页面布局发生改变
(4)FCP(First Contentful Paint):首次内容绘制
(5)TTFB (Time to First Byte) :第一个字节到达的时间点
1-4 VSCode 插件安装
- VSCode 插件:ES7 + React/Redux/React-Native snippets,该插件可以提供一些快速的提示,或者通过命令快速生成模板

rcc:快速生成类组件
rfc:快速生成函数组件
- chrome 插件:React Developer Tools,可以方便开发时调试

1-5 脚手架环境下开发的应用
- 可以使用 <></> 代替 <React.Fragment></React.Fragment>
- React17 以上的版本,子组件中可以不用写 import React from ‘react’
- 在 index.js 中,默认会使用 <React.StrictMode><App /></React.StrictMode> 严格模式,与 Fragment 一样,StrictMode 不会渲染任何可见的元素,作用是为其后代元素提供额外的检查与警告
- 可以使用快捷键(ctrl + /)快速注释内容
- 脚手架中内置了 ESLint,可以在 package.json 中进行配置
2、样式处理与 Sass 支持
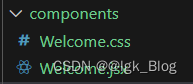
- 在创建子组件时,一般会在子组件相同目录下创建同名的 CSS 文件,然后在子组件中引入

- React中的样式是全局样式,在子组件中编写的样式会影响到全局
- 一般情况下可以通过加命名空间的方式来区分
/* Welcome.css */
.welcome .box1 {

    font-size: 30px;
    color: red;
}

.welcome .box2 {

    font-size: 30px;
    color: green;
}
// Welcome.jsx
import './Welcome.css'

export default function Welcome() {

    return (
        <div className='welcome'>
            <div className='box1'>Welcome</div>
            <div className='box2'>React</div>
        </div>
    )
}
- 在工程化环境中,可以引入 Sass 或 Less,使用层级嵌套
引入 Sass 进行使用:
- 安装
npm i sass
- 使用:创建 .scss 样式文件,然后在组件中引入
/* Welcome.scss */
.welcome {

    .box1 {

        font-size: 30px;
        color: red;
    }

    .box2 {

        font-size: 30px;
        color: green;
    }
}
// Welcome.jsx
import './Welcome.scss'

export default function Welcome() {

    return (
        <div className='welcome'>
            <div className='box1'>Welcome</div>
            <div className='box2'>React</div>
        </div>
    )
}
模块化 CSS:
- 模块化 CSS 命名规范:Xxx.module.css
- 模块化 CSS 很好的解决了样式全局化的问题
- 模块化 CSS 也是支持 Sass 的
/* Welcome.module.css */
.box1 {

    font-size: 30px;
    color: red;
}

.box2 {

    font-size: 30px;
    color: green;
}
// Welcome.jsx
import WelcomeStyle from './Welcome.module.css'

export default function Welcome() {

    return (
        <div>
            <div className={
   WelcomeStyle.box1}>Welcome</div>
            <div className={
   WelcomeStyle.box2}>React</div>
        </div>
    )
}
CSS-in-JS:
- 这种方式可以将 CSS 样式编写在 .jsx 文件内
- 比较主流的第三方库是 styled-components
- 安装
npm i styled-components
- 使用
// Welcome.jsx
import styled from 'styled-components'

const WelcomeStyled = styled.div`
    font-size: 40px;
    color: skyblue;
    font-weight: bold;
    &:hover {
        color: red;
    }
`
export default function Welcome() {

    return (
        <WelcomeStyled>
            <div className='welcome'>
                <div className='box1'>Welcome</div>
                <div className='box2'>React</div>
            </div>
        </WelcomeStyled>
    )
}
操作样式模块:
- 可以以对象的形式操作样式。通过控制样式的值是否为true来控制是否使用样式
- 安装
npm i classnames
- 使用
/* Welcome.css */
.welcome .bgColor {

    font-size: 30px;
    background-color: red;
}
.welcome .fontColor {

    color: green;
}
// Welcome.jsx
import classnames from 'classnames'
import './Welcome.css'

export default function Welcome() {

    const myClass = classnames({

        'bgColor': true,
        'fontColor': true
    })
    return (
        <div className='welcome'>
            <div className={
   myClass}>Welcome to React</div>
        </div>
    )
}
3、AntDesign 框架的使用
- Ant Design UI 组件库:https://ant-design.antgroup.com/components/overview-cn/
- Ant Design Mobile UI 组件库:https://mobile.ant.design/
- 下载安装
npm i antd
- 样式引入: 该引入样式的语句放在组件样式文件的头部
在最新的 antd@5.10.2 版本中已经不需要引入样式了,只有在之前的版本需要引入样式
@import '~antd/dist/antd.css';
- 安装图标组件: 图标需要单独下载引入
npm install @ant-design/icons --save
4、react-transition-group 模块实现动画功能
5、createPortal 传送门与逻辑组件的实现
6、React.lazy 与 React.Suspense 与错误边界
四、ReactRouter 路由与 Redux 状态管理
1、ReactRouter
- ReactRouter 地址:https://reactrouter.com/en/main
- ReactRouter 安装
npm install react-router-dom
- ReactRouter 有两种模式:history 模式:createBrowserRouter 和 hash 模式:createHashRouter
- 配置路由表:[{ path, element, children }]
- 配置路由组件写法:<Route path=‘’ element={} />
- 路由生效组件: <RouterProvider router={router} />
- 路由区域显示组件 <Outlet />,相当于 VueRouter 的 <router-view />
1-1 ReactRouter 基础路由搭建
- 创建路由页面:例如在 src/view/ 目录下创建两个页面 Home 和 About
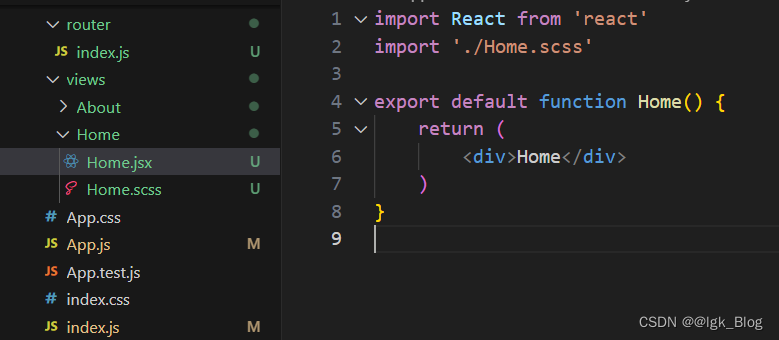
import React from 'react'
import './Home.scss'

export default function Home() {

    return (
        <div>Home</div>
    )
}
- 改造 App.js 文件
- <Outlet /> 组件是路由区域容器
import './App.css';
import {
    Outlet } from 'react-router-dom';

function App() {

  return (
    <div className="App">
      <h1>Hello React</h1>
      <Outlet />
    </div>
  );
}

export default App;
- 创建路由配置文件:在 src 目录下创建 router/index.js 文件
- 推荐使用【创建路由表】的写法,不建议【路由表组件】的写法
- 使用 History 路由还是 Hash 路由只需要使用对应的函数即可
// router/index.js
import {
    createBrowserRouter, createHashRouter, createRoutesFromElements, Route } from 'react-router-dom'
import App from './../App'
import Home from './../views/Home/Home'
import About from './../views/About/About'

// 创建路由表
const routes = [
    {

        path: '/',
        element: <App />,
        children: [{

            path: '',
            element: <Home />
        },
        {

            path: 'about',
            element: <About />
        }]
    }
]

// 路由表的组件写法
// const routes = createRoutesFromElements(
//     <Route path="/" element={<App />}>
//         <Route path='' element={<Home />} />
//         <Route path="about" element={<About />} />
//     </Route>
// )

// 创建路由对象
// history 路由
// const router = createBrowserRouter(routes)
// hash 路由
const router = createHashRouter(routes)

export default router
- 在 index.js 文件使用 router
import React from 'react';
import ReactDOM from 'react-dom/client';
import './index.css';
// import App from './App';
import reportWebVitals from './reportWebVitals';
import {
    RouterProvider } from 'react-router-dom';
import router from './router';

const root = ReactDOM.createRoot(document.getElementById('root'));
root.render(
  <React.StrictMode>
    {
   /* <App /> */}
    <RouterProvider router={
   router}> </RouterProvider>
  </React.StrictMode>
);

// If you want to start measuring performance in your app, pass a function
// to log results (for example: reportWebVitals(console.log))
// or send to an analytics endpoint. Learn more: https://bit.ly/CRA-vitals
reportWebVitals();
1-2 路由跳转之声明式路由
- 声明式路由:<Link to=‘’ > </Link>
import './App.css';
import {
Outlet, Link } from 'react-router-dom';
function App() {
return (
<div className="App">
<h1>Hello React</h1>
<Link to="/">首页</Link> |
<Link to="/about">关于</Link>
<Outlet />
</div>
);
}
export default App;
1-3 路由跳转之动态路由
- 动态路由:path: “test/:id” 与 useParams 函数
// router/index.js
import {
    createBrowserRouter } from 'react-router-dom'
import Bar from '../views/Bar/Bar'
import Footer from '../views/Footer/Footer'
import App from './../App'
import About from './../views/About/About'
import Home from './../views/Home/Home'

// 创建路由表
const routes = [
    {

        path: '/',
        element: <App />,
        children: [{

            path: '',
            element: <Home />
        },
        {

            path: 'about',
            element: <About />,
            children: [
                {

                    path: 'foo/:id',
                    element: <Footer />
                },
                {

                    path: 'bar',
                    element: <Footer />
                },
            ]
        }]
    }
]

// 路由表的组件写法
// const routes = createRoutesFromElements(
//     <Route path="/" element={<App />}>
//         <Route index element={<Home />} />
//         <Route path="about" element={<About />} />
//     </Route>
// )

// 创建路由对象
// history 路由
const router = createBrowserRouter(routes)
// hash 路由
// const router = createHashRouter(routes)

export default router
- Link 是不带样式的
// About/About.jsx
import React from 'react'
import {
    Link, Outlet } from 'react-router-dom'
import './About.scss'

export default function About() {

    return (
        <div>
            <h2>About</h2>
            <Link to="/about/foo/123">Footer 123</Link> |
            <Link to="/about/foo/456">Footer 456</Link>
            <Outlet />
        </div>
    )
}
- 如果想对当前点击的链接添加样式,可以使用 NavLink 进行样式的设置
// About/About.jsx
import React from 'react'
import {
    NavLink, Outlet } from 'react-router-dom'
import './About.scss'

export default function About() {

    return (
        <div>
            <h2>About</h2>
            {
   /* 方式1: 默认有一个 active 类样式名称 */}
            {
   /* <NavLink to="/about/foo/123" >Footer 123</NavLink> |
            <NavLink to="/about/foo/456">Footer 456</NavLink> */}
            {
   /* 方式2: 使用回调的方式解构出 isActive 属性,可以判断设置自定义的类样式名称 */}
            <NavLink to="/about/foo/123" className={
   ({
    isActive}) => isActive ? 'defineActive' : ''}>Footer 123</NavLink> |
            <NavLink to="/about/foo/456" className={
   ({
    isActive}) => isActive ? 'defineActive' : ''}>Footer 456</NavLink>
            <Outlet />
        </div>
    )
}

// 方式1
// .active {

//     background-color: green;
//     color: white;
// }

// 方式2
.defineActive {

    background-color: red;
    color: white;
}
// Footer/Footer.jsx
import React from 'react'
import {
    useParams } from 'react-router-dom'
import './Footer.scss'

export default function Footer() {

    const params = useParams()
    return (
        <div>Footer, {
    params.id }</div>
    )
}
1-4 路由跳转之编程式路由
- 编程式路由:useNavigate 函数
import React from 'react'
import {
    Outlet, useNavigate } from 'react-router-dom'
import './About.scss'

export default function About() {

    const navigate = useNavigate()

    const handleClick123 = () => {

        navigate('/about/foo/123')
    }
    const handleClick456 = () => {

        navigate('/about/foo/456')
    }
    const handleClickbar = () => {

        navigate('/about/bar')
    }
    return (
        <div>
            <h2>About</h2>
            {
   /* <NavLink to="/about/foo/123" >Footer 123</NavLink> |
            <NavLink to="/about/foo/456">Footer 456</NavLink> */}
            {
   /* <NavLink to="/about/foo/123" className={({isActive}) => isActive ? 'defineActive' : ''}>Footer 123</NavLink> |
            <NavLink to="/about/foo/456" className={({isActive}) => isActive ? 'defineActive' : ''}>Footer 456</NavLink> */}
            <button onClick={
   handleClick123}>foo 123</button> | <button onClick={
   handleClick456}>foo 456</button> | <button onClick={
   handleClickbar}>foo bar</button>
            <Outlet />
        </div>
    )
}
1-5 useSearchParams() 与 useLocation()
- useLocation 获取 URL 信息
- 可以在第二个参数中添加 state
//
const handleClickbar = () => {

    navigate('/about/bar', {
    state: {
    currPath: 'bar' } })
}
return (
    <div>
        <h2>About</h2>
        {
   /* 声明式路由传 state */}
        {
   /* <NavLink to="/about/foo/123" state={id: 123}>Footer 123</NavLink> |
        <NavLink to="/about/foo/456">Footer 456</NavLink> */}
        <button onClick={
   handleClick123}>foo 123</button> | <button onClick={
   handleClick456}>foo 456</button> | <button onClick={
   handleClickbar}>foo bar</button>
        <Outlet />
    </div>
)
// Bar/Bar.jsx
import React from 'react'
import {
    useLocation } from 'react-router-dom'
import './Bar.scss'

export default function Bar() {

    const location = useLocation()
    console.log(location)
    return (
        <div>Bar</div>
    )
}

// location
//{

    //hash: '',
    //key: '一个新的key',
    //pathname: '/about/bar',
    //search: '?username=zhangsan',
    //state: { currPath: 'bar' }
//}
- useSearchParams 用于获取设置的参数,数据是一个 Map 类型
- useSearchParams() 类似 useState(),可以解构出一个数组,第一项是对象,第二项是函数
import React from 'react'
import {
    useSearchParams } from 'react-router-dom'
import './Bar.scss'

export default function Bar() {

    // const location = useLocation()
    // console.log(location)
    const [searchParams, setSearchParams] = useSearchParams()
    console.log(searchParams.get('age'))
    const handleBarClick = () => {

        // 设置参数
        setSearchParams({

            name: '张三',
            age: 18
        })
    }
    return (
        <div onClick={
   handleBarClick}>Bar</div>
    )
}
1-6 默认路由展示与重定向路由
- 默认路由: { index: true, element: <div>默认内容</div> }
- 默认路由主要是通过 index 属性进行设置
- 如果想要默认展示的是某个组件,直接将 element 的值设置为重定向组件 <Navigate to=“指定组件的路由” />
- 404 处理:在跟路由中使用 errorElement 属性
- 如果只想在某个路由下显示 404 页面,可以在 path 属性使用通配符 *
import {
    Navigate, createBrowserRouter } from 'react-router-dom'
import Bar from '../views/Bar/Bar'
import Footer from '../views/Footer/Footer'
import App from './../App'
import About from './../views/About/About'
import Home from './../views/Home/Home'

// 创建路由表
const routes = [
    {

        path: '/',
        element: <App />,
        errorElement: <div>404</div>,
        children: [{

            path: '',
            element: <Home />
        },
        {

            path: 'about',
            element: <About />,
            children: [
                // {

                //     index: true,
                //     element: <div>默认展示的内容</div>
                // },
                {

                    index: true,
                    element: <Navigate to="/about/foo/123"></Navigate>
                },
                {

                    path: 'foo/:id',
                    element: <Footer />
                },
                {

                    path: 'bar',
                    element: <Bar />
                },
                {

                    path: '*',
                    element: <div>Not Found</div>
                }
            ]
        }]
    }
]

// 创建路由对象
// history 路由
const router = createBrowserRouter(routes)

export default router
1-7 路由的 loader 函数与 redirect 方法
- loader 函数是在路由前触发,类似 VueRouter 中的 beforeEach,配合 redirect 做权限拦截
- 配合使用 useLoaderData() 获取 loader 函数返回的数据
import {
    Navigate, createBrowserRouter, redirect } from 'react-router-dom'
import Bar from '../views/Bar/Bar'
import Footer from '../views/Footer/Footer'
import App from './../App'
import About from './../views/About/About'
import Home from './../views/Home/Home'

// 创建路由表
const routes = [
    {

        path: '/',
        element: <App />,
        errorElement: <div>404</div>,
        children: [{

            path: '',
            element: <Home />
        },
        {

            path: 'about',
            element: <About />,
            children: [
                // {

                //     index: true,
                //     element: <div>默认展示的内容</div>
                // },
                {

                    index: true,
                    element: <Navigate to="/about/foo/123"></Navigate>
                },
                {

                    path: 'foo/:id',
                    element: <Footer />
                },
                {

                    path: '*',
                    element: <div>Not Found</div>
                },
                {

                    path: 'bar',
                    element: <Bar />,
                    loader: () => {

                        // 逻辑处理
                        // return "传递给 useLoaderData() 接收的数据"

                        // 配合使用 redirect 进行重定向
                        return redirect('/login')
                    }
                }
            ]
        }]
    }
]

// 创建路由对象
// history 路由
const router = createBrowserRouter(routes)

export default router
- 使用 useLoaderData 接收 loader 返回的数据
// Bar.jsx
import React from 'react'
import {
    useLoaderData } from 'react-router-dom'
import './Bar.scss'

export default function Bar() {

    const loaderData = useLoaderData()
    console.log("loaderData=>",loaderData)

    return (
        <div >Bar</div>
    )
}
1-8 自定义全局守卫与自定义元信息
- 自定义全局组件 BeforeEach:包裹跟组件
- 自定义元信息:meta
- 首先,导出路由表 routes,然后为每个路由添加元信息 meta
import {
    Navigate, createBrowserRouter } from 'react-router-dom'
import Bar from '../views/Bar/Bar'
import Footer from '../views/Footer/Footer'
import App from './../App'
import About from './../views/About/About'
import Home from './../views/Home/Home'
import BeforeEach from './BeforeEach'

// 创建路由表
export const routes = [
    {

        path: '/',
        element: <BeforeEach> <App /> </BeforeEach>,
        errorElement: <div>404</div>,
        children: [{

            path: '',
            element: <Home />,
            meta: {

                title: '首页',
                auth: false
            },
        },
        {

            path: 'about',
            element: <About />,
            meta: {

                title: '关于',
                auth: false
            },
            children: [
                {

                    index: true,
                    element: <Navigate to="/about/foo/123"></Navigate>,
                    meta: {

                        title: '关于',
                        auth: false
                    },
                },
                {

                    path: 'foo/:id',
                    element: <Footer />,
                    meta: {

                        title: 'foo',
                        auth: false
                    },
                },
                {

                    path: 'bar',
                    element: <Bar />,
                    meta: {

                        title: 'bar',
                        auth: true
                    }
                },
                {

                    path: '*',
                    element: <div>Not Found</div>
                }
            ]
        }]
    }
]

// 创建路由对象
// history 路由
const router = createBrowserRouter(routes)

export default router
- 其次,创建一个 BeforeEach 文件实现路由拦截的功能
- 在路由表中需要将 BeforeEach 组件包裹根组件 <App />
- matchRoutes 用于匹配当前路由
// BeforeEach.jsx
import React from "react";
import {
    Navigate, matchRoutes, useLocation } from "react-router-dom";
import {
    routes } from ".";

export default function BeforeEach(props) {

    const location = useLocation();
    const matchs = matchRoutes(routes, location)
    const meta = matchs[matchs.length - 1].route.meta
    if(meta['auth']) {

        return <Navigate to="/login" />
    } else {

        return (
            <div>{
    props.children }</div>
        )
    }
}
2、Redux
- 官网地址:https://redux.js.org/introduction/getting-started
- Redux 状态管理的基本流程
通过 dispatch 触发 Reducer 的方法修改状态
通过 getState 获取状态值
通过 subscribe 对状态进行监听
通过 useState 对状态修改并渲染
2-1 Redux 状态管理
- 安装 Redux Core
npm install redux
- 旧版 Redux 使用 createStore 管理状态
- 使用 dispatch 传递的参数会到 action
// store/index.js
import {
    createStore } from 'redux';

const countReducer = (state = {
     count: 0 }, action) => {

    // 返回新的state
    switch (action.type) {

        case 'inc':
            return {
    count: state.count + action.payload }
        case 'dec':
            return {
    count: state.count - action.payload }
        default:
            return state
    }
}

const store = createStore(countReducer)

export default store
- 使用 subscribe() 监测状态的变化
- 需要使用 useState() 修改状态
import React from 'react'
import store from '../../store'
import './Footer.scss'

export default function Footer() {

    const [count, setCount] = React.useState(store.getState().count)
    const handleClick = () => {

        store.dispatch({

            type: 'inc',
            payload: 5
        })
    }
    store.subscribe(() => {

        setCount(store.getState().count)
    })
    return (
        <div>
            <button onClick={
   handleClick}>修改值</button>
            <div>Footer, {
    count }</div>
        </div>
    )
}
2-2 ReactRedux 简化对 Redux 的使用
- 安装 ReactRedux
npm install react-redux
- <Provider store={store} >
// index.js
import React from 'react';
import ReactDOM from 'react-dom/client';
// import App from './App';
import {
    Provider } from 'react-redux';
import {
    RouterProvider } from 'react-router-dom';
import './index.css';
import reportWebVitals from './reportWebVitals';
import router from './router';
import store from './store';

const root = ReactDOM.createRoot(document.getElementById('root'));
root.render(
  // React.StrictMode 会导致子组件执行两次
  <React.StrictMode>
    {
   /* <App /> */}
    <Provider store={
   store}>
      <RouterProvider router={
   router}> </RouterProvider>
    </Provider>
  </React.StrictMode>
);

// If you want to start measuring performance in your app, pass a function
// to log results (for example: reportWebVitals(console.log))
// or send to an analytics endpoint. Learn more: https://bit.ly/CRA-vitals
reportWebVitals();
- useSelector
- useDispatch
import React from 'react'
// import store from '../../store'
import {
    useDispatch, useSelector } from 'react-redux'
import './Footer.scss'

export default function Footer() {

    // const [count, setCount] = React.useState(store.getState().count)
    const count = useSelector(state => state.count)
    const dispatch = useDispatch()
    const handleClick = () => {

        // store.dispatch({

        //     type: 'inc'
        // })
        dispatch({

            type: 'inc'
        })
    }
    // store.subscribe(() => {

    //     setCount(store.getState().count)
    // })
    return (
        <div>
            <button onClick={
   handleClick}>修改值</button>
            <div>Footer, {
    count }</div>
        </div>
    )
}
2-3 处理多个 Reducer 函数及 Redux 模块化
- 使用 combineReducers 方法处理多个 reducer 函数
- 模块化时注意添加命名空间
// store/index.js
import {
    combineReducers, createStore } from 'redux';
import {
    countReducer } from './modules/counter';
import {
    messageReducer } from './modules/message';

const store = createStore(combineReducers({

    countNameSpace: countReducer,
    messageNameSpace: messageReducer
}))

export default store
// store/modules/counter
export const countReducer = (state = {
     count: 0 }, action) => {

    // 返回新的state
    switch (action.type) {

        case 'inc':
            return {
    count: state.count + action.payload }
        default:
            return state
    }
}

// store/modules/message
export const messageReducer = (state = {
    msg: 'hello' }, action) => {

    // 返回新的state
    switch (action.type) {

        case 'change':
            return {
    msg: action.payload }
        default:
            return state
    }
}
// Footer.jsx
import React from 'react'
// import store from '../../store'
import {
    useDispatch, useSelector } from 'react-redux'
import './Footer.scss'

export default function Footer() {

    // const [count, setCount] = React.useState(store.getState().count)
    const count = useSelector(state => state.countNameSpace.count)
    const message = useSelector(state => state.messageNameSpace.msg)
    const dispatch = useDispatch()
    const handleClick = () => {

        // store.dispatch({

        //     type: 'inc'
        // })
        dispatch({

            type: 'inc',
            payload: 5
        })
        dispatch({

            type: 'change',
            payload: 'hello world'
        })
    }
    // store.subscribe(() => {

    //     setCount(store.getState().count)
    // })
    return (
        <div>
            <button onClick={
   handleClick}>修改值</button>
            <div>Footer, {
    count }, {
   message}</div>
        </div>
    )
}
2-4 Redux-Thunk 中间件处理异步操作
- dispatch 默认只支持对象字面量,通过 redux-thunk 可以让 dispatch 支持回调函数
- 通过 applyMiddleware 方法,让中间件生效
- 安装 ReduxThunk
npm install redux-thunk
import {
    applyMiddleware, combineReducers, createStore } from 'redux';
import thunk from 'redux-thunk';
import {
    countReducer } from './modules/counter';
import {
    messageReducer } from './modules/message';

// 多个中间件可以 applyMiddleware(thunk, xxx, xxx ....)
const store = createStore(combineReducers({

    countNameSpace: countReducer,
    messageNameSpace: messageReducer
}), applyMiddleware(thunk))

export default store
// Footer.jsx
import React from 'react'
// import store from '../../store'
import {
    useDispatch, useSelector } from 'react-redux'
import './Footer.scss'

export default function Footer() {

    // const [count, setCount] = React.useState(store.getState().count)
    const count = useSelector(state => state.countNameSpace.count)
    const message = useSelector(state => state.messageNameSpace.msg)
    const dispatch = useDispatch()
    const handleClick = () => {

        // store.dispatch({

        //     type: 'inc'
        // })
        // dispatch({

        //     type: 'inc',
        //     payload: 5
        // })
        // dispatch({

        //     type: 'change',
        //     payload: 'hello world'
        // })
        // 使用 ReduxThunk 后支持回调函数
        dispatch((dispatch) => {

            setTimeout(() => {

                dispatch({

                    type: 'inc',
                    payload: 5
                })
                dispatch({

                    type: 'change',
                    payload: 'hello world'
                })
            },5000)
        })
    }
    // store.subscribe(() => {

    //     setCount(store.getState().count)
    // })
    return (
        <div>
            <button onClick={
   handleClick}>修改值</button>
            <div>Footer, {
    count }, {
   message}</div>
        </div>
    )
}
2-5 Redux-Toolkit(RTK)改善 Redux 使用体验
- 可以自动跟 redux devtools 结合,不需要再下载相应的模块
- 数据不需要再通过返回值进行修改,像 Vue 一样可以直接修改
- 内置了 ReduxThunk 这个异步插件
- 代码风格更好,采用选项式编程
- 安装 Redux-Toolkit
npm install @reduxjs/toolkit
Redux-Toolkit 模块:
- name::触发 dispatch 的命名空间
- initialState:初始化共享状态
- reducers:编写 reducer 方法
// modules/counter.js
// export const countReducer = (state = { count: 0 }, action) => {

//     // 返回新的state
//     switch (action.type) {

//         case 'inc':
//             return { count: state.count + action.payload }
//         default:
//             return state
//     }
// }

import {
    createSlice } from "@reduxjs/toolkit";

const counterSlice = createSlice({

    name: "counter",
    initialState: {

        count: 0,
    },
    reducers: {

        inc: (state, action) => {

            state.count += action.payload
        },
    },
})

export default counterSlice.reducer;
// store/index.js
// import { applyMiddleware, combineReducers, createStore } from 'redux';
// import thunk from 'redux-thunk';
// import { countReducer } from './modules/counter';
// import { messageReducer } from './modules/message';

// // 多个中间件可以 applyMiddleware(thunk, xxx, xxx ....)
// const store = createStore(combineReducers({

//     countNameSpace: countReducer,
//     messageNameSpace: messageReducer
// }), applyMiddleware(thunk))

// export default store

import {
    configureStore } from '@reduxjs/toolkit'
import counterReducer from './modules/counter'

const store = configureStore({

    reducer: {

        countNameSpace: counterReducer
    }
})

export default store
- redux-toolkit 也需要依赖 react-redux
import React from 'react'
// import store from '../../store'
import {
    useDispatch, useSelector } from 'react-redux'
import './Footer.scss'

export default function Footer() {

    // const [count, setCount] = React.useState(store.getState().count)
    const count = useSelector(state => state.countNameSpace.count)
    const dispatch = useDispatch()
    const handleClick = () => {

        dispatch({

            type: 'counter/inc',
            payload: 5
        })
    }
    return (
        <div>
            <button onClick={
   handleClick}>修改值</button>
            <div>Footer, {
    count }</div>
        </div>
    )
}
注意:modules/counter.js 中的命名空间是 dispatch 时使用的命名空间,store/index.js 中的命名空间是获取 reducer 时的命名空间。
2-6 Redux-Toolkit 处理异步任务
- 使用 createAsyncThunk 方法创建异步任务
- 还可以通过 extraReducers 配置额外的 reducer
// modules/counter.js
import {
    createAsyncThunk, createSlice } from "@reduxjs/toolkit";

export const counterThunkAction = createAsyncThunk("counter/testAction", async () => {

    const res = await new Promise((resolve, reject) => {

        setTimeout(() => {

            resolve(3)
        }, 1000)
    })
    return res
})

const counterSlice = createSlice({

    name: "counter",
    initialState: {

        count: 0,
    },
    reducers: {

        inc: (state, action) => {

            state.count += action.payload
        },
    },
    // 方式2
    extraReducers: {

        [counterThunkAction.fulfilled]: (state, action) => {

            state.count += action.payload
        }
    }
})

export default counterSlice.reducer;
// Footer.jsx
import React from 'react'
// import store from '../../store'
import {
    useDispatch, useSelector } from 'react-redux'
import {
    counterThunkAction } from '../../store/modules/counter'
import './Footer.scss'

export default function Footer() {

    // const [count, setCount] = React.useState(store.getState().count)
    const count = useSelector(state => state.countNameSpace.count)
    const dispatch = useDispatch()
    const handleClick = () => {

        // 方式1
        // dispatch(counterThunkAction()).then((res) => {

        //     // console.log(res)
        //     dispatch({

        //         type: 'counter/inc',
        //         payload: res.payload
        //     })
        // })
        // 方式2
        dispatch(counterThunkAction())
    }
    return (
        <div>
            <button onClick={
   handleClick}>修改值</button>
            <div>Footer, {
    count }</div>
        </div>
    )
}
2-7 Redux-Persist 数据持久化
npm install redux-persist
import {
    configureStore } from '@reduxjs/toolkit'
import {

    FLUSH,
    PAUSE,
    PERSIST,
    PURGE,
    REGISTER,
    REHYDRATE,
    persistReducer,
    persistStore,
} from 'redux-persist'
import storage from 'redux-persist/lib/storage'
import counterReducer from './modules/counter'

const persistConfig = {

    key: 'root',
    version: 1,
    storage,
    // whitelist: ['counter'],  // 指定白名单,指定之后不再被持久化
}

const store = configureStore({

    reducer: {

        countNameSpace: persistReducer(persistConfig, counterReducer)
    },
    middleware: (getDefaultMiddleware) =>
        getDefaultMiddleware({

            serializableCheck: {

                ignoredActions: [FLUSH, REHYDRATE, PAUSE, PERSIST, PURGE, REGISTER],
            },
        })
})

persistStore(store)

export default store


![[论文阅读]VoxSet——Voxel Set Transformer](https://img-blog.csdnimg.cn/direct/60f62ee88274416e859fef20b101be5f.png)