文章目录
一、代码
1.下载和缓存数据集
建立字典DATA_HUB,将数据集名称的字符串映射到数据集相关的二元组上,这个二元组包含数据集的url和验证文件完整性的sha-1密钥
import hashlib
import os
import tarfile
import zipfile
import requests

#@save
DATA_HUB = dict()
DATA_URL = 'http://d2l-data.s3-accelerate.amazonaws.com/'
定义download函数用来下载数据集,并返回下载文件的名称。 如果缓存目录中已经存在此数据集文件,并且其sha-1与存储在DATA_HUB中的相匹配, 我们将使用缓存的文件。
def download(name, cache_dir=os.path.join('..', 'data')):  #@save
    """下载一个DATA_HUB中的文件,返回本地文件名"""
    assert name in DATA_HUB, f"{
     name} 不存在于 {
     DATA_HUB}"
    url, sha1_hash = DATA_HUB[name]
#   递归创建目录
    os.makedirs(cache_dir, exist_ok=True)
    fname = os.path.join(cache_dir, url.split('/')[-1])

    # 检查本地是否已有缓存文件,如果有并且哈希值匹配,则直接返回本地文件路径
    if os.path.exists(fname):
        sha1 = hashlib.sha1()
        with open(fname, 'rb') as f:
            while True:
                data = f.read(1048576)
                if not data:
                    break
                sha1.update(data)
        if sha1.hexdigest() == sha1_hash:
            return fname  # 命中缓存
    print(f'正在从{
     url}下载{
     fname}...')
    r = requests.get(url, stream=True, verify=True)
    with open(fname, 'wb') as f:
        f.write(r.content)
    return fname
实现两个实用函数分别用于:下载并解压zip和tar文件,另一个是将所有数据集从DATA_HUB下载到缓存目录中。
def download_extract(name, folder=None):  #@save
    """下载并解压zip/tar文件"""
    fname = download(name)
#   给定文件的目录部分
    base_dir = os.path.dirname(fname)
#    分离文件名和拓展名
    data_dir, ext = os.path.splitext(fname)
    if ext == '.zip':
        fp = zipfile.ZipFile(fname, 'r')
    elif ext in ('.tar', '.gz'):
        fp = tarfile.open(fname, 'r')
    else:
        assert False, '只有zip/tar文件可以被解压缩'
#   将压缩文件中的内容解压到指定的目录
    fp.extractall(base_dir)

    return os.path.join(base_dir, folder) if folder else data_dir

def download_all():  #@save
    """下载DATA_HUB中的所有文件"""
    for name in DATA_HUB:
        download(name)
2.访问和读取数据集
# 如果没有安装pandas,请取消下一行的注释
# !pip install pandas

%matplotlib inline
import numpy as np
import pandas as pd
import torch
from torch import nn
from d2l import torch as d2l
使用上面定义的脚本下载并缓存Kaggle房屋数据集
DATA_HUB['kaggle_house_train'] = (  #@save
    DATA_URL + 'kaggle_house_pred_train.csv',
    '585e9cc93e70b39160e7921475f9bcd7d31219ce')

DATA_HUB['kaggle_house_test'] = (  #@save
    DATA_URL + 'kaggle_house_pred_test.csv',
    'fa19780a7b011d9b009e8bff8e99922a8ee2eb90')
使用pandas分别加载包含训练数据和测试数据
train_data = pd.read_csv(download('kaggle_house_train'))
test_data = pd.read_csv(download('kaggle_house_test'))
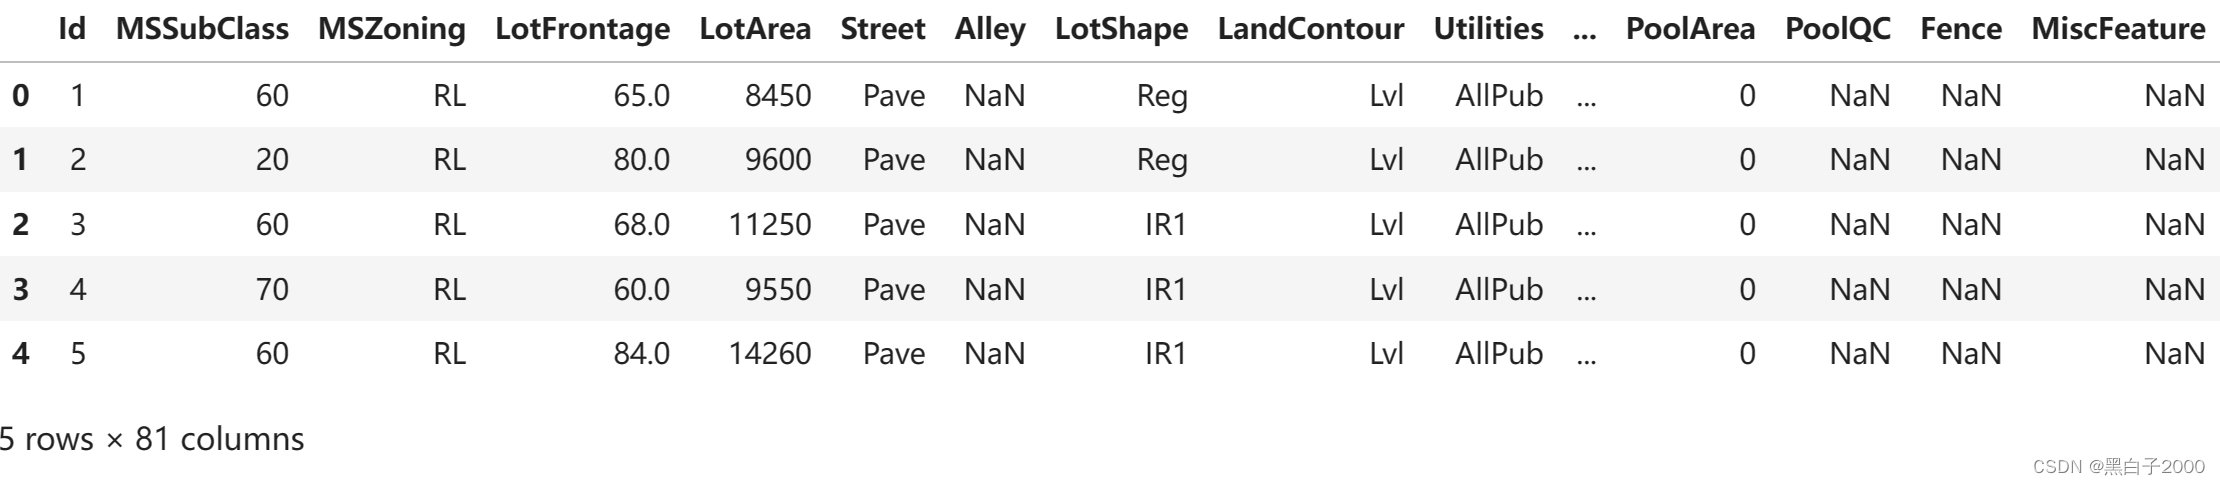
训练数据集包括1460个样本,每个样本80个特征和1个标签, 而测试数据集包含1459个样本,每个样本80个特征。
print(train_data.shape)
print(test_data.shape)
(1460, 81)
(1459, 80)
看前四个和最后两个特征,以及相应标签(房价)
# # 查看前四个和最后两个特征
print(train_data.iloc[0:4, [0, 1, 2, 3, -3, -2, -1]])
# print(train_data)
Id MSSubClass MSZoning LotFrontage SaleType SaleCondition SalePrice
0 1 60 RL 65.0 WD Normal 208500
1 2 20 RL 80.0 WD Normal 181500
2 3 60 RL 68.0 WD Normal 223500
3 4 70 RL 60.0 WD Abnorml 140000
在每个样本中,第一个特征是ID, 这有助于模型识别每个训练样本。 虽然这很方便,但它不携带任何用于预测的信息。 因此,在将数据提供给模型之前,我们将其从数据集中删除。
# ID对于预测房价没有作用,所以我们需要将其从数据集中删除
# train:选择所有行,第一列到不要最后一列,  test,所有行,第一列到最后一列
# print(train_data.iloc[:, 1:-1])
# print(test_data.iloc[:, 1:])
all_features = pd.concat((train_data.iloc[:, 1:-1], test_data.iloc[:, 1:]))
3.数据预处理
# print(all_features)
# 数据预处理
# 如果无法得到测试数据,根据训练数据计算均值和标准差
# 返回所有数据类型不是object的列(即非字符串型,通常数值型):
# 通常用于获取数据集中的数值特征
numeric_features = all_features.dtypes[all_features.dtypes != 'object'].index
# print(all_features.dtypes) # 每一列的数据类型
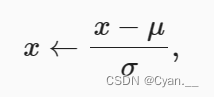
#对数值列进行归一化操作
all_features[numeric_features] = all_features[numeric_features].apply(
lambda x: (x - x.mean()) / (x.std()))
# print(all_features)
# 在标准化之后,所有均值消失,因此我们可以将缺失值设置为0
all_features[numeric_features] = all_features[numeric_features].fillna(0)
# 处理离散值
# all_features1 = all_features
# “Dummy_na=True”将“na”(缺失值)视为有效的特征值,并为其创建指示符特征
all_features = pd.get_dummies(all_features, dummy_na=True)
all_features.shape
转换为张量用于训练
#  从pandas格式中提取NumPy格式,并将其转换为张量表示用于训练。
n_train = train_data.shape[0]
train_features = torch.tensor(all_features[:n_train].values, dtype=torch.float32)
test_features = torch.tensor(all_features[n_train:].values, dtype=torch.float32)
train_labels = torch.tensor(
    train_data.SalePrice.values.reshape(-1, 1), dtype=torch.float32)
# print(train_labels) #价格
4.训练
loss = nn.MSELoss()
in_features = train_features.shape[1]

def get_net():
# 单层线性回归模型
    net = nn.Sequential(nn.Linear(in_features, 1))
    return net
# 计算对数均方根误差
def log_rmse(net, features, labels):
#     为了在取对数时进一步稳定该值, 将小于1的值设置为1
    clipped_preds = torch.clamp(net(features), 1, float('inf'))
    rmse = torch.sqrt(loss(torch.log(clipped_preds),
                          torch.log(labels)))
#     以python标量的形式返回
    return rmse.item()
def train(net, train_features, train_labels, test_features, test_labels,
num_epochs, learning_rate, weight_decay, batch_size):
train_ls, test_ls = [], []
train_iter = d2l.load_array((train_features, train_labels), batch_size)
# 这里使用的是Adam优化算法
optimizer = torch.optim.Adam(net.parameters(),
lr = learning_rate,
weight_decay = weight_decay)
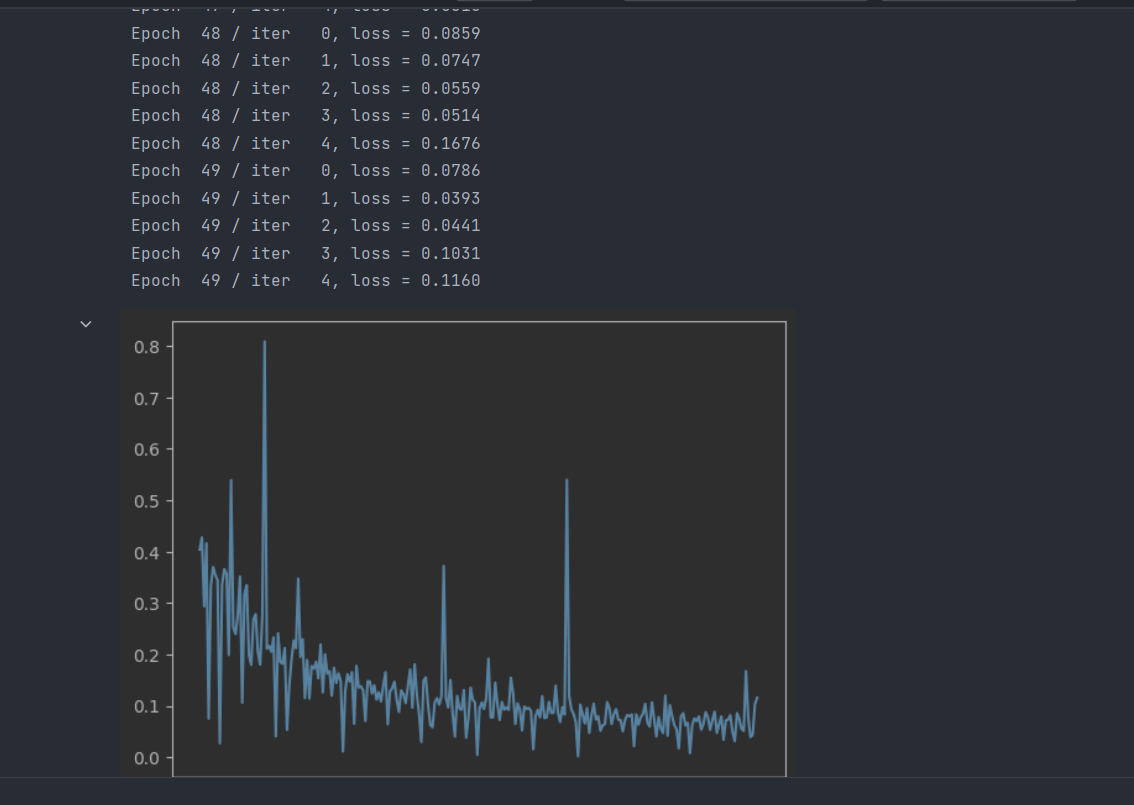
for epoch in range(num_epochs):
for X, y in train_iter:
optimizer.zero_grad()
l = loss(net(X), y)
l.backward()
# 优化器更新参数
optimizer.step()
train_ls.append(log_rmse(net, train_features, train_labels))
if test_labels is not None:
test_ls.append(log_rmse(net, test_features, test_labels))
return train_ls, test_ls
5.K折交叉验证
# k折交叉验证
def get_k_fold_data(k, i, X, y):
    assert k > 1
#   每折的大小
    fold_size = X.shape[0] // k
    X_train, y_train = None, None
    for j in range(k):
        idx = slice(j * fold_size, (j + 1) * fold_size)
        X_part, y_part = X[idx, :], y[idx]
        if j == i:
            X_valid, y_valid = X_part, y_part
        elif X_train is None:
            X_train, y_train = X_part, y_part
        else:
            X_train = torch.cat([X_train, X_part], 0)
            y_train = torch.cat([y_train, y_part], 0)
            #返回训练集和验证集
    return X_train, y_train, X_valid, y_valid
# 在折交叉验证中训练k次后,返回训练和验证误差的平均值
def k_fold(k, X_train, y_train, num_epochs, learning_rate, weight_decay,
batch_size):
train_l_sum, valid_l_sum = 0, 0
for i in range(k):
data = get_k_fold_data(k, i, X_train, y_train)
net = get_net()
train_ls, valid_ls = train(net, *data, num_epochs, learning_rate,
weight_decay, batch_size)
train_l_sum += train_ls[-1]
valid_l_sum += valid_ls[-1]
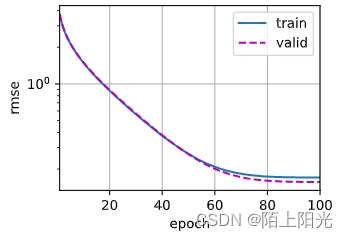
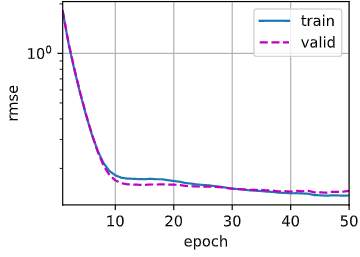
if i == 0:
d2l.plot(list(range(1, num_epochs + 1)), [train_ls, valid_ls],
xlabel='epoch', ylabel='rmse', xlim=[1, num_epochs],
legend=['train', 'valid'], yscale='log')
print(f'折{
i + 1},训练log rmse{
float(train_ls[-1]):f}, '
f'验证log rmse{
float(valid_ls[-1]):f}')
return train_l_sum / k, valid_l_sum / k
6.模型选择
# 模型选择
k, num_epochs, lr, weight_decay, batch_size = 5, 50, 35, 0, 64
train_l, valid_l = k_fold(k, train_features, train_labels, num_epochs, lr,
                          weight_decay, batch_size)
print(f'{
     k}-折验证: 平均训练log rmse: {
     float(train_l):f}, '
      f'平均验证log rmse: {
     float(valid_l):f}')
折1,训练log rmse0.137036, 验证log rmse0.146027
折2,训练log rmse0.132978, 验证log rmse0.148217
折3,训练log rmse0.132730, 验证log rmse0.142347
折4,训练log rmse0.136893, 验证log rmse0.140734
折5,训练log rmse0.128616, 验证log rmse0.169171
5-折验证: 平均训练log rmse: 0.133651, 平均验证log rmse: 0.149299
def train_and_pred(train_features, test_features, train_labels, test_data,
num_epochs, lr, weight_decay, batch_size):
net = get_net()
train_ls, _ = train(net, train_features, train_labels, None, None,
num_epochs, lr, weight_decay, batch_size)
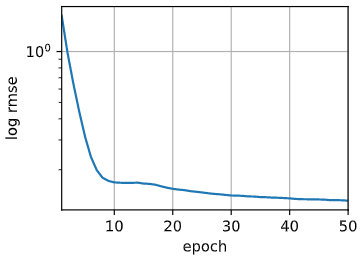
# 绘制训练误差曲线
d2l.plot(np.arange(1, num_epochs + 1), [train_ls], xlabel='epoch',
ylabel='log rmse', xlim=[1, num_epochs], yscale='log')
print(f'训练log rmse:{
float(train_ls[-1]):f}')
# 将网络应用于测试集。
preds = net(test_features).detach().numpy()
# 将其重新格式化以导出到Kaggle
test_data['SalePrice'] = pd.Series(preds.reshape(1, -1)[0])
submission = pd.concat([test_data['Id'], test_data['SalePrice']], axis=1)
submission.to_csv('submission.csv', index=False)
train_and_pred(train_features, test_features, train_labels, test_data,
               num_epochs, lr, weight_decay, batch_size)
训练log rmse:0.131205
【相关总结】
1.os.makedirs()
用于递归地创建目录
os.makedirs(path, mode, exist_ok=False)
path:要创建的目录,可以为相对路径或绝对路径
mode:指定权重模式
False表示当目标目录已存在时,抛出OSError
os.makedirs(cache_dir, exist_ok=True)
2.os.path.join()
os.path.join()用来拼接多个路径字符串。
import os

path1 = 'a'
path2 = 'b'
path3 = 'c'

path = os.path.join(path1,path2,path3)
print(path)
a\b\c
3.os.path.exits()
判断文件或者文件夹是否存在
import os
path_exits = os.path.exists('../data')
print(path)
True
4.os.path.dirname()
获取文件所在目录路径
import os

import sys

# print(sys.path[0])
fname = sys.path[0] # 输出当前文件所在目录
file = '../src/09test.ipynb'
print(fname)
# print (os.path.abspath('.'))
dir = os.path.dirname(fname)
file_dir = os.path.dirname(file)
print(dir)
print(file_dir)
5.os.path.splittext()
分离文件名与拓展名
如果 fname 是 ‘/path/to/some/file.txt’,那么 os.path.splitext(fname) 将返回 (‘/path/to/some/file’, ‘.txt’)。
6.pd.read_csv()
使用pandas进行数据读取时,可以读取以下文件:
- pd.read_csv() :csv, txt…
- pd.read_excel():.xls,.xlsx
- pd.read_sql:读取sql数据库
sep:可以指定读取csv文件时的分隔符,默认为逗号。
pd.read_csv('data.csv', sep='\t')
7.iloc[]–pands
对数据进行索引,提取出相应位置的数据
- iloc[a,b]:取行索引为a,列索引为b的位置
- iloc[a:b,c]:取行索引从a到b-1,列索引为c的位置
- iloc[a:b, c:d]:取行索引为从a到b-1,列索引从c到d-1的位置
- iloc[a]:取行索引为a,所有列的数据
import pandas as pd

#Creating a sample DataFrame
data = {

    'A': [1, 2, 3, 4, 5],
    'B': [10, 20, 30, 40, 50],
    'C': [100, 200, 300, 400, 500]
}

df = pd.DataFrame(data)
print("Original:")
print(df)

element_a2_b = df.iloc[1, 0]
print("\n (row 1, column 0):")
print(element_a2_b)

row_2 = df.iloc[2]
print("\n(row 2):")
print(row_2)

column_B = df.iloc[:, 1]
print("\n(column 1):")
print(column_B)

subset_a3_b2_c = df.iloc[2:4, 1:3]
print("(rows 2 to 3, columns 1 to 2):")
print(subset_a3_b2_c)
Original:
A B C
0 1 10 100
1 2 20 200
2 3 30 300
3 4 40 400
4 5 50 500
(row 1, column 0):
2
(row 2):
A 3
B 30
C 300
Name: 2, dtype: int64
(column 1):
0 10
1 20
2 30
3 40
4 50
Name: B, dtype: int64
(rows 2 to 3, columns 1 to 2):
B C
2 30 300
3 40 400
8.pd.concat()
用于沿着指定的轴连接两个或多个 pandas 对象(可以是 Series 或 DataFrame)。它可以用于纵向(沿着行)或横向(沿着列)连接数据
import pandas as pd

# 创建两个示例 DataFrame
df1 = pd.DataFrame({
   'A': [1, 2], 'B': [3, 4]})
df2 = pd.DataFrame({
   'A': [5, 6], 'B': [7, 8]})
print(df1)
print(df2)
# 纵向连接(沿着行)
# ignore_index:重新设置了 DataFrame 的索引。
result = pd.concat([df1, df2], ignore_index=True)
print("沿着行连接的DataFrame:")
print(result)

# 横向连接(沿着列)
result = pd.concat([df1, df2], axis=1)
print("沿着列连接的DataFrame:")
print(result)


# 创建两个具有不同列名的示例 DataFrame
df1 = pd.DataFrame({
   'A': [1, 2], 'B': [3, 4]})
df2 = pd.DataFrame({
   'C': [5, 6], 'D': [7, 8]})
A B
0 1 3
1 2 4
A B
0 5 7
1 6 8
沿着行连接的DataFrame:
A B
0 1 3
1 2 4
2 5 7
3 6 8
沿着列连接的DataFrame:
A B A B
0 1 3 5 7
1 2 4 6 8
9.pd.get_dummies()
pandas 库中用于执行独热编码(One-Hot Encoding)的函数。
import pandas as pd

# 创建一个包含分类变量的 DataFrame
data = {
   'Category': ['A', 'B', 'A', 'C']}
df = pd.DataFrame(data)

# 使用 pd.get_dummies 进行独热编码
df_encoded = pd.get_dummies(df, columns=['Category'], prefix='Category')

# 显示结果
print("Original DataFrame:")
print(df)
print("\nDataFrame after One-Hot Encoding:")
print(df_encoded)
Original DataFrame:
Category
0 A
1 B
2 A
3 C
DataFrame after One-Hot Encoding:
Category_A Category_B Category_C
0 1 0 0
1 0 1 0
2 1 0 0
3 0 0 1
1
10.torch.clamp()
用于对张量进行截断操作。即将张量中的值限制在一个特定范围内。
torch.clamp(input, min, max, out=None) -> Tensor
参数:
- input:输入的张量
- min:张量中元素的最小值,小于该值的元素被设置为该值
- max:张量中元素的最大值,大于该值的元素被设置为该值
- out:输出张量,如果提供,将结果存储到此张量中
这个函数的作用是将张量 input 中的元素限制在 [min, max] 的范围内。
import torch

tensor = torch.tensor([1, 5, 10, 15, 20], dtype=torch.float32)

# 对张量进行截断,使得元素不小于3,不大于12
result = torch.clamp(tensor, min=3, max=12)

print(result)
tensor([ 3., 5., 10., 12., 12.])
11.torch.cat()
torch.cat(tensors, dim=0, out=None) -> Tensor用于在给定维度上拼接张量。
参数:
- dim:0表示在行上进行拼接
import torch

# 创建两个张量
tensor1 = torch.tensor([[1, 2], [3, 4]])
tensor2 = torch.tensor([[5, 6]])

# 在第一个维度上拼接
result = torch.cat([tensor1, tensor2], dim=0)

print(result)
tensor([[1, 2],
[3, 4],
[5, 6]])