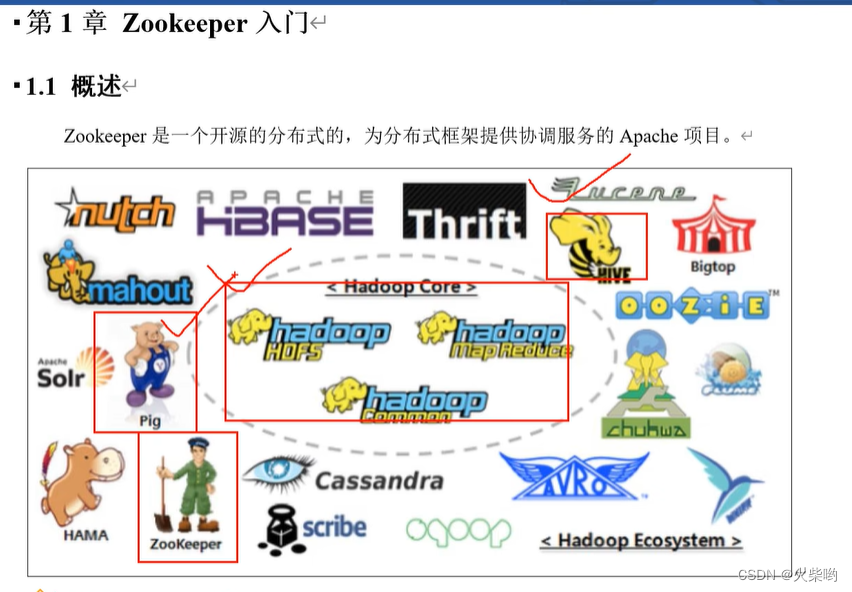
Zookeeper简介
- Zookeeper 是一个分布式的、开源的分布式应用程序的协调服务。
- Zookeeper 提供的主要功能包括:
-
- 配置管理(配置中心)
-
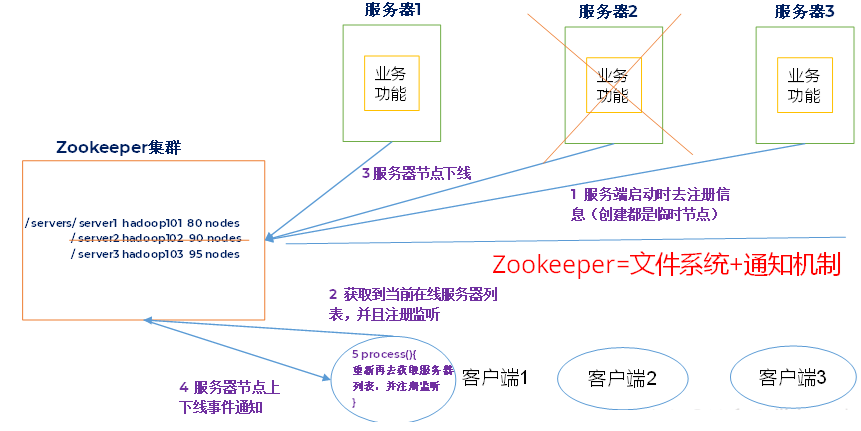
- 集群管理(注册中心)
-
- 分布式锁
ZooKeeper 命令操作
Zookeeper 数据模型
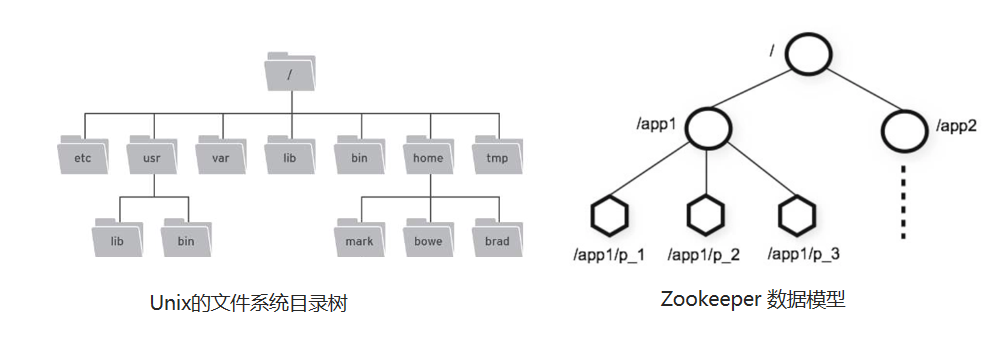
ZooKeeper 是一个树形目录服务,其数据模型和Unix的文件系统目录树很类似,拥有一个层次化结构。
这里面的每一个节点都被称为: ZNode,每个节点上都会保存自己的数据和节点信息。
节点可以拥有子节点,同时也允许少量(1MB)数据存储在该节点之下。
节点可以分为四大类:
- PERSISTENT 持久化节点
- EPHEMERAL 临时节点 :-e
- PERSISTENT_SEQUENTIAL 持久化顺序节点 :-s
- EPHEMERAL_SEQUENTIAL 临时顺序节点 :-es
Zookeeper 服务端常用命令
- 启动 ZooKeeper 服务:
./zkServer.sh start
- 查看 ZooKeeper 服务状态:
./zkServer.sh status
- 停止 ZooKeeper 服务:
./zkServer.sh stop
- 重启 ZooKeeper 服务:
./zkServer.sh restart
Zookeeper 客户端常用命令
- 连接ZooKeeper服务端:
./zkCli.sh –server ip:port
- 断开连接
quit
- 查看命令帮助
help
- 显示指定目录下节点
ls 目录
- 创建节点
create /节点path value
- 获取节点值
get /节点path
- 设置节点值
set /节点path value
- 删除单个节点
delete /节点path
- 删除带有子节点的节点
deleteall /节点path
- 创建临时节点
create -e /节点path value
- 创建顺序节点
create -s /节点path value
- 查询节点详细信息
ls –s /节点path

czxid:节点被创建的事务ID
ctime: 创建时间
mzxid: 最后一次被更新的事务ID
mtime: 修改时间
pzxid:子节点列表最后一次被更新的事务ID
cversion:子节点的版本号
dataversion:数据版本号
aclversion:权限版本号
ephemeralOwner:用于临时节点,代表临时节点的事务ID,如果为持久节点则为0
dataLength:节点存储的数据的长度
numChildren:当前节点的子节点个数
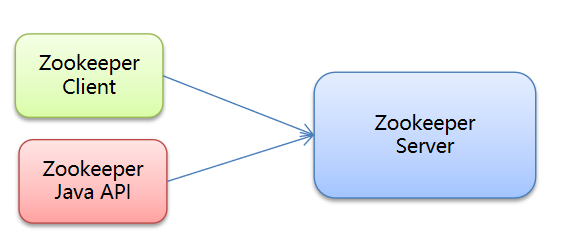
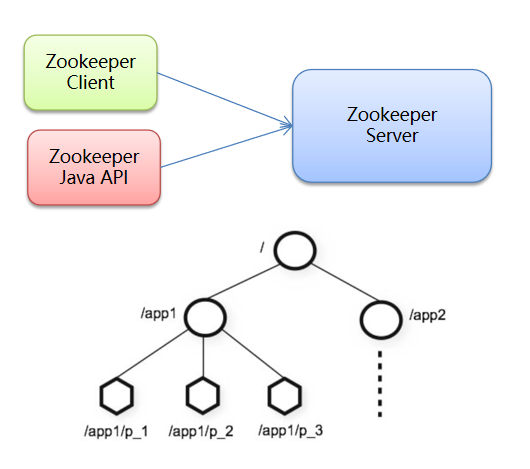
ZooKeeper JavaAPI 操作
Curator 介绍
Curator 是 Apache ZooKeeper 的Java客户端库。
常见的ZooKeeper Java API :
原生Java API
ZkClient
Curator
Curator 项目的目标是简化 ZooKeeper 客户端的使用。 Curator 最初是 Netfix 研发的,后来捐献了 Apache 基金会,目前是 Apache 的顶级项目。
Curator官网:http://curator.apache.org/
Curator API 常用操作
创建Maven工程,导包:
 <dependency>
            <groupId>junit</groupId>
            <artifactId>junit</artifactId>
            <version>4.10</version>
            <scope>test</scope>
        </dependency>

        <!--curator-->
        <dependency>
            <groupId>org.apache.curator</groupId>
            <artifactId>curator-framework</artifactId>
            <version>4.0.0</version>
        </dependency>

        <dependency>
            <groupId>org.apache.curator</groupId>
            <artifactId>curator-recipes</artifactId>
            <version>4.0.0</version>
        </dependency>
        <!--日志-->
        <dependency>
            <groupId>org.slf4j</groupId>
            <artifactId>slf4j-api</artifactId>
            <version>1.7.21</version>
        </dependency>

        <dependency>
            <groupId>org.slf4j</groupId>
            <artifactId>slf4j-log4j12</artifactId>
            <version>1.7.21</version>
        </dependency>
建立连接
添加节点
删除节点
修改节点
查询节点
package com.example.curator;

import org.apache.curator.RetryPolicy;
import org.apache.curator.framework.CuratorFramework;
import org.apache.curator.framework.CuratorFrameworkFactory;
import org.apache.curator.framework.api.BackgroundCallback;
import org.apache.curator.framework.api.CuratorEvent;
import org.apache.curator.retry.ExponentialBackoffRetry;
import org.apache.zookeeper.CreateMode;
import org.apache.zookeeper.data.Stat;
import org.junit.After;
import org.junit.Before;
import org.junit.Test;

import java.util.List;

public class CuratorTest {


    private CuratorFramework client;

    /**
     * 建立连接
     */
    @Before
    public void testConnect() {


        /*
         *
         * @param connectString       连接字符串。zk server 地址和端口 "192.168.149.135:2181,192.168.149.136:2181"
         * @param sessionTimeoutMs    会话超时时间 单位ms
         * @param connectionTimeoutMs 连接超时时间 单位ms
         * @param retryPolicy         重试策略
         */
       /* //重试策略
        RetryPolicy retryPolicy = new ExponentialBackoffRetry(3000,10);
        //1.第一种方式
        CuratorFramework client = CuratorFrameworkFactory.newClient("192.168.149.135:2181",
                60 * 1000, 15 * 1000, retryPolicy);*/
        //重试策略
        RetryPolicy retryPolicy = new ExponentialBackoffRetry(3000, 10);
        //2.第二种方式
        //CuratorFrameworkFactory.builder();
        client = CuratorFrameworkFactory.builder()
                .connectString("192.168.149.135:2181")
                .sessionTimeoutMs(60 * 1000)
                .connectionTimeoutMs(15 * 1000)
                .retryPolicy(retryPolicy)
                .namespace("example")
                .build();

        //开启连接
        client.start();

    }
//==============================create=============================================================================

    /**
     * 创建节点:create 持久 临时 顺序 数据
     * 1. 基本创建 :create().forPath("")
     * 2. 创建节点 带有数据:create().forPath("",data)
     * 3. 设置节点的类型:create().withMode().forPath("",data)
     * 4. 创建多级节点  /app1/p1 :create().creatingParentsIfNeeded().forPath("",data)
     */
    @Test
    public void testCreate() throws Exception {

        //2. 创建节点 带有数据
        //如果创建节点,没有指定数据,则默认将当前客户端的ip作为数据存储
        String path = client.create().forPath("/app2", "hehe".getBytes());
        System.out.println(path);

    }

    @Test
    public void testCreate2() throws Exception {

        //1. 基本创建
        //如果创建节点,没有指定数据,则默认将当前客户端的ip作为数据存储
        String path = client.create().forPath("/app1");
        System.out.println(path);

    }

    @Test
    public void testCreate3() throws Exception {

        //3. 设置节点的类型
        //默认类型:持久化
        String path = client.create().withMode(CreateMode.EPHEMERAL).forPath("/app3");
        System.out.println(path);


    }

    @Test
    public void testCreate4() throws Exception {

        //4. 创建多级节点  /app1/p1
        //creatingParentsIfNeeded():如果父节点不存在,则创建父节点
        String path = client.create().creatingParentsIfNeeded().forPath("/app4/p1");
        System.out.println(path);
    }
//===========================get================================================================================

    /**
     * 查询节点:
     * 1. 查询数据:get: getData().forPath()
     * 2. 查询子节点: ls: getChildren().forPath()
     * 3. 查询节点状态信息:ls -s:getData().storingStatIn(状态对象).forPath()
     */

    @Test
    public void testGet1() throws Exception {

        //1. 查询数据:get
        byte[] data = client.getData().forPath("/app1");
        System.out.println(new String(data));
    }

    @Test
    public void testGet2() throws Exception {

        // 2. 查询子节点: ls
        List<String> path = client.getChildren().forPath("/");

        System.out.println(path);
    }

    @Test
    public void testGet3() throws Exception {


        Stat status = new Stat();
        System.out.println(status);
        //3. 查询节点状态信息:ls -s
        client.getData().storingStatIn(status).forPath("/app1");

        System.out.println(status);

    }

    //===========================set================================================================================

    /**
     * 修改数据
     * 1. 基本修改数据:setData().forPath()
     * 2. 根据版本修改: setData().withVersion().forPath()
     * * version 是通过查询出来的。目的就是为了让其他客户端或者线程不干扰我。
     *
     * @throws Exception
     */
    @Test
    public void testSet() throws Exception {

        client.setData().forPath("/app1", "itcast".getBytes());
    }


    @Test
    public void testSetForVersion() throws Exception {


        Stat status = new Stat();
        //3. 查询节点状态信息:ls -s
        client.getData().storingStatIn(status).forPath("/app1");


        int version = status.getVersion();//查询出来的 3
        System.out.println(version);
        client.setData().withVersion(version).forPath("/app1", "hehe".getBytes());
    }

    //===========================delete================================================================================

    /**
     * 删除节点: delete deleteall
     * 1. 删除单个节点:delete().forPath("/app1");
     * 2. 删除带有子节点的节点:delete().deletingChildrenIfNeeded().forPath("/app1");
     * 3. 必须成功的删除:为了防止网络抖动。本质就是重试。  client.delete().guaranteed().forPath("/app2");
     * 4. 回调:inBackground
     * @throws Exception
     */


    @Test
    public void testDelete() throws Exception {

        // 1. 删除单个节点
        client.delete().forPath("/app1");
    }

    @Test
    public void testDelete2() throws Exception {

        //2. 删除带有子节点的节点
        client.delete().deletingChildrenIfNeeded().forPath("/app4");
    }
    @Test
    public void testDelete3() throws Exception {

        //3. 必须成功的删除
        client.delete().guaranteed().forPath("/app2");
    }

    @Test
    public void testDelete4() throws Exception {

        //4. 回调
        client.delete().guaranteed().inBackground(new BackgroundCallback(){


            @Override
            public void processResult(CuratorFramework client, CuratorEvent event) throws Exception {

                System.out.println("我被删除了~");
                System.out.println(event);
            }
        }).forPath("/app1");
    }

    @After
    public void close() {

        if (client != null) {

            client.close();
        }
    }


}
Watch事件监听
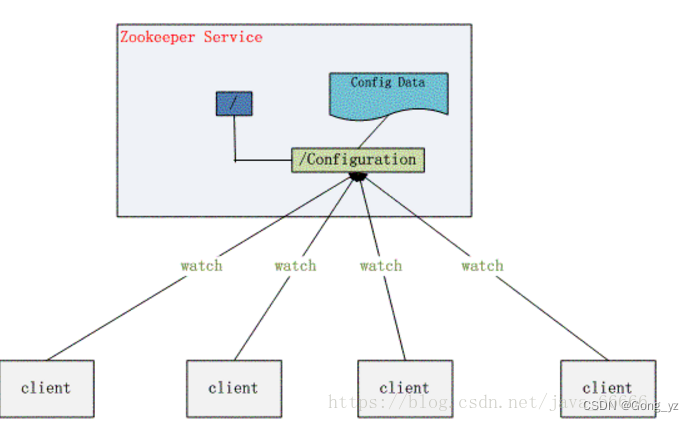
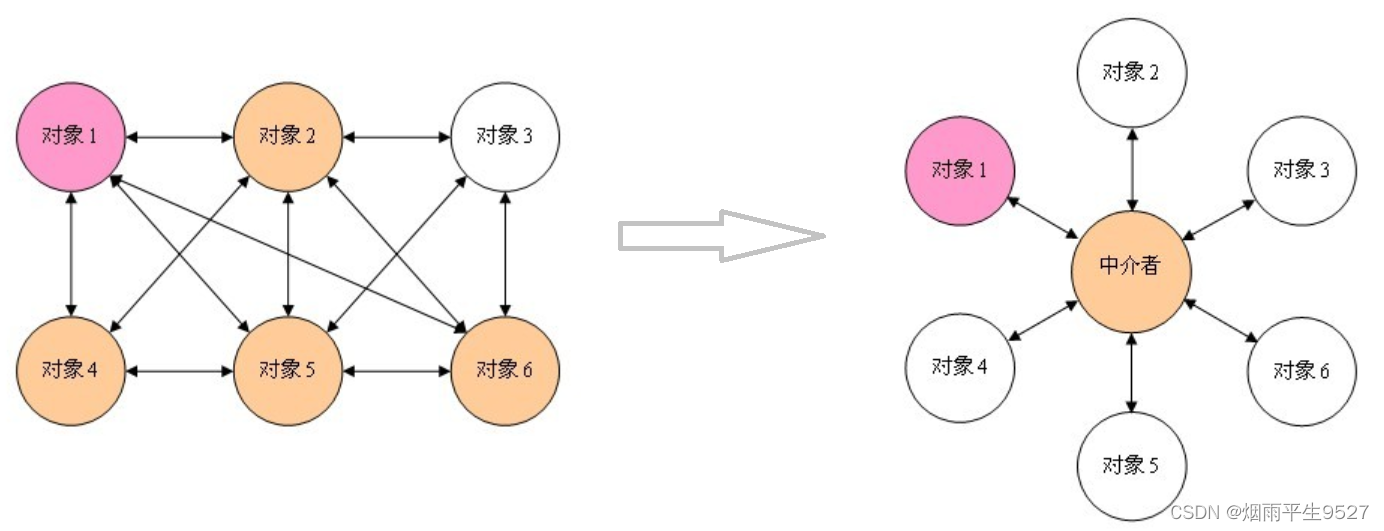
ZooKeeper 允许用户在指定节点上注册一些Watcher,并且在一些特定事件触发的时候,ZooKeeper 服务端会将事件通知到感兴趣的客户端上去,该机制是 ZooKeeper 实现分布式协调服务的重要特性。
ZooKeeper 中引入了Watcher机制来实现了发布/订阅功能,能够让多个订阅者同时监听某一个对象,当一个对象自身状态变化时,会通知所有订阅者。
ZooKeeper 原生支持通过注册Watcher来进行事件监听,但是其使用并不是特别方便
需要开发人员自己反复注册Watcher,比较繁琐。
Curator引入了 Cache 来实现对 ZooKeeper 服务端事件的监听。
ZooKeeper提供了三种Watcher:
- NodeCache : 只是监听某一个特定的节点
- PathChildrenCache : 监控一个ZNode的子节点.
- TreeCache : 可以监控整个树上的所有节点,类似于PathChildrenCache和NodeCache的组合
package com.example.curator;

import org.apache.curator.RetryPolicy;
import org.apache.curator.framework.CuratorFramework;
import org.apache.curator.framework.CuratorFrameworkFactory;
import org.apache.curator.framework.api.BackgroundCallback;
import org.apache.curator.framework.api.CuratorEvent;
import org.apache.curator.framework.recipes.cache.*;
import org.apache.curator.retry.ExponentialBackoffRetry;
import org.apache.zookeeper.CreateMode;
import org.apache.zookeeper.data.Stat;
import org.junit.After;
import org.junit.Before;
import org.junit.Test;

import java.util.List;

public class CuratorWatcherTest {


    private CuratorFramework client;

    /**
     * 建立连接
     */
    @Before
    public void testConnect() {


        /*
         *
         * @param connectString       连接字符串。zk server 地址和端口 "192.168.149.135:2181,192.168.149.136:2181"
         * @param sessionTimeoutMs    会话超时时间 单位ms
         * @param connectionTimeoutMs 连接超时时间 单位ms
         * @param retryPolicy         重试策略
         */
       /* //重试策略
        RetryPolicy retryPolicy = new ExponentialBackoffRetry(3000,10);
        //1.第一种方式
        CuratorFramework client = CuratorFrameworkFactory.newClient("192.168.149.135:2181",
                60 * 1000, 15 * 1000, retryPolicy);*/
        //重试策略
        RetryPolicy retryPolicy = new ExponentialBackoffRetry(3000, 10);
        //2.第二种方式
        //CuratorFrameworkFactory.builder();
        client = CuratorFrameworkFactory.builder()
                .connectString("192.168.149.135:2181")
                .sessionTimeoutMs(60 * 1000)
                .connectionTimeoutMs(15 * 1000)
                .retryPolicy(retryPolicy)
                .namespace("example")
                .build();

        //开启连接
        client.start();

    }

    @After
    public void close() {

        if (client != null) {

            client.close();
        }
    }

    /**
     * 演示 NodeCache:给指定一个节点注册监听器
     */

    @Test
    public void testNodeCache() throws Exception {

        //1. 创建NodeCache对象
        final NodeCache nodeCache = new NodeCache(client,"/app1");
        //2. 注册监听
        nodeCache.getListenable().addListener(new NodeCacheListener() {

            @Override
            public void nodeChanged() throws Exception {

                System.out.println("节点变化了~");

                //获取修改节点后的数据
                byte[] data = nodeCache.getCurrentData().getData();
                System.out.println(new String(data));
            }
        });

        //3. 开启监听.如果设置为true,则开启监听是,加载缓冲数据
        nodeCache.start(true);


        while (true){


        }
    }


    /**
     * 演示 PathChildrenCache:监听某个节点的所有子节点们
     */

    @Test
    public void testPathChildrenCache() throws Exception {

        //1.创建监听对象
        PathChildrenCache pathChildrenCache = new PathChildrenCache(client,"/app2",true);

        //2. 绑定监听器
        pathChildrenCache.getListenable().addListener(new PathChildrenCacheListener() {

            @Override
            public void childEvent(CuratorFramework client, PathChildrenCacheEvent event) throws Exception {

                System.out.println("子节点变化了~");
                System.out.println(event);
                //监听子节点的数据变更,并且拿到变更后的数据
                //1.获取类型
                PathChildrenCacheEvent.Type type = event.getType();
                //2.判断类型是否是update
                if(type.equals(PathChildrenCacheEvent.Type.CHILD_UPDATED)){

                    System.out.println("数据变了!!!");
                    byte[] data = event.getData().getData();
                    System.out.println(new String(data));

                }
            }
        });
        //3. 开启
        pathChildrenCache.start();

        while (true){


        }
    }


    /**
     * 演示 TreeCache:监听某个节点自己和所有子节点们
     */

    @Test
    public void testTreeCache() throws Exception {

        //1. 创建监听器
        TreeCache treeCache = new TreeCache(client,"/app2");

        //2. 注册监听
        treeCache.getListenable().addListener(new TreeCacheListener() {

            @Override
            public void childEvent(CuratorFramework client, TreeCacheEvent event) throws Exception {

                System.out.println("节点变化了");
                System.out.println(event);
            }
        });

        //3. 开启
        treeCache.start();

        while (true){


        }
    }

}
分布式锁
在我们进行单机应用开发,涉及并发同步的时候,我们往往采用synchronized或者Lock的方式来解决多线程间的代码同步问题,这时多线程的运行都是在同一个JVM之下,没有任何问题。
但当我们的应用是分布式集群工作的情况下,属于多JVM下的工作环境,跨JVM之间已经无法通过多线程的锁解决同步问题。
那么就需要一种更加高级的锁机制,来处理跨机器的进程之间的数据同步问题——这就是分布式锁。
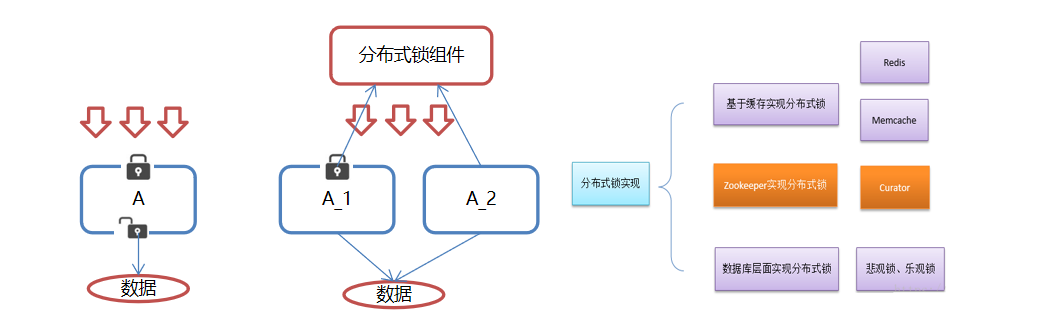
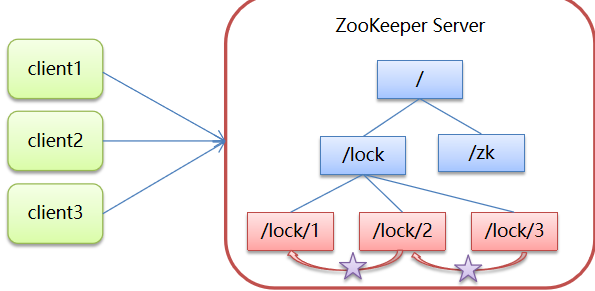
ZooKeeper分布式锁原理
核心思想:当客户端要获取锁,则创建节点,使用完锁,则删除该节点。
客户端获取锁时,在lock节点下创建临时顺序节点。然后获取lock下面的所有子节点,客户端获取到所有的子节点之后,如果发现自己创建的子节点序号最小,那么就认为该客户端获取到了锁。使用完锁后,将该节点删除。
如果发现自己创建的节点并非lock所有子节点中最小的,说明自己还没有获取到锁,此时客户端需要找到比自己小的那个节点,同时对其注册事件监听器,监听删除事件。
如果发现比自己小的那个节点被删除,则客户端的 Watcher 会收到相应通知,此时再次判断自己创建的节点是否是 lock 子节点中序号最小的,如果是则获取到了锁, 如果不是则重复以上步骤继续获取到比自己小的一个节点并注册监听。
Curator实现分布式锁API
在Curator中有五种锁方案:
- InterProcessSemaphoreMutex:分布式排它锁(非可重入锁)
- InterProcessMutex:分布式可重入排它锁
- InterProcessReadWriteLock:分布式读写锁
- InterProcessMultiLock:将多个锁作为单个实体管理的容器
- InterProcessSemaphoreV2:共享信号量
模拟12306售票案例
package com.example.curator;

import org.apache.curator.RetryPolicy;
import org.apache.curator.framework.CuratorFramework;
import org.apache.curator.framework.CuratorFrameworkFactory;
import org.apache.curator.framework.recipes.cache.*;
import org.apache.curator.retry.ExponentialBackoffRetry;
import org.junit.After;
import org.junit.Before;
import org.junit.Test;

public class LockTest {


    public static void main(String[] args) {

        Ticket12306 ticket12306 = new Ticket12306();

        //创建客户端
        Thread t1 = new Thread(ticket12306,"携程");
        Thread t2 = new Thread(ticket12306,"飞猪");

        t1.start();
        t2.start();
    }

}
package com.example.curator;

import org.apache.curator.RetryPolicy;
import org.apache.curator.framework.CuratorFramework;
import org.apache.curator.framework.CuratorFrameworkFactory;
import org.apache.curator.framework.recipes.locks.InterProcessMutex;
import org.apache.curator.retry.ExponentialBackoffRetry;

import java.util.concurrent.TimeUnit;

public class Ticket12306 implements Runnable{


    private int tickets = 10;//数据库的票数

    private InterProcessMutex lock ;


    public Ticket12306(){

        //重试策略
        RetryPolicy retryPolicy = new ExponentialBackoffRetry(3000, 10);
        //2.第二种方式
        //CuratorFrameworkFactory.builder();
        CuratorFramework client = CuratorFrameworkFactory.builder()
                .connectString("192.168.149.135:2181")
                .sessionTimeoutMs(60 * 1000)
                .connectionTimeoutMs(15 * 1000)
                .retryPolicy(retryPolicy)
                .build();

        //开启连接
        client.start();

        lock = new InterProcessMutex(client,"/lock");
    }

    @Override
    public void run() {


        while(true){

            //获取锁
            try {

                lock.acquire(3, TimeUnit.SECONDS);
                if(tickets > 0){


                    System.out.println(Thread.currentThread()+":"+tickets);
                    Thread.sleep(100);
                    tickets--;
                }
            } catch (Exception e) {

                e.printStackTrace();
            }finally {

                //释放锁
                try {

                    lock.release();
                } catch (Exception e) {

                    e.printStackTrace();
                }
            }


        }

    }
}
ZooKeeper 集群搭建
Zookeeper 集群介绍
Leader选举:
- Serverid:服务器ID
比如有三台服务器,编号分别是1,2,3。
编号越大在选择算法中的权重越大。 - Zxid:数据ID
服务器中存放的最大数据ID.值越大说明数据 越新,在选举算法中数据越新权重越大。 - 在Leader选举的过程中,如果某台 ZooKeeper 获得了超过半数的选票,则此ZooKeeper就可以成为Leader了,成为Leader后,新添加的服务器直接成为Follower。
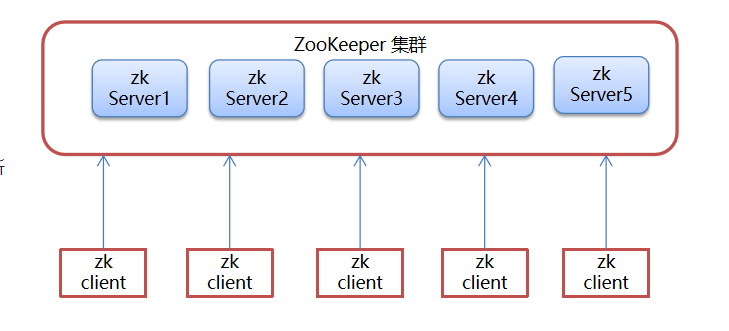
Zookeeper 集群角色
在ZooKeeper集群服中务中有三个角色:
Leader 领导者 :
- 处理事务请求
- 集群内部各服务器的调度者
Follower 跟随者 :
- 处理客户端非事务请求,转发事务请求给Leader服务器
- 参与Leader选举投票
Observer 观察者:
- 处理客户端非事务请求,转发事务请求给Leader服务器