本次环境为Centos7.6,redis-7.0.4
1:主备模式:即主节点的数据自动同步到从节点,但当主节点挂了,从节点需要手动设置为主节点,比较麻烦。
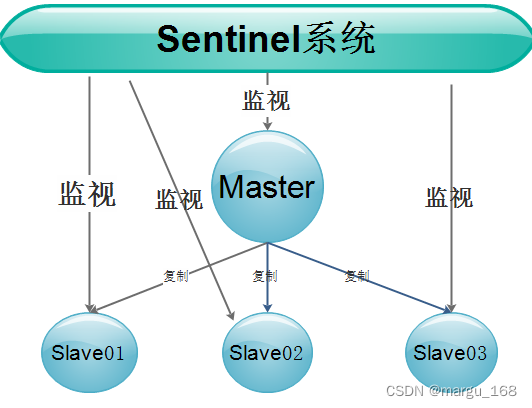
2:哨兵模式:当主节点挂了,自动投票产生主节点,要求从节点个数大于3且为基数。
3:集群模式:集群模式数据会分散到各个主节点,主要用于解决大数据问题。根据hash值自动计算数据应该放哪个主机的主节点。集群模式解决的是大数据问题,不是高可用。
生产环境主要解决的是高可用,因为当前的数据量还不足以需要使用到集群来分散处理。所以本次实践主要是主备+哨兵。
1. 准备环境
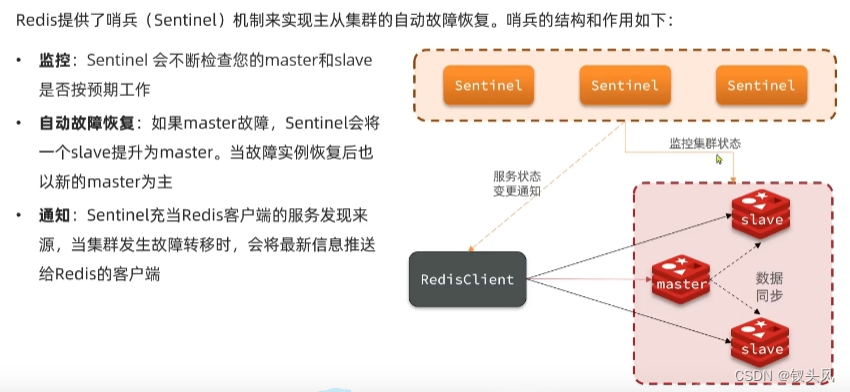
1.确保你有至少三台服务器(或虚拟机),每台服务器上安装了Redis和Redis Sentinel。哨兵模式需要至少三个哨兵实例来确保系统的健壮性。
2. 配置Redis主从复制
在主节点和从节点上配置Redis的主从复制。以下是基本步骤:
2.主节点配置
编辑主节点的Redis配置文件(通常是redis.conf),确保以下配置项正确设置:
bind 0.0.0.0  # 允许所有IP地址连接,根据需要调整
port 6379    # Redis监听的端口
requirepass dddd #记得改密码
启动主节点:
redis-server /path/to/redis.conf
redis也可以改为自动启
cd /etc/rc.d/init.d/
vi redis

################以下为内容,自行修改 路径#####################

#!/bin/bash
#chkconfig: 2345 10 90
#description: Start and Stop redis
PATH=/usr/local/bin:/sbin:/usr/bin:/bin
REDISPORT=6379
EXEC=/data/redis-7.0.4/src/redis-server   #对应你自己的配置地址
REDIS_CLI=/data/redis-7.0.4/src/redis-cli   #对应你自己的配置地址
PIDFILE=/var/run/redis.pid
CONF="/data/redis-7.0.4/redis.conf"  #对应你自己的配置地址
AUTH="你自己的redis密码"
case "$1" in
     start)
             if [ -f $PIDFILE ]
             then
                     echo "$PIDFILE exists, process is already running or crashed."
             else
                     echo "Starting Redis server..."
                     $EXEC $CONF
             fi
             if [ "$?"="0" ]
             then
                     echo "Redis is running..."
             fi
             ;;
     stop)
             if [ ! -f $PIDFILE ]
             then
                     echo "$PIDFILE exists, process is not running."
             else
                     PID=$(cat $PIDFILE)
                     echo "Stopping..."
                    $REDIS_CLI -p $REDISPORT  SHUTDOWN
                     sleep 2
                    while [ -x $PIDFILE ]
                    do
                             echo "Waiting for Redis to shutdown..."
                            sleep 1
                     done
                     echo "Redis stopped"
             fi
             ;;
     restart|force-reload)
             ${0} stop
             ${0} start
             ;;
     *)
            echo "Usage: /etc/init.d/redis {start|stop|restart|force-reload}" >&2
             exit 1
esac
########################################
chmod +x redis
chkconfig --add redis
chkconfig redis on
systemctl enable redis
systemctl start/stop/restart/status redis
3.从节点配置
编辑从节点的Redis配置文件(通常是redis.conf),添加以下配置项:
slaveof <主节点IP> <主节点端口>
masterauth 主节点的密码
例如,如果主节点的IP地址是192.168.1.100,端口是6379,则配置如下:
slaveof 192.168.1.100 6379
masterauth 主节点redis密码
启动从节点:
redis-server /path/to/redis.conf
# or
systemctl start redis
4. 配置Redis Sentinel
在每台部署了哨兵的服务器上,编辑哨兵配置文件(通常是sentinel.conf),添加以下配置项:
sentinel monitor mymaster <主节点IP> <主节点端口> <法定人数>
sentinel auth-pass mymaster 主节点的redis密码
sentinel down-after-milliseconds mymaster 5000
sentinel failover-timeout mymaster 60000
sentinel parallel-syncs mymaster 1
例如:
sentinel monitor mymaster 192.168.1.100 6379 2
sentinel auth-pass mymaster 主节点的redis密码
sentinel down-after-milliseconds mymaster 5000
sentinel failover-timeout mymaster 60000
sentinel parallel-syncs mymaster 1
mymaster:主节点的名称。
192.168.1.100 6379:主节点的地址和端口。
2:法定人数,即在决定主节点是否不可用时,需要至少2个哨兵同意。
5.启动Redis Sentinel
在每台部署了哨兵的服务器上启动哨兵实例:
redis-sentinel /path/to/sentinel.conf
# or
systemctl start redis-sentinel
也可以配置哨兵加入系统自动启动
cd /etc/init.d/
vi redis-sentinel
内容在下面
chmod +x redis-sentinel
chkconfig --add redis-sentinel
chkconfig redis-sentinel on
systemctl enable redis-sentinel
#使用systemctl来启动他
systemctl start/stop/restart redis-sentinel
redis-sentinel内容
#!/bin/sh
# chkconfig: 2345 90 10
# description: Redis Sentinel

PATH=/usr/local/sbin:/usr/local/bin:/sbin:/bin:/usr/sbin:/usr/bin
DAEMON=/data/redis-7.0.4/src/redis-sentinel
CONFIG=/data/redis-7.0.4/sentinel.conf
NAME=redis-sentinel

case "$1" in
    start)
        echo "Starting $NAME..."
        $DAEMON $CONFIG
        ;;
    stop)
        echo "Stopping $NAME..."
        $DAEMON $CONFIG stop
        ;;
    restart)
        $0 stop
        $0 start
        ;;
    *)
        echo "Usage: $0 {start|stop|restart}"
        exit 1
        ;;
esac
exit 0
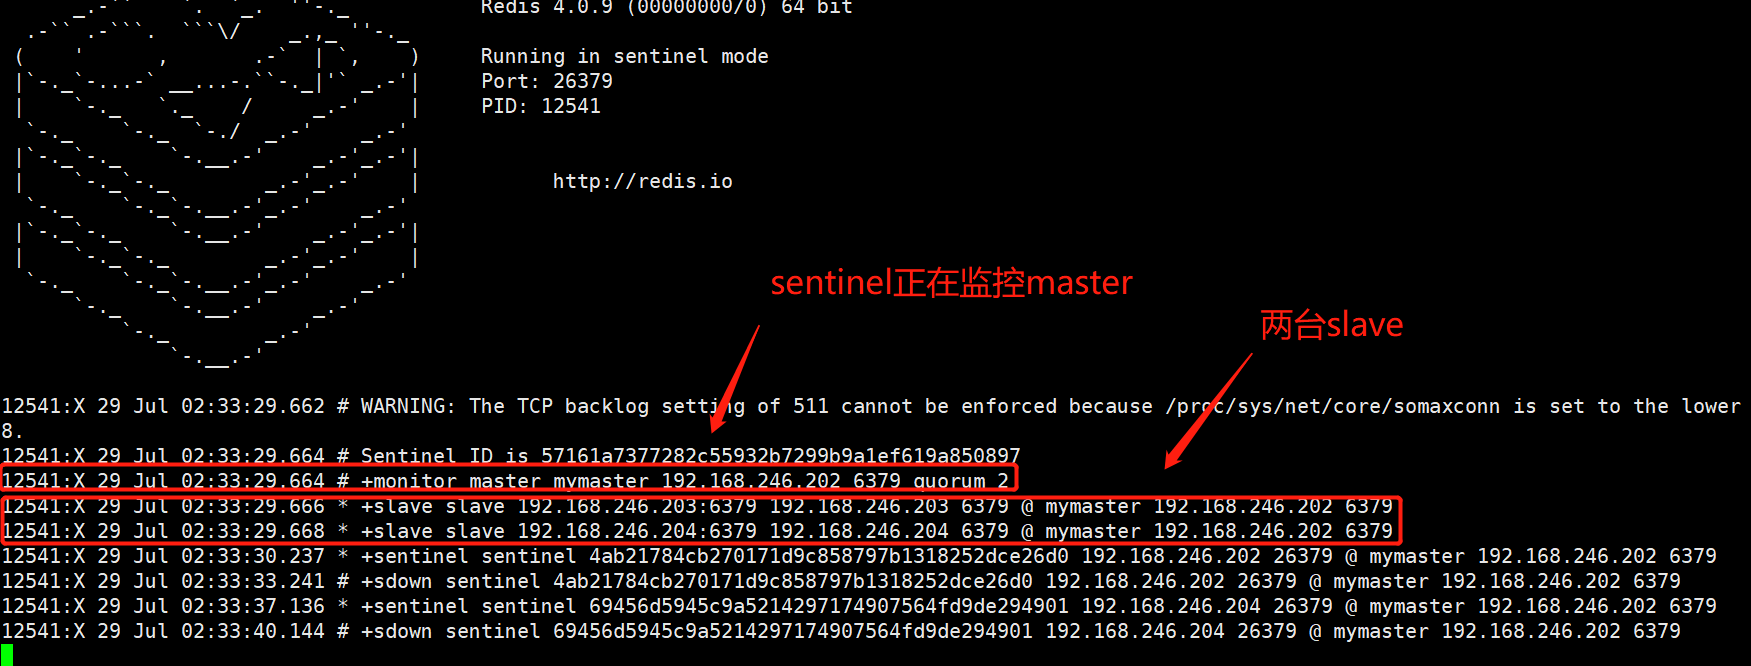
6.验证哨兵配置是否正确
连接到任意一个哨兵实例,使用以下命令检查哨兵状态:
redis-cli -h <哨兵IP> -p 26379
然后在Redis CLI中执行:
SENTINEL get-master-addr-by-name mymaster
这将返回当前主节点的地址和端口。
redis-cli -h ip -p 26379
auth redis密码
info sentinel
上面会打印哨兵状态,下面是一个模拟输出,正常是slaves=3 sentinels=3 。如果你的salves=2需要进一步排查问题。
# Sentinel
sentinel_masters:1
sentinel_tilt:0
sentinel_running_scripts:0
sentinel_scripts_queue_length:0
sentinel_simulate_failure_flags:0
master0:name=mymaster,status=ok,address=192.168.1.100:6379,slaves=2,sentinels=3
你可以使用
SENTINEL slaves mymaster
查看具体的从节点信息,没出现在里面的那台,肯定就是哪里有问题,要么配置不生效,要么配置不对,要么网络不通等等,如果都核实过了没问题,就把服务杀掉,重启一下。
7.springboot修改配置
在Spring Boot的配置文件(例如application.properties或application.yml)中,添加Redis Sentinel的相关配置。
使用application.properties
spring.redis.sentinel.master=mymaster
spring.redis.sentinel.nodes=192.168.1.100:26379,192.168.1.101:26379,192.168.1.102:26379
spring.redis.password=myredispassword
使用application.yml
spring:
  redis:
    sentinel:
      master: mymaster
      nodes:
        - 192.168.1.100:26379
        - 192.168.1.101:26379
        - 192.168.1.102:26379
    password: myredispassword