1.架构图

2.基础环境准备:
2.1 关闭防火墙和selinux
[root@localhost ~]# setenforce 0
[root@localhost ~]# sed -i 's/SELINUX=enforcing/SELINUX=disabled/g' /etc/selinux/config
[root@localhost ~]# cat /etc/selinux/config

# This file controls the state of SELinux on the system.
# SELINUX= can take one of these three values:
#     enforcing - SELinux security policy is enforced.
#     permissive - SELinux prints warnings instead of enforcing.
#     disabled - No SELinux policy is loaded.
SELINUX=disabled
# SELINUXTYPE= can take one of three two values:
#     targeted - Targeted processes are protected,
#     minimum - Modification of targeted policy. Only selected processes are protected.
#     mls - Multi Level Security protection.
SELINUXTYPE=targeted
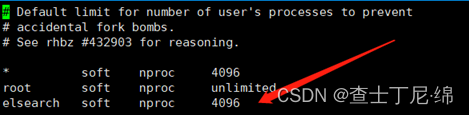
2.2 修改Linux最大打开文件数
[root@localhost ~]# cat /etc/security/limits.conf |grep -v "^#"|grep -v "^$"
*                soft    nproc           65536
*                hard    nproc           65536
*                soft    nofile          65536
*                hard    nofile          65536

[root@localhost ~]# cat /etc/sysctl.conf |grep -v "^#"
vm.max_map_count = 655360
[root@localhost ~]# sysctl -p
vm.max_map_count = 655360

[root@localhost ~]# cat /etc/systemd/system.conf | grep -v "^#"

[Manager]
DefaultLimitNOFILE=655360
DefaultLimitNPROC=655360
2.3 安装java环境
下载地址:https://www.oracle.com/java/technologies/downloads/#license-lightbox
#1.安装命令
[root@localhost ~]# yum install -y jdk-11.0.24_linux-x64_bin.rpm
已加载插件:product-id, search-disabled-repos, subscription-manager
This system is registered with an entitlement server, but is not receiving updates. You can use subscription-manager to assign subscriptions.
正在检查 jdk-11.0.24_linux-x64_bin.rpm: 2000:jdk-11-11.0.24-7.x86_64
jdk-11.0.24_linux-x64_bin.rpm 将被安装
正在解决依赖关系
--> 正在检查事务
---> 软件包 jdk-11.x86_64.2000.11.0.24-7 将被 安装
--> 解决依赖关系完成

依赖关系解决

=======================================================================================================================================================================================================================================
 Package                                          架构                                             版本                                                     源                                                                    大小
=======================================================================================================================================================================================================================================
正在安装:
 jdk-11                                           x86_64                                           2000:11.0.24-7                                           /jdk-11.0.24_linux-x64_bin                                           270 M

事务概要
=======================================================================================================================================================================================================================================
安装  1 软件包

总计:270 M
安装大小:270 M
Downloading packages:
Running transaction check
Running transaction test
Transaction test succeeded
Running transaction
  正在安装    : 2000:jdk-11-11.0.24-7.x86_64                                                                                                                                                                                       1/1
  验证中      : 2000:jdk-11-11.0.24-7.x86_64                                                                                                                                                                                       1/1

已安装:
  jdk-11.x86_64 2000:11.0.24-7

完毕!

#2.查看java版本
[root@localhost ~]# java -version
java version "11.0.24" 2024-07-16 LTS
Java(TM) SE Runtime Environment 18.9 (build 11.0.24+7-LTS-271)
Java HotSpot(TM) 64-Bit Server VM 18.9 (build 11.0.24+7-LTS-271, mixed mode)

#3.声明环境变量
[root@localhost ~]# export JAVA_HOME=/usr/java/jdk-11-oracle-x64/
[root@localhost ~]# export PATH=$PATH:$JAVA_HOME/bin
[root@localhost ~]# export CLASSPATH=.:$JAVA_HOME/lib/dt.jar:$JAVA_HOME/lib/tools.jar
[root@localhost ~]# export LS_JAVA_HOME=/usr/java/jdk-11-oracle-x64/
3.Elasticsearch搭建
3.1 Elasticsearch认识
一个开源的分布式搜索引擎,可以用来实现搜索、日志统计、分析、系统监控等功能
基于倒排索引,优点是根据词条搜索、模糊搜索时,速度非常快,缺点是只能给指定词条创建索引,而不是字段,无法根据字段做排序,关于正向索引和倒排索引会在后面再说明。
3.2 安装Elasticsearch
#1.解压压缩包
[root@localhost ~]# tar -zxvf elasticsearch-8.14.3-linux-x86_64.tar.gz
elasticsearch-8.14.3/
elasticsearch-8.14.3/lib/
elasticsearch-8.14.3/lib/elasticsearch-8.14.3.jar
elasticsearch-8.14.3/lib/elasticsearch-preallocate-8.14.3.jar
elasticsearch-8.14.3/lib/elasticsearch-x-content-8.14.3.jar
elasticsearch-8.14.3/lib/elasticsearch-lz4-8.14.3.jar
elasticsearch-8.14.3/lib/elasticsearch-cli-8.14.3.jar
elasticsearch-8.14.3/lib/elasticsearch-vec-8.14.3.jar
elasticsearch-8.14.3/lib/elasticsearch-native-8.14.3.jar
elasticsearch-8.14.3/lib/elasticsearch-core-8.14.3.jar
elasticsearch-8.14.3/lib/elasticsearch-logging-8.14.3.jar
elasticsearch-8.14.3/lib/elasticsearch-secure-sm-8.14.3.jar
...
elasticsearch-8.14.3/logs/
elasticsearch-8.14.3/plugins/
elasticsearch-8.14.3/config/jvm.options.d/

#2.拷贝安装目录
[root@localhost ~]# mv elasticsearch-8.14.3 /opt/

#3.创建es用户
[root@localhost elasticsearch-8.14.3]# groupadd es
[root@localhost elasticsearch-8.14.3]# useradd es -g es -p es
[root@localhost elasticsearch-8.14.3]# chown -R es:es /opt/elasticsearch-8.14.3/
3.3 配置Elasticsearch
#1.修改配置文件
[es@localhost config]$ cat elasticsearch.yml|grep -v "^#"|grep -v "^$"
#节点名称
node.name: node-1
#允许所有ip访问
network.host: 0.0.0.0
#端口(默认9200)
http.port: 9200
#日志信息输出目录(按需求修改)
path.data: /datalog/es/data
path.logs: /datalog/es/logs
# 集群发现种子节点列表(集群部署配多个),默认["127.0.0.1"]
discovery.seed_hosts: ["localhost"]
# 手动指定可以成为 mater 的所有节点的 name 或者 ip,这些配置将会在第一次选举中进行计算(可配多>个)
cluster.initial_master_nodes: ["node-1"]
#自动写入的安全配置
#----------------------- BEGIN SECURITY AUTO CONFIGURATION -----------------------

# The following settings, TLS certificates, and keys have been automatically

# generated to configure Elasticsearch security features on 16-06-2022 06:41:20

# --------------------------------------------------------------------------------

# Enable security features

xpack.security.enabled: true

xpack.security.enrollment.enabled: true

# Enable encryption for HTTP API client connections, such as Kibana, Logstash, and Agents

xpack.security.http.ssl:
  enabled: false
  keystore.path: certs/elastic-certificates.p12

# Enable encryption and mutual authentication between cluster nodes

xpack.security.transport.ssl:
  enabled: true
  verification_mode: certificate
  keystore.path: certs/elastic-certificates.p12
  truststore.path: certs/elastic-certificates.p12


#2.生成加密Elasticsearch集群内部通信的自签名证书
[es@localhost bin]$ cd /opt/elasticsearch-8.14.3/bin/
[es@localhost bin]$ ./elasticsearch-certutil ca
This tool assists you in the generation of X.509 certificates and certificate
signing requests for use with SSL/TLS in the Elastic stack.

The 'ca' mode generates a new 'certificate authority'
This will create a new X.509 certificate and private key that can be used
to sign certificate when running in 'cert' mode.

Use the 'ca-dn' option if you wish to configure the 'distinguished name'
of the certificate authority

By default the 'ca' mode produces a single PKCS#12 output file which holds:
    * The CA certificate
    * The CA's private key

If you elect to generate PEM format certificates (the -pem option), then the output will
be a zip file containing individual files for the CA certificate and private key

Please enter the desired output file [elastic-stack-ca.p12]:
Enter password for elastic-stack-ca.p12 :

[es@localhost bin]$ ./elasticsearch-certutil cert --ca elastic-stack-ca.p12
This tool assists you in the generation of X.509 certificates and certificate
signing requests for use with SSL/TLS in the Elastic stack.

The 'cert' mode generates X.509 certificate and private keys.
    * By default, this generates a single certificate and key for use
       on a single instance.
    * The '-multiple' option will prompt you to enter details for multiple
       instances and will generate a certificate and key for each one
    * The '-in' option allows for the certificate generation to be automated by describing
       the details of each instance in a YAML file

    * An instance is any piece of the Elastic Stack that requires an SSL certificate.
      Depending on your configuration, Elasticsearch, Logstash, Kibana, and Beats
      may all require a certificate and private key.
    * The minimum required value for each instance is a name. This can simply be the
      hostname, which will be used as the Common Name of the certificate. A full
      distinguished name may also be used.
    * A filename value may be required for each instance. This is necessary when the
      name would result in an invalid file or directory name. The name provided here
      is used as the directory name (within the zip) and the prefix for the key and
      certificate files. The filename is required if you are prompted and the name
      is not displayed in the prompt.
    * IP addresses and DNS names are optional. Multiple values can be specified as a
      comma separated string. If no IP addresses or DNS names are provided, you may
      disable hostname verification in your SSL configuration.


    * All certificates generated by this tool will be signed by a certificate authority (CA)
      unless the --self-signed command line option is specified.
      The tool can automatically generate a new CA for you, or you can provide your own with
      the --ca or --ca-cert command line options.


By default the 'cert' mode produces a single PKCS#12 output file which holds:
    * The instance certificate
    * The private key for the instance certificate
    * The CA certificate

If you specify any of the following options:
    * -pem (PEM formatted output)
    * -multiple (generate multiple certificates)
    * -in (generate certificates from an input file)
then the output will be be a zip file containing individual certificate/key files

Enter password for CA (elastic-stack-ca.p12) :
Please enter the desired output file [elastic-certificates.p12]:
Enter password for elastic-certificates.p12 :

Certificates written to /opt/elasticsearch-8.14.3/elastic-certificates.p12

This file should be properly secured as it contains the private key for
your instance.
This file is a self contained file and can be copied and used 'as is'
For each Elastic product that you wish to configure, you should copy
this '.p12' file to the relevant configuration directory
and then follow the SSL configuration instructions in the product guide.

For client applications, you may only need to copy the CA certificate and
configure the client to trust this certificate.

#3.重置elastic用户密码
[es@localhost elasticsearch-8.14.3]$ cd /opt/elasticsearch-8.14.3/
[es@localhost elasticsearch-8.14.3]$ ./bin/elasticsearch-reset-password -u elastic
This tool will reset the password of the [elastic] user to an autogenerated value.
The password will be printed in the console.
Please confirm that you would like to continue [y/N]y


Password for the [elastic] user successfully reset.
New value: wLpzHs9uTUrjU0iiZy0*
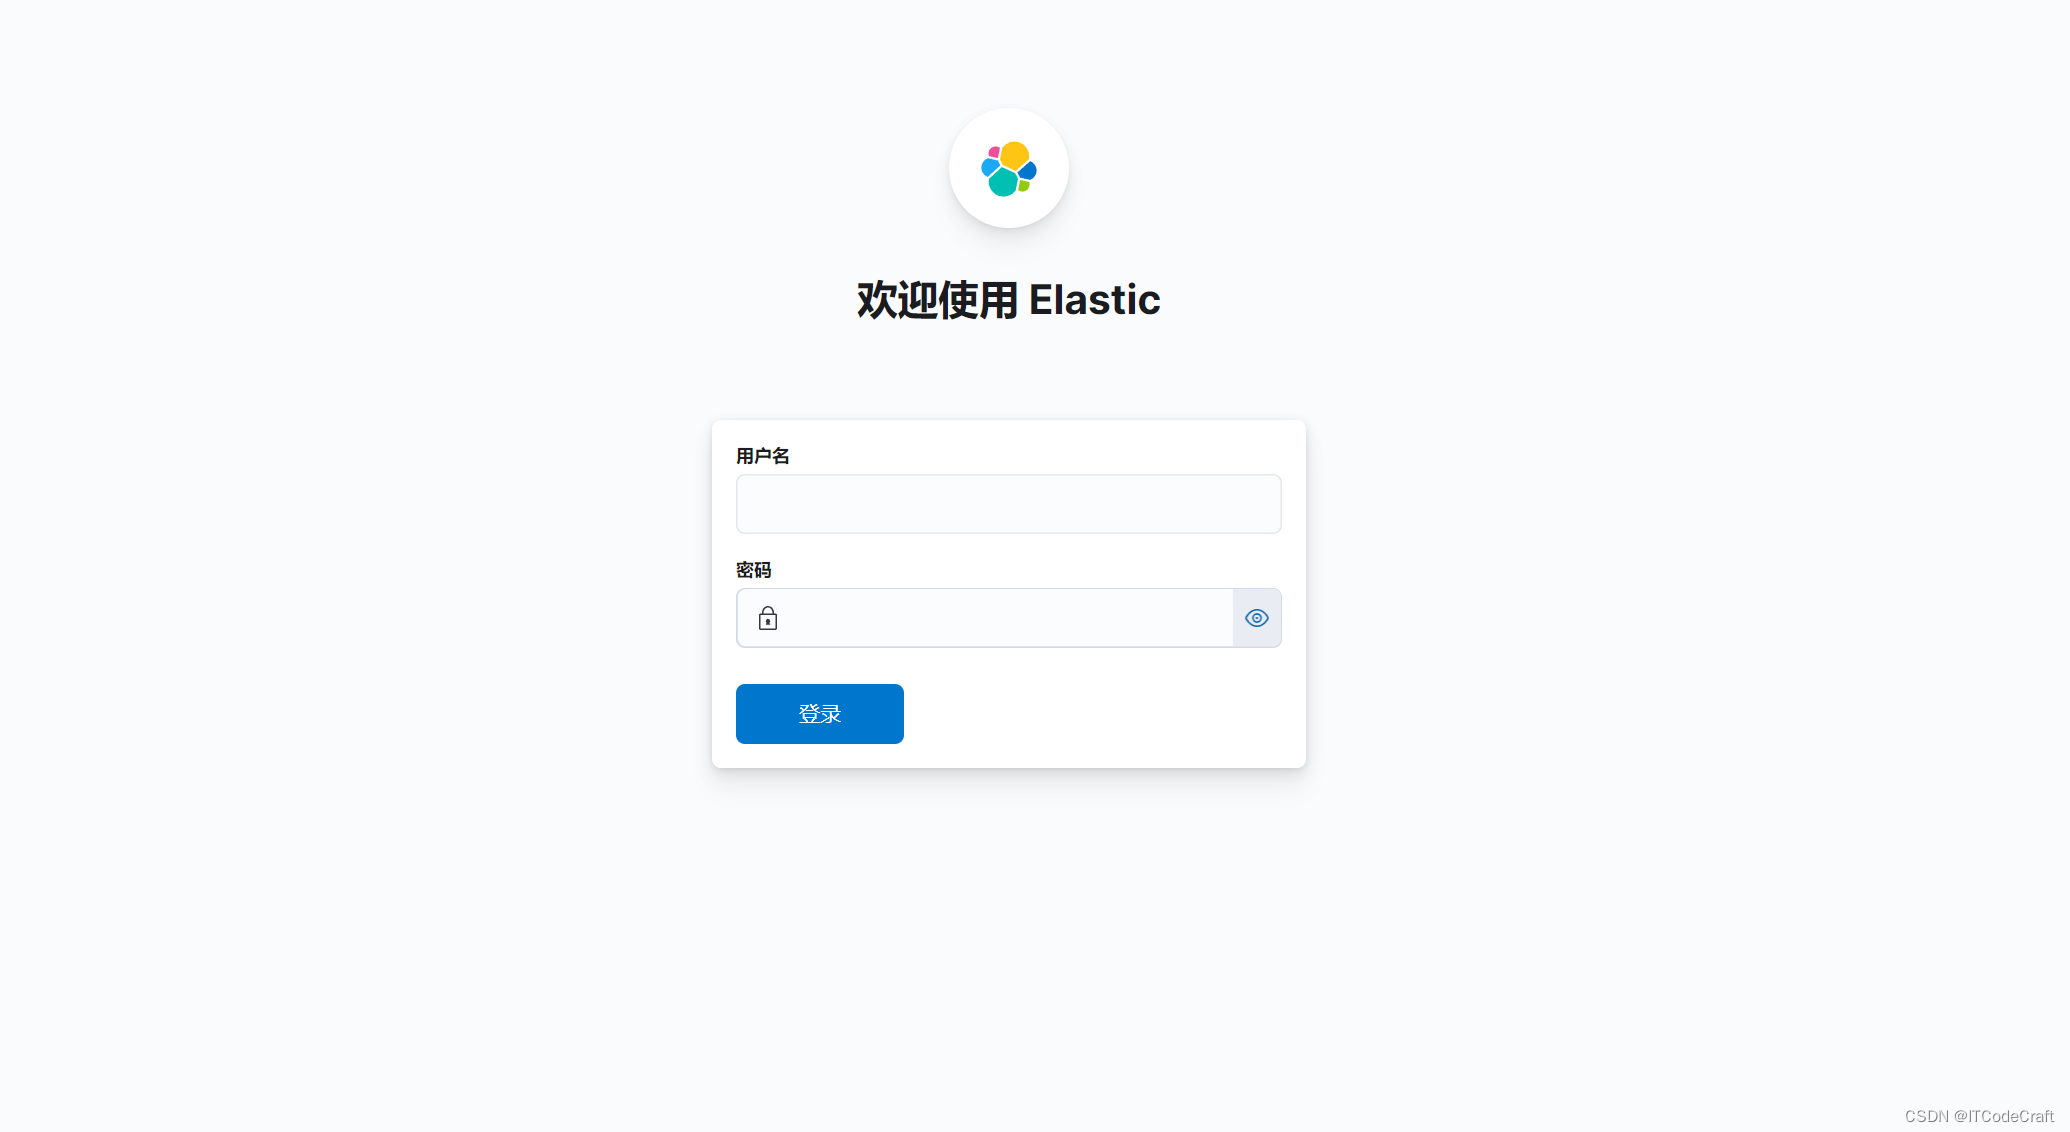
3.4 启动Elasticsearch并测试登录
[es@localhost elasticsearch-8.14.3]$ cd /opt/elasticsearch-8.14.3/
[es@localhost elasticsearch-8.14.3]$ ./bin/elasticsearch -d
登录输入账号密码:

4.Kibana搭建
4.1 安装Kibana
#1.解压kibana压缩包
[root@localhost ~]# tar -zxvf kibana-8.14.3-linux-x86_64.tar.gz

#2.将解压包移动至/opt目录下
[root@localhost ~]# mv kibana-8.14.3 /opt/

#3.对kibana目录进行es授权
[root@localhost ~]# chown -R es:es /opt/kibana-8.14.3/
4.2 修改Kibana配置文件
#1.切换es用户,修改kibana配置文件
[root@localhost ~]# su es
[es@localhost opt]$ cd /opt/kibana-8.14.3/
[es@localhost kibana-8.14.3]$ cat config/kibana.yml |grep -v "^#"|grep -v "^$"
server.port: 5601
server.host: "11.0.1.17"
elasticsearch.hosts: ["http://11.0.1.17:9200"]
i18n.locale: "zh-CN"
elasticsearch.username: "kibana"
elasticsearch.password: "wLpzHs9uTUrjU0iiZy0*"
4.3 启动Kibana
[es@localhost kibana-8.14.3]$ ./bin/kibana5.logstash搭建
5.1 logstash安装
#1.解压logstash包并拷贝到/opt目录
[root@localhost ~]# tar -zxvf logstash-8.14.3-linux-x86_64.tar.gz
[root@localhost ~]# mv logstash-8.14.3 /opt/
[root@localhost ~]# chown -R es:es /opt/logstash-8.14.3/
5.2 logstash配置
[root@localhost ~]# su es
[es@localhost kibana-8.14.3]$ cd /opt/logstash-8.14.3/
[es@localhost logstash-8.14.3]$ cat config/logstash.conf
input {
  syslog {
    type => "system-syslog"
    port => "5044"
  }
}
output {
  elasticsearch {
    hosts => ["https://11.0.1.17:9200"]
    index => "system-syslog-%{+YYYY.MM}"
    user => "elastic"
    password => "wLpzHs9uTUrjU0iiZy0*"
   # cacert => "/opt/logstash-8.14.3/certs/elastic-certificates.p12"
  }
}
然后用./bin/logstash -f config/logstash.conf启动即可