camunda工作流引擎如何调用现有的python编写的服务,并调用将结果返回前端
在Camunda工作流引擎中调用现有的Python编写的服务,并将结果返回前端,通常涉及到几个关键步骤和技术选择。Camunda 是一个强大的BPMN 2.0流程引擎,它本身主要运行在Java环境中,但它可以通过外部任务(External Tasks)、HTTP请求、REST API调用等方式与Python服务进行交互。
以下是实现这一需求的一般步骤:
1. Python服务准备
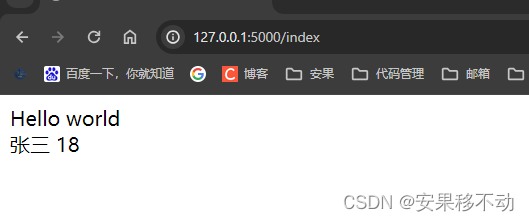
首先,确保你的Python服务可以处理HTTP请求并返回结果。你可以使用Flask或Django这样的框架来快速构建REST API。
例如,使用Flask创建一个简单的API:
from flask import Flask, request, jsonify

app = Flask(__name__)

@app.route('/process-data', methods=['POST'])
def process_data():
    # 假设接收到的数据是一个JSON对象
    data = request.json
    # 处理数据
    processed_result = {"result": "处理后的数据"}
    return jsonify(processed_result)

if __name__ == '__main__':
    app.run(debug=True, port=5000)
2. Camunda配置
2.1 外部任务(External Tasks)
如果流程需要异步处理,并且Python服务处理时间较长,可以使用Camunda的外部任务。但这通常需要Java代码来管理任务的生命周期,并调用Python服务。这不是最直接的方法,但适合复杂场景。
2.2 HTTP请求
更常见和简单的方法是使用Camunda的Delegate Task(服务任务)来调用HTTP服务。你可以通过Java Delegate来执行HTTP请求,但这需要Java代码。
为了纯Camunda环境,你可以考虑使用Camunda的Script Task(脚本任务),但请注意Camunda的Script Task主要支持JavaScript(取决于配置,有时可以配置为Groovy等)。直接使用Python脚本并不直接支持。
3. 使用HTTP请求调用Python服务
一个替代方案是在Camunda流程中配置一个服务任务(Service Task),然后在服务任务中调用一个外部Java Delegate。这个Java Delegate将使用Java的HTTP客户端(如Apache HttpClient、OkHttp等)来调用你的Python服务。
Java Delegate 示例:
import org.apache.http.client.methods.HttpPost;
import org.apache.http.entity.StringEntity;
import org.apache.http.impl.client.CloseableHttpClient;
import org.apache.http.impl.client.HttpClients;
import org.apache.http.util.EntityUtils;
import org.camunda.bpm.engine.delegate.DelegateExecution;
import org.camunda.bpm.engine.delegate.JavaDelegate;

public class CallPythonServiceDelegate implements JavaDelegate {

    @Override
    public void execute(DelegateExecution execution) throws Exception {
        String url = "http://localhost:5000/process-data";
        try (CloseableHttpClient httpClient = HttpClients.createDefault()) {
            HttpPost httpPost = new HttpPost(url);
            String jsonInputString = "{\"key\":\"value\"}"; // 根据需要构建JSON
            StringEntity input = new StringEntity(jsonInputString);
            input.setContentType("application/json");
            httpPost.setEntity(input);

            String jsonResponse = httpClient.execute(httpPost, httpResponse ->
                EntityUtils.toString(httpResponse.getEntity()));

            // 处理响应或设置到流程变量中
            execution.setVariable("response", jsonResponse);
        }
    }
}
4. 前端集成
一旦Camunda流程执行完成,并设置了相应的流程变量(如上面例子中的response),你可以通过Camunda REST API查询流程实例变量,并将这些数据展示在前端。
你可以使用JavaScript的Fetch API或Axios库从前端应用发送HTTP请求到Camunda REST API,获取流程实例的变量并显示。
这是一个复杂的流程,但通过上述步骤,你可以将Camunda工作流引擎与Python服务集成,并将结果返回到前端。
前端查询camunda工作流引擎的流程变量数据
后端,查询运行中的流程实例的变量/查询历史流程实例变量
查询运行中实例变量

import org.camunda.bpm.engine.ProcessEngine;
import org.camunda.bpm.engine.ProcessEngines;
import org.camunda.bpm.engine.RuntimeService;
import org.camunda.bpm.engine.runtime.VariableInstance;

import java.util.List;
import java.util.Map;

public class QueryProcessVariables {
    public static void main(String[] args) {
        // 创建流程引擎
        ProcessEngine processEngine = ProcessEngines.getDefaultProcessEngine();

        // 获取运行时服务
        RuntimeService runtimeService = processEngine.getRuntimeService();

        // 流程实例ID
        String processInstanceId = "yourProcessInstanceId";

        // 查询流程实例变量
        List<VariableInstance> variables = runtimeService.createVariableInstanceQuery()
                .processInstanceId(processInstanceId)
                .list();

        // 打印变量
        for (VariableInstance variable : variables) {
            System.out.println("Variable Name: " + variable.getName());
            System.out.println("Variable Value: " + variable.getValue());
            System.out.println("Variable Type: " + variable.getTypeName());
        }
    }
}


-----------------------------------------------------------------------------------------
//查询历史实例变量

import org.camunda.bpm.engine.ProcessEngine;
import org.camunda.bpm.engine.ProcessEngines;
import org.camunda.bpm.engine.RuntimeService;
import org.camunda.bpm.engine.runtime.VariableInstance;

import java.util.List;
import java.util.Map;

public class QueryProcessVariables {
    public static void main(String[] args) {
        // 创建流程引擎
        ProcessEngine processEngine = ProcessEngines.getDefaultProcessEngine();

        // 获取运行时服务
        RuntimeService runtimeService = processEngine.getRuntimeService();

        // 流程实例ID
        String processInstanceId = "yourProcessInstanceId";

        // 查询流程实例变量
        List<VariableInstance> variables = runtimeService.createVariableInstanceQuery()
                .processInstanceId(processInstanceId)
                .list();

        // 打印变量
        for (VariableInstance variable : variables) {
            System.out.println("Variable Name: " + variable.getName());
            System.out.println("Variable Value: " + variable.getValue());
            System.out.println("Variable Type: " + variable.getTypeName());
        }
    }
}
在前端查询Camunda工作流引擎的流程变量数据,你通常需要通过Camunda提供的REST API来实现。Camunda REST API允许你获取关于流程实例、任务、历史数据等的各种信息,包括流程变量。
以下是一个基本的步骤和示例,说明如何从前端(例如使用JavaScript和Fetch API)查询Camunda工作流引擎中的流程变量数据:
步骤 1: 确定流程实例ID
首先,你需要知道你想要查询的流程实例的ID。这通常是在流程启动后获得的,并可能作为流程启动的响应的一部分返回,或者你可以通过查询所有流程实例来找到它。
步骤 2: 使用Camunda REST API查询流程变量
Camunda REST API提供了一个端点来查询特定流程实例的变量。端点URL通常类似于:
GET /engine-rest/process-instance/{id}/variables其中{id}是流程实例的ID。
步骤 3: 编写前端代码
在前端,你可以使用JavaScript的Fetch API或其他HTTP客户端库(如Axios)来发送请求并处理响应。
示例代码(使用Fetch API)
// 假设你已经有了流程实例ID和Camunda REST API的URL
const processInstanceId = 'your-process-instance-id';
const camundaRestUrl = 'http://your-camunda-server/engine-rest';

// 构造完整的URL
const url = `${camundaRestUrl}/process-instance/${processInstanceId}/variables`;

// 发送GET请求
fetch(url, {
    method: 'GET',
    headers: {
        'Content-Type': 'application/json',
        // 如果Camunda配置了认证,你需要添加Authorization头
        // 'Authorization': 'Basic ' + btoa('username:password')
    }
})
.then(response => {
    if (!response.ok) {
        throw new Error('Network response was not ok');
    }
    return response.json();
})
.then(data => {
    // 处理从Camunda REST API返回的数据
    console.log(data);
    // 假设你想在前端显示某个变量的值
    const variableValue = data.variables.find(var => var.name === 'yourVariableName').value;
    console.log('Variable Value:', variableValue);
    // 在这里,你可以将变量值显示到前端UI中
})
.catch(error => {
    console.error('There was a problem with your fetch operation:', error);
});
注意事项
认证:如果你的Camunda服务器配置了认证(如Basic Auth、OAuth等),你需要在请求中包含适当的认证信息。
跨域问题:如果你的前端和Camunda服务器部署在不同的域上,你可能会遇到跨域资源共享(CORS)问题。确保你的Camunda服务器配置了适当的CORS策略以允许来自你前端域的请求。
错误处理:在上面的示例中,我添加了一些基本的错误处理。在实际应用中,你可能需要更复杂的错误处理逻辑来优雅地处理各种可能的错误情况。
变量类型:Camunda REST API返回的变量值可能是基本类型(如字符串、数字)或复杂类型(如JSON对象)。你可能需要在前端代码中适当地处理这些类型。
安全性:确保不要将敏感信息(如用户密码)硬编码在前端代码中,并始终使用HTTPS来保护你的数据


![[Vulnhub] digitalworld.local-JOY snmp+ProFTPD权限提升](https://img-blog.csdnimg.cn/img_convert/618d8e6c82a03c71060f88c996a83e71.jpeg)


![[米联客-安路飞龙DR1-FPSOC] FPGA基础篇连载-17 I2C通信协议原理](https://i-blog.csdnimg.cn/direct/fb635a2d07cb4936af003200ed4676bf.png)