以下是一个更加详细的Angular开发编码规约,涵盖了项目结构、命名约定、代码风格、组件与模板、服务与依赖注入、模块、路由、测试、文档与注释、版本控制等方面的详细指导。
Angular 开发编码规约
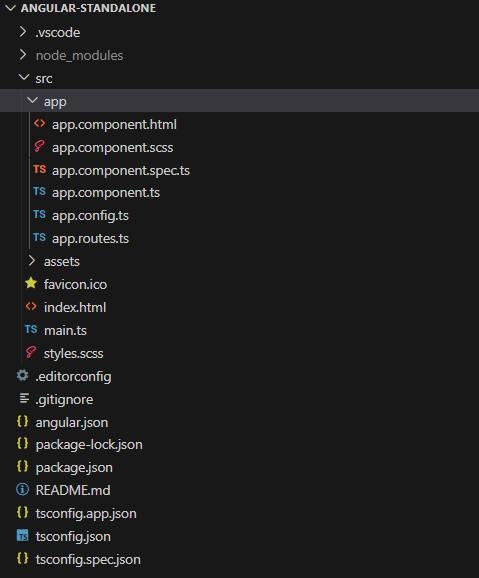
一、项目结构
顶层目录:
src/: 源代码目录src/app/: 应用主模块和组件src/assets/: 静态资源文件src/environments/: 环境配置文件
功能模块:
每个功能模块放在单独的文件夹中。
使用特性模块(feature modules)来分割应用。
src/ ├── app/ │ ├── core/ # 核心模块(单例服务,全局组件) │ ├── shared/ # 共享模块(可复用的组件、指令、管道) │ ├── feature1/ # 功能模块1 │ ├── feature2/ # 功能模块2 │ └── app.module.ts # 根模块 ├── assets/ ├── environments/ └── main.ts每个模块的子结构:
每个模块应包含
components、services、models、pipes和directives等子文件夹。示例:
feature1/

├── components/

│   ├── component1/

│   │   ├── component1.component.ts

│   │   ├── component1.component.html

│   │   ├── component1.component.scss

│   │   └── component1.component.spec.ts

│   └── component2/

├── services/

│   └── service1.service.ts

├── models/

│   └── model1.model.ts

├── pipes/

│   └── pipe1.pipe.ts

└── directives/

    └── directive1.directive.ts
二、命名约定
文件命名:
使用短横线(kebab-case)命名。
示例:
user-profile.component.ts,user.service.ts。
类名和接口名:
使用帕斯卡命名法(PascalCase)。
示例:
UserProfileComponent,UserService。
变量和函数:
使用驼峰命名法(camelCase)。
示例:
userName,getUserProfile()。
组件选择器:
使用短横线命名,且包含应用前缀。
示例:
app-user-profile。
枚举命名:
枚举名称使用帕斯卡命名法,枚举值使用全大写下划线命名法。
示例:
export enum UserRole {

    ADMIN = 'ADMIN',

    USER = 'USER'

}
三、代码风格
使用单引号:
优先使用单引号,只有在包含单引号的字符串中使用双引号。
示例:
const title = 'Hello World';。
缩进与空格:
使用2个空格缩进。
避免使用制表符。
分号:
- 在每个语句结束时使用分号。
箭头函数:
- 尽量使用箭头函数来保持上下文中的
this。
- 尽量使用箭头函数来保持上下文中的
模板字符串:
- 使用模板字符串(反引号)拼接长字符串。
注释:
在复杂的逻辑或关键部分添加注释。
避免冗长或不必要的注释。
示例:
// 检查用户是否已登录 if (this.authService.isLoggedIn()) { ... }空行:
- 在代码块之间和逻辑分段之间添加空行,增强可读性。
代码长度:
- 每行代码的长度不应超过120个字符,避免过长的代码行。
四、组件与模板
组件类:
每个组件都应包含一个类。
遵循单一职责原则,一个组件只做一件事。
示例:
import { Component, OnInit } from '@angular/core'; @Component({ selector: 'app-user-profile', templateUrl: './user-profile.component.html', styleUrls: ['./user-profile.component.scss'] }) export class UserProfileComponent implements OnInit { user: User; constructor(private userService: UserService) { } ngOnInit(): void { this.userService.getUser().subscribe(user => this.user = user); } }模板文件:
使用内联模板(template)或外部模板文件(templateUrl)。
避免在模板中使用复杂的表达式。
示例:
<div *ngIf="user"> <h1>{{ user.name }}</h1> <p>{{ user.email }}</p> </div>样式文件:
使用内联样式(styles)或外部样式文件(styleUrls)。
推荐使用SCSS。
示例:
.user-profile { h1 { color: #333; } p { font-size: 14px; } }数据绑定:
使用单向数据绑定(
[property]),避免双向绑定([(ngModel)])带来的复杂性。示例:
<input [value]="user.name" (input)="user.name = $event.target.value">事件绑定:
使用事件绑定(
(event))处理用户交互。示例:
<button (click)="onClick()">Click me</button>指令与管道:
自定义指令和管道应在共享模块中定义和导出。
使用Angular内置指令和管道(如
*ngIf、*ngFor、| date)。示例:
@Pipe({ name: 'capitalize' })

export class CapitalizePipe implements PipeTransform {

  transform(value: string): string {

    return value.charAt(0).toUpperCase() + value.slice(1);

  }

}
五、服务与依赖注入
服务类:
所有服务都应注入到根模块或特性模块中。
使用
@Injectable装饰器。示例:
@Injectable({ providedIn: 'root' }) export class UserService { constructor(private http: HttpClient) { } getUser(): Observable<User> { return this.http.get<User>('/api/user'); } }依赖注入:
遵循Angular的依赖注入机制,避免直接实例化服务。
使用构造函数参数注入服务。
示例:
export class UserProfileComponent { constructor(private userService: UserService) { } }提供商模式:
服务应在模块级别或组件级别提供。
使用
providedIn属性将服务提供给根模块或特定模块。
六、模块
模块文件:
每个模块应包含一个NgModule。
避免在同一模块中导入和声明太多组件。
示例:
@NgModule({ declarations: [UserProfileComponent, UserListComponent], imports: [CommonModule, FormsModule], providers: [UserService] }) export class UserModule { }共享模块:
创建共享模块以声明和导出公共组件、指令和管道。
示例:
@NgModule({ declarations: [CommonComponent, CommonDirective, CommonPipe], exports: [CommonComponent, CommonDirective, CommonPipe], imports: [CommonModule] }) export class SharedModule { }核心模块:
创建核心模块用于应用级别的单例服务和全局组件。
示例:
@NgModule({

  providers: [AuthService, ApiService]

})

export class CoreModule { }
七、路由
路由配置:
将路由配置放在一个独立的模块中。
使用惰性加载