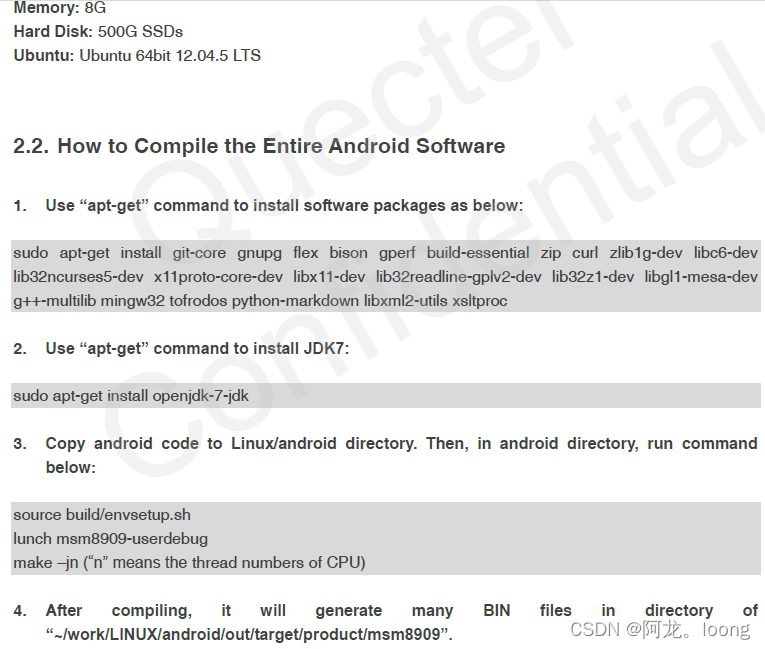
0. 环境准备
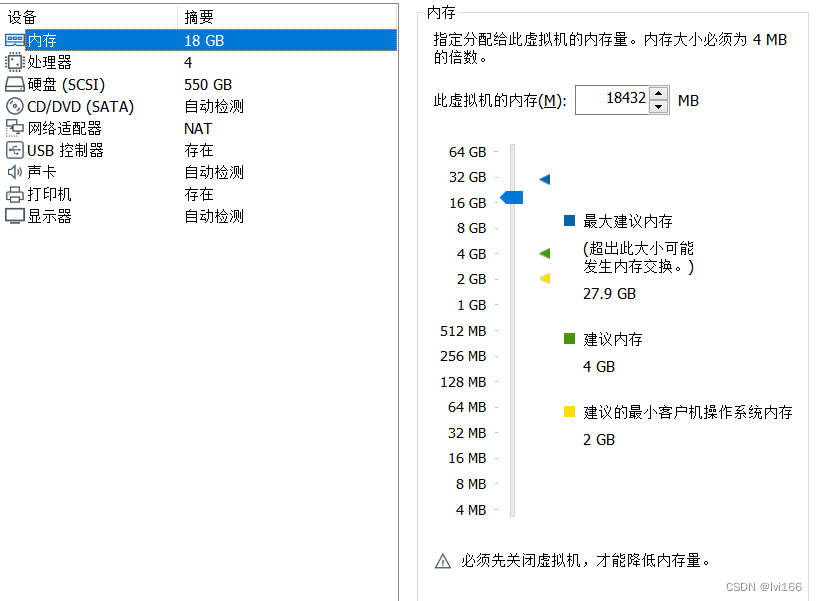
Ubuntu 16.04 LTS(预留至少95GB磁盘空间,实测占94.2GB)

Pixel 2 XL
要买欧版的,不要美版的。
欧版能解锁BootLoader、能刷机。
美版IMEI里一般带“v”或者"version",这样不能解锁BootLoader、也不能刷机。想刷入Android-8.1.0_r1
1. 下载源码
参考:https://blog.csdn.net/aichu6610/article/details/116071003
注意改用 python3 ~/bin/repo init -u https://android.googlesource.com/platform/manifest -b android-8.1.0_r1
1.1 安装并配置git和repo
安装git
sudo apt install git
git config --global user.name “your name”
git config --global user.email “XXX@XXX.com”
安装并配置repo
sudo apt install curl

mkdir ~/bin
PATH=~/bin:$PATH
curl https://storage.googleapis.com/git-repo-downloads/repo > ~/bin/repo
chmod a+x ~/bin/repo
安装JDK 8
sudo apt update
sudo apt install openjdk-8-jdk
创建文件目录
mkdir  /home/tom/Android-8.1.0_r1
cd /home/tom/Android-8.1.0_r1
修改配置
找到~/bin/repo文件,修改如下配置
REPO_URL = ‘https://mirrors.tuna.tsinghua.edu.cn/git/git-repo’
在终端下运行
git config --global url.https://mirrors.tuna.tsinghua.edu.cn/git/AOSP/.insteadof https://android.googlesource.com
执行gedit ~/.bashrc然后在末尾添加:
export PATH=~/bin:$PATH
export REPO_URL=‘https://mirrors.tuna.tsinghua.edu.cn/git/git-repo’
运行 source ~/.bashrc 使环境变量生效
1.2 使用repo同步代码
Repo是谷歌提供的一套python脚本,封装了一系列git命令,用来管理多个git库
初始化repo仓库
python3 ~/bin/repo init -u https://android.googlesource.com/platform/manifest -b android-8.1.0_r1
如果想用其他版本,在这里查询:
https://source.android.com/source/build-numbers?hl=zh-cn
同步代码
repo sync -j8
这个过程会持续数个小时
-j8貌似是并行的意思,如果报错可以去掉-j8试试
中间有报错,但不知道是否有影响

某些时刻输出过长,所以最后就多出来一截 应该无大碍

以防万一,又 repo sync 了几遍

2. 准备驱动脚本
地址:https://developers.google.com/android/drivers
要找 android-8.1.0_r1 的 pixel 2xl的驱动
android-8.1.0_r1就是OPM1.171019.011
参考:https://source.android.com/docs/setup/about/build-numbers?hl=zh-cn#source-code-tags-and-builds
所以锁定:
https://developers.google.com/android/drivers#taimenopm1.171019.011

将上面两个link的内容下载下来,得到两个sh:
extract-google_devices-taimen.sh
extract-qcom-taimen.sh
3. 编译
3.1 编译
source build/envsetup.sh

将下载的两个驱动脚本 放入源码根目录下 并执行
./extract-google_devices-taimen.sh
./extract-qcom-taimen.sh
一顿敲回车(注意不要敲过油了)
最后敲入I ACCEPT


执行lunch
lunch
我的是Pixel 2 XL,也就是 taimen,所以选27
(各机型的对照参考:https://blog.csdn.net/guyongqiangx/article/details/123971895)

执行 time make
(这里不并行了,并行容易出bug,如果想并行可以time make -j4 )
time make
3.2 报错:Assertion `cnt < (sizeof (_nl_value_type_LC_TIME) / sizeof (_nl_value_type_LC_TIME[0]))’ failed.

[  4% 5148/105788] Lex: applypatch <= bootable/recovery/edify/lexer.ll
FAILED: out/target/product/taimen/obj/STATIC_LIBRARIES/libedify_intermediates/lexer.cpp
/bin/bash -c "prebuilts/misc/linux-x86/flex/flex-2.5.39 -oout/target/product/taimen/obj/STATIC_LIBRARIES/libedify_intermediates/lexer.cpp bootable/recovery/edify/lexer.ll"
flex-2.5.39: loadlocale.c:130: _nl_intern_locale_data: Assertion `cnt < (sizeof (_nl_value_type_LC_TIME) / sizeof (_nl_value_type_LC_TIME[0]))' failed.
Aborted (core dumped)
[  4% 5153/105788] target arm C++: libaudioprocessing_32 <= frameworks/av/media/libaudioprocessing/AudioResamplerDyn.cpp
ninja: build stopped: subcommand failed.
15:07:08 ninja failed with: exit status 1
解决办法:参考:https://groups.google.com/g/android-building/c/0kzPnw3akxg/m/ozJe-XlSAQAJ
export LC_ALL=C
然后
make clean
time make
出现了新的报错
3.3 报错:Out of memory error GC overhead limit exceeded.

[ 62% 65895/105788] Building with Jack: out/target/common/obj/JAVA_LIBRARIES/framework_intermediates/with-local/classes.dex
FAILED: out/target/common/obj/JAVA_LIBRARIES/framework_intermediates/with-local/classes.dex
/bin/bash out/target/common/obj/JAVA_LIBRARIES/framework_intermediates/with-local/classes.dex.rsp
Out of memory error (version 1.3-rc7 'Douarn' (445000 d7be3910514558d6715ce455ce0861ae2f56925a by android-jack-team@google.com)).
GC overhead limit exceeded.
Try increasing heap size with java option '-Xmx<size>'.
Warning: This may have produced partial or corrupted output.
[ 62% 65900/105788] //art/compiler:libart-compiler clang++ optimizing/optimizing_compiler.cc [linux]
ninja: build stopped: subcommand failed.
20:28:27 ninja failed with: exit status 1
解决办法:参考 https://blog.csdn.net/liangtianmeng/article/details/86665237
在文件/prebuilts/sdk/tools/jack-admin中修正-Xmx参数
修改变量JACK_SERVER_VM_ARGUMENTS,添加参数 -Xmx2048M
JACK_SERVER_VM_ARGUMENTS="${JACK_SERVER_VM_ARGUMENTS:=-Dfile.encoding=UTF-8 -XX:+TieredCompilation -mx2048M}"
然后
make clean
time make


至此,编译成功了
4. 刷机
4.1 Ubuntu安装fastboot和adb
在Ubuntu系统上安装ADB Fastboot
sudo apt install android-tools-adb
sudo apt install android-tools-fastboot
4.2 手机OEM解锁
要买欧版的,不要美版的。
欧版能解锁BootLoader、能刷机。
美版IMEI里一般带“v”或者"version",这样不能解锁BootLoader、也不能刷机。
手机解锁
参考:https://www.cnblogs.com/ciml/p/13949911.html
adb reboot bootloader
# 先看看设备是否连接成功
fastboot devices
# 解锁 (用于2015年及之后的设备)
fastboot flashing unlock

# 老设备解锁 (2014及以前的设备)
fastboot oem unlock
这里用fastboot flashing unlock
如果报错
FAILED (remote: 'Flashing Unlock is not allowed')
fastboot: error: Command failed
说明手机的开发者模式里“OEM解锁”没有打开
需要保证网络畅通,确保能访问Google

再次adb reboot bootloader
手机进入bootloader
adb reboot bootloader
fastboot flashing unlock
之后通过音量加减键选中Yes,通过电源键确认
4.3 刷入img镜像
参考:https://www.cnblogs.com/ciml/p/13714036.html
在刚才编译源码的同一终端窗口内执行
fastboot flashall
如果报错 error: ANDROID_PRODUCT_OUT not set
大概率是没在同一终端窗口执行
解决方法:执行
export ANDROID_PRODUCT_OUT=~/Android-8.1.0_r1/out/target/product/taimen
其中,~/Android-8.1.0_r1/out/target/product/taimen 是img文件所在的目录

再次执行fastboot flashall


成功!