一、什么是BS4
Beautiful Soup是一个 可以从 HTML 或 XML 文件中提取数据的 Python 库。它能用你喜欢的解析器和习惯的方式实现 文档树的导航、查找、和修改。它会帮你节省数小时甚至数天的工作时间。
这篇文档介绍了 Beautiful Soup 4 中所有主要特性,并附带例子。文档会展示这个库的适合场景, 工作原理,怎样使用,如何达到预期效果,以及如何处理异常情况。
文档覆盖了 Beautful Soup 4.12.0 版本,文档中的例子使用 Python 3.8 版本编写。
你可能在寻找Beautiful Soup3的文档,Beautiful Soup 3 目前已经停止开发,并且自 2020年12月31日以后就停止维护了。 如果想要了解 Beautiful Soup 3 和 Beautiful Soup 4 的不同,参考迁移到 BS4。
这篇文档已经被翻译成多种语言:
这篇文档当然还有中文版, (Github 地址).
このページは日本語で利用できます(外部リンク)
Este documento também está disponível em Português do Brasil.
二、快速开始
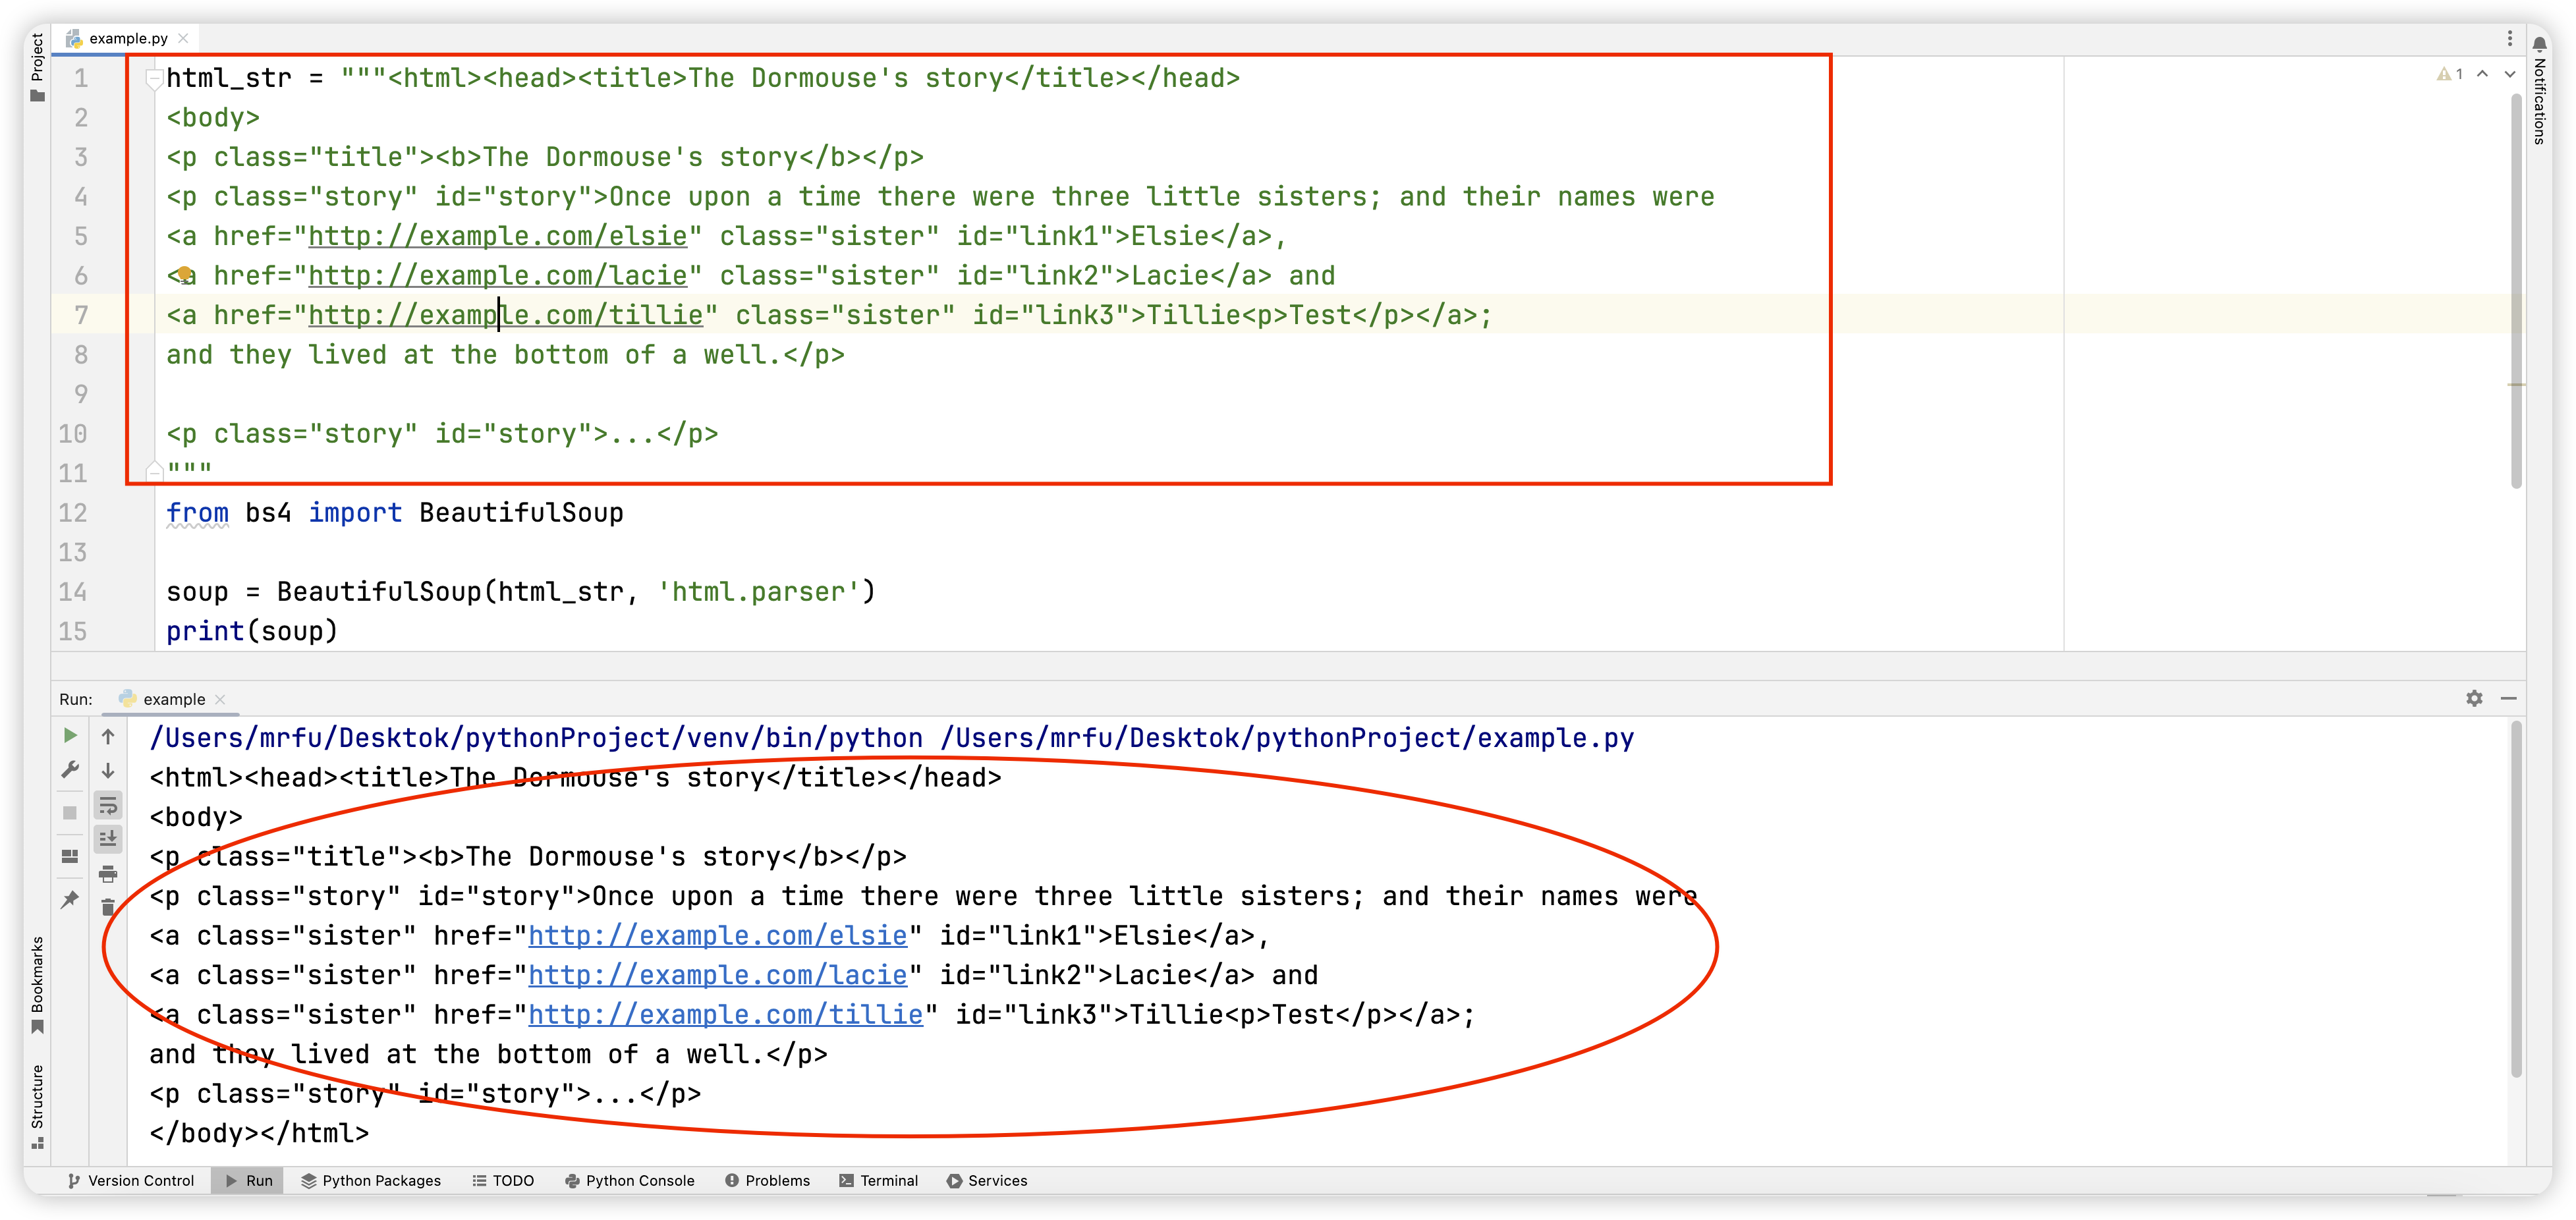
下面的一段HTML代码将作为例子被多次用到。这是爱丽丝梦游仙境的一段内容(以后简称爱丽丝的文档):
html_doc = """
<html><head><title>The Dormouse's story</title></head>
<body>
<p class="title"><b>The Dormouse's story</b></p>
<p class="story">Once upon a time there were three little sisters; and their names were
<a href="http://example.com/elsie" class="sister" id="link1">Elsie</a>,
<a href="http://example.com/lacie" class="sister" id="link2">Lacie</a> and
<a href="http://example.com/tillie" class="sister" id="link3">Tillie</a>;
and they lived at the bottom of a well.</p>
<p class="story">...</p>
"""
上面的爱丽丝文档经过 Beautiful Soup 的解析后,会得到一个BeautifulSoup的对象, 一个嵌套结构的对象:
from bs4 import BeautifulSoup
soup = BeautifulSoup(html_doc, 'html.parser')
print(soup.prettify())
# <html>
# <head>
# <title>
# The Dormouse's story
# </title>
# </head>
# <body>
# <p class="title">
# <b>
# The Dormouse's story
# </b>
# </p>
# <p class="story">
# Once upon a time there were three little sisters; and their names were
# <a class="sister" href="http://example.com/elsie" id="link1">
# Elsie
# </a>
# ,
# <a class="sister" href="http://example.com/lacie" id="link2">
# Lacie
# </a>
# and
# <a class="sister" href="http://example.com/tillie" id="link2">
# Tillie
# </a>
# ; and they lived at the bottom of a well.
# </p>
# <p class="story">
# ...
# </p>
# </body>
# </html>
这是几个简单的浏览结构化数据的方法:
soup.title
# <title>The Dormouse's story</title>
soup.title.name
# u'title'
soup.title.string
# u'The Dormouse's story'
soup.title.parent.name
# u'head'
soup.p
# <p class="title"><b>The Dormouse's story</b></p>
soup.p['class']
# u'title'
soup.a
# <a class="sister" href="http://example.com/elsie" id="link1">Elsie</a>
soup.find_all('a')
# [<a class="sister" href="http://example.com/elsie" id="link1">Elsie</a>,
# <a class="sister" href="http://example.com/lacie" id="link2">Lacie</a>,
# <a class="sister" href="http://example.com/tillie" id="link3">Tillie</a>]
soup.find(id="link3")
# <a class="sister" href="http://example.com/tillie" id="link3">Tillie</a>
常见任务之一,就是从文档中找到所有 <a> 标签的链接:
for link in soup.find_all('a'):
print(link.get('href'))
# http://example.com/elsie
# http://example.com/lacie
# http://example.com/tillie
另一种常见任务,是从文档中获取所有文字内容:
print(soup.get_text())
# The Dormouse's story
#
# The Dormouse's story
#
# Once upon a time there were three little sisters; and their names were
# Elsie,
# Lacie and
# Tillie;
# and they lived at the bottom of a well.
#
# ...
这是你想要的吗?是的话,继续看下去。
三、安装BS
如果你用的是新版的 Debain 或 Ubuntu,那么可以通过系统的软件包管理来安装:
$apt-getinstallpython3-bs4
Beautiful Soup 4 通过 PyPi 发布,所以如果无法使用系统包管理安装,那么 也可以通过easy_install或pip来安装。包的名字是beautifulsoup4。 确保使用的是与 Python 版本对应的pip或easy_install版本 (他们的名字也可能是pip3和easy_install)。
$easy_installbeautifulsoup4
$pipinstallbeautifulsoup4
(在 PyPi 中还有一个名字是BeautifulSoup的包,但那可能不是你想要的,那是Beautiful Soup3版本。因为很多项目还在使用BS3, 所以BeautifulSoup包依然有效。但是新项目中,应该安装beautifulsoup4。)
如果没有安装easy_install或pip,那也可以下载 BS4 的源码, 然后通过setup.py来安装。
$Pythonsetup.pyinstall
如果上述安装方法都行不通,根据 Beautiful Soup 的协议,可以将项目的代码打包在 你的项目中,这样无须安装即可使用。
Beautiful Soup 用 Python 3.10 版本开发,但也可以在当前的其它版本中运行。
安装解析器
Beautiful Soup 支持 Python 标准库中的 HTML 解析器,还支持一些第三方的解析器, 其中一个是lxml parser。根据安装方法的不同, 可以选择下列方法来安装 lxml:
$apt-get install Python-lxml
$easy_installl xml
$pip install lxml
另一个可供选择的解析器是纯 Python 实现的html5lib, html5lib 的解析方式与浏览器相同,根据安装方法的不同,可以选择下列方法来安装html5lib:
$apt-get install python-html5lib
$easy_install html5lib
$pip install html5lib
下表描述了几种解析器的优缺点:
解析器 |
使用方法 |
优势 |
劣势 |
Python 标准库 |
|
- Python的内置标准库 - 执行速度较快 - 容错能力强 |
- 速度没有 lxml 快,容错没有 html5lib强 |
lxml HTML 解析器 |
|
- 速度快 - 容错能力强 |
- 额外的 C 依赖 |
lxml XML 解析器 |
|
- 速度快 - 唯一支持 XML 的解析器 |
- 额外的 C 依赖 |
html5lib |
|
- 最好的容错性 - 以浏览器的方式解析文档 - 生成 HTML5 格式的文档 |
- 速度慢 - 额外的 Python 依赖 |
如果可以,推荐使用 lxml 来获得更高的速度。
注意,如果一段文档格式不标准,那么在不同解析器生成的 Beautiful Soup 数可能不一样。 查看解析器之间的区别了解更多细节。
四、如何使用
解析文档是,将文档传入BeautifulSoup的构造方法。也可以传入一段字符串或一个文件句柄:
from bs4 import BeautifulSoup
with open("index.html") as fp:
soup = BeautifulSoup(fp, 'html.parser')
soup = BeautifulSoup("<html>a web page</html>", 'html.parser')
首先,文档被转换成 Unicode,并且 HTML 中的实体也都被转换成 Unicode 编码
print(BeautifulSoup("<html><head></head><body>Sacré bleu!</body></html>", "html.parser"))
# <html><head></head><body>Sacré bleu!</body></html>
然后,Beautiful Soup 选择最合适的解析器来解析这段文档。如果指定了解析器那么 Beautiful Soup 会选择指定的解析器来解析文档。(参考解析成XML)。
五、对象的种类
Beautiful Soup 将复杂的 HTML 文档转换成一个复杂的由 Python 对象构成的树形结构,但处理对象的过程只包含 4 种类型的对象:Tag,NavigableString,BeautifulSoup, 和Comment。
1.标签对象 - Tag
TagTag对象与 XML 或 HTML 原生文档中的 tag 相同:
soup = BeautifulSoup('<b class="boldest">Extremely bold</b>', 'html.parser')
tag = soup.b
type(tag)
# <class 'bs4.element.Tag'>
Tag有很多属性和方法,在遍历文档树和搜索文档树中有详细解释。 现在介绍一下 tag 中最重要的属性: name 和 attributes。
bs4.name
每个 tag 都有一个名字:
tag.name
# u'b'
如果改变了 tag 的 name,那将影响所有通过当前 Beautiful Soup 对象生成的HTML文档:
tag.name = "blockquote"
tag
# <blockquote class="boldest">Extremely bold</blockquote>
bs4.attrs
一个 HTML 或 XML 的 tag 可能有很多属性。tag<b id="boldest">有 一个 “id” 的属性,值为 “boldest”。你可以想处理一个字段一样来处理 tag 的属性:
tag = BeautifulSoup('<b id="boldest">bold</b>', 'html.parser').b
tag['id']
# 'boldest'
也可以直接”点”取属性,比如:.attrs:
tag.attrs
# {u'class': u'boldest'}
tag 的属性可以被添加、删除或修改。再说一次,tag的属性操作方法与字典一样
tag['id'] = 'verybold'
tag['another-attribute'] = 1
tag
# <b another-attribute="1" id="verybold"></b>
del tag['id']
del tag['another-attribute']
tag
# <b>bold</b>
tag['id']
# KeyError: 'id'
tag.get('id')
# None
多值属性
HTML 4 定义了一系列可以包含多个值的属性。在 HTML5 中移除了一些,却增加更多。 最常见的多值的属性是class(一个 tag 可以有多个 CSS class)。还有一些 属性rel、rev、accept-charset、headers、accesskey。 默认情况,Beautiful Soup 中将多值属性解析为一个列表:
css_soup = BeautifulSoup('<p class="body"></p>', 'html.parser')
css_soup.p['class']
# ['body']
css_soup = BeautifulSoup('<p class="body strikeout"></p>', 'html.parser')
css_soup.p['class']
# ['body', 'strikeout']
If an attribute `looks` like it has more than one value, but it's not
a multi-valued attribute as defined by any version of the HTML
standard, Beautiful Soup will leave the attribute alone::
id_soup = BeautifulSoup('<p id="my id"></p>', 'html.parser')
id_soup.p['id']
# 'my id'
如果某个属性看起来好像有多个值,但在任何版本的 HTML 定义中都没有将其定义为多值属性, 那么 Beautiful Soup 会将这个属性作为单值返回
id_soup = BeautifulSoup('<p id="my id"></p>', 'html.parser')
id_soup.p['id']
# 'my id'
将 tag 转换成字符串时,多值属性会合并为一个值
rel_soup = BeautifulSoup('<p>Back to the <a rel="index first">homepage</a></p>', 'html.parser')
rel_soup.a['rel']
# ['index', 'first']
rel_soup.a['rel'] = ['index', 'contents']
print(rel_soup.p)
# <p>Back to the <a rel="index contents">homepage</a></p>
若想强制将所有属性当做多值进行解析,可以在BeautifulSoup构造方法中设置multi_valued_attributes=None参数:
no_list_soup = BeautifulSoup('<p class="body strikeout"></p>', 'html.parser', multi_valued_attributes=None)
no_list_soup.p['class']
# 'body strikeout'
或者使用get_attribute_list方法来获取多值列表,不管是不是一个多值属性:
id_soup.p.get_attribute_list('id')
# ["my id"]
如果以 XML 方式解析文档,则没有多值属性:
xml_soup = BeautifulSoup('<p class="body strikeout"></p>', 'xml')
xml_soup.p['class']
# 'body strikeout'
但是,可以通过配置multi_valued_attributes参数来修改:
class_is_multi= { '*' : 'class'}
xml_soup = BeautifulSoup('<p class="body strikeout"></p>', 'xml', multi_valued_attributes=class_is_multi)
xml_soup.p['class']
# ['body', 'strikeout']
可能实际当中并不需要修改默认配置,默认采用的是 HTML 标准:
from bs4.builder import builder_registry
builder_registry.lookup('html').DEFAULT_CDATA_LIST_ATTRIBUTES
classbs4.NavigableString
2.可遍历的字符串对象 - NavigableString
字符串对应 tag 中的一段文本。Beautiful Soup 用NavigableString类来包装 tag 中的字符串:
soup = BeautifulSoup('<b class="boldest">Extremely bold</b>', 'html.parser')
tag = soup.b
tag.string
# 'Extremely bold'
type(tag.string)
# <class 'bs4.element.NavigableString'>
一个NavigableString对象与 Python 中的Unicode 字符串相同, 并且还支持包含在遍历文档树和搜索文档树中的一些特性。通过str方法可以直接将NavigableString对象转换成 Unicode 字符串:
unicode_string = str(tag.string)
unicode_string
# 'Extremely bold'
type(unicode_string)
# <type 'str'>
tag 中包含的字符串不能直接编辑,但是可以被替换成其它的字符串,用replace_with()方法:
tag.string.replace_with("No longer bold")
tag
# <blockquote>No longer bold</blockquote>
NavigableString对象支持遍历文档树和搜索文档树中定义的大部分属性, 并非全部。尤其是,一个字符串不能包含其它内容(tag 能够包含字符串或是其它 tag),字符串不支持.contents或.string属性或find()方法。
如果想在 Beautiful Soup 之外使用NavigableString对象,需要调用unicode()方法,将该对象转换成普通的Unicode字符串,否则就算 Beautiful Soup 方法已经执行结束,该对象的输出 也会带有对象的引用地址。这样会浪费内存。
3.文档树对象 - BeautifulSoup
classbs4.BeautifulSoup
BeautifulSoup对象表示的是一个文档的全部内容。大部分时候,可以把它当作Tag对象, 它支持遍历文档树和搜索文档树中描述的大部分的方法。
因为BeautifulSoup对象并不是真正的HTML或XML的tag,所以它没有name和attribute属性。 但有时查看它的.name属性是很方便的,所以BeautifulSoup对象包含了一个 值为 “[document]” 的特殊属性.name
soup.name
# u'[document]'
4.注释及特殊字符串 - Comment
Tag,NavigableString,BeautifulSoup几乎覆盖了html和xml中的所有内容,但是还有一些特殊对象。容易让人担心的内容是文档的注释部分:
markup = "<b><!--Hey, buddy. Want to buy a used parser?--></b>"
soup = BeautifulSoup(markup, 'html.parser')
comment = soup.b.string
type(comment)
# <class 'bs4.element.Comment'>
Comment对象是一个特殊类型的NavigableString对象:
comment
# u'Hey, buddy. Want to buy a used parser'
但是当它出现在 HTML 文档中时,Comment对象会使用特殊的格式输出:
print(soup.b.prettify())
# <b>
# <!--Hey, buddy. Want to buy a used parser?-->
# </b>
(1)针对 HTML 文档
Beautiful Soup 定义了一些NavigableString子类来处理特定的 HTML 标签。 通过忽略页面中表示程序指令的字符串,可以更容易挑出页面的 body 内容。 (这些类是在 Beautiful Soup 4.9.0 版本中添加的,html5lib 解析器不会使用它们)
classbs4.Stylesheet
有一种NavigableString子类表示嵌入的 CSS 脚本; 内容是<style>标签内部的所有字符串。
classbs4.Script
有一种NavigableString子类表示嵌入的 JavaScript 脚本; 内容是<script>标签内部的所有字符串。
classbs4.Template
有一种NavigableString子类表示嵌入的 HTML 模板, 内容是<template>标签内部的所有字符串。
(2)针对 XML 文档
Beautiful Soup 定义了一些NavigableString子类来处理 XML 文档中的特定 字符串。比如Comment,这些NavigableString的子类生成字符 串时会添加额外内容。
classbs4.Declaration
有一种NavigableString子类表示 XML 文档开头的declaration。
classbs4.Doctype
有一种NavigableString子类表示可能出现在 XML 文档开头的document type declaration。
classbs4.CData
有一种NavigableString子类表示CData section。
classbs4.ProcessingInstruction
有一种NavigableString子类表示XML 处理指令。
五、遍历文档树
还是用”爱丽丝”的文档来做例子:
html_doc = """
<html><head><title>The Dormouse's story</title></head>
<body>
<p class="title"><b>The Dormouse's story</b></p>
<p class="story">Once upon a time there were three little sisters; and their names were
<a href="http://example.com/elsie" class="sister" id="link1">Elsie</a>,
<a href="http://example.com/lacie" class="sister" id="link2">Lacie</a> and
<a href="http://example.com/tillie" class="sister" id="link3">Tillie</a>;
and they lived at the bottom of a well.</p>
<p class="story">...</p>
"""
from bs4 import BeautifulSoup
soup = BeautifulSoup(html_doc, 'html.parser')
通过这段例子来演示怎样从文档的一段内容找到另一段内容
1.遍历子节点
tag 可能包含多个字符串或其它的 tag,这些都是这个 Tag 的子节点。Beautiful Soup 提供了许多查找 和操作子节点的方法。
注意: Beautiful Soup中字符串节点不支持这些属性,因为字符串没有子节点。
tag 的名字
操作文档树最简单的方法就是告诉它你想获取的 tag 的 name。如果想获取 <head> 标签,只要用soup.head:
soup.head
# <head><title>The Dormouse's story</title></head>
soup.title
# <title>The Dormouse's story</title>
这是个获取tag的小窍门,可以在文档树的tag中多次调用这个方法。下面的代码可以获取 <body> 标签中的 第一个 <b> 标签:
soup.body.b
# <b>The Dormouse's story</b>
通过点取属性的方式只能获得当前名字的第一个tag:
soup.a
# <a class="sister" href="http://example.com/elsie" id="link1">Elsie</a>
如果想要得到所有的 <a> 标签,或是比通过名字获取内容更复杂的方法时,就需要用到搜索文档树中描述的方法,比如:find_all()
soup.find_all('a')
# [<a class="sister" href="http://example.com/elsie" id="link1">Elsie</a>,
# <a class="sister" href="http://example.com/lacie" id="link2">Lacie</a>,
# <a class="sister" href="http://example.com/tillie" id="link3">Tillie</a>]
.contents和.children
Tag 的.contents属性可以将 tag 的全部子节点以列表的方式输出:
head_tag = soup.head
head_tag
# <head><title>The Dormouse's story</title></head>
head_tag.contents
[<title>The Dormouse's story</title>]
title_tag = head_tag.contents[0]
title_tag
# <title>The Dormouse's story</title>
title_tag.contents
# [u'The Dormouse's story']
BeautifulSoup对象一定会包含子节点。下面例子中 <html> 标签就是BeautifulSoup对象的子节点:
len(soup.contents)
# 1
soup.contents[0].name
# u'html'
字符串没有.contents属性,因为字符串没有子节点:
text = title_tag.contents[0]
text.contents
# AttributeError: 'NavigableString' object has no attribute 'contents'
通过 tag 的.children生成器,可以对 tag 的子节点进行循环:
for child in title_tag.children:
print(child)
# The Dormouse's story
如果想要修改 tag 的子节点,使用修改文档树中描述的方法。不要直接修改contents列表: 那样会导致细微且难以定位的问题。
.descendants
.contents和.children属性仅包含 tag 的直接子节点。例如,<head> 标签只有一个直接 子节点 <title>
head_tag.contents
# [<title>The Dormouse's story</title>]
但是 <title> 标签也包含一个子节点:字符串 “The Dormouse’s story”。这种情况下字符串 “The Dormouse’s story” 也属于 <head> 标签的子节点。.descendants属性可以对 所有 tag 的子孙节点进行递归循环[5],包括子节点,子节点的子节点:
for child in head_tag.descendants:
print(child)
# <title>The Dormouse's story</title>
# The Dormouse's story
上面的例子中,<head> 标签只有一个子节点,但是有 2 个子孙节点: <head> 标签和 <head> 的子节点。BeautifulSoup对象只有一个直接子节点(<html> 节点),却有很多子孙节点:
len(list(soup.children))
# 1
len(list(soup.descendants))
# 25
.string
如果 tag 只有一个NavigableString类型子节点,那么这个tag可以使用.string得到子节点:
title_tag.string
# u'The Dormouse's story'
如果一个tag仅有一个子节点,那么这个tag也可以使用.string方法,输出结果与当前唯一 子节点的.string结果相同:
head_tag.contents
# [<title>The Dormouse's story</title>]
head_tag.string
# u'The Dormouse's story'
如果tag包含了多个子节点,tag就无法确定.string方法应该调用哪个子节点的内容,.string的输出结果是None:
print(soup.html.string)
# None
.strings 和 stripped_strings
如果 tag 中包含多个字符串[2],可以使用.strings来循环获取:
for string in soup.strings:
print(repr(string))
# u"The Dormouse's story"
# u'\n\n'
# u"The Dormouse's story"
# u'\n\n'
# u'Once upon a time there were three little sisters; and their names were\n'
# u'Elsie'
# u',\n'
# u'Lacie'
# u' and\n'
# u'Tillie'
# u';\nand they lived at the bottom of a well.'
# u'\n\n'
# u'...'
# u'\n'
输出的字符串中可能包含了很多空格或空行,使用.stripped_strings可以去除多余空白内容:
for string in soup.stripped_strings:
print(repr(string))
# u"The Dormouse's story"
# u"The Dormouse's story"
# u'Once upon a time there were three little sisters; and their names were'
# u'Elsie'
# u','
# u'Lacie'
# u'and'
# u'Tillie'
# u';\nand they lived at the bottom of a well.'
# u'...'
全部是空格的行会被忽略掉,段首和段末的空白会被删除
2.遍历父节点
继续分析文档树,每个 tag 或字符串都有父节点: 包含当前内容的 tag
.parent
通过.parent属性来获取某个元素的父节点。在例子“爱丽丝”的文档中,<head> 标签是 <title> 标签的父节点:
title_tag = soup.title
title_tag
# <title>The Dormouse's story</title>
title_tag.parent
# <head><title>The Dormouse's story</title></head>
文档的 title 字符串也有父节点: <title> 标签
title_tag.string.parent
# <title>The Dormouse's story</title>
文档的顶层节点比如 <html> 的父节点是BeautifulSoup对象:
html_tag = soup.html
type(html_tag.parent)
# <class 'bs4.BeautifulSoup'>
BeautifulSoup对象的.parent是None:
print(soup.parent)
# None
.parents
通过元素的.parents属性可以递归得到元素的所有父辈节点,下面的例子使用了.parents方法遍历了 <a> 标签到根节点的所有节点
link = soup.a
link
# <a class="sister" href="http://example.com/elsie" id="link1">Elsie</a>
for parent in link.parents:
if parent is None:
print(parent)
else:
print(parent.name)
# p
# body
# html
# [document]
# None
3.遍历兄弟节点
看一段简单的例子:
sibling_soup = BeautifulSoup("<a><b>text1</b><c>text2</c></a>", 'html.parser')
print(sibling_soup.prettify())
# <a>
# <b>
# text1
# </b>
# <c>
# text2
# </c>
# </a>
因为 <b> 标签和 <c> 标签是同一层: 他们是同一个元素的子节点,所以 <b> 和 <c> 可以被称为兄弟节点。 一段文档以标准格式输出时,兄弟节点有相同的缩进级别。在代码中也可以使用这种关系。
.next_sibling 和 .previous_sibling
在文档树中,使用.next_sibling和.previous_sibling属性来查询兄弟节点:
sibling_soup.b.next_sibling
# <c>text2</c>
sibling_soup.c.previous_sibling
# <b>text1</b>
<b> 标签有.next_sibling属性,但是没有.previous_sibling属性, 因为 <b> 标签在同级节点中是第一个。同理,<c>标签有.previous_sibling属性, 却没有.next_sibling属性:
print(sibling_soup.b.previous_sibling)
# None
print(sibling_soup.c.next_sibling)
# None
例子中的字符串 “text1” 和 “text2” 不是兄弟节点,因为它们的父节点不同:
sibling_soup.b.string
# u'text1'
print(sibling_soup.b.string.next_sibling)
# None
实际文档中的 tag 的.next_sibling和.previous_sibling属性通常是字符串或空白。 看看“爱丽丝”文档:
<a href="http://example.com/elsie" class="sister" id="link1">Elsie</a>
<a href="http://example.com/lacie" class="sister" id="link2">Lacie</a>
<a href="http://example.com/tillie" class="sister" id="link3">Tillie</a>
如果以为第一个 <a> 标签的.next_sibling结果是第二个 <a> 标签,那就错了, 真实结果是第一个 <a> 标签和第二个<a> 标签之间的顿号和换行符:
link = soup.a
link
# <a class="sister" href="http://example.com/elsie" id="link1">Elsie</a>
link.next_sibling
# u',\n'
第二个<a>标签是顿号的.next_sibling属性:
link.next_sibling.next_sibling
# <a class="sister" href="http://example.com/lacie" id="link2">Lacie</a>
.next_siblings 和 .previous_siblings
通过.next_siblings和.previous_siblings属性可以对当前节点的兄弟节点迭代输出:
for sibling in soup.a.next_siblings:
print(repr(sibling))
# ',\n'
# <a class="sister" href="http://example.com/lacie" id="link2">Lacie</a>
# ' and\n'
# <a class="sister" href="http://example.com/tillie" id="link3">Tillie</a>
# '; and they lived at the bottom of a well.'
for sibling in soup.find(id="link3").previous_siblings:
print(repr(sibling))
# ' and\n'
# <a class="sister" href="http://example.com/lacie" id="link2">Lacie</a>
# ',\n'
# <a class="sister" href="http://example.com/elsie" id="link1">Elsie</a>
# 'Once upon a time there were three little sisters; and their names were\n'
4.回退和前进
看一下“爱丽丝” 文档:
<html><head><title>The Dormouse's story</title></head>
<p class="title"><b>The Dormouse's story</b></p>
HTML解析器把这段字符串转换成一连串的事件: “打开<html>标签”,”打开一个<head>标签”, “打开一个<title>标签”,”添加一段字符串”,”关闭<title>标签”,”打开<p>标签”,等等。 Beautiful Soup提供了重现解析器初始化过程的方法。
.next_element 和 .previous_element
.next_element属性指向解析过程中下一个被解析的对象(字符串或tag), 结果可能与.next_sibling相同,但通常是不一样的。
这是“爱丽丝”文档中最后一个 <a> 标签,它的.next_sibling结果是一个字符串, 因为当前的解析过程[2]因为当前的解析过程因为遇到了<a>标签而中断了:
last_a_tag = soup.find("a", id="link3")
last_a_tag
# <a class="sister" href="http://example.com/tillie" id="link3">Tillie</a>
last_a_tag.next_sibling
# '; and they lived at the bottom of a well.'
但这个 <a> 标签的.next_element属性结果是在 <a> 标签被解析之后的解析内容, 不是 <a> 标签后的句子部分,而是字符串 “Tillie”:
last_a_tag.next_element
# u'Tillie'
这是因为在原始文档中,字符串 “Tillie” 在分号前出现,解析器先进入 <a> 标签, 然后是字符串 “Tillie”,然后关闭 </a> 标签,然后是分号和剩余部分。 分号与 <a> 标签在同一层级,但是字符串 “Tillie” 会先被解析。
.previous_element属性刚好与.next_element相反, 它指向当前被解析的对象的前一个解析对象:
last_a_tag.previous_element
# u' and\n'
last_a_tag.previous_element.next_element
# <a class="sister" href="http://example.com/tillie" id="link3">Tillie</a>
.next_elements 和 .previous_elements
通过.next_elements和.previous_elements的迭代器就可以向前或向后 访问文档的解析内容,就好像文档正在被解析一样:
for element in last_a_tag.next_elements:
print(repr(element))
# u'Tillie'
# u';\nand they lived at the bottom of a well.'
# u'\n\n'
# <p class="story">...</p>
# u'...'
# u'\n'
# None
六、搜索文档树
Beautiful Soup 定义了很多相似的文档搜索方法,这里着重介绍2个:find()和find_all(), 其它方法的参数和用法类似,所以一笔带过。
再以“爱丽丝”文档作为例子:
html_doc = """
<html><head><title>The Dormouse's story</title></head>
<body>
<p class="title"><b>The Dormouse's story</b></p>
<p class="story">Once upon a time there were three little sisters; and their names were
<a href="http://example.com/elsie" class="sister" id="link1">Elsie</a>,
<a href="http://example.com/lacie" class="sister" id="link2">Lacie</a> and
<a href="http://example.com/tillie" class="sister" id="link3">Tillie</a>;
and they lived at the bottom of a well.</p>
<p class="story">...</p>
"""
from bs4 import BeautifulSoup
soup = BeautifulSoup(html_doc, 'html.parser')
使用find_all()这种过滤方法,就可以检索想要查找的文档内容。
1.过滤器类型
介绍find_all()或类似方法前,先介绍一下这些方法可以使用哪些过滤器的类型[3], 这些过滤器在搜索的 API 中反复出现。过滤器可以作用在 tag 的 name 上,节点的属性上, 字符串上或与他们混合使用。
(1)字符串
最简单的过滤器是字符串。在搜索方法中传入一个字符串参数,Beautiful Soup 会查找与字符串完整匹配的内容,下面的例子用于查找文档中所有的 <b> 标签:
soup.find_all('b')
# [<b>The Dormouse's story</b>]
如果传入字节码参数,Beautiful Soup会当作UTF-8编码,可以传入一段Unicode 编码来避免 Beautiful Soup 解析编码出错。
(2)正则表达式
如果传入正则表达式作为参数,Beautiful Soup 会通过正则表达式的match()来匹配内容。 下面例子中找出所有以 b 开头的标签,这种情况下 <body> 和 <b> 标签都会被找到:
import re
for tag in soup.find_all(re.compile("^b")):
print(tag.name)
# body
# b
下面代码找出所有名字中包含 “t” 的标签:
for tag in soup.find_all(re.compile("t")):
print(tag.name)
# html
# title
(3)列表
如果传入列表参数,Beautiful Soup会 将与列表中任一元素匹配的内容返回。 下面代码找到文档中所有 <a> 标签和 <b> 标签:
soup.find_all(["a", "b"])
# [<b>The Dormouse's story</b>,
# <a class="sister" href="http://example.com/elsie" id="link1">Elsie</a>,
# <a class="sister" href="http://example.com/lacie" id="link2">Lacie</a>,
# <a class="sister" href="http://example.com/tillie" id="link3">Tillie</a>]
(4)True
True可以匹配任何值,下面代码查找到所有的 tag,但是不会返回字符串节点
for tag in soup.find_all(True):
print(tag.name)
# html
# head
# title
# body
# p
# b
# p
# a
# a
# a
# p
(5)函数
如果没有合适过滤器,那么还可以定义一个函数方法,参数是一个元素[4], 如果这个方法返回True表示当前元素匹配并且被找到,如果不是则反回False。
下面方法实现的匹配功能是,如果包含class属性却不包含id属性, 那么将返回True:
def has_class_but_no_id(tag):
return tag.has_attr('class') and not tag.has_attr('id')
将这个方法作为参数传入find_all()方法,将得到所有 <p> 标签:
soup.find_all(has_class_but_no_id)
# [<p class="title"><b>The Dormouse's story</b></p>,
# <p class="story">Once upon a time there were...</p>,
# <p class="story">...</p>]
返回结果中只有 <p> 标签,没有 <a> 标签,因为 <a> 标签还定义了”id”, 没有返回 <html> 和 <head>,因为 <html> 和 <head> 中没有定义 “class” 属性。
如果通过方法来筛选特殊属性,比如href,传入方法的参数应该是对应属性的值, 而不是整个元素。下面的例子是找出那些a标签中的href属性不匹配指定正则:
def not_lacie(href):
return href and not re.compile("lacie").search(href)
soup.find_all(href=not_lacie)
# [<a class="sister" href="http://example.com/elsie" id="link1">Elsie</a>,
# <a class="sister" href="http://example.com/tillie" id="link3">Tillie</a>]
标签过滤方法可以使用复杂方法。下面的例子可以过滤出前后都有文字的标签。
from bs4 import NavigableString
def surrounded_by_strings(tag):
return (isinstance(tag.next_element, NavigableString)
and isinstance(tag.previous_element, NavigableString))
for tag in soup.find_all(surrounded_by_strings):
print tag.name
# p
# a
# a
# a
# p
现在来了解一下搜索方法的细节
2.find_all()
find_all(name,attrs,recursive,string,**kwargs)
find_all()方法搜索当前 tag 的所有子节点,并判断是否符合过滤器的条件。过滤器类型中已经举过几个例子,这里再展示几个新例子:
soup.find_all("title")
# [<title>The Dormouse's story</title>]
soup.find_all("p", "title")
# [<p class="title"><b>The Dormouse's story</b></p>]
soup.find_all("a")
# [<a class="sister" href="http://example.com/elsie" id="link1">Elsie</a>,
# <a class="sister" href="http://example.com/lacie" id="link2">Lacie</a>,
# <a class="sister" href="http://example.com/tillie" id="link3">Tillie</a>]
soup.find_all(id="link2")
# [<a class="sister" href="http://example.com/lacie" id="link2">Lacie</a>]
import re
soup.find(string=re.compile("sisters"))
# u'Once upon a time there were three little sisters; and their names were\n'
有几个方法很相似,还有几个方法是新的,参数中的string和id是什么含义? 为什么find_all("p","title")返回的是CSS Class为”title”的<p>标签? 我们来仔细看一下find_all()的参数
(1)name 参数
传一个值给name参数,就可以查找所有名字为name的 tag。所有文本都会被忽略掉, 因为它们不匹配标签名字。
简单的用法如下:
soup.find_all("title")
# [<title>The Dormouse's story</title>]
回忆过滤器类型中描述的内容,搜索name的参数值可以是: 字符串、正则表达式、列表、方法或是True。
(2)keyword 参数
如果动态参数中出现未能识别的参数名,搜索时会把该参数当作 tag 属性来搜索, 比如搜索参数中包含一个名字为id的参数,Beautiful Soup 会搜索每个 tag 上的id属性
soup.find_all(id='link2')
# [<a class="sister" href="http://example.com/lacie" id="link2">Lacie</a>]
如果传入href参数,Beautiful Soup会搜索每个 tag 的href属性
soup.find_all(href=re.compile("elsie"))
# [<a class="sister" href="http://example.com/elsie" id="link1">Elsie</a>]
搜索指定名字的属性时可以使用的参数值包括字符串,正则表达式,列表,True.
下面的例子在文档树中查找所有包含id属性的 tag,无论id的值是什么:
soup.find_all(id=True)
# [<a class="sister" href="http://example.com/elsie" id="link1">Elsie</a>,
# <a class="sister" href="http://example.com/lacie" id="link2">Lacie</a>,
# <a class="sister" href="http://example.com/tillie" id="link3">Tillie</a>]
使用多个指定名字的参数可以同时过滤多个 tag 属性:
soup.find_all(href=re.compile("elsie"), id='link1')
# [<a class="sister" href="http://example.com/elsie" id="link1">three</a>]
有些 tag 属性在搜索不能使用,比如HTML5中的 data-* 属性:
data_soup = BeautifulSoup('<div data-foo="value">foo!</div>')
data_soup.find_all(data-foo="value")
# SyntaxError: keyword can't be an expression
这种情况下可以通过find_all()方法的attrs参数定义一个字典参数 来搜索包含特殊属性的 tag:
data_soup.find_all(attrs={"data-foo": "value"})
# [<div data-foo="value">foo!</div>]
不要使用 “name” 作为关键字参数搜索 HTML 元素,因为 Beautiful Soup 用name来识别 tag 本身的名字。换一种方法,你可以这样搜索属性中的 “name” 值
name_soup = BeautifulSoup('<input name="email"/>', 'html.parser')
name_soup.find_all(name="email")
# []
name_soup.find_all(attrs={"name": "email"})
# [<input name="email"/>]
(3)按CSS搜索
按照 CSS 类名搜索的功能非常实用,但标识 CSS 类名的关键字class在Python中是保留字, 使用class做参数会导致语法错误。从 Beautiful Soup 4.1.2 版本开始,可以通过class_参数搜索有指定CSS类名的 tag:
soup.find_all("a", class_="sister")
# [<a class="sister" href="http://example.com/elsie" id="link1">Elsie</a>,
# <a class="sister" href="http://example.com/lacie" id="link2">Lacie</a>,
# <a class="sister" href="http://example.com/tillie" id="link3">Tillie</a>]
作为关键字形式的参数class_同样接受不同类型的过滤器,字符串、正则表达式、 方法或True:
soup.find_all(class_=re.compile("itl"))
# [<p class="title"><b>The Dormouse's story</b></p>]
def has_six_characters(css_class):
return css_class is not None and len(css_class) == 6
soup.find_all(class_=has_six_characters)
# [<a class="sister" href="http://example.com/elsie" id="link1">Elsie</a>,
# <a class="sister" href="http://example.com/lacie" id="link2">Lacie</a>,
# <a class="sister" href="http://example.com/tillie" id="link3">Tillie</a>]
tag 的class属性是多值属性。按照 CSS 类名搜索时,表示匹配到 tag 中任意 CSS 类名:
css_soup = BeautifulSoup('<p class="body strikeout"></p>')
css_soup.find_all("p", class_="strikeout")
# [<p class="body strikeout"></p>]
css_soup.find_all("p", class_="body")
# [<p class="body strikeout"></p>]
搜索class属性时也可以通过 CSS 值进行完全匹配:
css_soup.find_all("p", class_="body strikeout")
# [<p class="body strikeout"></p>]
完全匹配class的值时,如果CSS类名的顺序与实际不符,将搜索不到结果:
css_soup.find_all("p", class_="strikeout body")
# []
如果想要通过多个 CSS 类型来搜索 tag,应该使用 CSS 选择器
css_soup.select("p.strikeout.body")
# [<p class="body strikeout"></p>]
在旧版本的 Beautiful Soup 中,可能不支持class_,这时可以使用attrs实现相同效果。 创建一个字典,包含要搜索的 class 类名(或者正则表达式等形式)
soup.find_all("a", attrs={"class": "sister"})
# [<a class="sister" href="http://example.com/elsie" id="link1">Elsie</a>,
# <a class="sister" href="http://example.com/lacie" id="link2">Lacie</a>,
# <a class="sister" href="http://example.com/tillie" id="link3">Tillie</a>]
(4)string 参数
通过string参数可以搜索文档中的字符串内容。与name参数接受的值一样,string参数接受字符串,正则表达式,列表,函数,True。看例子:
soup.find_all(string="Elsie")
# [u'Elsie']
soup.find_all(string=["Tillie", "Elsie", "Lacie"])
# [u'Elsie', u'Lacie', u'Tillie']
soup.find_all(string=re.compile("Dormouse"))
[u"The Dormouse's story", u"The Dormouse's story"]
def is_the_only_string_within_a_tag(s):
""Return True if this string is the only child of its parent tag.""
return (s == s.parent.string)
soup.find_all(string=is_the_only_string_within_a_tag)
# [u"The Dormouse's story", u"The Dormouse's story", u'Elsie', u'Lacie', u'Tillie', u'...']
虽然string参数用于搜索字符串,同时也以与其它参数混合使用来搜索 tag。 Beautiful Soup 会过滤那些string值与.string参数相符的 tag。 下面代码用来搜索内容里面包含 “Elsie” 的 <a> 标签:
soup.find_all("a", string="Elsie")
# [<a href="http://example.com/elsie" class="sister" id="link1">Elsie</a>]
string参数是在 4.4.0 中新增的。早期版本中该参数名为text。
soup.find_all("a", text="Elsie")
# [<a href="http://example.com/elsie" class="sister" id="link1">Elsie</a>]
(5)limit参数
find_all()方法会返回全部的搜索结构,如果文档树很大那么搜索会很慢。 如果我们不需要全部结果,可以使用limit参数限制返回结果的数量。 效果与SQL中的limit关键字类似,当搜索到的结果数量达到limit的限制时, 就停止搜索返回结果。
“爱丽丝”文档例子中有 3 个 tag 符合搜索条件,但下面例子中的结果只返回了 2 个, 因为我们限制了返回数量:
soup.find_all("a", limit=2)
# [<a class="sister" href="http://example.com/elsie" id="link1">Elsie</a>,
# <a class="sister" href="http://example.com/lacie" id="link2">Lacie</a>]
(6)recursive参数
如果调用mytag.find_all()方法,Beautiful Soup 会检索mytag的所有子孙节点, 如果只想搜索直接子节点,可以使用参数recursive=False。查看下面例子
soup.html.find_all("title")
# [<title>The Dormouse's story</title>]
soup.html.find_all("title", recursive=False)
# []
下面一段简单的文档:
<html>
<head>
<title>
The Dormouse's story
</title>
</head>
...
<title> 标签在 <html> 标签之下,但并不是直接子节点,<head> 标签才是直接子节点。 在允许查询所有后代节点时 Beautiful Soup 能够查找到 <title> 标签。 但是使用了recursive=False参数之后,只能查找直接子节点,这样就查不到 <title> 标签了。
Beautiful Soup 提供了多种 DOM 树搜索方法。这些方法都使用了类似的参数定义。 比如这些方法:find_all():name,attrs,text,limit. 但是只有find_all()和find()支持recursive参数。
3.像调用find_all()一样调用tag
find_all()几乎是 Beautiful Soup 中最常用的搜索方法,所以我们定义了它的简写方法。BeautifulSoup对象和Tag对象可以被当作一个方法来使用,这个方法的执行结果与 调用这个对象的find_all()方法相同,下面两行代码是等价的:
soup.find_all("a")
soup("a")
这两行代码也是等价的:
soup.title.find_all(string=True)
soup.title(string=True)
4.find()
find(name,attrs,recursive,string,**kwargs)
find_all()方法将返回文档中符合条件的所有 tag,尽管有时候我们只想得到一个结果。 比如文档中只有一个 <body> 标签,那么使用find_all()方法来查找 <body> 标签就 不太合适,使用find_all方法并设置limit=1参数不如直接使用find()方法。 下面两行代码是等价的:
soup.find_all('title', limit=1)
# [<title>The Dormouse's story</title>]
soup.find('title')
# <title>The Dormouse's story</title>
唯一的区别是find_all()方法的返回结果是值包含一个元素的列表,而find()方法 直接返回结果。
find_all()方法没有找到目标是返回空列表,find()方法找不到目标时,返回None。
print(soup.find("nosuchtag"))
# None
soup.head.title是Tag 的名字方法的简写。这个简写就是通过多次调用find()方 法实现的:
soup.head.title
# <title>The Dormouse's story</title>
soup.find("head").find("title")
# <title>The Dormouse's story</title>
5.find_parents() 和 find_parent()
find_parents(name,attrs,recursive,string,**kwargs)
find_parent(name,attrs,recursive,string,**kwargs)
我们已经用了很大篇幅来介绍find_all()和find()方法,Beautiful Soup 中 还有 10 个用于搜索的 API。它们中有 5 个用的是与find_all()相同的搜索参数, 另外 5 个与find()方法的搜索参数类似。区别仅是它们搜索文档的位置不同。
首先来看看find_parents()和find_parent()。 记住:find_all()和find()只搜索当前节点的所有子节点,孙子节点等。 而这 2 个方法刚好相反,它们用来搜索当前节点的父辈节点。 我们来试试看,从例子文档中的一个深层叶子节点开始:
a_string = soup.find(string="Lacie")
a_string
# u'Lacie'
a_string.find_parents("a")
# [<a class="sister" href="http://example.com/lacie" id="link2">Lacie</a>]
a_string.find_parent("p")
# <p class="story">Once upon a time there were three little sisters; and their names were
# <a class="sister" href="http://example.com/elsie" id="link1">Elsie</a>,
# <a class="sister" href="http://example.com/lacie" id="link2">Lacie</a> and
# <a class="sister" href="http://example.com/tillie" id="link3">Tillie</a>;
# and they lived at the bottom of a well.</p>
a_string.find_parents("p", class="title")
# []
文档中的一个 <a> 标签是是当前叶子节点的直接父节点,所以可以被找到。 还有一个 <p> 标签,是目标叶子节点的间接父辈节点,所以也可以被找到。 包含 class 值为 “title” 的 <p> 标签不是不是目标叶子节点的父辈节点, 所以通过find_parents()方法搜索不到。
find_parent()和find_parents()方法会让人联想到.parent和.parents属性。 它们之间的联系非常紧密。搜索父辈节点的方法实际上就是对.parents属性的迭代搜索。
6.find_next_siblings() 和 find_next_sibling()
find_next_siblings(name,attrs,recursive,string,**kwargs)
find_next_sibling(name,attrs,recursive,string,**kwargs)
这 2 个方法通过.next_siblings属性对当 tag 的所有后面解析[5]的兄弟tag节点进行迭代,find_next_siblings()方法返回所有符合条件的后面的兄弟节点,find_next_sibling()只返回符合条件的后面的第一个 tag 节点。
first_link = soup.a
first_link
# <a class="sister" href="http://example.com/elsie" id="link1">Elsie</a>
first_link.find_next_siblings("a")
# [<a class="sister" href="http://example.com/lacie" id="link2">Lacie</a>,
# <a class="sister" href="http://example.com/tillie" id="link3">Tillie</a>]
first_story_paragraph = soup.find("p", "story")
first_story_paragraph.find_next_sibling("p")
# <p class="story">...</p>
7.find_previous_siblings() 和 find_previous_sibling()
find_previous_siblings(name,attrs,recursive,string,**kwargs)
find_previous_sibling(name,attrs,recursive,string,**kwargs)
这 2 个方法通过.previous_siblings属性对当前 tag 的前面解析[5]的兄弟 tag 节点进行迭代,find_previous_siblings()方法返回所有符合条件的前面的兄弟节点,find_previous_sibling()方法返回第一个符合条件的前面的兄弟节点:
last_link = soup.find("a", id="link3")
last_link
# <a class="sister" href="http://example.com/tillie" id="link3">Tillie</a>
last_link.find_previous_siblings("a")
# [<a class="sister" href="http://example.com/lacie" id="link2">Lacie</a>,
# <a class="sister" href="http://example.com/elsie" id="link1">Elsie</a>]
first_story_paragraph = soup.find("p", "story")
first_story_paragraph.find_previous_sibling("p")
# <p class="title"><b>The Dormouse's story</b></p>
8.find_all_next() 和 find_next()
find_all_next(name,attrs,recursive,string,**kwargs)
find_next(name,attrs,recursive,string,**kwargs)
这 2 个方法通过.next_elements属性对当前 tag 的之后的[5]tag 和字符串进行迭代,find_all_next()方法返回所有符合条件的节点,find_next()方法返回第一个符合条件的节点:
first_link = soup.a
first_link
# <a class="sister" href="http://example.com/elsie" id="link1">Elsie</a>
first_link.find_all_next(string=True)
# [u'Elsie', u',\n', u'Lacie', u' and\n', u'Tillie',
# u';\nand they lived at the bottom of a well.', u'\n\n', u'...', u'\n']
first_link.find_next("p")
# <p class="story">...</p>
第一个例子中,字符串 “Elsie”也被显示出来,尽管它被包含在我们开始查找的 <a> 标签的里面。 第二个例子中,最后一个<p>标签也被显示出来,尽管它与我们开始查找位置的 <a> 标签不属于同一部分。 例子中,搜索的重点是要匹配过滤器的条件,以及元素在文档中出现的顺序要在查找的元素的之后。
9.find_all_previous() 和 find_previous()
find_all_previous(name,attrs,recursive,string,**kwargs)
find_previous(name,attrs,recursive,string,**kwargs)
这 2 个方法通过.previous_elements属性对当前节点前面[5]的 tag 和字符串进行迭代,find_all_previous()方法返回所有符合条件的节点,find_previous()方法返回第一个符合条件的节点。
first_link = soup.a
first_link
# <a class="sister" href="http://example.com/elsie" id="link1">Elsie</a>
first_link.find_all_previous("p")
# [<p class="story">Once upon a time there were three little sisters; ...</p>,
# <p class="title"><b>The Dormouse's story</b></p>]
first_link.find_previous("title")
# <title>The Dormouse's story</title>
find_all_previous("p")既返回了文档中的第一段(class=”title”的那段),还返回了第二段, 包含了我们开始查找的 <a> 标签的那段。不用惊讶,这段代码的功能是查找所有出现在指定 <a> 标签之前 的 <p> 标签,因为这个 <p> 标签包含了开始的 <a> 标签,所以 <p> 标签当然是在 <a> 之前出现的。
10.CSS 选择器
BeautifulSoup 对象和 Tag 对象支持通过.css属性实现 CSS 选择器。具体选择功能是通过Soup Sieve库实现的,在 PyPI 上通 过关键字soupsieve可以找到。通过 pip 安装 Beautiful Soup 时,Soup Sieve 也会自 动安装,不用其它额外操作。
Soup Sieve 文档列出了当前支持的 CSS 选择器, 下面是一些基本应用
soup.css.select("title")
# [<title>The Dormouse's story</title>]
soup.css.select("p:nth-of-type(3)")
# [<p class="story">...</p>]
查找指定层级的 tag:
soup.css.select("body a")
# [<a class="sister" href="http://example.com/elsie" id="link1">Elsie</a>,
# <a class="sister" href="http://example.com/lacie" id="link2">Lacie</a>,
# <a class="sister" href="http://example.com/tillie" id="link3">Tillie</a>]
soup.css.select("html head title")
# [<title>The Dormouse's story</title>]
找到某个 tag 标签下的直接子标签[6]:
soup.css.select("head > title")
# [<title>The Dormouse's story</title>]
soup.css.select("p > a")
# [<a class="sister" href="http://example.com/elsie" id="link1">Elsie</a>,
# <a class="sister" href="http://example.com/lacie" id="link2">Lacie</a>,
# <a class="sister" href="http://example.com/tillie" id="link3">Tillie</a>]
soup.css.select("p > a:nth-of-type(2)")
# [<a class="sister" href="http://example.com/lacie" id="link2">Lacie</a>]
soup.css.select("p > #link1")
# [<a class="sister" href="http://example.com/elsie" id="link1">Elsie</a>]
soup.css.select("body > a")
# []
找到兄弟节点标签:
soup.css.select("#link1 ~ .sister")
# [<a class="sister" href="http://example.com/lacie" id="link2">Lacie</a>,
# <a class="sister" href="http://example.com/tillie" id="link3">Tillie</a>]
soup.css.select("#link1 + .sister")
# [<a class="sister" href="http://example.com/lacie" id="link2">Lacie</a>]
通过 CSS 的类名查找:
soup.css.select(".sister")
# [<a class="sister" href="http://example.com/elsie" id="link1">Elsie</a>,
# <a class="sister" href="http://example.com/lacie" id="link2">Lacie</a>,
# <a class="sister" href="http://example.com/tillie" id="link3">Tillie</a>]
soup.css.select("[class~=sister]")
# [<a class="sister" href="http://example.com/elsie" id="link1">Elsie</a>,
# <a class="sister" href="http://example.com/lacie" id="link2">Lacie</a>,
# <a class="sister" href="http://example.com/tillie" id="link3">Tillie</a>]
通过 id 查找 tag:
soup.css.select("#link1")
# [<a class="sister" href="http://example.com/elsie" id="link1">Elsie</a>]
soup.css.select("a#link2")
# [<a class="sister" href="http://example.com/lacie" id="link2">Lacie</a>]
查找符合列表中任意一个选择器的 tag:
soup.css.select("#link1,#link2")
# [<a class="sister" href="http://example.com/elsie" id="link1">Elsie</a>,
# <a class="sister" href="http://example.com/lacie" id="link2">Lacie</a>]
通过是否存在某个属性来查找:
soup.css.select('a[href]')
# [<a class="sister" href="http://example.com/elsie" id="link1">Elsie</a>,
# <a class="sister" href="http://example.com/lacie" id="link2">Lacie</a>,
# <a class="sister" href="http://example.com/tillie" id="link3">Tillie</a>]
通过属性的值来查找:
soup.css.select('a[href="http://example.com/elsie"]')
# [<a class="sister" href="http://example.com/elsie" id="link1">Elsie</a>]
soup.css.select('a[href^="http://example.com/"]')
# [<a class="sister" href="http://example.com/elsie" id="link1">Elsie</a>,
# <a class="sister" href="http://example.com/lacie" id="link2">Lacie</a>,
# <a class="sister" href="http://example.com/tillie" id="link3">Tillie</a>]
soup.css.select('a[href$="tillie"]')
# [<a class="sister" href="http://example.com/tillie" id="link3">Tillie</a>]
soup.css.select('a[href*=".com/el"]')
# [<a class="sister" href="http://example.com/elsie" id="link1">Elsie</a>]
还有一个select_one()方法,它会返回符合筛选条件的元素列表中的第一个
soup.css.select_one(".sister")
# <a class="sister" href="http://example.com/elsie" id="link1">Elsie</a>
为了方便使用,在 BeautifulSoup 或 Tag 对象上直接调用select()和select_one()方法, 中间省略.css属性
soup.select('a[href$="tillie"]')
# [<a class="sister" href="http://example.com/tillie" id="link3">Tillie</a>]
soup.select_one(".sister")
# <a class="sister" href="http://example.com/elsie" id="link1">Elsie</a>
CSS 选择器对于熟悉 CSS 语法的人来说非常方便。你可以在 Beautiful Soup 中使用相同的方法。 但是如果你只需要使用 CSS 选择器就够了,那么应该lxml作为文档解析器:因为速度快很多。 但是 Soup Sieve 也有优势,它允许组合使用 CSS 选择器和 Beautiful Soup 的 API。
11.Soup Sieve 高级特性
Soup Sieve 提供的是比select()和select_one()更底层的方法,通过 Tag 或 Beautiful Soup 对象的.css属性,可以调用大部分的 API。下面是支持这种调用方式的方法列表, 查看Soup Sieve文档了解全部细节。
iselect()方法与select()效果相同,区别是返回的结果是迭代器。
[tag['id'] for tag in soup.css.iselect(".sister")]
# ['link1', 'link2', 'link3']
closest()方法与find_parent()方法相似,返回符合 CSS 选择器的 Tag 对象的最近父级。
elsie = soup.css.select_one(".sister")
elsie.css.closest("p.story")
# <p class="story">Once upon a time there were three little sisters; and their names were
# <a class="sister" href="http://example.com/elsie" id="link1">Elsie</a>,
# <a class="sister" href="http://example.com/lacie" id="link2">Lacie</a> and
# <a class="sister" href="http://example.com/tillie" id="link3">Tillie</a>;
# and they lived at the bottom of a well.</p>
match()方法返回布尔结果,标记指定 Tag 是否符合指定筛选器
# elsie.css.match("#link1")
True
# elsie.css.match("#link2")
False
filter()方法返回 tag 直接子节点中符合筛选器的节点列表
[tag.string for tag in soup.find('p', 'story').css.filter('a')]
# ['Elsie', 'Lacie', 'Tillie']
escape()方法可以对 CSS 标识符中的特殊字符进行转义,否则是非法 CSS 标识符
soup.css.escape("1-strange-identifier")
# '\\31 -strange-identifier'
12.CSS 筛选器中的命名空间
如果解析的 XML 文档中定义了命名空间,那么 CSS 筛选器中也可以使用
from bs4 import BeautifulSoup
xml = """<tag xmlns:ns1="http://namespace1/" xmlns:ns2="http://namespace2/">
<ns1:child>I'm in namespace 1</ns1:child>
<ns2:child>I'm in namespace 2</ns2:child>
</tag> """
namespace_soup = BeautifulSoup(xml, "xml")
namespace_soup.css.select("child")
# [<ns1:child>I'm in namespace 1</ns1:child>, <ns2:child>I'm in namespace 2</ns2:child>]
namespace_soup.css.select("ns1|child")
# [<ns1:child>I'm in namespace 1</ns1:child>]
Beautiful Soup 尝试自动匹配解析文档中的命名空间前缀,除此之外,你还可以自定义目录的缩写
namespaces = dict(first="http://namespace1/", second="http://namespace2/")
namespace_soup.css.select("second|child", namespaces=namespaces)
# [<ns1:child>I'm in namespace 2</ns1:child>]
13.支持 CSS 筛选器的历史版本
.css属性是在 Beautiful Soup 4.12.0 中添加的。在此之前,只能使用.select()和
.select_one()方法。
Soup Sieve 是在 Beautiful Soup 4.7.0 开始集成的。早期版本中有.select()方法,但 仅能支持最常用的 CSS 选择器。
七、修改文档树
Beautiful Soup 的强项是文档树的搜索,但也支持修改文档数,或者编写新的 HTML、XML 文档。
1.修改 tag 的名称和属性
在Tag.attrs的章节中已经介绍过这个功能,但是再看一遍也无妨。重命名一个 tag, 改变属性的值,添加或删除属性
soup = BeautifulSoup('<b class="boldest">Extremely bold</b>', 'html.parser')
tag = soup.b
tag.name = "blockquote"
tag['class'] = 'verybold'
tag['id'] = 1
tag
# <blockquote class="verybold" id="1">Extremely bold</blockquote>
del tag['class']
del tag['id']
tag
# <blockquote>Extremely bold</blockquote>
2.修改.string
如果设置 tag 的.string属性值,就相当于用新的内容替代了原来的内容:
markup = '<a href="http://example.com/">I linked to <i>example.com</i></a>'
soup = BeautifulSoup(markup, 'html.parser')
tag = soup.a
tag.string = "New link text."
tag
# <a href="http://example.com/">New link text.</a>
注意:如果 tag 原本包含了其它子节点,原有的所有内容包括子 tag 都会被覆盖掉。
3.append()
向 tag 中添加内容可以使用Tag.append()方法,就好像调用 Python 列表的.append()方法:
soup = BeautifulSoup("<a>Foo</a>", 'html.parser')
soup.a.append("Bar")
soup
# <a>FooBar</a>
soup.a.contents
# ['Foo', 'Bar']
4.extend()
从 Beautiful Soup 4.7.0 版本开始,tag 增加了.extend()方法,可以把一个列表中内容, 按顺序全部添加到一个 tag 当中
soup = BeautifulSoup("<a>Soup</a>", 'html.parser')
soup.a.extend(["'s", " ", "on"])
soup
# <a>Soup's on</a>
soup.a.contents
# ['Soup', ''s', ' ', 'on']
5.NavigableString() 和 .new_tag()
如果想添加一段文本内容到文档中,可以将一个 Python 字符串对象传给append()方法, 或调用NavigableString构造方法:
from bs4 import NavigableString
soup = BeautifulSoup("<b></b>", 'html.parser')
tag = soup.b
tag.append("Hello")
new_string = NavigableString(" there")
tag.append(new_string)
tag
# <b>Hello there.</b>
tag.contents
# ['Hello', ' there']
如果想要创建一段注释,或其它NavigableString的子类,只要调用构造方法:
from bs4 import Comment
new_comment = Comment("Nice to see you.")
tag.append(new_comment)
tag
# <b>Hello there<!--Nice to see you.--></b>
tag.contents
# ['Hello', ' there', 'Nice to see you.']
(这是 Beautiful Soup 4.4.0 中新增的方法)
如果需要新创建一个 tag,最好的方法是调用工厂方法BeautifulSoup.new_tag()
soup = BeautifulSoup("<b></b>", 'html.parser')
original_tag = soup.b
new_tag = soup.new_tag("a", href="http://www.example.com")
original_tag.append(new_tag)
original_tag
# <b><a href="http://www.example.com"></a></b>
new_tag.string = "Link text."
original_tag
# <b><a href="http://www.example.com">Link text.</a></b>
只有第一个参数用作 tag 的 name,是必填的。
6.insert()
Tag.insert()方法与Tag.append()方法类似,区别是不会把新元素添加到 父节点.contents属性的最后。而是把元素插入到按顺序指定的位置。与 Python 列表中的.insert()方法的用法相同
markup = '<a href="http://example.com/">I linked to <i>example.com</i></a>'
soup = BeautifulSoup(markup, 'html.parser')
tag = soup.a
tag.insert(1, "but did not endorse ")
tag
# <a href="http://example.com/">I linked to but did not endorse <i>example.com</i></a>
tag.contents
# ['I linked to ', 'but did not endorse', <i>example.com</i>]
7.insert_before() 和 insert_after()
insert_before()方法可以在文档树中直接在目标之前添加 tag 或文本
soup = BeautifulSoup("<b>leave</b>", 'html.parser')
tag = soup.new_tag("i")
tag.string = "Don't"
soup.b.string.insert_before(tag)
soup.b
# <b><i>Don't</i>leave</b>
insert_after()方法可以在文档树中直接在目标之后添加 tag 或文本
div = soup.new_tag('div')
div.string = 'ever'
soup.b.i.insert_after(" you ", div)
soup.b
# <b><i>Don't</i> you <div>ever</div> leave</b>
soup.b.contents
# [<i>Don't</i>, ' you', <div>ever</div>, 'leave']
8.clear()
Tag.clear()方法可以移除 tag 的内容:
markup = '<a href="http://example.com/">I linked to <i>example.com</i></a>'
soup = BeautifulSoup(markup, 'html.parser')
tag = soup.a
tag.clear()
tag
# <a href="http://example.com/"></a>
9.extract()
PageElement.extract()方法将当前 tag 或文本从文档树中移除,并返回被删除的内容:
markup = '<a href="http://example.com/">I linked to <i>example.com</i></a>'
soup = BeautifulSoup(markup, 'html.parser')
a_tag = soup.a
i_tag = soup.i.extract()
a_tag
# <a href="http://example.com/">I linked to</a>
i_tag
# <i>example.com</i>
print(i_tag.parent)
# None
这个方法实际上产生了 2 个文档树: 一个是原始文档的BeautifulSoup对象, 另一个是被移除并且返回的文档树。还可以在新生成的文档树上继续调用extract方法:
my_string = i_tag.string.extract()
my_string
# 'example.com'
print(my_string.parent)
# None
i_tag
# <i></i>
10.decompose()
Tag.decompose()方法会将前节点从文档书中移除并完全销毁:
markup = '<a href="http://example.com/">I linked to <i>example.com</i></a>'
soup = BeautifulSoup(markup, 'html.parser')
a_tag = soup.a
i_tag = soup.i
i_tag.decompose()
a_tag
# <a href="http://example.com/">I linked to</a>
被 decompose 的 Tag 或者NavigableString是不稳定的,什么时候都不要使用它。如果不确定 某些内容是否被 decompose 了,可以通过.decomposed属性进行检查(Beautiful Soup 4.9.0 新增)
i_tag.decomposed
# True
a_tag.decomposed
# False
11.replace_with()
PageElement.replace_with()方法移除文档树中的某段内容,并用新 tag 或文本节点替代它:
markup = '<a href="http://example.com/">I linked to <i>example.com</i></a>'
soup = BeautifulSoup(markup, 'html.parser')
a_tag = soup.a
new_tag = soup.new_tag("b")
new_tag.string = "example.com"
a_tag.i.replace_with(new_tag)
a_tag
# <a href="http://example.com/">I linked to <b>example.com</b></a>
bold_tag = soup.new_tag("b")
bold_tag.string = "example"
i_tag = soup.new_tag("i")
i_tag.string = "net"
a_tag.b.replace_with(bold_tag, ".", i_tag)
a_tag
# <a href="http://example.com/">I linked to <b>example</b>.<i>net</i></a>
replace_with()方法返回被替代的 tag 或文本节点,可以用来检查或添加到文档树其它地方。
传递多个参数给 replace_with() 方法在 Beautiful Soup 4.10.0 版本中新增
12.wrap()
PageElement.wrap()方法可以对指定的tag元素进行包装[8],并返回包装后的结果:
soup = BeautifulSoup("<p>I wish I was bold.</p>", 'html.parser')
soup.p.string.wrap(soup.new_tag("b"))
# <b>I wish I was bold.</b>
soup.p.wrap(soup.new_tag("div"))
# <div><p><b>I wish I was bold.</b></p></div>
该方法在 Beautiful Soup 4.0.5 中添加。
13.unwrap()
Tag.unwrap()方法与wrap()方法相反。它将用 tag 内内容来替换 tag 本身, 该方法常被用来解包内容:
markup = '<a href="http://example.com/">I linked to <i>example.com</i></a>'
soup = BeautifulSoup(markup, 'html.parser')
a_tag = soup.a
a_tag.i.unwrap()
a_tag
# <a href="http://example.com/">I linked to example.com</a>
与replace_with()方法相同,unwrap()方法会返回被移除的 tag。
14.smooth()
调用了一堆修改文档树的方法后,可能剩下的是 2 个或更多个彼此衔接的 NavigableString 对象。 Beautiful Soup 处理起来没有问题,但在刚刚解析的文档树中,可能会出现非预期情况
soup = BeautifulSoup("<p>A one</p>", 'html.parser')
soup.p.append(", a two")
soup.p.contents
# ['A one', ', a two']
print(soup.p.encode())
# b'<p>A one, a two</p>'
print(soup.p.prettify())
# <p>
# A one
# , a two
# </p>
这时可以使用Tag.smooth()方法来清理文档树,把相邻的字符串平滑的链接到一起
soup.smooth()
soup.p.contents
# ['A one, a two']
print(soup.p.prettify())
# <p>
# A one, a two
# </p>
该方法在 Beautiful Soup 4.8.0 中添加。
八、输出
1.格式化输出
prettify()方法将 Beautiful Soup 的文档树格式化后以 Unicode 编码输出, 每个 XML/HTML 标签都独占一行
markup = '<html><head><body><a href="http://example.com/">I linked to <i>example.com</i></a>'
soup = BeautifulSoup(markup, 'html.parser')
soup.prettify()
# '<html>\n <head>\n </head>\n <body>\n <a href="http://example.com/">\n...'
print(soup.prettify())
# <html>
# <head>
# </head>
# <body>
# <a href="http://example.com/">
# I linked to
# <i>
# example.com
# </i>
# </a>
# </body>
# </html>
BeautifulSoup对象的根节点和它的所有 tag 节点都可以调用prettify()方法:
print(soup.a.prettify())
# <a href="http://example.com/">
# I linked to
# <i>
# example.com
# </i>
# </a>
因为格式化会添加额外的空格(为了换行显示),因为prettify()会改变 HTML 文档的内容, 所以不要用来格式化文档。prettify()方法的设计目标是为了帮助更好的显示和理解文档。
2.压缩输出
如果只想得到结果字符串,不重视格式,那么可以对一个BeautifulSoup对象或Tag对象 使用 Python 的unicode()或str()方法:
str(soup)
# '<html><head></head><body><a href="http://example.com/">I linked to <i>example.com</i></a></body></html>'
str(soup.a)
# '<a href="http://example.com/">I linked to <i>example.com</i></a>'
str()方法返回 UTF-8 编码的字符串,查看定编码了解更多选项。
还可以调用encode()方法获得字节码或调用decode()方法获得Unicode。
3.输出格式
Beautiful Soup 输出是会将 HTML 中的特殊字符编码转换成 Unicode, 比如 “&lquot;”:
soup = BeautifulSoup("“Dammit!” he said.", 'html.parser')
str(soup)
# '“Dammit!” he said.'
如果将文档转换成字节编码,那么字节码 Unicode 会被编码成 UTF-8。并且无法再转换回 html 中的特殊字符编码:
soup.encode("utf8")
# b'\xe2\x80\x9cDammit!\xe2\x80\x9d he said.'
默认情况下,只会转义 & 符号和尖角号。它们会被转义为 “&”,”<” 和 “>”,因此 Beautiful Soup 不会无意间生成错误格式的的 HTML 或 XML
soup = BeautifulSoup("<p>The law firm of Dewey, Cheatem, & Howe</p>", 'html.parser')
soup.p
# <p>The law firm of Dewey, Cheatem, & Howe</p>
soup = BeautifulSoup('<a href="http://example.com/?foo=val1&bar=val2">A link</a>', 'html.parser')
soup.a
# <a href="http://example.com/?foo=val1&bar=val2">A link</a>
修改默认转义规则的方法是,设置prettify(),encode(), 或decode()方法的formatter参数。Beautiful Soup 可以识别 5 种formatter值。
默认的设置是formatter="minimal"。处置字符串时 Beautiful Soup 会确保生成合法的 HTML/XML
french = "<p>Il a dit <<Sacré bleu!>></p>"
soup = BeautifulSoup(french, 'html.parser')
print(soup.prettify(formatter="minimal"))
# <p>
# Il a dit <<Sacré bleu!>>
# </p>
设置为formatter="html"时,Beautiful Soup 会尽可能把 Unicode 字符转换为 HTML 实体
print(soup.prettify(formatter="html"))
# <p>
# Il a dit <<Sacré bleu!>>
# </p>
设置为formatter="html5"时,结果与formatter="html"相似,区别是 Beautiful Soup 会忽略 HTML 标签种空标签里的斜杠符号,比如 “br” 标签
br = BeautifulSoup("<br>", 'html.parser').br
print(br.encode(formatter="html"))
# b'<br/>'
print(br.encode(formatter="html5"))
# b'<br>'
另外,如果属性的值为空字符串的,它会变为 HTML 风格的 boolean 属性
option = BeautifulSoup('<option selected=""></option>').option
print(option.encode(formatter="html"))
# b'<option selected=""></option>'
print(option.encode(formatter="html5"))
# b'<option selected></option>'
这种机制在 Beautiful Soup 4.10.0 中添加。
设置为formatter=None时,Beautiful Soup 在输出时不会修改任何字符串内容。这是效率最高的选项, 但可能导致输出非法的 HTML/XML,比如下面例子
print(soup.prettify(formatter=None))
# <p>
# Il a dit <<Sacré bleu!>>
# </p>
link_soup = BeautifulSoup('<a href="http://example.com/?foo=val1&bar=val2">A link</a>', 'html.parser')
print(link_soup.a.encode(formatter=None))
# b'<a href="http://example.com/?foo=val1&bar=val2">A link</a>'
4.格式化对象
如果需要更复杂的机制来控制输出内容,可以实例化 Beautiful Soup 的 formatter 实例, 然后用作formatter参数。
classbs4.HTMLFormatter
可以用来自定义 HTML 文档的格式化规则。
下面的 formatter 例子,可以将字符串全部转化为大写,不论是文字节点中的字符还是属性值
from bs4.formatter import HTMLFormatter
def uppercase(str):
return str.upper()
formatter = HTMLFormatter(uppercase)
print(soup.prettify(formatter=formatter))
# <p>
# IL A DIT <<SACRÉ BLEU!>>
# </p>
print(link_soup.a.prettify(formatter=formatter))
# <a href="HTTP://EXAMPLE.COM/?FOO=VAL1&BAR=VAL2">
# A LINK
# </a>
下面的 formatter 例子,在美化文档时增加缩进长度
formatter = HTMLFormatter(indent=8)
print(link_soup.a.prettify(formatter=formatter))
# <a href="http://example.com/?foo=val1&bar=val2">
# A link
# </a>
classbs4.XMLFormatter
可以用来自定义 XML 文档的格式化规则。
5.编写自定义 formatter
HTMLFormatterorXMLFormatter的子类可以控制更多的输出过程。 例如,Beautiful Soup 默认情况下会对属性中的 tag 进行排序
attr_soup = BeautifulSoup(b'<p z="1" m="2" a="3"></p>', 'html.parser')
print(attr_soup.p.encode())
# <p a="3" m="2" z="1"></p>
若想关闭这个功能,可以使用子类的Formatter.attributes()方法,该方法可以控制输出那些属性 以及这些属性的输出顺序。下面的例子会过滤掉文档中的 “m” 属性
class UnsortedAttributes(HTMLFormatter):
def attributes(self, tag):
for k, v in tag.attrs.items():
if k == 'm':
continue
yield k, v
print(attr_soup.p.encode(formatter=UnsortedAttributes()))
# <p z="1" a="3"></p>
危险提示:如果创建了CData对象,对象中的字符串对象始终表示原始内容,不会被格式化方法影响。 Beautiful Soup 输出时依然会调用自定义格式化方法,以防自定义方法中包含自定义的字符串计数方法, 但调用后不会使用返回结果,不影响原来的返回值。
from bs4.element import CData
soup = BeautifulSoup("<a></a>", 'html.parser')
soup.a.string = CData("one < three")
print(soup.a.prettify(formatter="html"))
# <a>
# <![CDATA[one < three]]>
# </a>
6.get_text()
如果只想得到 tag 中包含的文本内容,那么可以调用get_text()方法,这个方法获取到 tag 包含的所有文本内容,包括子孙 tag 中的可读内容,并将结果作为单独的一个 Unicode 编码字符串返回:
markup = '<a href="http://example.com/">\nI linked to <i>example.com</i>\n</a>'
soup = BeautifulSoup(markup, 'html.parser')
soup.get_text()
'\nI linked to example.com\n'
soup.i.get_text()
'example.com''
可以通过参数指定 tag 的文本内容的连接符:
# soup.get_text("|")
'\nI linked to |example.com|\n'
还可以去除每一个文本片段内容的前后空白:
# soup.get_text("|", strip=True)
'I linked to|example.com'
但这种情况,你可能应该使用.stripped_strings生成器, 获得文本列表后手动处理内容:
[text for text in soup.stripped_strings]
# ['I linked to', 'example.com']
因为 Beautiful Soup 4.9.0 版本开始使用 lxml 或 html.parser,<script>,<style> 和 <template> 标签中的内容不会被当做普通的 ‘文本’ 来处理,因此这些标签中的内容不会算作页面中的 可读内容的一部分。
Beautiful Soup 4.10.0 版本以后,可以在 NavigableString 对象上调用 get_text(),.strings 或 .stripped_strings 属性,结果会返回对象本身或空,这种用法只有在对混合类型列表迭代时才会用到。
九、指定文档解析器
如果仅是想要解析HTML文档,只需要创建BeautifulSoup对象时传入文档就可以了。Beautiful Soup 会自动选择一个解析器来解析文档。同时还可以使用额外参数,来指定文档解析器。
BeautifulSoup第一个参数应该是要被解析的文档字符串或是文件句柄 – 待解析文件的句柄, 第二个参数用来标识怎样解析文档。
如果不指定解析器,默认使用已安装的最佳HTML 解析器。Beautiful Soup 把 lxml 解析器排在第一, 然后是 html5lib, 然后是 Python 标准库。在下面两种条件下解析器优先顺序会变化:
要解析的文档是什么类型: 目前支持, “html”,“xml”,和 “html5”
指定使用哪种解析器: 目前支持,“lxml”,“html5lib”,和 “html.parser”(Python 标准库)
安装解析器章节介绍了可以使用哪种解析器,以及如何安装。
如果指定的解析器没有安装,Beautiful Soup会自动选择其它方案。目前只有 lxml 解析器支持XML文档的解析, 在没有安装 lxml 库的情况下,无法自动选择 XML 文档解析器,手动指定 lxml 也不行。
解析器之间的区别
Beautiful Soup 为不同的解析器提供了相同的接口,但解析器本身时有区别的。同一篇文档被不同的解析器解析后 可能会生成不同结构的文档。区别最大的是 HTML 解析器和 XML 解析器,看下面片段被解析成 HTML 结构:
BeautifulSoup("<a><b/></a>", "html.parser")
# <a><b></b></a>
因为空标签 <b /> 不符合 HTML 标准,html.parser 解析器把它解析成一对儿 <b></b>。
同样的文档使用 XML 解析结果如下(解析 XML 需要安装 lxml 库)。注意,空标签 <b /> 依然被保留, 并且文档前添加了 XML 头,而不是被包含在 <html> 标签内:
print(BeautifulSoup("<a><b/></a>", "xml"))
# <?xml version="1.0" encoding="utf-8"?>
# <a><b/></a>
HTML 解析器之间也有区别,如果被解析的HTML文档是标准格式,那么解析器之间没有任何差别。 只是解析速度不同,结果都会返回正确的文档树。
但是如果被解析文档不是标准格式,那么不同的解析器返回结果可能不同。下面例子中,使用 lxml 解析错误格式的文档,结果 </p> 标签被直接忽略掉了:
BeautifulSoup("<a></p>", "lxml")
# <html><body><a></a></body></html>
使用 html5lib 库解析相同文档会得到不同的结果:
BeautifulSoup("<a></p>", "html5lib")
# <html><head></head><body><a><p></p></a></body></html>
html5lib 库没有忽略掉 </p> 标签,而是自动补全了标签,还给文档树添加了 <head> 标签。
使用 pyhton 内置库解析结果如下:
BeautifulSoup("<a></p>", "html.parser")
# <a></a>
与 lxml[7]库类似的,Python 内置库忽略掉了 </p> 标签,与 html5lib 库不同的是标准库没有 尝试创建符合标准的文档格式或将文档片段包含在 <body> 标签内,与lxml不同的是标准库甚至连 <html> 标签都没有尝试去添加。
因为文档片段 “<a></p>” 是错误格式,所以以上解析方式都能算作 “正确”,html5lib 库使用的是 HTML5 的部分标准,所以最接近”正确”。不过所有解析器的结构都能够被认为是”正常”的。
不同的解析器可能影响代码执行结果,如果在分发给别人的代码中使用了BeautifulSoup, 那么最好注明使用了哪种解析器,以减少不必要的麻烦。
十、编码
任何 HTML 或 XML 文档都有自己的编码方式,比如ASCII 或 UTF-8。但是使用 Beautiful Soup 解析后, 文档都被转换成了 Unicode:
markup = "<h1>Sacr\xc3\xa9 bleu!</h1>"
soup = BeautifulSoup(markup, 'html.parser')
soup.h1
# <h1>Sacré bleu!</h1>
soup.h1.string
# 'Sacr\xe9 bleu!'
这不是魔术(但很神奇),Beautiful Soup 用了编码自动检测子库来识别当前 文档编码并转换成 Unicode 编码。BeautifulSoup对象的.original_encoding属性记录了 自动识别编码的结果:
soup.original_encoding
'utf-8'
编码自动检测功能大部分时候都能猜对编码格式,但有时候也会出错。有时候即使 猜测正确,也是在逐个 字节的遍历整个文档后才猜对的,这样很慢。如果预先知道文档编码,可以设置编码参数 来减少自动检查编码 出错的概率并且提高文档解析速度。在创建BeautifulSoup对象的时候设置from_encoding参数。
下面一段文档用了 ISO-8859-8 编码方式,这段文档太短,结果 Beautiful Soup 以为文档是用 ISO-8859-7 编码:
markup = b"<h1>\xed\xe5\xec\xf9</h1>"
soup = BeautifulSoup(markup, 'html.parser')
print(soup.h1)
# <h1>νεμω</h1>
print(soup.original_encoding)
# iso-8859-7
通过传入from_encoding参数来指定编码方式:
soup = BeautifulSoup(markup, 'html.parser', from_encoding="iso-8859-8")
print(soup.h1)
# <h1>םולש</h1>
print(soup.original_encoding)
# iso8859-8
如果仅知道文档采用了 Unicode 编码,但不知道具体编码。可以先自己猜测,猜测错误(依旧是乱码)时, 可以把错误编码作为exclude_encodings参数,这样文档就不会尝试使用这种编码了解码了。
译者备注: 在没有指定编码的情况下,BS会自己猜测编码,把不正确的编码排除掉,BS就更容易猜到正确编码。
soup = BeautifulSoup(markup, 'html.parser', exclude_encodings=["iso-8859-7"])
print(soup.h1)
# <h1>םולש</h1>
print(soup.original_encoding)
# WINDOWS-1255
猜测的结果 Windows-1255 可能不是 100% 准确,但是 Windows-1255 编码是 ISO-8859-8 的扩展集, 所以猜测结果已经十分接近了,并不影响使用。(exclude_encodings参数是 4.4.0版本的新功能)
少数情况下(通常是UTF-8编码的文档中包含了其它编码格式的文件),想获得正确的 Unicode 编码就不得不将 文档中少数特殊编码字符替换成特殊 Unicode 编码,“REPLACEMENT CHARACTER” (U+FFFD, �)[9]。 如果 Beautifu Soup 猜测文档编码时作了特殊字符的替换,那么 Beautiful Soup 会把UnicodeDammit或BeautifulSoup对象的.contains_replacement_characters属性标记为True。 这样就可以知道当前文档进行 Unicode 编码后丢失了一部分特殊内容字符。如果文档中包含 � 而.contains_replacement_characters属性是False,则表示 � 就是文档中原来的字符, 不是转码失败。
1.输出编码
通过 Beautiful Soup 输出文档时,不管输入文档是什么编码方式,输出编码均为UTF-8编码, 下面例子输入文档是 Latin-1 编码:
markup = b'''
<html>
<head>
<meta content="text/html; charset=ISO-Latin-1" http-equiv="Content-type" />
</head>
<body>
<p>Sacr\xe9 bleu!</p>
</body>
</html>
'''
soup = BeautifulSoup(markup, 'html.parser')
print(soup.prettify())
# <html>
# <head>
# <meta content="text/html; charset=utf-8" http-equiv="Content-type" />
# </head>
# <body>
# <p>
# Sacré bleu!
# </p>
# </body>
# </html>
注意,输出文档中的 <meta> 标签内容中的编码信息已经修改成了与输出编码一致的 UTF-8。
如果不想用 UTF-8 编码输出,可以将编码方式传入prettify()方法:
print(soup.prettify("latin-1"))
# <html>
# <head>
# <meta content="text/html; charset=latin-1" http-equiv="Content-type" />
# ...
还可以调用BeautifulSoup对象或任意节点的encode()方法,就像 Python 的字符串 调用encode()方法一样:
soup.p.encode("latin-1")
# b'<p>Sacr\xe9 bleu!</p>'
soup.p.encode("utf-8")
# b'<p>Sacr\xc3\xa9 bleu!</p>'
如果文档中包含当前编码不支持的字符,那么这些字符将被转换成一系列 XML 特殊字符引用,下面例子中 包含了 Unicode 编码字符 SNOWMAN:
markup = u"<b>\N{SNOWMAN}</b>"
snowman_soup = BeautifulSoup(markup, 'html.parser')
tag = snowman_soup.b
SNOWMAN 字符在 UTF-8 编码中可以正常显示(看上去是 ☃),但有些编码不支持 SNOWMAN 字符,比如 ISO-Latin-1 或 ASCII,那么在这些编码中 SNOWMAN 字符会被转换成 “☃”:
print(tag.encode("utf-8"))
# b'<b>\xe2\x98\x83</b>'
print(tag.encode("latin-1"))
# b'<b>☃</b>'
print(tag.encode("ascii"))
# b'<b>☃</b>'
2.Unicode, Dammit
译者备注: Unicode Dammit 是 Beautiful Soup 内置库,主要用来猜测文档编码。
编码自动检测功能可以在 Beautiful Soup 以外使用。当遇到一段未知编码 的文档时,可以通过下面方法把它转换为 Unicode 编码
from bs4 import UnicodeDammit
dammit = UnicodeDammit(b"\xc2\xabSacr\xc3\xa9 bleu!\xc2\xbb")
print(dammit.unicode_markup)
# «Sacré bleu!»
dammit.original_encoding
# 'utf-8'
如果安装了 Python 的chardet或cchardet库,那么编码检测功能的准确率将大大提高。 输入的字符越多,检测结果越准确,如果事先猜测到一些可能编码,那么可以将猜测的编码作为参数, 这样将优先检测这些编码:
dammit = UnicodeDammit("Sacr\xe9 bleu!", ["latin-1", "iso-8859-1"])
print(dammit.unicode_markup)
# Sacré bleu!
dammit.original_encoding
# 'latin-1'
编码自动检测功能中有 2 项功能是 Beautiful Soup 库中用不到的
(1)智能引号
使用 Unicode 时,Beautiful Soup 还会智能的把引号[10]转换成 HTML 或 XML 中的特殊字符:
markup = b"<p>I just \x93love\x94 Microsoft Word\x92s smart quotes</p>"
UnicodeDammit(markup, ["windows-1252"], smart_quotes_to="html").unicode_markup
# '<p>I just “love” Microsoft Word’s smart quotes</p>'
UnicodeDammit(markup, ["windows-1252"], smart_quotes_to="xml").unicode_markup
# '<p>I just “love” Microsoft Word’s smart quotes</p>'
也可以把引号转换为 ASCII 码:
UnicodeDammit(markup, ["windows-1252"], smart_quotes_to="ascii").unicode_markup
# '<p>I just "love" Microsoft Word\'s smart quotes</p>'
虽然这个功能很有用,但是 Beautiful Soup 没有使用这种方式。默认情况下,Beautiful Soup 把引号转换成 Unicode:
UnicodeDammit(markup, ["windows-1252"]).unicode_markup
# '<p>I just “love” Microsoft Word’s smart quotes</p>'
(2)矛盾的编码
有时文档的大部分都是用 UTF-8,但同时还包含了 Windows-1252 编码的字符,就像微软的智能引号[10]一样。 一些包含多个信息的来源网站容易出现这种情况。UnicodeDammit.detwingle()方法可以把这类文档转换成纯 UTF-8 编码格式,看个简单的例子:
snowmen = (u"\N{SNOWMAN}" * 3)
quote = (u"\N{LEFT DOUBLE QUOTATION MARK}I like snowmen!\N{RIGHT DOUBLE QUOTATION MARK}")
doc = snowmen.encode("utf8") + quote.encode("windows_1252")
这段文档很杂乱,snowmen 是 UTF-8 编码,引号是 Windows-1252 编码,直接输出时不能同时显示 snowmen 和引号,因为它们编码不同:
print(doc)
# ☃☃☃�I like snowmen!�
print(doc.decode("windows-1252"))
# ☃☃☃“I like snowmen!”
如果对这段文档用 UTF-8 解码就会产生UnicodeDecodeError异常,如果用 Windows-1252 解码就会得到一堆乱码。幸好,UnicodeDammit.detwingle()方法会把这段字符串转换成 UTF-8 编码,允许我们同时显示出文档中的 snowmen 和引号:
new_doc = UnicodeDammit.detwingle(doc)
print(new_doc.decode("utf8"))
# ☃☃☃“I like snowmen!”
UnicodeDammit.detwingle()方法只能解码包含在 UTF-8 编码中的 Windows-1252 编码内容, (反过来的话,大概也可以)但这是最常见的用法。
在创建BeautifulSoup或UnicodeDammit对象前一定要先对文档调用UnicodeDammit.detwingle()确保文档的编码方式正确。Beautiful Soup 会假设文档只包含一种编码,如果尝试去解析一段同时包含 UTF-8 和 Windows-1252 编码的文档, 就有可能被误判成整个文档都是 Windows-1252 编码,解析结果就会得到一堆乱码, 比如: ☃☃☃“I like snowmen!”。
UnicodeDammit.detwingle()方法在 Beautiful Soup 4.1.0 版本中新增。
十一、行编号
html.parser和html5lib解析器可以跟踪原始文档中发现的每个 Tag。查看原始信息可以 使用Tag.sourceline(行号)和Tag.sourcepos(标签所在行的起始位置)
markup = "<p\n>Paragraph 1</p>\n <p>Paragraph 2</p>"
soup = BeautifulSoup(markup, 'html.parser')
for tag in soup.find_all('p'):
print(repr((tag.sourceline, tag.sourcepos, tag.string)))
# (1, 0, 'Paragraph 1')
# (3, 4, 'Paragraph 2')
注意,这两个解析器的sourceline和sourcepos会有些许的不同。html.parser 将 标签开始的 小于号作为标签起始符号,而 html5lib 将标签开始的大于号作为标签起始符号
soup = BeautifulSoup(markup, 'html5lib')
for tag in soup.find_all('p'):
print(repr((tag.sourceline, tag.sourcepos, tag.string)))
# (2, 0, 'Paragraph 1')
# (3, 6, 'Paragraph 2')
可以在 BeautifulSoup 构造函数中配置store_line_numbers=False来关闭这个功能
markup = "<p\n>Paragraph 1</p>\n <p>Paragraph 2</p>"
soup = BeautifulSoup(markup, 'html.parser', store_line_numbers=False)
print(soup.p.sourceline)
# None
这个功能在 4.8.1 版本中引入,lxml 解析器不支持这个功能。
十二、比较对象是否相同
两个NavigableString或Tag对象具有相同的 HTML 或 XML 结构时, Beautiful Soup就判断这两个对象相同。这个例子中,2个 <b> 标签在 BS 中是相同的, 尽管他们在文档树的不同位置,但是具有相同的表象: “<b>pizza</b>”
markup = "<p>I want <b>pizza</b> and more <b>pizza</b>!</p>"
soup = BeautifulSoup(markup, 'html.parser')
first_b, second_b = soup.find_all('b')
print(first_b == second_b)
# True
print(first_b.previous_element == second_b.previous_element)
# False
如果想判断两个对象是否严格的指向同一个对象可以通过is来判断
print first_b is second_b
# False
十三、复制Beautiful Soup对象
copy.copy()方法可以复制任意Tag或NavigableString对象
import copy
p_copy = copy.copy(soup.p)
print(p_copy)
# <p>I want <b>pizza</b> and more <b>pizza</b>!</p>
复制后的对象跟与对象是相等的,但指向不同的内存地址
print soup.p == p_copy
# True
print soup.p is p_copy
# False
源对象和复制对象的区别是源对象在文档树中,而复制后的对象是独立的还没有添加到文档树中。 复制后对象的效果跟调用了extract()方法相同。
print p_copy.parent
# None
这是因为相等的对象不能同时插入相同的位置
十四、高级自定义解析
Beautiful Soup 提供多种途径自定义解析器如果解析 HTML 和 XML。本章覆盖了最常用的自定义方法。
1.解析部分文档
如果仅仅因为想要查找文档中的 <a> 标签而将整片文档进行解析,实在是浪费内存和时间。最快的方法 是从一开始 就把 <a> 标签以外的东西都忽略掉。SoupStrainer类可以选择解析哪部分文档内容, 创建一个SoupStrainer对象并作为parse_only参数给BeautifulSoup的构造 方法即可。
(注意,这个功能在 html5lib 解析器中无法使用。如果使用 html5lib 解析器,整篇文档都会被解析, 这是因为 html5lib 会重新排列文档树的结构,如果部分节点不在文档树中,会导致崩溃。为了避免混淆, 下面的例子中 Beautiful Soup 都强制指定使用了 Python 内置解析器。)
2.SoupStrainer
SoupStrainer类接受与典型搜索方法相同的参数:name,attrs,recursive,string,**kwargs。 下面举例说明三种SoupStrainer对象:
from bs4 import SoupStrainer
only_a_tags = SoupStrainer("a")
only_tags_with_id_link2 = SoupStrainer(id="link2")
def is_short_string(string):
return string is not None and len(string) < 10
only_short_strings = SoupStrainer(string=is_short_string)
再拿“爱丽丝”文档来举例,来看看使用三种SoupStrainer对象做参数会有什么不同:
html_doc = """<html><head><title>The Dormouse's story</title></head>
<body>
<p class="title"><b>The Dormouse's story</b></p>
<p class="story">Once upon a time there were three little sisters; and their names were
<a href="http://example.com/elsie" class="sister" id="link1">Elsie</a>,
<a href="http://example.com/lacie" class="sister" id="link2">Lacie</a> and
<a href="http://example.com/tillie" class="sister" id="link3">Tillie</a>;
and they lived at the bottom of a well.</p>
<p class="story">...</p>
"""
print(BeautifulSoup(html_doc, "html.parser", parse_only=only_a_tags).prettify())
# <a class="sister" href="http://example.com/elsie" id="link1">
# Elsie
# </a>
# <a class="sister" href="http://example.com/lacie" id="link2">
# Lacie
# </a>
# <a class="sister" href="http://example.com/tillie" id="link3">
# Tillie
# </a>
print(BeautifulSoup(html_doc, "html.parser", parse_only=only_tags_with_id_link2).prettify())
# <a class="sister" href="http://example.com/lacie" id="link2">
# Lacie
# </a>
print(BeautifulSoup(html_doc, "html.parser", parse_only=only_short_strings).prettify())
# Elsie
# ,
# Lacie
# and
# Tillie
# ...
#
还可以将SoupStrainer作为参数传入搜索文档树中提到的方法。虽然不常用,但还是提一下:
soup = BeautifulSoup(html_doc, 'html.parser')
soup.find_all(only_short_strings)
# ['\n\n', '\n\n', 'Elsie', ',\n', 'Lacie', ' and\n', 'Tillie',
# '\n\n', '...', '\n']
3.自定义包含多个值的属性
在 HTML 文档中,像class这样的属性的值是一个列表,像id这样的属性的值是一个单一字符串, 因为 HTML 标准定义了这些属性的不同行为
markup = '<a class="cls1 cls2" id="id1 id2">'
soup = BeautifulSoup(markup, 'html.parser')
soup.a['class']
# ['cls1', 'cls2']
soup.a['id']
# 'id1 id2'
设置multi_valued_attributes=None可以禁用多值的自动识别,然后全部属性的值都变成一个字符串
soup = BeautifulSoup(markup, 'html.parser', multi_valued_attributes=None)
soup.a['class']
# 'cls1 cls2'
soup.a['id']
# 'id1 id2'
如果给multi_valued_attributes参数传入一个字典,可以实现一点点解析自定义。如果需要这么做, 查看HTMLTreeBuilder.DEFAULT_CDATA_LIST_ATTRIBUTES了解 Beautiful Soup 的默认配置, 这些均是基于 HTML 标准配置的。
(这个功能添加于 Beautiful Soup 4.8.0)
4.处理重复属性
使用html.parser解析器时,可以通过设置on_duplicate_attribute参数,来定义当 Beautiful Soup 在 tag 中发现重复的属性名字时如何处理
markup = '<a href="http://url1/" href="http://url2/">'
默认行为是,重名属性会使用最后出现的值
soup = BeautifulSoup(markup, 'html.parser')
soup.a['href']
# http://url2/
soup = BeautifulSoup(markup, 'html.parser', on_duplicate_attribute='replace')
soup.a['href']
# http://url2/
当on_duplicate_attribute='ignore'时,Beautiful Soup 会使用第一个出现的值,然后忽略 后出现的值
soup = BeautifulSoup(markup, 'html.parser', on_duplicate_attribute='ignore')
soup.a['href']
# http://url1/
(lxml 和 html5lib 总是采用这种处理方式,它们的默认行为不能通过 Beautiful Soup 配置。)
如果需要复杂的控制,可以传入一个方法,当属性值重复时会被调用
def accumulate(attributes_so_far, key, value):
if not isinstance(attributes_so_far[key], list):
attributes_so_far[key] = [attributes_so_far[key]]
attributes_so_far[key].append(value)
soup = BeautifulSoup(markup, 'html.parser', on_duplicate_attribute=accumulate)
soup.a['href']
# ["http://url1/", "http://url2/"]
这个特性新增于 Beautiful Soup 4.9.1。
5.实例化自定义子类
当解析器传递给 Beautiful Soup 一个标签或一个字符串后,Beautiful Soup 会实例化为Tag或NavigableString对象,并包含相关信息。如果想修改默认行为,可以让 Beautiful Soup 实例化Tag或NavigableString的子类,子类中可以自定义行为
from bs4 import Tag, NavigableString
class MyTag(Tag):
pass
class MyString(NavigableString):
pass
markup = "<div>some text</div>"
soup = BeautifulSoup(markup, 'html.parser')
isinstance(soup.div, MyTag)
# False
isinstance(soup.div.string, MyString)
# False
my_classes = { Tag: MyTag, NavigableString: MyString }
soup = BeautifulSoup(markup, 'html.parser', element_classes=my_classes)
isinstance(soup.div, MyTag)
# True
isinstance(soup.div.string, MyString)
# True
这种用法可用在于 Beautiful Soup 与测试框架集成。
这个特性新增于 Beautiful Soup 4.8.1。
十五、常见问题
1.代码诊断
如果想知道 Beautiful Soup 到底怎样处理一份文档,可以将文档传入diagnose()方法(Beautiful Soup 4.2.0中新增), Beautiful Soup 会输出一份报告, 说明不同的解析器会怎样处理这段文档,并标出当前的解析过程会使用哪种解析器:
from bs4.diagnose import diagnose
with open("bad.html") as fp:
data = fp.read()
diagnose(data)
# Diagnostic running on Beautiful Soup 4.2.0
# Python version 2.7.3 (default, Aug 1 2012, 05:16:07)
# I noticed that html5lib is not installed. Installing it may help.
# Found lxml version 2.3.2.0
#
# Trying to parse your data with html.parser
# Here's what html.parser did with the document:
# ...
diagnose()方法的输出结果可能帮助你找到问题的原因,如果不行,还可以把结果复制出来以 便寻求他人的帮助。
2.文档解析错误
文档解析错误有两种。一种是崩溃,Beautiful Soup 尝试解析一段文档结果却抛除了异常,通常是HTMLParser.HTMLParseError。还有一种异常情况,是Beautiful Soup 解析后的文档树 看起来与原来的内容相差很多。
这些错误几乎都不是 Beautiful Soup 的原因,这不是因为 Beautiful Soup 的代码写得多优秀, 而是因为 Beautiful Soup 没有包含任何文档解析代码。异常产生自被依赖的解析器,如果解析器不能 很好的解析出当前的文档,那么最好的办法是换一个解析器。更多细节查看安装解析器章节。
最常见的解析错误是HTMLParser.HTMLParseError:malformedstarttag和HTMLParser.HTMLParseError:badendtag。这都是由Python内置的解析器引起的, 解决方法是安装 lxml 或 html5lib。
最常见的非预期行为是发现不了一个确定存在稳当中的 Tag。光是用眼睛就能轻易发现,但用find_all()方法返回 [] ,用find()方法返回 None 。这是 Python 内置解析器的又一个问题: 解析器会跳过那些 它不知道的 tag。解决方法还是安装 lxml 或 html5lib
3.版本错误
SyntaxError:Invalidsyntax(异常位置在代码行:ROOT_TAG_NAME=u'[document]'), 原因是用 Python2 版本的 Beautiful Soup 未经过代码转换,直接在 Python3 中运行。ImportError:NomodulenamedHTMLParser因为在 Python3 中执行 Python2 版本的 Beautiful Soup。ImportError:Nomodulenamedhtml.parser因为在 Python2 中执行 Python3 版本的 Beautiful SoupImportError:NomodulenamedBeautifulSoup因为在没有安装 Beautiful Soup3 库的 Python 环境下执行代码, 或忘记了 Beautiful Soup4 的代码需要从bs4包中引入。ImportError:Nomodulenamedbs4因为当前 Python 环境下还没有安装 Beautiful Soup4。
4.解析成XML
默认情况下,Beautiful Soup 会将当前文档作为 HTML 格式解析,如果要解析 XML 文档,要在BeautifulSoup构造方法中加入第二个参数 “xml”:
soup=BeautifulSoup(markup,"xml")
当然,还需要安装 lxml
5.其它解析器的错误
如果同样的代码在不同环境下结果不同,可能是因为两个环境下使用不同的解析器造成的。 例如这个环境中安装了 lxml,而另一个环境中只有 html5lib,解析器之间的区别中说明了原因。 修复方法是在
BeautifulSoup的构造方法中中指定解析器。因为HTML标签是大小写敏感的, 所以解析器会将 tag 和属性都转换成小写。例如文档中的 <TAG></TAG> 会被转换为 <tag></tag> 。 如果想要保留 tag 的大写的话,那么应该将文档解析成XML。
6.杂项错误
UnicodeEncodeError:'charmap'codeccan'tencodecharacter'\xfoo'inpositionbar(或其它类型的UnicodeEncodeError)的错误, 主要是两方面的原因,第一种是正在使用的终端(console)无法显示部分Unicode,参考Python wiki,第二种是向文件 写入时,被写入文件不支持部分 Unicode,这时需要用u.encode("utf8")方法将 编码转换为UTF-8。KeyError:[attr]因为调用tag['attr']方法而引起,因为这个 tag 没有定义 该属性。出错最多的是KeyError:'href'和KeyError:'class'。如果不确定 某个属性是否存在时,用tag.get('attr')方法去获取它,跟获取 Python 字典的 key 一样。AttributeError:'ResultSet'objecthasnoattribute'foo'错误通常是 因为把find_all()的返回结果当作一个 tag 或文本节点使用,实际上返回结果是一个 列表或ResultSet对象的字符串,需要对结果进行循环才能得到每个节点的.foo属性。 或者使用find()方法仅获取到一个节点。AttributeError:'NoneType'objecthasnoattribute'foo'这个错误通常是 在调用了find()方法后直节点取某个属性 foo。但是find()方法并没有找到任何 结果,所以它的返回值是None。需要找出为什么find()的返回值是None。AttributeError:'NavigableString'objecthasnoattribute'foo'这种问题 通常是因为吧一个字符串当做一个 tag 来处理。可能在迭代一个列表时,期望其中都是 tag,但实际上 列表里既包含 tag 也包含字符串。
7.如何提高效率
Beautiful Soup对文档的解析速度不会比它所依赖的解析器更快,如果对计算时间要求很高或者计算机的时间比程序员的时间更值钱,那么就应该直接使用lxml。
换句话说,还有提高 Beautiful Soup 效率的办法,使用lxml作为解析器。Beautiful Soup 用 lxml 做解析器比用 html5lib 或 Python 内置解析器速度快很多。
安装cchardet后文档的解码的编码检测 速度会更快。
解析部分文档不会节省多少解析时间,但是会节省很多内存,并且搜索时也会变得更快。
附录
[1]BeautifulSoup 的 google 讨论组不是很活跃,可能是因为库已经比较完善了吧,但是作者还是会很热心的尽量帮你解决问题的。
[2](1,2)文档被解析成树形结构,所以下一步解析过程应该是当前节点的子节点
[3]过滤器只能作为搜索文档的参数,或者说应该叫参数类型更为贴切,原文中用了filter因此翻译为过滤器
[4]元素参数,HTML 文档中的一个 tag 节点,不能是文本节点
[6]CSS选择器是一种单独的文档搜索语法,参考CSS 元素选择器
[7]原文写的是 html5lib, 译者觉得这是原文档的一个笔误
[8]wrap含有包装,打包的意思,但是这里的包装不是在外部包装而是将当前tag的内部内容包装在一个tag里。 包装原来内容的新tag依然在执行wrap()方法的tag内
[9]文档中特殊编码字符被替换成特殊字符(通常是�)的过程是Beautful Soup自动实现的, 如果想要多种编码格式的文档被完全转换正确,那么,只好,预先手动处理,统一编码格式
[10](1,2)智能引号,常出现在 microsoft 的 word 软件中,即在某一段落中按引号出现的顺序每个引号都被自动转换为左引号,或右引号。


![[misc]-压缩包-zip](https://i-blog.csdnimg.cn/direct/73d8dc16a4d240998472d884e003945e.png)