
在 Android 开发中,网络请求是不可避免的任务之一。OKHttp3 是一个强大且灵活的 HTTP 客户端,但在实际开发中,我们往往需要对其进行封装以简化使用。本文将介绍如何封装 OKHttp3 以便于更高效地进行网络请求。
一、为什么要封装OKHttp3? 🤔
虽然 OKHttp3 功能强大,但直接使用时需要编写大量重复代码。通过封装,我们可以:
- 简化网络请求的使用。
- 提高代码的可读性和可维护性。
- 统一错误处理和响应解析。
二、封装OKHttp3的步骤 🛠️
1. 添加依赖
首先,在你的 build.gradle 文件中添加 OKHttp3 的依赖。
dependencies {
    implementation 'com.squareup.okhttp3:okhttp:4.9.2'
    implementation 'com.squareup.okhttp3:logging-interceptor:4.9.2'
}
2. 创建一个 Singleton 的 OkHttpClient
为了确保全局使用同一个 OkHttpClient 实例,可以使用单例模式进行封装。
object HttpClient {
    private val client: OkHttpClient

    init {
        val logging = HttpLoggingInterceptor()
        logging.setLevel(HttpLoggingInterceptor.Level.BODY)

        client = OkHttpClient.Builder()
            .addInterceptor(logging)
            .connectTimeout(30, TimeUnit.SECONDS)
            .readTimeout(30, TimeUnit.SECONDS)
            .writeTimeout(30, TimeUnit.SECONDS)
            .build()
    }

    fun getClient(): OkHttpClient {
        return client
    }
}
3. 封装网络请求
接下来,我们创建一个 ApiService 类,用于封装具体的网络请求逻辑。
object ApiService {

    fun get(url: String, headers: Map<String, String> = emptyMap()): String {
        val requestBuilder = Request.Builder().url(url)

        for ((key, value) in headers) {
            requestBuilder.addHeader(key, value)
        }

        val request = requestBuilder.build()
        val response = HttpClient.getClient().newCall(request).execute()

        if (response.isSuccessful) {
            return response.body?.string() ?: ""
        } else {
            throw IOException("Unexpected code $response")
        }
    }

    fun post(url: String, jsonBody: String, headers: Map<String, String> = emptyMap()): String {
        val body = RequestBody.create(MediaType.parse("application/json; charset=utf-8"), jsonBody)
        val requestBuilder = Request.Builder().url(url).post(body)

        for ((key, value) in headers) {
            requestBuilder.addHeader(key, value)
        }

        val request = requestBuilder.build()
        val response = HttpClient.getClient().newCall(request).execute()

        if (response.isSuccessful) {
            return response.body?.string() ?: ""
        } else {
            throw IOException("Unexpected code $response")
        }
    }
}
三、使用示例 📖
以下是如何使用封装后的 ApiService 进行网络请求的示例。
GET 请求示例
fun fetchUserData() {
    val url = "https://api.example.com/user"
    try {
        val response = ApiService.get(url)
        println(response)
    } catch (e: IOException) {
        e.printStackTrace()
    }
}
POST 请求示例
fun sendUserData() {
    val url = "https://api.example.com/user"
    val jsonBody = """{"name": "John", "age": 30}"""
    try {
        val response = ApiService.post(url, jsonBody)
        println(response)
    } catch (e: IOException) {
        e.printStackTrace()
    }
}
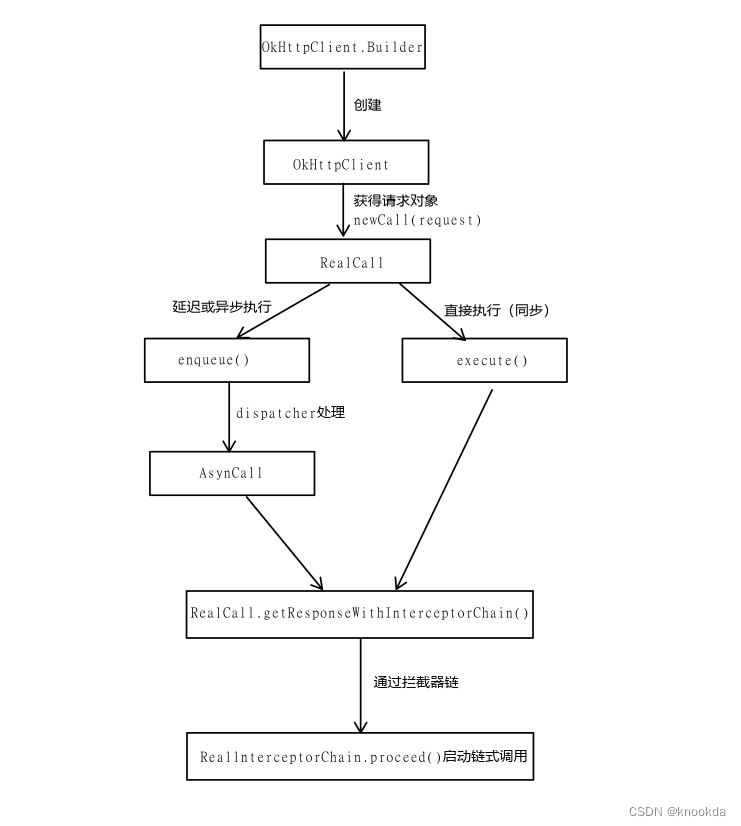
四、类图与时序图 📊
类图 📋

@startuml
class HttpClient {
    +OkHttpClient client
    +getClient(): OkHttpClient
}

class ApiService {
    +get(url: String, headers: Map<String, String>): String
    +post(url: String, jsonBody: String, headers: Map<String, String>): String
}

HttpClient --> OkHttpClient
ApiService --> HttpClient
@enduml
时序图 ⏲️
以下时序图展示了调用 ApiService.get() 方法进行 GET 请求的过程。

@startuml
actor User

User -> ApiService : get(url, headers)
ApiService -> HttpClient : getClient()
HttpClient --> ApiService : OkHttpClient
ApiService -> OkHttpClient : newCall(request).execute()
OkHttpClient -> ApiService : Response
ApiService --> User : Response Body
@enduml
五、总结 🏁
通过封装 OKHttp3,我们可以简化网络请求的使用,提高代码的可读性和可维护性。本文详细介绍了封装的步骤,并提供了类图和时序图以帮助理解。如果你有任何问题或建议,欢迎留言讨论。
Best Regards!


![[Linux]CentOS软件的安装](https://i-blog.csdnimg.cn/direct/90ae0184db8f48d786ee6c1ef40bc692.png)
