C++ QT开发 学习笔记(1)
考试系统
创建项目
新建Qt桌面应用程序,项目名:ExamSys。
类信息:类名LoginDialog继承自QDialog
(1) ExamSys.pro
工程文件,包含当前工程的相关信息。
QDialog 是 Qt 框架中用于创建对话框的基类。对话框是一种特殊类型的窗口,通常用于短期的交互和信息交换,比如用户输入、设置选项、文件选择等。QDialog 提供了许多专为这种用途设计的特性和功能。
ExamSys.pro
QT       += core gui

greaterThan(QT_MAJOR_VERSION, 4): QT += widgets

TARGET = ExamSys
TEMPLATE = app
logindialog.h
#ifndef LOGINDIALOG_H
#define LOGINDIALOG_H

#include <QDialog>

namespace Ui {
class LoginDialog; //Ui_LoginDialog son class, use for describe the login window detail message.
}

class LoginDialog : public QDialog
{
    Q_OBJECT  //Support signal and slots

public:
    explicit LoginDialog(QWidget *parent = 0);
    ~LoginDialog();

private:
    Ui::LoginDialog *ui;
};

#endif // LOGINDIALOG_H
logindialog.cpp
#include "logindialog.h"
#include "ui_logindialog.h"

LoginDialog::LoginDialog(QWidget *parent) :
    QDialog(parent),
    ui(new Ui::LoginDialog)
{
    ui->setupUi(this);
}

LoginDialog::~LoginDialog()
{
    delete ui;
}
main.cpp
#include "logindialog.h"
#include <QApplication>
#include <examdialog.h>

int main(int argc, char *argv[])
{
    QApplication a(argc, argv); //Define the apps object
    LoginDialog w;				//Define the window object
    w.show();					//Display window
    return a.exec();			//Enter APP execeute loop
}
logindialog.ui
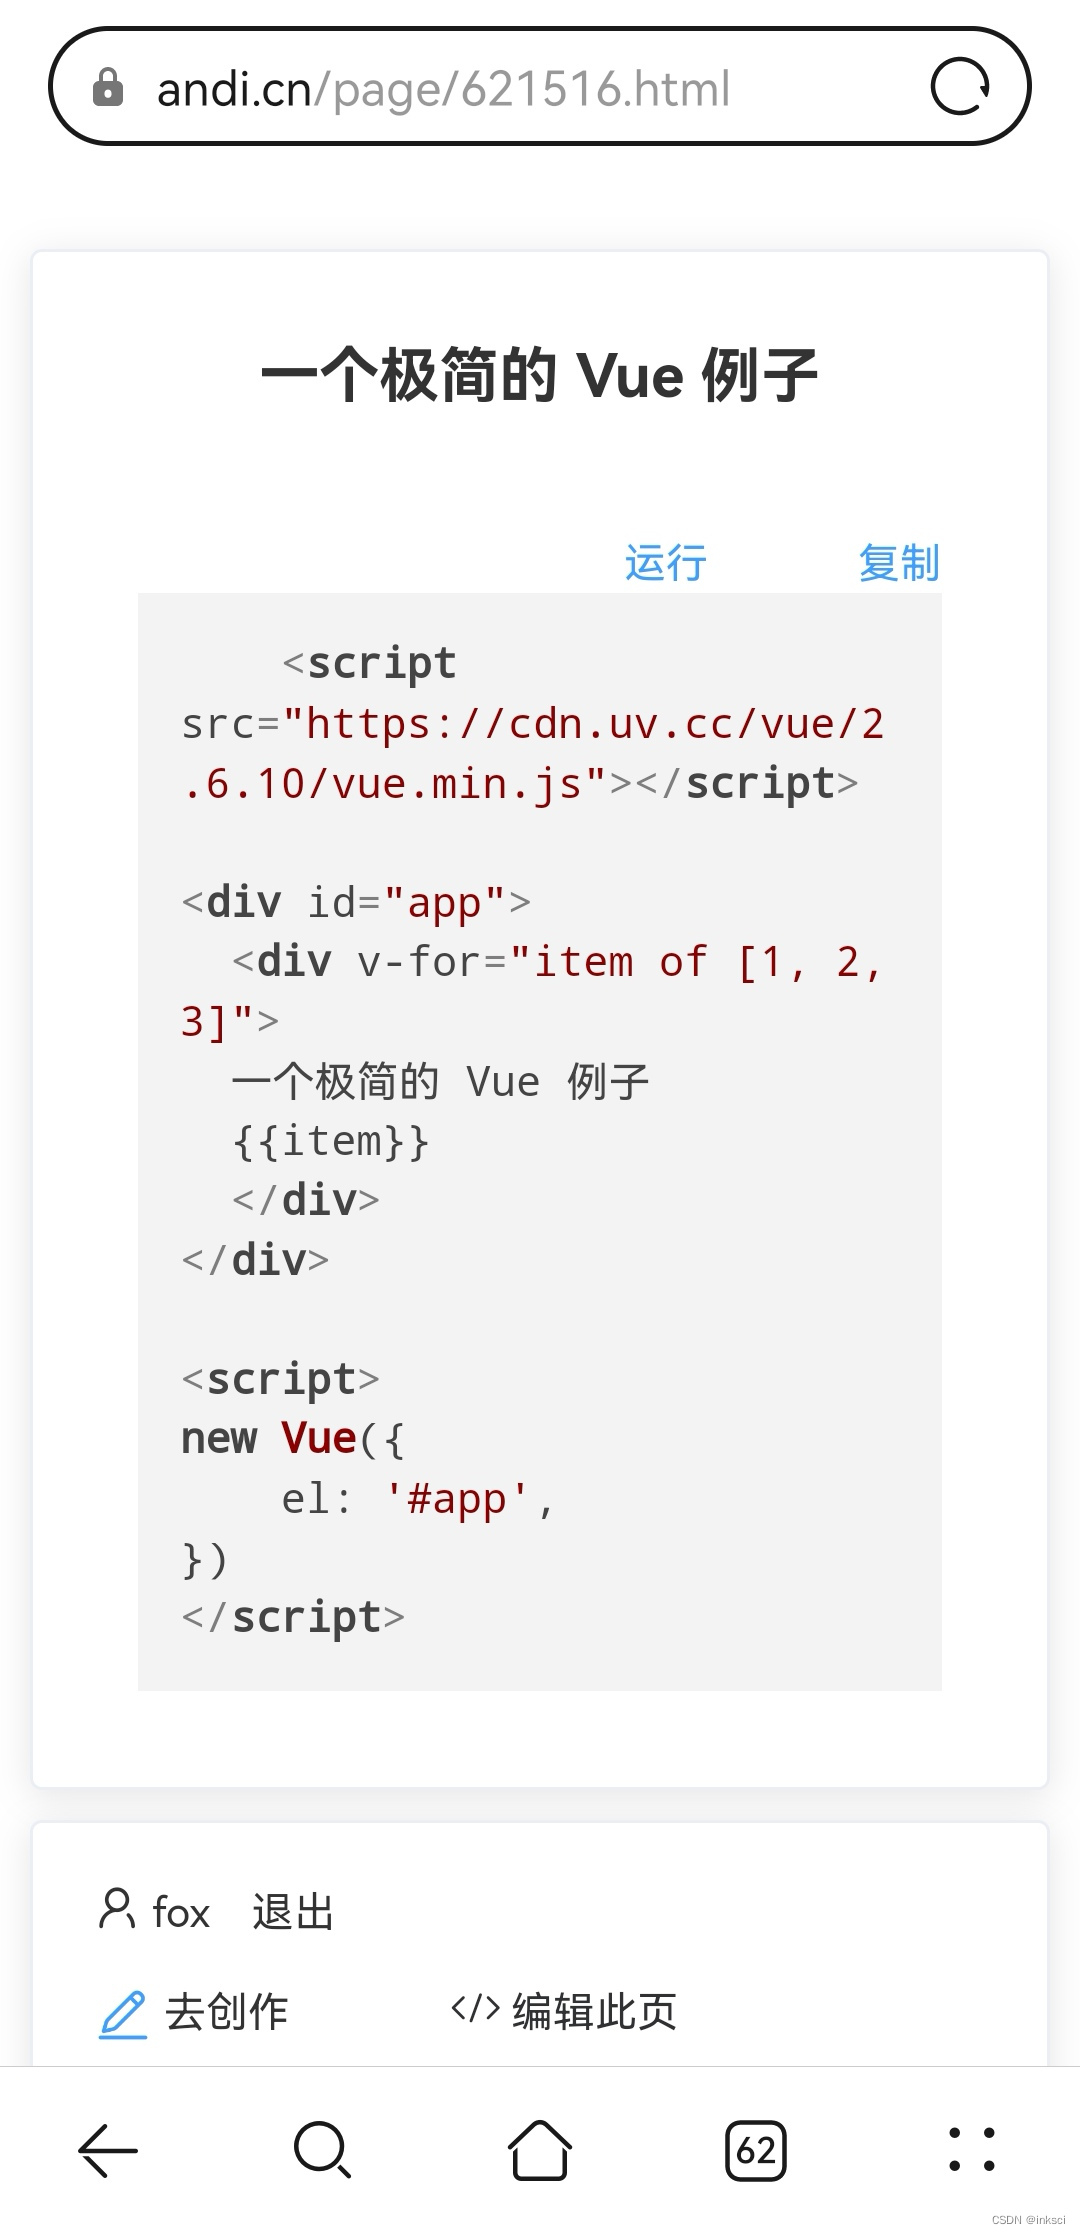
登录窗口界面文件。
登录界面
设计模式下添加账号、密码标签,账号、密码输入框,登录、取消按钮,并修改对象名,添加资源文件imgage.qrc,给imgLabel添加图片资源做背景。


logindialog.cpp构造函数中设置窗体标题、风格
LoginDialog::LoginDialog(QWidget *parent) :
    QDialog(parent),
    ui(new Ui::LoginDialog)
{
    ui->setupUi(this);
    this->resize(600,400);
    setFixedSize(width(),height());
    this->setWindowTitle("Cat Exam");
    this->setWindowFlags(Qt::Dialog| Qt::WindowCloseButtonHint);
    this->setWindowFlags(Qt::Window| Qt::WindowFullscreenButtonHint);
}

验证邮箱地址
给登录按钮添加响应点击信号的槽方法:
设计模式下,右键单击登录按钮,选择“转到槽”,选择点击信号clicked().
给槽方法void LoginDialog::on_loginBtn_clicked()添加如下代码:
void LoginDialog::on_login_Button_clicked()
{
    //QMessageBox::information(this,"Hint","Slot method used");
    //Verify the email address username@address   ex:123980@qq.com
    //Symbol decalration: ^string start  &string end
    //+match times>=1 *match any times(include 0 times)  {n,m}match times at least n times, at most m times.
    QRegExp rx("^[A-Za-z0-9]+([_\.][A-Za-z0-9]+)*@([A-Za-z0-9\-]+\.)+[A-Za-z0-9]{2,6}$");

    bool res = rx.exactMatch(ui->account_edit->text());
    if(!res)// If failed match
    {
        QMessageBox::information(this,"Hint","Invalid email address, please reenter the email address");
    }
    else
    {
        QMessageBox::information(this,"Hint","Welcome to the CAT exam!");
    }
注意:需要加上头文件 include <QMessageBox>
验证账号密码 (通过账号密码保存在文档的方式)
在logindialog.cpp添加头文件
#include <QFile>
#include <QTextStream>
这两个头文件的引入有特定的目的,主要涉及到文件处理和文本数据的流式读写
编辑 void LoginDialog::on_loginBtn_clicked()方法
void LoginDialog::on_login_Button_clicked()
{
    //QMessageBox::information(this,"Hint","Slot method used");
    //Verify the email address username@address   ex:123980@qq.com
    //Symbol decalration: ^string start  &string end
    //+match times>=1 *match any times(include 0 times)  {n,m}match times at least n times, at most m times.
    QRegExp rx("^[A-Za-z0-9]+([_\.][A-Za-z0-9]+)*@([A-Za-z0-9\-]+\.)+[A-Za-z0-9]{2,6}$");

    bool res = rx.exactMatch(ui->account_edit->text());
    if(!res)// If failed match
    {
        QMessageBox::information(this,"Hint","Invalid email address, please reenter the email address");
        ui->account_edit->clear();
        ui->code_edit->clear();
        ui->account_edit->setFocus();
        return;
    }

    else
    {
        //QMessageBox::information(this,"Hint","Welcome to the cat EXAM!");
        QString filename;       //Account & password data file
        QString strAccInput;    //User input account
        QString strCode;        //User input password
        QString strLine;        //Every line read data
        QStringList strList;    //Use for seperate the line from strLine for account and password

        filename = "../account.txt";    //According to the debug folder. so need to go previous folder get account.txt
        strAccInput = ui->account_edit->text();
        strCode = ui->code_edit->text();

        QFile file(filename);
        QTextStream stream(&file);
        if (file.open(QIODevice::ReadOnly | QIODevice::Text))
        {
            while(!stream.atEnd())
            {
                strLine = stream.readLine();
                strList = strLine.split(",");
                    if(strAccInput == strList.at(0))
                    {
                        if(strCode == strList.at(1))
                        {
                            QMessageBox::information(this,"Hint","Welcome to the CAT Exam");
                            file.close();
                            return;
                        }
                        else
                        {
                            QMessageBox::information(this,"Hint","The password is wrong! Please reenter your password");
                            ui->code_edit->clear();
                            ui->code_edit->setFocus();
                            file.close();
                            return;
                        }
                    }
            }
            QMessageBox::information(this,"Hint","Your account is invalid to login to the Exam! Please contact admin to register you account!");
            ui->account_edit->clear();
            ui->code_edit->clear();
            ui->account_edit->setFocus();
            file.close();
            return;
        }
        else
        {
            QMessageBox::information(this, "Hint","Abnormal! Not able to read the account");
            return;
        }

    }

}
QRegExp - 是一个类提供了对正则表达式的支持,使得开发者能够进行复杂的模式匹配和数据提取任务。
QRegExp已经在 Qt 5 中被标记为过时(deprecated),并在后续版本中被建议用更现代且功能更强大的QRegularExpression类替代。不过,对于旧代码的维护或者对性能要求极高的场合,了解QRegExp仍然是有意义的.exactMatch - 是
QRegExp类中的一个方法,专门用于判断给定的字符串是否完全符合正则表达式的模式。这意味着整个字符串从头到尾需要与正则表达式完全匹配,而不是只匹配字符串中的某个部分。Ui::LoginDialog类是由 Qt 的 uic 工具自动生成的,它定义了你在 Qt Designer 中设计的界面的布局和组件。这个类通常不包含任何业务逻辑,只是纯粹的界面布局描述。业务逻辑需要在一个相应的包装类中实现,这个类通常会使用一个Ui::LoginDialog对象来设置和管理界面*ui成员指针是一种管理和访问由 Qt Designer 生成的界面元素的便捷方式。QString是 Qt 中用于处理字符串的核心类,设计以支持多语言和高效的文本操作
QString::number 是 QString 类的一个静态方法,用于将各种数值类型转换为 QString 对象
例子:
int myInt = 255;
QString str1 = QString::number(myInt);
QStringList是 Qt 框架中的一个类,专门用于处理字符串列表。它基本上是QList<QString>的一个类型别名,提供了一系列便利的方法来操作字符串数组,例如排序、搜索和合并字符串。QStringList给常见的列表操作增加了很多针对字符串特定的功能,使得处理字符串集合更加方便。
考试时间
右键单击项目名新建C++类的考试窗口类,取名ExamDialog.

打开考试窗口类头文件,编辑构造方法,声明Q_OBJECT宏、初始化计时器成员方法、刷新考试时间的槽方法并定义计时器、考试时间数据。
examdialog.h
#ifndef EXAMDIALOG_H
#define EXAMDIALOG_H
#include <QDialog>
#include <QTimer>

class ExamDialog : public QDialog
{
    Q_OBJECT
public:
    ExamDialog(QWidget* parent =0);
    void initTimer();

private:
    QTimer *m_timer;    //Timer for the exam
    int m_timeGo;       //Exam used time

private slots:
    void freshTime();

};

#endif // EXAMDIALOG_H
编辑ExamDialog类构造函数
ExamDialog::ExamDialog(QWidget* parent):QDialog(parent)
{
    setWindowTitle("Exam Time already used: 0 minutes 0 second");
    initTimer();
}
定义void initTimer()方法
void ExamDialog::initTimer()
{
    m_timeGo = 0;
    m_timer = new QTimer(this);  //this represent the current class is the 'father' of the QTimer class. So when current class is deconstruct, the QTimer class will also deconstructed.
    m_timer->setInterval(1000);
    m_timer->start();
    connect(m_timer,SIGNAL(timeout()),this,SLOT(freshTime()));
}
m_timer = new QTimer(this); - 这里是分配了内存空间,括号里的(this)带入原因是为了让QTimer成为当前类的子类,以便当当前的类被消除的时候,QTimer类也会被销毁.
m_timer->setInterval(1000); - 这行代码设置定时器的触发间隔为 1000 毫秒(1 秒)。
setInterval方法接受一个以毫秒为单位的整数,定义了timeout()信号的发送频率。connect(m_timer,SIGNAL(timeout()),this,SLOT(freshTime())); - 这行代码的作用是在
m_timer的定时器超时并发出timeout()信号时,自动调用与之连接的freshTime()方法。这是实现定时任务的常见方法,例如更新界面、刷新数据、或执行定时检查等。
定义 void freshTimer()方法
void ExamDialog::freshTime()
{
    //Refresh the exam time
    m_timeGo++;
    QString min = QString::number(m_timeGo / 60);
    QString second = QString::number(m_timeGo %60);

    setWindowTitle("Exam Time already used: " + min + " minutes " + second + " second");
}
编辑main.cpp文件中的main方法,并添加头文件 #include <examdialog.h>
#include "logindialog.h"
#include <QApplication>
#include <examdialog.h>

int main(int argc, char *argv[])
{
    QApplication a(argc, argv);
//    LoginDialog w;
//    w.show();
    ExamDialog w;
    w.show();

    return a.exec();
}
初始化题库
examdialog.h添加头文件
#include <QTextEdit>
#include <QLabel>
#include <QRadioButton>
#include <QCheckBox>
#include <QGridLayout>
examdialog.h添加公有成员方法及私有数据

examdialog.cpp添加头文件
#include <QFile>
#include <QTextStream>
#include <QMessageBox>
#include <QApplication>
编辑ExamDialog类构造方法:
ExamDialog::ExamDialog(QWidget* parent):QDialog(parent)
{
    //Setup the font size;
    QFont font;
    font.setPointSize(12);
    this->setFont(font);

    //Setup the window bg colour
    setPalette(QPalette(QColor(209,215,255)));

    setWindowTitle("Exam Time already used: 0 minutes 0 second");
    setWindowFlags(Qt::Dialog | Qt::WindowCloseButtonHint);
    resize(800,900);

    initTimer();
    initLayout();
    if(!initTextEditor())
    {
        QMessageBox::information(this,"Hint","Initial the question list error!");
        QTimer::singleShot(0,qApp,SLOT(quit()));   //qApp = current apps.
    }
}
QTFont - 在 Qt 框架中,
QFont类是用于处理字体相关属性的类。它封装了与字体相关的信息,如字体家族(如 Arial、Times New Roman 等)、字体风格(如斜体、粗体)、字体大小(点数或像素)、以及其他诸如字重、下划线、删除线等属性。this->setFont(font); - 应用字体
setPalette(QPalette(QColor(209,215,255))); -
QPalette是 Qt 中一个非常重要的类,用于定义和管理用户界面元素的颜色方案。通过合理地使用QPalette,开发者可以提供更丰富和符合设计需求的用户界面,增强应用程序的视觉吸引力和用户体验。QTimer::singleShot是一个非常有用的静态方法,用于在指定的延迟后执行一次给定的槽函数。这行代码实现了在程序中安排一个即刻执行的操作,该操作会导致应用程序退出
其中,0是定时器延迟的时间
qApp是全局指针,指向当前的 QApplication 实例
SLOT(quit()):这指定了当定时器触发时要调用的槽函数。quit()是QCoreApplication(和其子类QApplication)的一个槽
void initLayout() 成员方法添加定义:
void ExamDialog::initLayout()
{
    m_layout = new QGridLayout(this);
    m_layout->setSpacing(10);   //Setup the taskbar spacing
    m_layout->setMargin(10);    //Setup the window and the taskbar spacing
}
bool initTextEdit()添加成员方法:
bool ExamDialog::initTextEditor()
{
    QString strLine;    //Save the document read row data
    QStringList strList;
    QString filename("../exam.txt");
    QFile file(filename);
    QTextStream stream(&file);
    stream.setCodec("UTF-8");

    if(file.open(QIODevice::ReadOnly | QIODevice::Text))
    {
        m_textEdit = new QTextEdit(this);
        m_textEdit->setReadOnly(true);
        QString strText;        //Used for saving the displayed data from the editor
        int nLines = 0;
        while(!stream.atEnd())
        {
            //Filter out the first row.
            if(nLines == 0)
            {
                stream.readLine();
                nLines++;
                continue;
            }
            //Filter out the answer row
            if((nLines >=6 && nLines <=6 *9 && (nLines % 6 ==0)) || (nLines == 6*9 +4) )
            {
                strLine = stream.readLine();
                strList = strLine.split(" ");
                m_answerList.append(strList.at(1));
                strText += "\n";
                nLines++;
                continue;
            }

            strText += stream.readLine();
            strText += "\n";
            nLines++;
        }
        m_textEdit->setText(strText);
        m_layout->addWidget(m_textEdit,0,0,1,10);
        file.close();
        return true;
    }
    else
    {
        return false;
    }
}
setCodec("UTF-8")方法用于指定文本流应该使用的字符编码。这是确保文本数据以正确的格式读取和写入的关键设置QTextEdit类是一个富文本编辑器部件,提供了显示和编辑格式化文本的功能。这个类是基于QWidget,可以用来处理纯文本和富文本,如 HTMLm_textEdit->setReadOnly(true) - 让文本无法被修改
setText()方法属于QTextEdit(或其他文本显示控件,如QLabel、QLineEdit等)的成员函数之一。此方法用于设置控件的文本内容。当你在QTextEdit上调用setText()方法时,它会将控件当前显示的内容替换为你提供的新字符串当
addWidget()用于QGridLayout时,它不仅指定了要添加的控件,还指定了控件在网格中的位置和它应该占据的行和列数为什么addWidget(m_textEdit,0,0,1,10); 和 addWidget(m_textEdit,0,0,1,1); 看起来窗口一样大?
- 因为
QTextEdit控件是窗口中唯一的或主要的控件,并且没有其他控件占用额外的空间,那么窗口的大小可能主要由QTextEdit的内容和默认尺寸决定。如果窗口没有设置固定大小或其他控件来影响其大小,它可能自动调整大小以适应内容或维持最小可接受尺寸
- 因为
布局按键
examdialog.h添加头文件、定义单选按钮分组数据、声明void initButtons()公有成员方法:
#include <QButtonGroup>

``````````````
    public:
	void initButtons();

	private:
	QButtonGroup* m_btnGroups[9];
- QButtonGroup类的定义是为了把某些特定的按键加到特定的组里面,以便该组只有一个选项可选
examdialog.cpp中添加void ExamDialog::initButtons()定义。
同时添加头文件
#include <QPushButton>

`````````````````````````````

void ExamDialog::initButtons()
{
    QStringList strList = {"A","B","C","D"};
    for(int i=0; i<10; i++)
    {
        //Question Label
        m_titleLabels[i] = new QLabel(this);
        m_titleLabels[i]->setText("Question: " + QString::number(i+1) );
        m_layout->addWidget(m_titleLabels[i],1,i);

        if(i ==9)
        {
            m_radioA = new QRadioButton(this);
            m_radioB = new QRadioButton(this);
            m_radioA -> setText ("正确");
            m_radioB -> setText ("错误");

            //Determine Question
            m_layout->addWidget(m_radioA,2,9);
            m_layout->addWidget(m_radioB,3,9);

            m_btnGroup[8] = new QButtonGroup(this);
            m_btnGroup[8]->addButton(m_radioA);
            m_btnGroup[8]->addButton(m_radioB);
            break;
        }

        if(i<8) m_btnGroup[i] = new QButtonGroup(this);

        //Selection question
        for(int j=0; j<4; j++)
        {
            //Multiple choice question
            if(i==8)
            {
                m_checkBtns[j] = new QCheckBox(this);
                m_checkBtns[j] -> setText(strList.at(j));
                m_layout->addWidget(m_checkBtns[j],2+j,8);

            }
            else
            {
                //Single choice question
                m_radioBtns[4*i+j] = new QRadioButton(this);
                m_radioBtns[4*i+j] ->setText(strList.at(j));
                m_layout->addWidget(m_radioBtns[4*i+j],2+j,i);
                m_btnGroup[i]->addButton(m_radioBtns[4*i+j]);
            }
        }
    }

    QPushButton* submitBtn = new QPushButton(this);
    submitBtn->setText("Submit");
    submitBtn->setFixedSize(100,35);
    m_layout->addWidget(submitBtn,6,9);
}
- 当发现程序有问题时,可以使用Debug调试方法查看问题在哪里.
- 快捷键F9 - 设置Breakpoint
- 快捷键F5 - Debug模式编译程序
- 快捷键F11-进入该行程序的内部运行
- 快捷键F10- 运行下一行程序
- 快捷键F9(有Breakpoint时) - 删除该Breakpoint
- CTRL+i - 快速对齐代码
提交试卷
void ExamDialog::initButtons()定义中将提交按钮的点击信号及响应的槽方法连接起来,添加红色标注的代码。

上述的使用信号和槽机制方法和之前做UI的方式不一样,但目的都一样?为什么?
void LoginDialog::on_exit_Button_clicked()
{
    done(Rejected);
}
上述UI方法更简洁,无需无需手动编写
connect语句但是使用手动编写
connect()语句连接信号与槽提供了更高的灵活性。这种方式适合于需要动态创建连接或者处理逻辑较为复杂的场景
examdialog.h声明:void getScore()槽方法、bool hasNoSelect()成员方法
public:
``````````````
    bool haveNoSelect();
private slots:
	void getScore();
- 上述的
haveNoSelect()我个人认为也可以写在private slots里面
void ExamDialog::getScore()定义:
void ExamDialog::getScore()
{
    if(haveNoSelect())
    {
        QMessageBox::information(this,"Hint","You have incompleted question, please complete it!");
        return;
    }
    int scores = 0;
    for(int i=0; i<10; i++)
    {
        if(i<8)   //Single choice question score calculation
        {
            if(m_btnGroup[i]->checkedButton()->text() == m_answerList.at(i))
            {
                scores+=10;
            }
        }
        if(i==8)   //Multiple choice question score calculation
        {
            QString answer = m_answerList.at(i);
            bool hasA = false;
            bool hasB = false;
            bool hasC = false;
            bool hasD = false;

            if(answer.contains("A")) hasA = true;
            if(answer.contains("B")) hasB = true;
            if(answer.contains("C")) hasC = true;
            if(answer.contains("D")) hasD = true;

            bool checkA = m_checkBtns[0]->checkState();
            bool checkB = m_checkBtns[1]->checkState();
            bool checkC = m_checkBtns[2]->checkState();
            bool checkD = m_checkBtns[3]->checkState();

            if(hasA != checkA) continue;
            if(hasB != checkB) continue;
            if(hasC != checkC) continue;
            if(hasD != checkD) continue;

            scores += 10;
        }

        if(i==9)
        {
            if(m_btnGroup[8]->checkedButton()->text() == m_answerList.at(i))
            {
                scores += 10;
            }
        }


    }
    QString str = QString::number(scores);
    int res = QMessageBox::information(this,"Hint","Your total scores is: " + str +" Do you want to retest?",QMessageBox::Yes | QMessageBox::No);
    if(res == QMessageBox::Yes)
    {
        return;
    }
    else
    {
        close();
    }

}
*  `m_btnGroup[i]->checkedButton()->text()` - 可以直接抓取该按键群组有被点击的内容
*  `answer.contains("A")` - 可以检查该answer(QString类)的内容是否含有 "A"字母
*  `int res = QMessageBox::information(this,"Hint","..........",QMessageBox::Yes | QMessageBox::No); `- 第四个参数是让这个窗口下方拥有一个互动的Yes/No按钮给用户点击. 必须注意写成这种方式的话必须返回一个结果给int.
*  `if(res == QMessageBox::Yes)` - 代表上述的用于是否点击了Yes.
close();- 这属于QWidget类的方法. 主要用于关闭当前窗口.
bool ExamDialog::hasNoSelect()定义:
bool ExamDialog::haveNoSelect()
{
    int radioSelects = 0;
    for(int i=0; i<8; i++)
    {
        if(m_btnGroup[i]->checkedButton())
        {
            radioSelects++;
        }
    }

    if(radioSelects != 8)
    {
        return true;
    }

    int checkSelects = 0;
    for(int i =0; i<4; i++)
    {
        if(m_checkBtns[i]->isChecked())
        {
            checkSelects++;
        }
    }

    if(checkSelects <=1)
    {
        return true;
    }

    if(!m_radioA->isChecked() && !m_radioB->isChecked())
    {
        return true;
    }

    return false;
}
窗口交互
登录窗口设计模式下,给取消按钮添加相应点击信号的槽方法。
logindialog.h头文件会自动添加相应槽方法的声明。
private slots:
	void on_cancelBtn_clicked();
logindialog.cpp 中编辑void LoginDialog::on_loginBtn_clicked()方法,添加done方法的那一行代码。
QDialog 类中的一个方法,用于结束对话框并设置对话框的返回值void LoginDialog::on_loginBtn_clicked()
{
    ```````````````````````
    if(strCode == strList.at(1))
	{
		QMessageBox::information(this,"Hint","Welcome to the CAT Exam");
		file.close();
		done(Accepted);
		return;
    }
    ```````````````````````````````
}
- done()是
QDialog类中的一个方法,用于结束对话框并设置对话框的返回值.
定义void on_cancelBtn_clicked()槽方法
void LoginDialog::on_exit_Button_clicked()
{
    done(Rejected);
}
编辑mainc.pp中的程序入口函数:
#include "logindialog.h"
#include <QApplication>
#include <examdialog.h>

int main(int argc, char *argv[])
{
    QApplication a(argc, argv);
    LoginDialog logDialog;
    int res = logDialog.exec();
    if(res == QDialog::Accepted)
    {
        ExamDialog* examDialog;
        examDialog = new ExamDialog;
    }
    else
    {
        return 0;
    }
    return a.exec();

}
- 主函数里面调用.exec 和 .show 方法都用于显示窗口,但它们的行为和用途有显著的不同
.show()方法用于显示窗口,但它不会阻塞程序执行。这意味着当你调用.show()后,程序会继续执行后面的代码而不等待该窗口关闭..show()方法用于显示窗口,但它不会阻塞程序执行。这意味着当你调用.show()后,程序会继续执行后面的代码而不等待该窗口关闭.exec()方法用于模态对话框,它会显示窗口并阻塞其后的代码执行,直到关闭该窗口。这意味着应用程序的主事件循环会等待.exec()方法运行的对话框关闭后才继续。.exec()还会返回一个整数,指示对话框是如何被关闭的(例如QDialog::Accepted或QDialog::Rejected),这有助于根据用户的响应做出适当的处理.
- 上述代码
examDialog = new ExamDialog;是为了让 examDialog不会在运行时直接’'一闪而过"- 因为如果没有定义动态内存的话 examDialog的作用域仅在 {} 里面,一旦程序运行结束后会直接被销毁.
发布
发布之前,请大家将代码中访问数据文件的相对路径从上级目录改成当前路径,修改后再重新编译。

另外也在QT 的 Projects里面更改Working Directory 路径成 D:\QT\ExamSys
设置应用程序图标
准备好login.ico文件,ExamSys.pro文件中添加如下一行的代码
QT       += core gui
RC_ICONS += beluga-cat-meme.ico
greaterThan(QT_MAJOR_VERSION, 4): QT += widgets
编译运行即可。
注意:使用在线转icon方法
手动发布
文件清单:
ExamSys.exe
account.txt、exam.txt
Qt5Core.dll、Qt5Gui.dll、Qt5Widgets.dll
libstdc+±6.dll、libwinpthread-1.dll、libgcc_s_sjlj-1.dll、libgcc_s_dw2-1.dll
注意:运行时提示缺少xxx库,就补上xxx库,此清单仅可用于有Qt环境的电脑上运行。
缺少的动态库路径(根据自己的实际安装路径查找):

windeployqt发布
以下为桌面建立一个exam发布文件夹,将ExamSys.exe及account.txt、exam.txt放入文件夹中。

解决方法:
给mingw53_32的bin目录添加环境变量(System variables->Path->Edit),然后重新打开命令窗口:
外链图片转存失败,源站可能有防盗链机制,建议将图片保存下来直接上传
(4)NSIS发布
- 在步骤(3)(windeployqt方法)发布的文件夹中添加程序安装图标、卸载图标及License.txt文件.如下图

注意生成图标时候像素选择大点,如256*256。License.txt文件内容可自行定义。
- 安装NSIS
- 安装脚本编辑器
- 运行脚本编辑器(NisEdit)
- 生成脚本文件