目录
	import * as THREE from 'three';
			import { MeshPhongNodeMaterial, color, pass, reflector, normalWorld, texture, uv, viewportTopLeft } from 'three/nodes';//引入一些类

			import { GLTFLoader } from 'three/addons/loaders/GLTFLoader.js';//引入加载器

			import WebGPU from 'three/addons/capabilities/WebGPU.js';//引入WebGPU
			import WebGL from 'three/addons/capabilities/WebGL.js';//引入WebGL

			import WebGPURenderer from 'three/addons/renderers/webgpu/WebGPURenderer.js';//WebGPU渲染
			import PostProcessing from 'three/addons/renderers/common/PostProcessing.js';//后处理

			import { OrbitControls } from 'three/addons/controls/OrbitControls.js';//控制器

			import Stats from 'three/addons/libs/stats.module.js';//性能检测

			let camera, scene, renderer;//相机 场景 渲染器
			let model, mixer, clock;//模型 动画混合器  时钟
			let postProcessing;//后期处理
			let controls;//控制器
			let stats;//性能检测
1 判断浏览器是否支持
if ( WebGPU.isAvailable() === false && WebGL.isWebGL2Available() === false ) {

					document.body.appendChild( WebGPU.getErrorMessage() );

					throw new Error( 'No WebGPU or WebGL2 support' );//不支持

				}
2 THREE.DirectionalLight
.shadow : DirectionalLightShadow
DirectionalLightShadow 对象,用于计算该平行光产生的阴影。
2.1DirectionalLightShadow
这是用于在DirectionalLights内部计算阴影
与其他阴影类不同,它是使用OrthographicCamera来计算阴影,而不是PerspectiveCamera。这是因为来自DirectionalLight的光线是平行的。
//模拟太阳
const sunLight = new THREE.DirectionalLight( 0xFFE499, 5 );
//.castShadow : Boolean 此属性设置为 true 灯光将投射阴影。注意:这样做的代价比较高,需要通过调整让阴影看起来正确。 查看 DirectionalLightShadow 了解详细信息。 默认值为 false。
sunLight.castShadow = true;
//.shadow DirectionalLightShadow 对象,用于计算该平行光产生的阴影
//.camera : Camera 在光的世界里。这用于生成场景的深度图;从光的角度来看,其他物体背后的物体将处于阴影中
sunLight.shadow.camera.near = .1;//摄像机视锥体近端面
sunLight.shadow.camera.far = 5;//摄像机视锥体远端面
sunLight.shadow.camera.right = 2;
sunLight.shadow.camera.left = - 2;//摄像机视锥体左侧面
sunLight.shadow.camera.top = 2;//摄像机视锥体上侧面
sunLight.shadow.camera.bottom = - 2;
// .mapSize : Vector2 一个Vector2定义阴影贴图的宽度和高度。
//较高的值会以计算时间为代价提供更好的阴影质量。值必须是2的幂,直到给定设备的WebGLRenderer.capabilities.maxTextureSize, 虽然宽度和高度不必相同(例如,(512,1024)有效)。 默认值为(512,512)。
sunLight.shadow.mapSize.width = 2048;
sunLight.shadow.mapSize.height = 2048;
//.bias : Float
//阴影贴图偏差,在确定曲面是否在阴影中时,从标准化深度添加或减去多少。
//默认值为0.此处非常小的调整(大约0.0001)可能有助于减少阴影中的伪影
sunLight.shadow.bias = - 0.001;
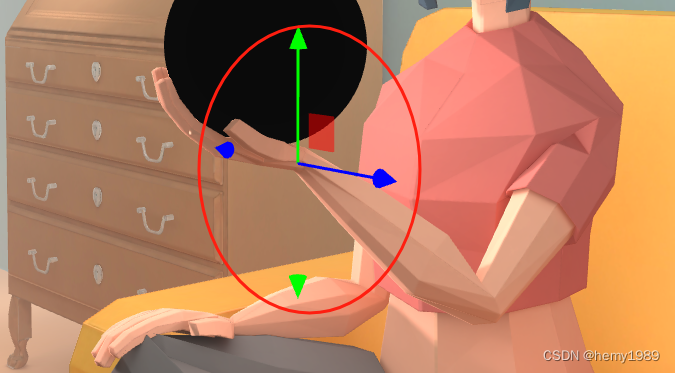
//.position : Vector3 假如这个值设置为 Object3D.DEFAULT_UP (0, 1, 0),光线将会从上往下照射
sunLight.position.set( .5, 3, .5 );半球光(HemisphereLight)
光源直接放置于场景之上,光照颜色从天空光线颜色渐变到地面光线颜色。半球光不能投射阴影。
3 Texture
包裹模式
THREE.RepeatWrapping THREE.ClampToEdgeWrapping THREE.MirroredRepeatWrapping
这些常量定义了纹理贴图的 wrapS 和 wrapT 属性,定义了水平和垂直方向上纹理的包裹方式。
使用RepeatWrapping,纹理将简单地重复到无穷大。 With RepeatWrapping the texture will simply repeat to infinity.
ClampToEdgeWrapping是默认值,纹理中的最后一个像素将延伸到网格的边缘。
使用MirroredRepeatWrapping, 纹理将重复到无穷大,在每次重复时将进行镜像。
.colorSpace
默认值为THREE.NoColorSpace。 请参阅texture constants来了解其他格式的详细信息
3.1 .wrapS
这个值定义了纹理贴图在水平方向上将如何包裹,在UV映射中对应于U。
默认值是THREE.ClampToEdgeWrapping,即纹理边缘将被推到外部边缘的纹素。 其它的两个选项分别是THREE.RepeatWrapping和THREE.MirroredRepeatWrapping。 请参阅texture constants来了解详细信息。
3.2 .wrapT
这个值定义了纹理贴图在垂直方向上将如何包裹,在UV映射中对应于V。
可以使用与 .wrapS : number相同的选项。
请注意:纹理中图像的平铺,仅有当图像大小(以像素为单位)为2的幂(2、4、8、16、32、64、128、256、512、1024、2048、……)时才起作用。 宽度、高度无需相等,但每个维度的长度必须都是2的幂。 这是WebGL中的限制,不是由three.js所限制的。
使用RepeatWrapping,纹理将简单地重复到无穷大 使用MirroredRepeatWrapping, 纹理将重复到无穷大,在每次重复时
3.3 .colorSpace
色彩空间
THREE.NoColorSpace = "" THREE.SRGBColorSpace = "srgb" THREE.LinearSRGBColorSpace = "srgb-linear"
用于定义纹理的色彩空间(以及渲染器的输出色彩空间)。
如果在材质已使用纹理后更改了颜色空间类型, 您需要将 Material.needsUpdate 设置为使材料重新编译。true
const textureLoader = new THREE.TextureLoader();//图片下载
const floorColor = textureLoader.load( '../three.js-r163/examples/textures/floors/FloorsCheckerboard_S_Diffuse.jpg' );//地面
//这个值定义了纹理贴图在水平方向上将如何包裹,在UV映射中对应于U。
//默认值是THREE.ClampToEdgeWrapping,即纹理边缘将被推到外部边缘的纹素。 其它的两个选项分别是THREE.RepeatWrapping和THREE.MirroredRepeatWrapping。 请参阅texture constants来了解详细信息。
floorColor.wrapS = THREE.RepeatWrapping;
//这个值定义了纹理贴图在垂直方向上将如何包裹,在UV映射中对应于V。
//可以使用与 .wrapS : number相同的选项。
//请注意:纹理中图像的平铺,仅有当图像大小(以像素为单位)为2的幂(2、4、8、16、32、64、128、256、512、1024、2048、……)时才起作用。 宽度、高度无需相等,但每个维度的长度必须都是2的幂。 这是WebGL中的限制,不是由three.js所限制的。
floorColor.wrapT = THREE.RepeatWrapping;//使用RepeatWrapping,纹理将简单地重复到无穷大 使用MirroredRepeatWrapping, 纹理将重复到无穷大,在每次重复时将进行镜像
//色彩空间
//默认值为THREE.NoColorSpace。 请参阅texture constants来了解其他格式的详细信息
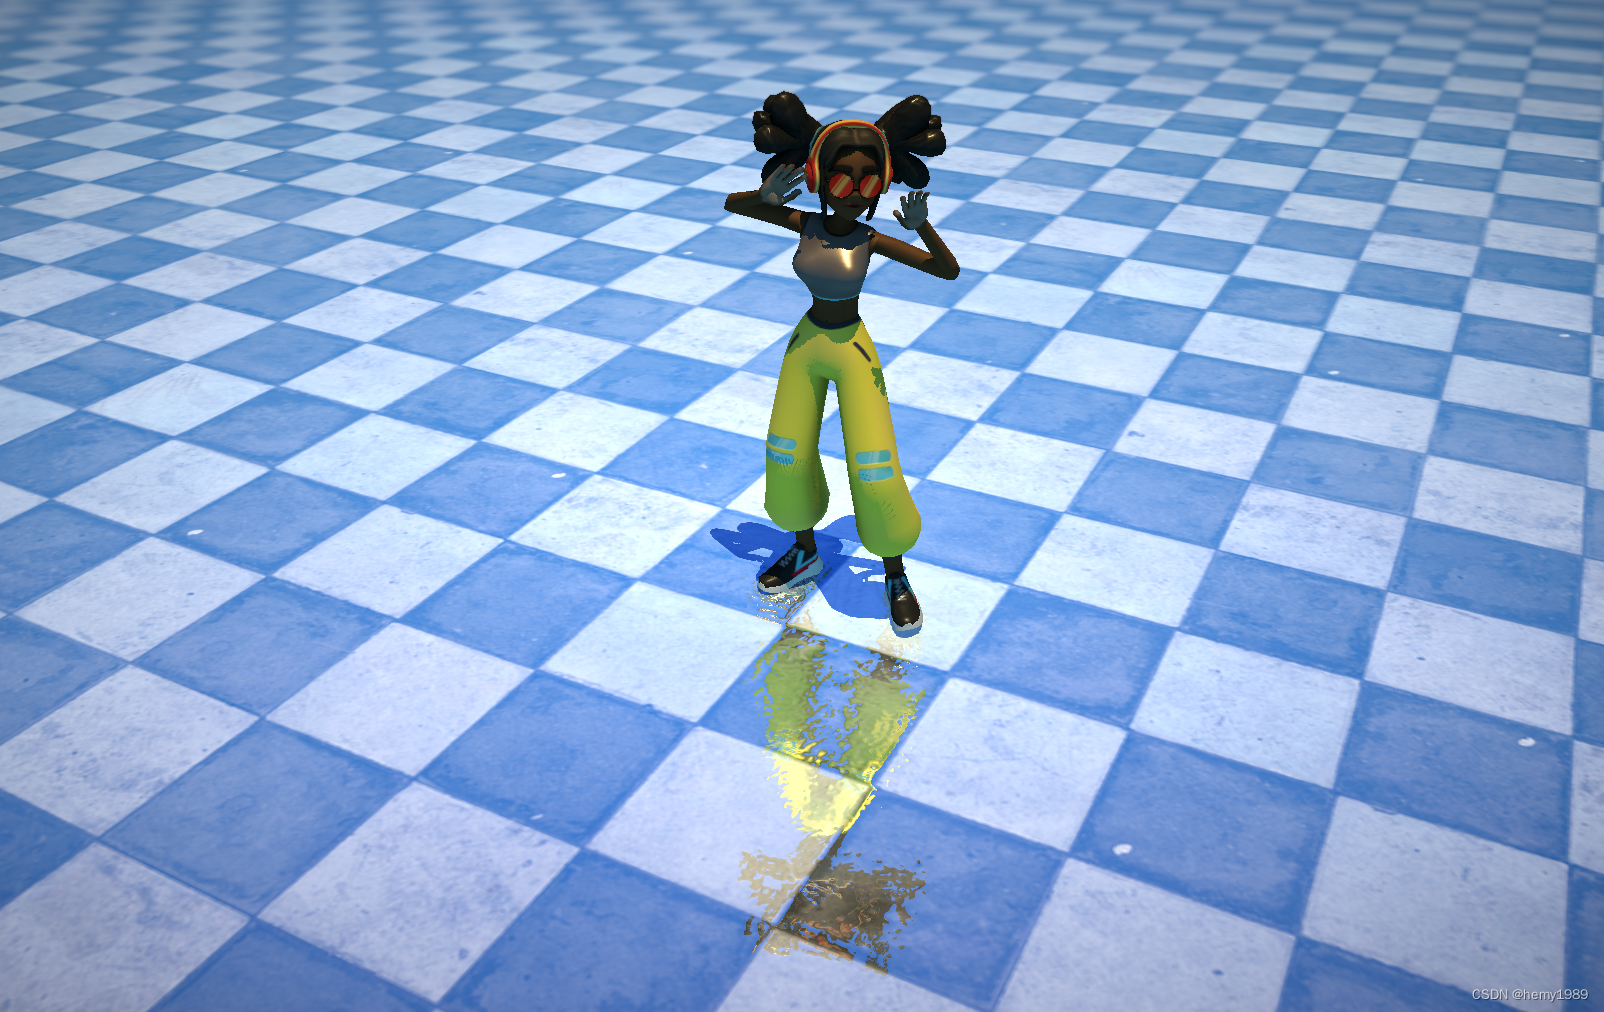
floorColor.colorSpace = THREE.SRGBColorSpace;4 创建地面
这部分没看太懂,后面再补充吧,先就这么跟着用吧。
MeshPhongNodeMaterial
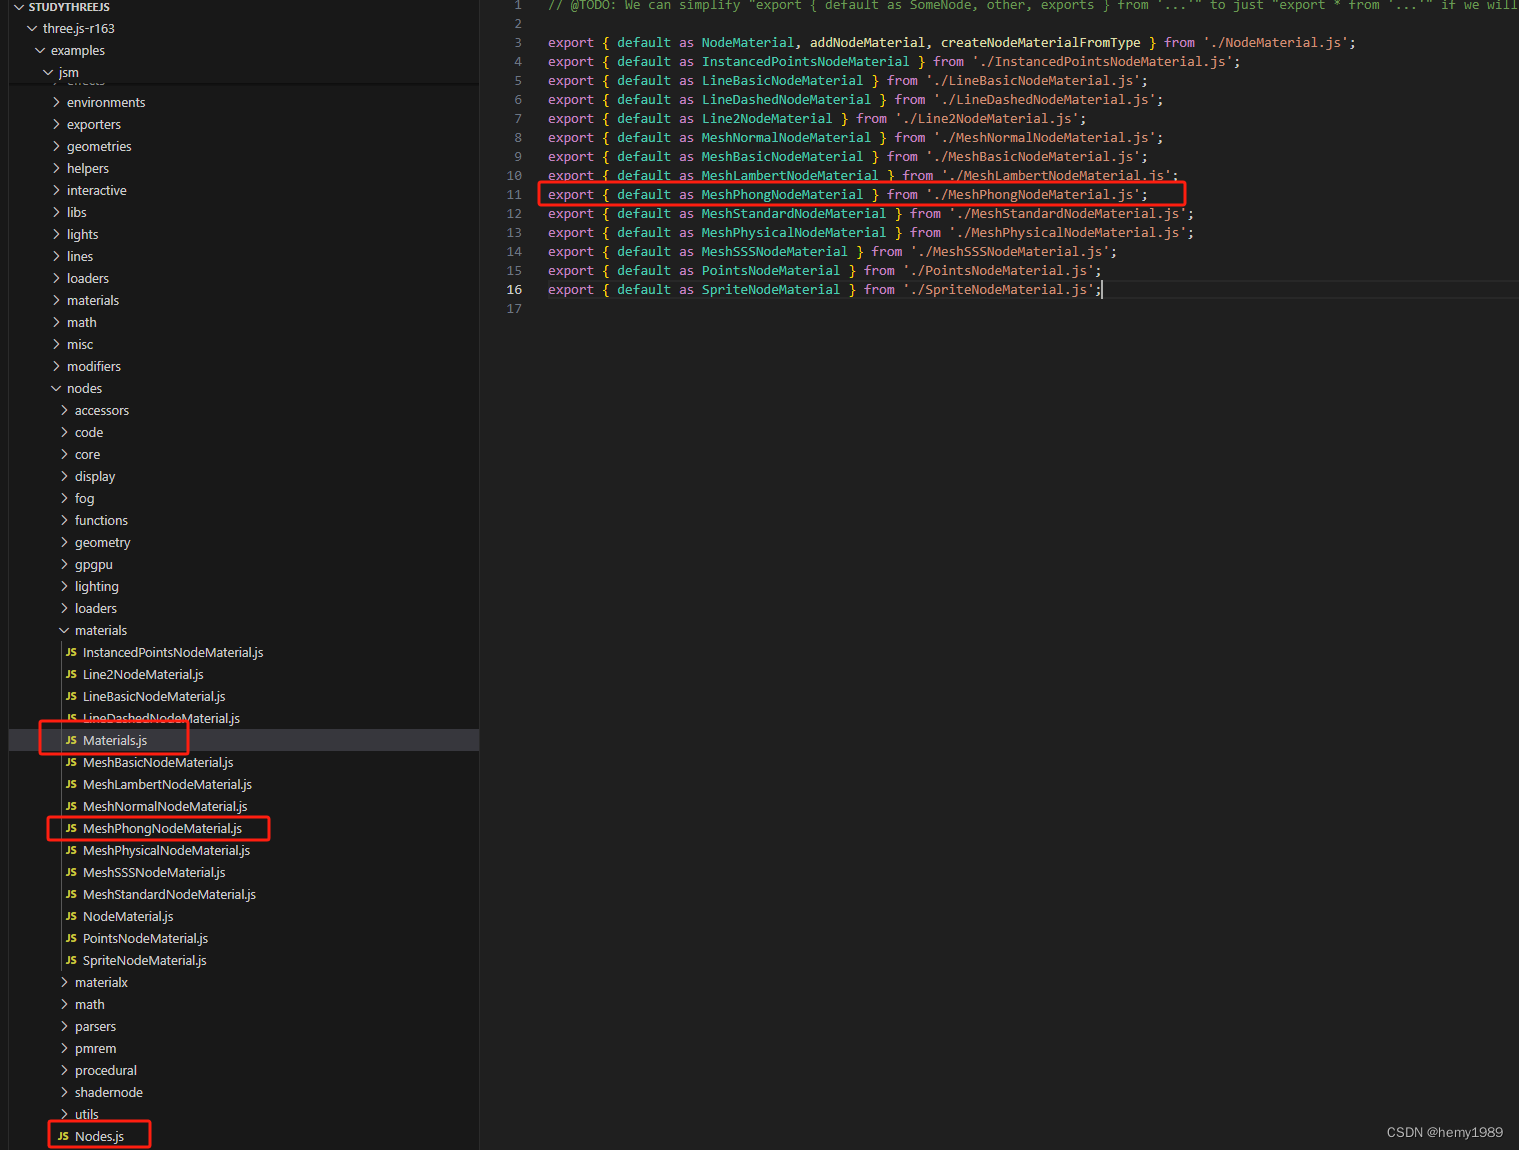
uv
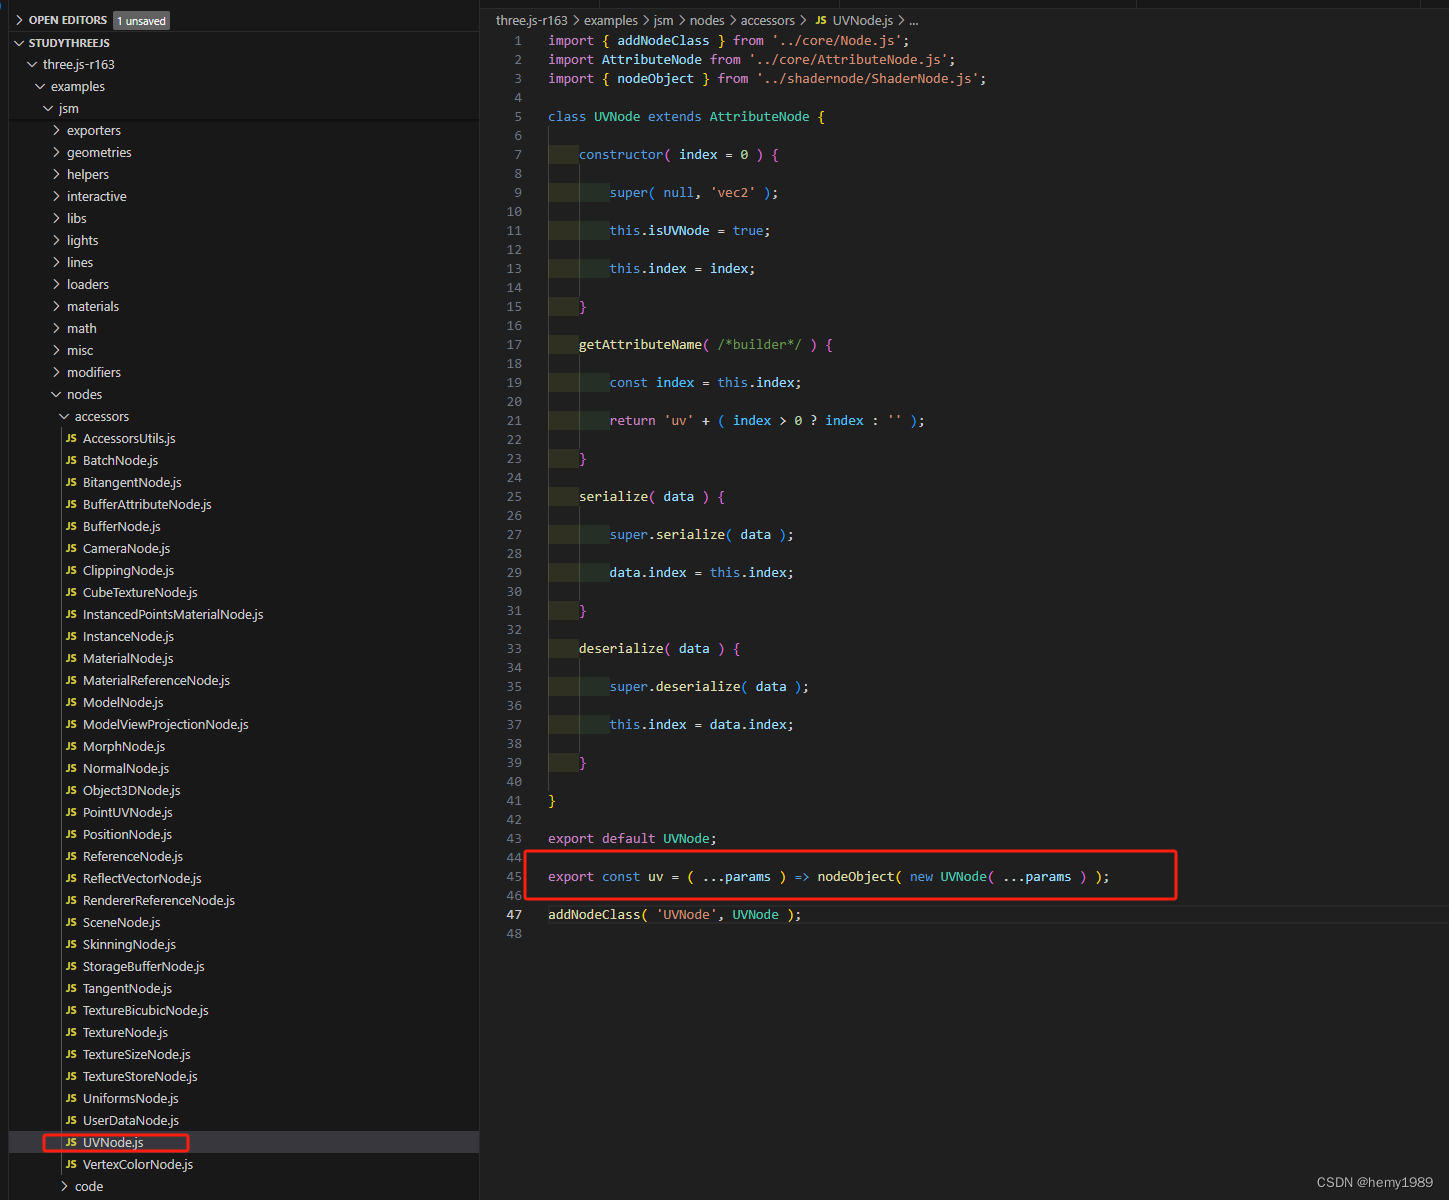
texture
TextureNode.js

5 WebGPURenderer
antialias - 是否执行抗锯齿。默认为false
.setAnimationLoop ( callback : Function ) : undefined
callback — 每个可用帧都会调用的函数。 如果传入‘null’,所有正在进行的动画都会停止。
可用来代替requestAnimationFrame的内置函数. 对于WebXR项目,必须使用此函数。
renderer = new WebGPURenderer( { antialias: true } );
				renderer.setPixelRatio( window.devicePixelRatio );//setPixelRatio 设置设备像素比。通常用于避免HiDPI设备上绘图模糊
                //setSize 将输出canvas的大小调整为(width, height)并考虑设备像素比,且将视口从(0, 0)开始调整到适合大小 将updateStyle设置为false以阻止对canvas的样式做任何改变。
				renderer.setSize( window.innerWidth, window.innerHeight );
				renderer.setAnimationLoop( animate );
				document.body.appendChild( renderer.domElement );
6 OrbitControls 控制器
  //控制器
				controls = new OrbitControls( camera, renderer.domElement );
				controls.minDistance = 1;//你能够将相机向内移动多少
				controls.maxDistance = 10;//你能够将相机向外移动多少
				controls.maxPolarAngle = Math.PI / 2;//你能够垂直旋转的角度的下限,范围是0到Math.PI,其默认值为0
				controls.autoRotate = true;//将其设为true,以自动围绕目标旋转。请注意,如果它被启用,你必须在你的动画循环里调用.update()
				controls.autoRotateSpeed = 1;//当.autoRotate为true时,围绕目标旋转的速度将有多快,默认值为2.0,相当于在60fps时每旋转一周需要30秒
				controls.target.set( 0, .5, 0 );//控制器的焦点,.object的轨道围绕它运行。 它可以在任何时候被手动更新,以更改控制器的焦点
				controls.update();//更新控制器。必须在摄像机的变换发生任何手动改变后调用
7 屏幕后处理
这部分没看太懂,后面再补充吧,先就这么跟着用吧。
后处理的脚本注掉,整个屏幕变黑。
	// post-processing 屏幕后处理

				const scenePass = pass( scene, camera );
				const scenePassColor = scenePass.getTextureNode();//颜色
				const scenePassDepth = scenePass.getDepthNode().remapClamp( .3, .5 ); //深度

				const scenePassColorBlurred = scenePassColor.gaussianBlur();
				scenePassColorBlurred.directionNode = scenePassDepth;

				const vignet = viewportTopLeft.distance( .5 ).mul( 1.35 ).clamp().oneMinus();

				postProcessing = new PostProcessing( renderer );//后处理
				postProcessing.outputNode = scenePassColorBlurred.mul( vignet );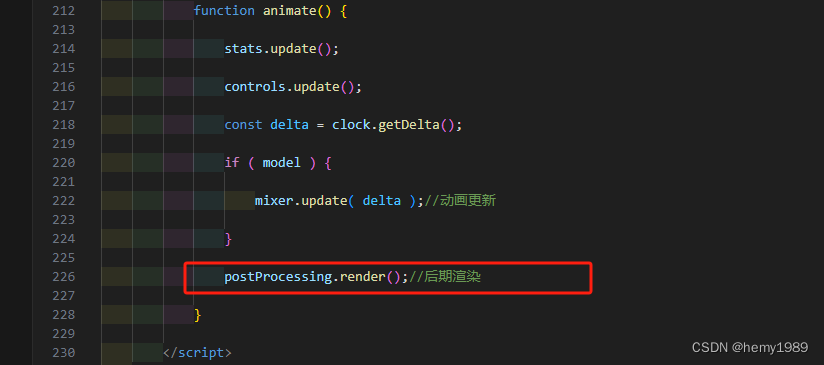
7 全部脚本
<!DOCTYPE html>
<html lang="en">
<head>
<title>three.js webgpu - reflection</title>
<meta charset="utf-8">
<meta name="viewport" content="width=device-width, user-scalable=no, minimum-scale=1.0, maximum-scale=1.0">
<link type="text/css" rel="stylesheet" href="../three.js-r163/examples/main.css">
</head>
<body>
<div id="info">
<a href="https://threejs.org" target="_blank" rel="noopener">three.js</a> webgpu - reflection
</div>
<script type="importmap">
{
"imports": {
"three": "../three.js-r163/build/three.module.js",
"three/addons/": "../three.js-r163/examples/jsm/",
"three/nodes": "../three.js-r163/examples/jsm/nodes/Nodes.js"
}
}
</script>
<script type="module">
import * as THREE from 'three';
import { MeshPhongNodeMaterial, color, pass, reflector, normalWorld, texture, uv, viewportTopLeft } from 'three/nodes';//引入一些类
import { GLTFLoader } from 'three/addons/loaders/GLTFLoader.js';//引入加载器
import WebGPU from 'three/addons/capabilities/WebGPU.js';//引入WebGPU
import WebGL from 'three/addons/capabilities/WebGL.js';//引入WebGL
import WebGPURenderer from 'three/addons/renderers/webgpu/WebGPURenderer.js';//WebGPU渲染
import PostProcessing from 'three/addons/renderers/common/PostProcessing.js';//后处理
import { OrbitControls } from 'three/addons/controls/OrbitControls.js';//控制器
import Stats from 'three/addons/libs/stats.module.js';//性能检测
let camera, scene, renderer;//相机 场景 渲染器
let model, mixer, clock;//模型 动画混合器 时钟
let postProcessing;//后期处理
let controls;//控制器
let stats;//性能检测
init();
function init() {
if ( WebGPU.isAvailable() === false && WebGL.isWebGL2Available() === false ) {
document.body.appendChild( WebGPU.getErrorMessage() );
throw new Error( 'No WebGPU or WebGL2 support' );//不支持
}
//创建相机
camera = new THREE.PerspectiveCamera( 50, window.innerWidth / window.innerHeight, 0.25, 30 );
camera.position.set( 2, 2.5, 3 );
//场景
scene = new THREE.Scene();
scene.fog = new THREE.Fog( 0x0487e2, 7, 25 );//雾
scene.backgroundNode = normalWorld.y.mix( color( 0x0487e2 ), color( 0x0066ff ) );
camera.lookAt( 0, 1, 0 );
//模拟太阳
const sunLight = new THREE.DirectionalLight( 0xFFE499, 5 );
//.castShadow : Boolean 此属性设置为 true 灯光将投射阴影。注意:这样做的代价比较高,需要通过调整让阴影看起来正确。 查看 DirectionalLightShadow 了解详细信息。 默认值为 false。
sunLight.castShadow = true;
//.shadow DirectionalLightShadow 对象,用于计算该平行光产生的阴影
//.camera : Camera 在光的世界里。这用于生成场景的深度图;从光的角度来看,其他物体背后的物体将处于阴影中
sunLight.shadow.camera.near = .1;//摄像机视锥体近端面
sunLight.shadow.camera.far = 5;//摄像机视锥体远端面
sunLight.shadow.camera.right = 2;
sunLight.shadow.camera.left = - 2;//摄像机视锥体左侧面
sunLight.shadow.camera.top = 2;//摄像机视锥体上侧面
sunLight.shadow.camera.bottom = - 2;
// .mapSize : Vector2 一个Vector2定义阴影贴图的宽度和高度。
//较高的值会以计算时间为代价提供更好的阴影质量。值必须是2的幂,直到给定设备的WebGLRenderer.capabilities.maxTextureSize, 虽然宽度和高度不必相同(例如,(512,1024)有效)。 默认值为(512,512)。
sunLight.shadow.mapSize.width = 2048;
sunLight.shadow.mapSize.height = 2048;
//.bias : Float
//阴影贴图偏差,在确定曲面是否在阴影中时,从标准化深度添加或减去多少。
//默认值为0.此处非常小的调整(大约0.0001)可能有助于减少阴影中的伪影
sunLight.shadow.bias = - 0.001;
//.position : Vector3 假如这个值设置为 Object3D.DEFAULT_UP (0, 1, 0),光线将会从上往下照射
sunLight.position.set( .5, 3, .5 );
//半球光
const waterAmbientLight = new THREE.HemisphereLight( 0x333366, 0x74ccf4, 5 );
const skyAmbientLight = new THREE.HemisphereLight( 0x74ccf4, 0, 1 );
scene.add( sunLight );
scene.add( skyAmbientLight );
scene.add( waterAmbientLight );
clock = new THREE.Clock();//
// animated model
const loader = new GLTFLoader();
loader.load( '../three.js-r163/examples/models/gltf/Michelle.glb', function ( gltf ) {
model = gltf.scene;
model.children[ 0 ].children[ 0 ].castShadow = true;//
mixer = new THREE.AnimationMixer( model );//动画混合器
console.log(gltf.animations);
const action = mixer.clipAction( gltf.animations[ 0 ] );
action.play();
scene.add( model );
} );
// textures
const textureLoader = new THREE.TextureLoader();//图片下载
const floorColor = textureLoader.load( '../three.js-r163/examples/textures/floors/FloorsCheckerboard_S_Diffuse.jpg' );//地面
//这个值定义了纹理贴图在水平方向上将如何包裹,在UV映射中对应于U。
//默认值是THREE.ClampToEdgeWrapping,即纹理边缘将被推到外部边缘的纹素。 其它的两个选项分别是THREE.RepeatWrapping和THREE.MirroredRepeatWrapping。 请参阅texture constants来了解详细信息。
floorColor.wrapS = THREE.RepeatWrapping;
//这个值定义了纹理贴图在垂直方向上将如何包裹,在UV映射中对应于V。
//可以使用与 .wrapS : number相同的选项。
//请注意:纹理中图像的平铺,仅有当图像大小(以像素为单位)为2的幂(2、4、8、16、32、64、128、256、512、1024、2048、……)时才起作用。 宽度、高度无需相等,但每个维度的长度必须都是2的幂。 这是WebGL中的限制,不是由three.js所限制的。
floorColor.wrapT = THREE.RepeatWrapping;//使用RepeatWrapping,纹理将简单地重复到无穷大 使用MirroredRepeatWrapping, 纹理将重复到无穷大,在每次重复时将进行镜像
//色彩空间
//默认值为THREE.NoColorSpace。 请参阅texture constants来了解其他格式的详细信息
floorColor.colorSpace = THREE.SRGBColorSpace;
const floorNormal = textureLoader.load( '../three.js-r163/examples/textures/floors/FloorsCheckerboard_S_Normal.jpg' );
floorNormal.wrapS = THREE.RepeatWrapping;
floorNormal.wrapT = THREE.RepeatWrapping;
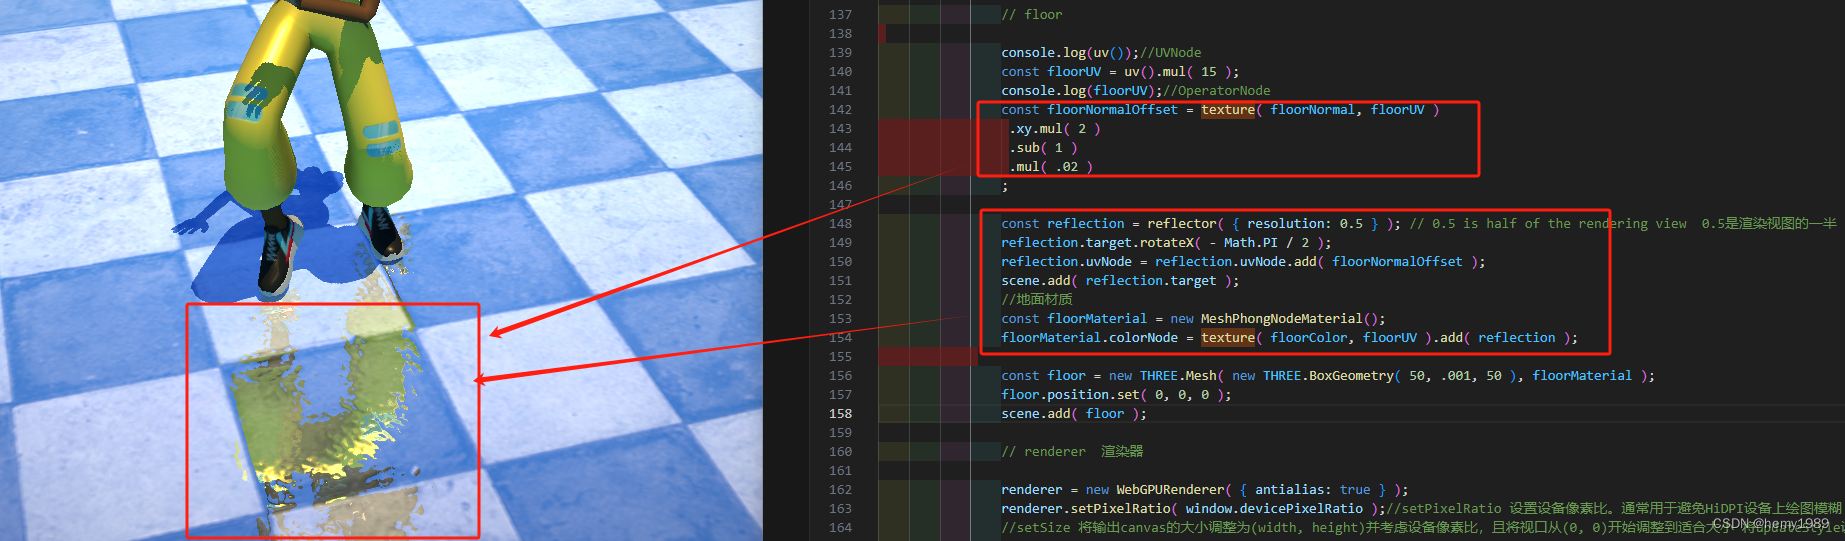
// floor
console.log(uv());//UVNode
const floorUV = uv().mul( 15 );
console.log(floorUV);//OperatorNode
const floorNormalOffset = texture( floorNormal, floorUV )
.xy.mul( 2 )
.sub( 1 )
.mul( .02 )
;
//反射
const reflection = reflector( { resolution: 0.5 } ); // 0.5 is half of the rendering view 0.5是渲染视图的一半
reflection.target.rotateX( - Math.PI / 2 );
reflection.uvNode = reflection.uvNode.add( floorNormalOffset );
scene.add( reflection.target );
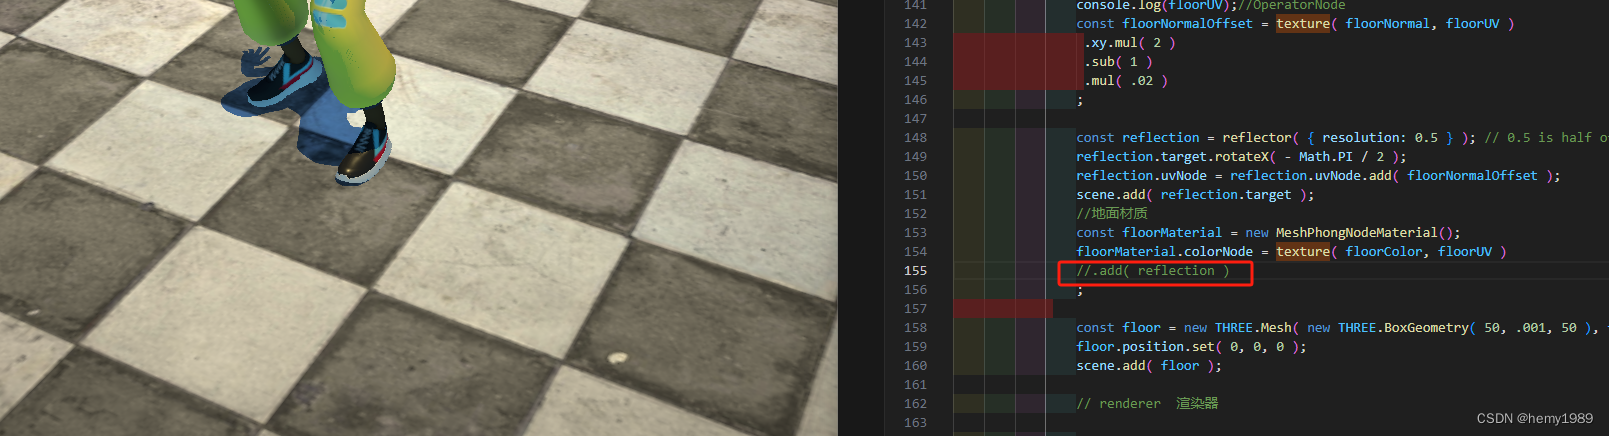
//地面材质
const floorMaterial = new MeshPhongNodeMaterial();
floorMaterial.colorNode = texture( floorColor, floorUV )
.add( reflection )
;
const floor = new THREE.Mesh( new THREE.BoxGeometry( 50, .001, 50 ), floorMaterial );
floor.position.set( 0, 0, 0 );
scene.add( floor );
// renderer 渲染器
renderer = new WebGPURenderer( { antialias: true } );
renderer.setPixelRatio( window.devicePixelRatio );//setPixelRatio 设置设备像素比。通常用于避免HiDPI设备上绘图模糊
//setSize 将输出canvas的大小调整为(width, height)并考虑设备像素比,且将视口从(0, 0)开始调整到适合大小 将updateStyle设置为false以阻止对canvas的样式做任何改变。
renderer.setSize( window.innerWidth, window.innerHeight );
renderer.setAnimationLoop( animate );
document.body.appendChild( renderer.domElement );
//性能检测
stats = new Stats();
document.body.appendChild( stats.dom );
//控制器
controls = new OrbitControls( camera, renderer.domElement );
controls.minDistance = 1;//你能够将相机向内移动多少
controls.maxDistance = 10;//你能够将相机向外移动多少
controls.maxPolarAngle = Math.PI / 2;//你能够垂直旋转的角度的下限,范围是0到Math.PI,其默认值为0
controls.autoRotate = true;//将其设为true,以自动围绕目标旋转。请注意,如果它被启用,你必须在你的动画循环里调用.update()
controls.autoRotateSpeed = 1;//当.autoRotate为true时,围绕目标旋转的速度将有多快,默认值为2.0,相当于在60fps时每旋转一周需要30秒
controls.target.set( 0, .5, 0 );//控制器的焦点,.object的轨道围绕它运行。 它可以在任何时候被手动更新,以更改控制器的焦点
controls.update();//更新控制器。必须在摄像机的变换发生任何手动改变后调用
// post-processing 屏幕后处理
const scenePass = pass( scene, camera );
const scenePassColor = scenePass.getTextureNode();//颜色
const scenePassDepth = scenePass.getDepthNode().remapClamp( .3, .5 ); //深度
const scenePassColorBlurred = scenePassColor.gaussianBlur();
scenePassColorBlurred.directionNode = scenePassDepth;
const vignet = viewportTopLeft.distance( .5 ).mul( 1.35 ).clamp().oneMinus();
postProcessing = new PostProcessing( renderer );//后处理
postProcessing.outputNode = scenePassColorBlurred.mul( vignet );
//
window.addEventListener( 'resize', onWindowResize );
}
function onWindowResize() {
camera.aspect = window.innerWidth / window.innerHeight;
camera.updateProjectionMatrix();
renderer.setSize( window.innerWidth, window.innerHeight );
}
function animate() {
stats.update();
controls.update();
const delta = clock.getDelta();
if ( model ) {
mixer.update( delta );//动画更新
}
postProcessing.render();//后期渲染
}
</script>
</body>
</html>