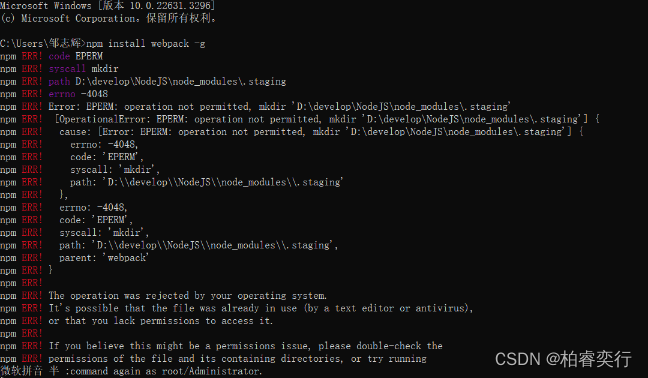
1. 前言:
新手引导组件,顾名思义,就是强制性的要求第一次使用的用户跟随引导使用应用,可以让一些第一次使用系统的新手快速上手,正好我最近也遇到了这个需求,于是就想着开发一个通用组件拿出来使用(写完之后才发现element就有,后悔了哈哈哈😭😭)
示例图:
第一步

第二步

第三步

2. 使用的技术栈以及组件:
Vue3+Vite+Element+uuid,使用了el-popover组件以及el-button组件
3. 遇到的问题:
开发这个组件不是一个简单的事情,遇到了不少的问题,尤其是样式上的问题,下面我一一说明以及对应的解决方式
需要将用户可以点击的部分凸出出来:
在原先我是打算给组件传入一个
class类名的,然后通过指定的class类名获取到dom,之后再通过dom.getBoundingclientRect()方法获取指定dom的尺寸以及位置信息,然后再组件中创建一个空白区域,但是我真正尝试的时候才发现一个致命问题,getBoundingclientRect方法获取的位置信息都是对的,但是尺寸却是固定的0,后面才发现,如果新手引导的内容是一个图片的话,就必须要等到图片加载完成后再在页面上进行引导,我尝试了onload之后再进行绘制,虽然实现了想要的效果,但是我觉得这样操作太麻烦了,就抛弃了这种方法改为插槽:
上面的方法行不通,操作也麻烦,然后我就创建了两个插槽,一个是content插槽,此插槽没有任何作用,只是将内容显示出来,一个是target插槽,这里的插槽将会作为新手引导的内容,这里解释下为什么需要两个插槽,因为新手引导组件可能应用于循环中,针对于循环的其他内容,可以使用content插槽填充,需要新手引导的内容再使用target插槽即可
4. 源码讲解(请查看详细注释):
<!--
 * @Author: wangZhiyu <w3209605851@163.com>
 * @Date: 2024-07-05 09:28:39
 * @LastEditTime: 2024-07-11 14:05:36
 * @LastEditors: wangZhiyu <w3209605851@163.com>
 * @Descripttion: /新手引导组件.vue
-->
<template>
  <!-- 新手引导插槽 -->
  <div class="targetSlot" v-if="isTarget">
    <!-- 提示文字区域 -->
    <el-popover :popper-style="`width:auto;color:#000;font-size:20px;z-index:${forceShowPopover ? 9999 : 2024}`" :visible="visible" placement="top" :offset="25">
      <!-- popover内的元素 -->
      <div style="white-space: nowrap; display: flex; align-items: center; justify-content: center">
        <el-button v-if="isShowAudioCourse" type="info" circle size="small" style="font-size: 18px">?</el-button>
        <span style="margin: 0 5px">{{ tipMessage }}</span>
        <el-button v-if="readBtn" type="primary" @click="onRead">{{ readMessage }}</el-button>
      </div>

      <!-- 触发popover的元素 -->
      <template #reference>
        <!-- 元素背景高亮区域 -->
        <div :class="`highLightArea highLightArea_${uuid}`" v-if="isFoucsArea"></div>
      </template>
    </el-popover>
    <slot name="target"></slot>
  </div>
  <!-- <slot name="target"></slot> -->

  <!-- 普通内容插槽(根据传入的参数进行动态改变) -->
  <slot :name="isTarget ? 'content' : 'target'"></slot>

  <!-- 新手引导遮罩层(这里给遮罩层添加了一个点击事件,并且组织事件冒泡,是为了避免点击遮罩层所产生事件冒泡罩层影响) -->
  <div class="maskArea" @click.stop="() => {}" v-if="isFoucsArea && value"></div>
</template>

<script setup>
// 导入UUID库
import { v4 as uuidv4 } from 'uuid';

import { ref, nextTick, onMounted, useSlots, watch } from 'vue';

// 设置是否显示提示信息
const visible = ref(false);

// 生成一个uuid
const uuid = uuidv4();

// 抛出事件
const emits = defineEmits(['onRead']);

// 父组件传入的参数
const props = defineProps({
  // 是否继承父组件样式
  isInheritStyle: {
    type: Boolean,
    default: () => false,
  },
  // 高亮区域盒子的占比大小-->宽
  highLightAreaWidth: {
    type: [String, Number],
  },
  // 高亮区域盒子的占比大小-->高
  highLightAreaHeight: {
    type: [String, Number],
  },
  // 高亮区域盒子的占比位置-->垂直距离调整
  highLightAreaTop: {
    type: [String, Number],
  },
  // 高亮区域盒子的占比位置-->水平距离调整
  highLightAreaLeft: {
    type: [String, Number],
  },
  // 是否强制显示提示(避免提示被遮住的情况)
  forceShowPopover: {
    type: Boolean,
    default: () => false,
  },
  // 是否显示已阅读按钮
  readBtn: {
    type: Boolean,
    default: () => false,
  },
  // 内部按钮文字
  readMessage: {
    type: String,
    default: () => '下一步',
  },
  // 提示文字
  tipMessage: {
    type: String,
    default: () => '',
  },
  // 是否显示提示按钮,点击后可显示对应的视频教程
  isShowAudioCourse: {
    type: Boolean,
    default: () => false,
  },
  // 是否为当前应该显示的教程步骤(用于一个页面多个步骤的流程引导)
  isTarget: {
    type: Boolean,
    default: () => true,
  },
  // 是否为当前应该显示的教程步骤(用于一个页面多个步骤的流程引导)
  value: {
    type: Boolean,
    default: () => true,
  },
});

// 当前组件中被使用的插槽
const slot = useSlots();

// 已完成引导
const onRead = () => {
  visible.value = false;
  emits('onRead');
};

// 是否聚焦按钮,高亮新手引导
let isFoucsArea = ref(false);

// 如果 slot.target 成立,则表示使用了新手引导插槽
isFoucsArea.value = slot.target ? true : false;

// 页面初始化函数
const init = () => {
  nextTick(() => {
    // 判断是否指定了新手引导插槽的高层级盒子继承父元素的全部css属性(最小程度的影响添加一个div布局的影响)
    if (props.isInheritStyle) {
      // 获取新手引导插槽的高层级盒子
      const targetSlot = document.querySelector('.targetSlot');
      targetSlot.className = 'inheritFather';
    }

    // 获取高亮盒子
    const highLightArea = document.querySelector(`.highLightArea_${uuid}`);
    // 判断高亮盒子是否存在
    if (highLightArea) {
      // 根据指定参数配置盒子的高亮区域尺寸
      highLightArea.style.width = `${props.highLightAreaWidth || 100}%`;
      highLightArea.style.height = `${props.highLightAreaHeight || 100}%`;
      highLightArea.style.top = `${props.highLightAreaTop || 50}%`;
      highLightArea.style.left = `${props.highLightAreaLeft || 50}%`;
    }
    // TODO:将显示提示放在setTimeout中,存入宏任务队列,避免顺序执行错误,应该等到highLightArea盒子全部处理完成后再显示提示区域,否则有可能显示的位置不对,这里设置是否显示提示信息表示为isFoucsArea.value,表示只给设置了新手引导插槽中添加提示,其余盒子不添加提示
    setTimeout(() => (visible.value = isFoucsArea.value), 100);
  });
};

watch(
  () => props.isTarget,
  () => {
    setTimeout(() => {
      visible.value = true;
    }, 1);
  }
);

onMounted(init);
</script>

<style>
.maskArea {
  position: fixed;
  top: 0px;
  left: 0px;
  width: 100vw;
  height: 100vh;
  background: rgba(0, 0, 0, 0.4);
  z-index: 1;
  cursor: default;
}
.handGif {
  position: absolute;
  left: 100%;
  width: 60px;
  height: 70px;
  transform: translateX(50%);
}

.targetSlot {
  position: relative;
  z-index: 10;
  display: flex;
  justify-content: center;
  align-items: center;
}

.inheritFather {
  all: inherit;
  z-index: 10;
}
.highLightArea {
  position: absolute;
  width: 100%;
  height: 100%;
  top: 50%;
  left: 50%;
  transform: translate(-50%, -50%);
  border: 3px solid #fff;
  border-radius: 5px;
  z-index: 9;
  font-size: 16px;
  pointer-events: none;
  padding: 10px;
}
</style>
5. 使用新手引导组件示例:
<!--
 * @Author: wangZhiyu <w3209605851@163.com>
 * @Date: 2024-07-09 13:44:13
 * @LastEditTime: 2024-07-09 15:49:38
 * @LastEditors: wangZhiyu <w3209605851@163.com>
 * @FilePath: \Vue3新手引导组件\Vue3-Tour\src\App.vue
 * @Descripttion:
-->
<template>
  <div class="container">
    <w-tour @onRead="onRead" readBtn tipMessage="这是新手教程的第一步" :isTarget="step === 1" :value="open">
      <template #target>
        <el-button type="primary">按钮1</el-button>
      </template>
    </w-tour>

    <w-tour @onRead="onRead" readBtn tipMessage="这是新手教程的第二步" :isTarget="step === 2" :value="open">
      <template #target>
        <el-button type="primary">按钮2</el-button>
      </template>
    </w-tour>

    <w-tour @onRead="onRead" readBtn tipMessage="这是新手教程的第三步" :isTarget="step === 3" :value="open">
      <template #target>
        <el-button type="primary">按钮3</el-button>
      </template>
    </w-tour>
  </div>
</template>
<script setup>
import { ref } from 'vue';
const step = ref(1);
const open = ref(true);

const onRead = () => {
  step.value++;

  if (step.value === 4) {
    // step.value = 0;
    open.value = false;
  }
  console.log(step.value);
};
</script>

<style scoped>
.container {
  display: flex;
  justify-content: space-around;
  align-items: center;
  width: 500px;
  height: 100px;
  background-color: #7c7777;
  margin: 100px auto;
  padding: 10px;
}
</style>
6. 总结:
以上就是从0到1开发一个能简单使用的新手引导组件的全过程以及源码了,可能使用起来不是很方便,哈哈,这里不得不佩服那些开发通用组件的大佬,确实很不容易👍🏻👍🏻