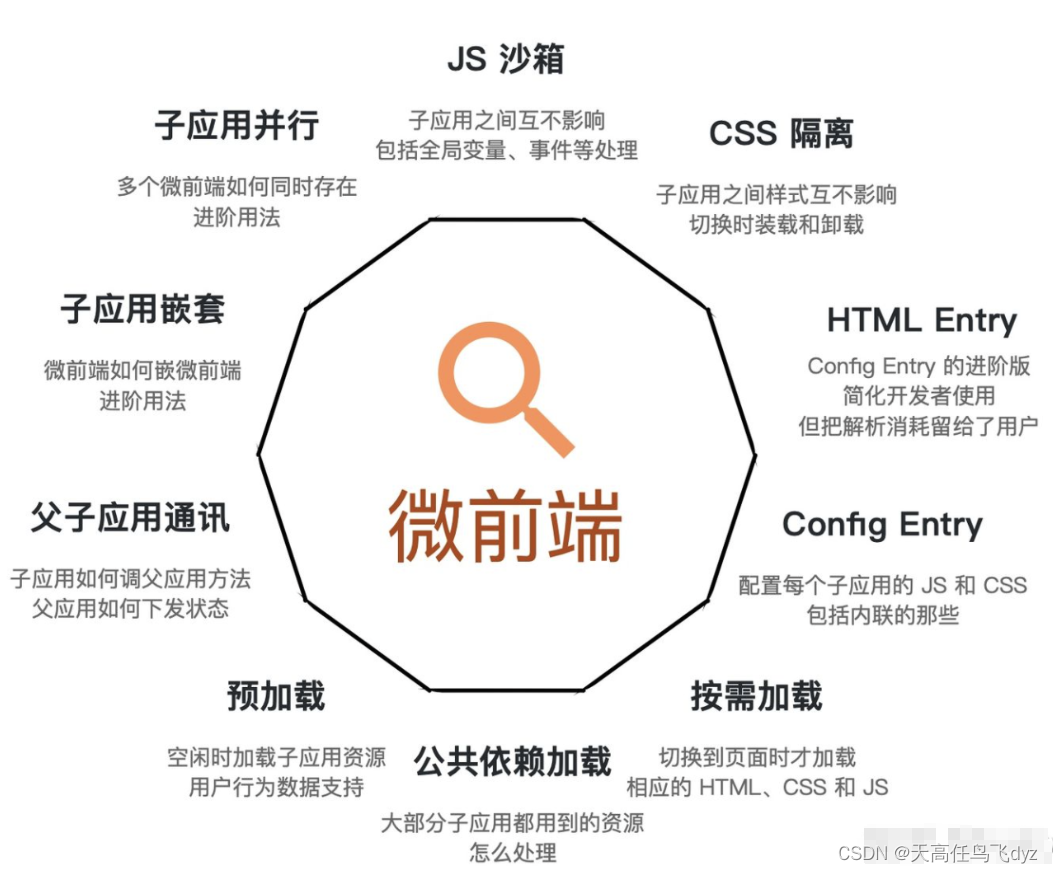
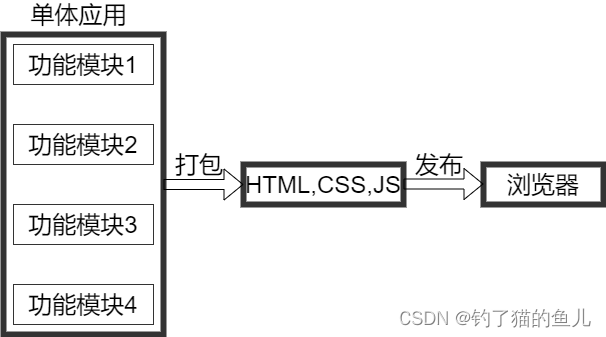
这篇文章是关于使用 qiankun 搭建微服务的全过程及遇到的问题汇总。
新建项目
分别新建主应用和微应用
vue create qiankun-micro-vue3-app 子应用
vue create qiankun-micro-vue3-base 主应用
习惯用 typescript 的执行 vue add typescript
按照官网和github上的example来修改即可。
qiankun官网:https://qiankun.umijs.org/zh/guide
官方给的 github项目地址:qiankun/examples/vue3 at master · umijs/qiankun · GitHub
微应用改造
1.安装qiankun,yarn add qiankun
2.按照官网的步骤新增public-path.js 文件,在 main.ts 中引入
/*eslint-disable no-undef */
// 上面这句代码取消了eslint检查,否则会报错


if (window.__POWERED_BY_QIANKUN__) {
    __webpack_public_path__ = window.__INJECTED_PUBLIC_PATH_BY_QIANKUN__;
  }
main.ts 改造
完整代码如下,目前还没有引入router,把router的部分去掉
import { createApp } from 'vue'
import App from './App.vue'

// createApp(App).mount('#app')

import "./public-path"
import router from './router';

// let router = null;
let instance: any = null; //如果不想要ts类型检查,可以使用@ts-ignore
// let history = null;

function render(props: any = {}) {
  const { container } = props;
//   history = createWebHistory(window.__POWERED_BY_QIANKUN__ ? '/vue3' : '/');
//   router = createRouter({
//     history,
//     routes,
//   });

  instance = createApp(App);
  instance.use(router);
//   instance.use(store);
  instance.mount(container ? container.querySelector('#app') : '#app');
}

// 独立运行时
// @ts-ignore
if (!window.__POWERED_BY_QIANKUN__) {
    render();
}

export async function bootstrap() {
    console.log('%c%s', 'color: green;', 'vue3.0 app bootstraped');
}

export async function mount(props:any) {
    // storeTest(props);
    render(props);
    instance.config.globalProperties.$onGlobalStateChange = props.onGlobalStateChange;
    instance.config.globalProperties.$setGlobalState = props.setGlobalState;
  }

  export async function unmount() {
    instance.unmount();
    instance._container.innerHTML = '';
    instance = null;
    // router = null;
    // history.destroy();
}上面的代码使用@ts-ignore 来忽略ts的类型校验,否则会一直报错,一直提示找不到这个变量__POWERED_BY_QIANKUN__
shims-vue.d.ts 修改
根本的解决办法:
找到 main.ts 的同级目录下的shims-vue.d.ts 文件,声明全局变量,并且添加__POWERED_BY_QIANKUN__属性,这样,我们就可以在项目 main.ts 中使用 window.__POWERED_BY_QIANKUN__ 来访问 __POWERED_BY_QIANKUN__ 属性了。
/* eslint-disable */
declare module '*.vue' {
  import type { DefineComponent } from 'vue'
  const component: DefineComponent<{}, {}, any>
  export default component
}

/* 下面这段是新添加的代码**/
declare global {
  interface Window {
    __POWERED_BY_QIANKUN__: boolean;
  }
}

export {}
主应用改造
main.ts 改造
在主应用中注册子引用,这一步跟着官方来就好了
import { createApp } from 'vue'
import App from './App.vue'
import { registerMicroApps,start } from 'qiankun'
registerMicroApps([
    {
        name: 'qiankun-micro-vue3-app', // 这里使用的是子应用里面 package.json 里面的name
        entry: '//localhost:8082', // 这里的端口也改成子应用里面 vue.config.js 里面修改后的端口号
        container: '#vue3-app-container', // 子应用挂载的元素id
        activeRule: '/vue3-app',
        props: {
            nickname:"最爱橘子呀",
            age: 18
        }
    }
]);
start()
createApp(App).mount('#app')
App.vue 中挂载
id="vue3-app-container" 与 main.ts 中的 container 对应。
<template>
  <a href="/vue3-app">go to vue3-app</a>
  <div id="vue3-app-container"></div>
  <img alt="Vue logo" src="./assets/logo.png">
  <HelloWorld msg="Welcome to Your Vue.js + TypeScript App"/>
</template>
启动主项目,发现无法正确引入子项目,报错如下:

这是因为在子应用中我们少做了一步,修改wenpack配置,(目前vite支持不是很好,搭建微服务建议使用webpack)
在子应用中修改 vue.config.js 文件,看这个示例:https://github.com/umijs/qiankun/tree/master/src
完整代码:
const { defineConfig } = require('@vue/cli-service')
const { name } = require('./package');
module.exports = defineConfig({
  transpileDependencies: true,
  lintOnSave: false,
  devServer: {
    port: 8082,
    headers: {
      'Access-Control-Allow-Origin': '*',
    },
  },
  configureWebpack: {
    output: {
      library: `${name}-[name]`,
      libraryTarget: 'umd', // 把微应用打包成 umd 库格式
      chunkLoadingGlobal: `webpackJsonp_${name}`, // webpack 5 需要把 jsonpFunction 替换成 chunkLoadingGlobal
    },
  },

})
现在,主应用中点击go to vue3-app 就会显示子应用的界面

在子应用中加入路由
执行 yarn add vue-router -S ,添加router/index.ts
在 pages 里添加页面组件 Dog 和 Cat,在 router 中引入
import { createRouter,createWebHistory,RouteRecordRaw } from 'vue-router'

const routes: RouteRecordRaw[] = [{
    path: '/cat',
    name: 'Cat',
    component: () => import('../pages/Cat.vue')
},{
    path: '/dog',
    name: 'Dog',
    component: () => import('../pages/Dog.vue')
}]
const router = createRouter({
    history: createWebHistory(window.__POWERED_BY_QIANKUN__?"/vue3-app":'/'),  // 微应用要嵌入到主应用中,/vue3-app取得是主应用注册微应用时activeRule
    routes
})

export default router;
在子应用中添加路由跳转
App.vue
<template>
  <div>子应用</div>
  <router-link to="/cat">cat</router-link>|
  <router-link to="/dog">dog</router-link>
  <router-view></router-view>
</template>
最后在主应用中测试,微应用是否能在主应用中自由跳转

页面跳转没问题,一个简单的微服务就搭建好了。