autoware.universe源码略读3.12--perception:lidar_centerpoint/lidar_centerpoint_tvm
Overview
这两个包应该都是关于使用雷达点云进行3D目标检测的东西,当然看起来也是分成了两种部署的形式。然后涉及到的算法应该是下面两篇文章
[1] Yin, Tianwei, Xingyi Zhou, and Philipp Krähenbühl. “Center-based 3d object detection and tracking.” arXiv preprint arXiv:2006.11275 (2020).
[2] Lang, Alex H., et al. “Pointpillars: Fast encoders for object detection from point clouds.” Proceedings of the IEEE/CVF Conference on Computer Vision and Pattern Recognition. 2019.
这里直接来看下代码,看看能不能边看代码边了解下原理。不过这里我大概瞄了一眼,tvm部署的东西好像也是没写完的。。所以这个里面是不支持用tvm么,后边要是部署的话可能还有点麻烦
lidar_centerpoint
这个包用的还是TensorRT来进行部署的
lib
这个里面涉及到的文件还有点多,首先里面有三个文件夹:network,postprocess和preprocess,这么根据文件夹名字来看就是对应的网络结构、后处理以及预处理部分了。剩下还有几个文件应该是以辅助功能为主,当然centerpoint_trt应该会涉及到具体模型的部署,我们这里来看一下
utils
非常简单,定义了一个Box3D,对应的就是3D检测框,里面的元素包括标签、分数、坐标、长宽高、朝向和速度。还有一个函数就是divup,这个其实就是在进行两个数除法的时候确保向上取整,具体的操作就是对a加上了b-1
return (a + b - 1) / b;
ros_utils
针对ROS写的接口,也没有很复杂的东西,其实就是box3DToDetectedObject,这个函数的作用很好理解,我们检测得到的结果其实是3D的框框,但是最后发布出去的时候肯定不能只发布Box,这里就是转换成可以发布的消息类型
在函数的一开始,还是根据检测到的box3d的数据来进行的分类,所以这里是不是也表明了对点云直接进行检测得到的结果里是有label这个信息的
// TODO(yukke42): the value of classification confidence of DNN, not probability.
obj.existence_probability = box3d.score;
// classification
autoware_auto_perception_msgs::msg::ObjectClassification classification;
classification.probability = 1.0f;
if (box3d.label >= 0 && static_cast<size_t>(box3d.label) < class_names.size()) {
  classification.label = getSemanticType(class_names[box3d.label]);
} else {
  classification.label = Label::UNKNOWN;
  RCLCPP_WARN_STREAM(
    rclcpp::get_logger("lidar_centerpoint"), "Unexpected label: UNKNOWN is set.");
}
然后就是对这个obj对象的具体特征值进行赋值了。这里对yaw角的单独处理了一下,我估计是检测出来的和ROS中的这个yaw定义不太一样,剩下就没什么好说的了,赋值就行了
// pose and shape
// mmdet3d yaw format to ros yaw format
float yaw = -box3d.yaw - tier4_autoware_utils::pi / 2;
obj.kinematics.pose_with_covariance.pose.position =
  tier4_autoware_utils::createPoint(box3d.x, box3d.y, box3d.z);
obj.kinematics.pose_with_covariance.pose.orientation =
  tier4_autoware_utils::createQuaternionFromYaw(yaw);
obj.shape.type = autoware_auto_perception_msgs::msg::Shape::BOUNDING_BOX;
obj.shape.dimensions =
  tier4_autoware_utils::createTranslation(box3d.length, box3d.width, box3d.height);
// twist
if (has_twist) {
  float vel_x = box3d.vel_x;
  float vel_y = box3d.vel_y;
  geometry_msgs::msg::Twist twist;
  twist.linear.x = std::sqrt(std::pow(vel_x, 2) + std::pow(vel_y, 2));
  twist.angular.z = 2 * (std::atan2(vel_y, vel_x) - yaw);
  obj.kinematics.twist_with_covariance.twist = twist;
  obj.kinematics.has_twist = has_twist;
}
detection_class_remapper
这个里面的类看名字是对检测类型进行重映射时需要的,这里的具体原理每太想明白,不过看mapClasses函数里,就是先计算了下物体在鸟瞰图下的面积,然后把label重新映射到满足条件的值上
for (auto & object : msg.objects) {
  const float bev_area = object.shape.dimensions.x * object.shape.dimensions.y;
  for (auto & classification : object.classification) {
    auto & label = classification.label;
    for (int i = 0; i < num_labels_; ++i) {
      if (
        allow_remapping_by_area_matrix_(label, i) && bev_area >= min_area_matrix_(label, i) &&
        bev_area <= max_area_matrix_(label, i)) {
        label = i;
        break;
      }
    }
  }
}
centerpoint_config
这个是整个模块的一个配置文件,里面对参数值进行了设置,当然很多值也是有对应的默认值的,可以看到里面大致分为四个部分,第一个部分是input params,也就是输入的一些参数,包括距离限制、体素网格的一些设置等等;第二个是network params,主要是神经网络相关的一些内容,包括批处理大小之类的;第三个是post-process params,后处理要用到的参数;最后一个则是calculated params,可以理解为在运算过程中可能用到的一些参数,主要也是和网格相关的。
CUDA_UTILS
为使用CUDA预先定义的一些函数,可以在使用CUDA时更加方便一些
preprocess
这个是神经网络预处理的部分,应该就是对输入数据先进行的处理吧。
第一个是pointcloud_densification,这个看名字应该就是点云密集化(不是很能想明白),定义的第一个类是DensificationParam,这里面主要就是设置了两个变量,一个是world_frame_id,应该对应的就是世界坐标系;另一个是pointcloud_cache_size_,对应的应该是点云的缓存大小?之后在几个地方都有使用到这个类。之后在PointCloudDensification里,主要的函数是enqueuePointCloud,首先先找到了世界坐标系到当前点云坐标系的转换关系,当然也把这里的转换矩阵变成Eigen形式了
auto transform_world2current =
  getTransform(tf_buffer, header.frame_id, param_.world_frame_id(), header.stamp);
/// ...
auto affine_world2current = transformToEigen(transform_world2current.get());
然后调用的是enqueue,这里是把点云消息和坐标转换关系(当前点云坐标系到世界坐标系)放在了一起,然后把这个点放在了pointcloud_cache_前面,另一个就是dequeue,这个就是在点云数量超限的时候直接把最尾部,对应的也就是最旧的点云删除掉,这样可能就是把点云的消息一直维持在一个数量上吧
voxel_generator看起来是生成体素网格的。这里接受两个输入参数,一个是刚才提到过的DensificationParam,另一个是整体的一个配置文件CenterPointConfig,构造函数的作用就是根据config来配置要用到的成员变量的值,包括距离限制以及网格大小。而enqueuePointCloud函数就很简单了,直接调用PointCloudDensification类的接口函数就可以了
return pd_ptr_->enqueuePointCloud(input_pointcloud_msg, tf_buffer);
而pointsToVoxels这个函数应该是比较重要的一个函数,作用就是把点云数据转换到体素网格中,这里我们首先可以注意到,是把3D的网格先转成了一维的vector
const std::size_t grid_size = config_.grid_size_z_ * config_.grid_size_y_ * config_.grid_size_x_;
std::vector<int> coord_to_voxel_idx(grid_size, -1);
接下来对当前还在序列中的点云数据进行遍历,遍历的目的是为了最后给voxels,coordinates和num_points_per_voxel三个变量赋值,也就是把点云都转到了对应的体素网格上
preprocess_kernel是预处理的核心函数了,这个和之前用到过的图像雷达点云融合用的核函数似乎差不多,也是分成一个核函数(这里是__global__ void generateFeatures_kernel)以及一个供外部调用的接口函数,函数的解释可以参考之前的文章:autoware.universe源码略读(3.9),不过这里有一点点不同的是,因为之前是对2D的处理,所以z_offset是没有考虑的,这里对z轴也进行来处理,最后输出的也是features
- 这里有一个点,就是在计算偏移量的时候可以看到x和z轴其实是反着来的,也就是float x_offset = voxel_x / 2 + cordsSM[pillar_idx_inBlock].z * voxel_x + range_min_x;,所以这里应该是坐标系不同带来的区别,不过具体为什么是这样的也还没想明白
network
这里应该对应的就是神经网络中的网路部分了
TensorRTWrapper看起来是把TensorRT可能会用到的一些部分进行了打包,比如这里的初始化init,就是先实例化了一个nvinfer1::IRuntime并且完成了一些其他的设置
if (engine_file.is_open()) {
  success = loadEngine(engine_path);    // 加载engine
} else {
  success = parseONNX(onnx_path, engine_path, precision); // 解析onnx模型
}
success &= createContext();   // 生成执行上下文
这里解析onnx模型的时候没有使用到common包里的trt_common,仔细看了下确实有些不一样的地方,不过核心思路是差不多的,就是依次调用nvinfer1中的各种函数
network_trt就继承自刚刚定义的这个TensorRTWrapper,这里面定义了两个类,一个是体素编码,其实也就是对特征的提取VoxelEncoderTRT,另一个是网络的头部阶段,即从体素编码器提取的特征中进行目标检测、分类或其他任务的HeadTRT,这里设置的profile其实是builder.createOptimizationProfile(),也就是网络在优化过程中的一些配置选项,也没什么特殊的地方
scatter_kernel的目的看起来是把点云投影到特征图上的一个操作。这里涉及到了两个索引,pillar_i对应的是x,feature_i对应的是y,所以可以理解为这里是那种对统同一X依次处理Y那种操作吧,最后赋值的时候也是这样的
const auto feature = pillar_features[pillar_feature_size * pillar_i + feature_i];
scattered_features[grid_size_y * grid_size_x * feature_i + grid_size_x * coord.y + coord.z] =
  feature;
然后在接口函数里就是计算了这个块和线程的大小维度,再直接启动内核函数,这里<<<blocks, threads, 0, stream>>>是CUDA 的内核启动语法,用于指定 CUDA 内核函数的执行配置。
dim3 blocks(
  divup(max_voxel_size, THREADS_PER_BLOCK), divup(encoder_out_feature_size, THREADS_PER_BLOCK));
dim3 threads(THREADS_PER_BLOCK, THREADS_PER_BLOCK);
scatterFeatures_kernel<<<blocks, threads, 0, stream>>>(
  pillar_features, coords, num_pillars, encoder_out_feature_size, grid_size_x, grid_size_y,
  scattered_features);
postprocess
这部分是神经网络中的后处理部分
circle_nms_kernel看起来是非极大值抑制的一个核函数,这里把核函数包装了几层,具体的核函数是__global__ void circleNMS_Kernel,这里需要留意的第一点是,在所有的block中只处理了对角线及以下的块,因为这里最后判断的是重叠关系,那么A和B的重叠关系与B和A的关系是一致的,所以我们只算一半就可以了。而这里计算的是3DBOX之间的距离,当距离小于dist2d_pow_threshold阈值的时候,就把对应的掩码设置为1
if (threadIdx.x < row_size) {
  const std::size_t cur_box_idx = THREADS_PER_BLOCK_NMS * row_start + threadIdx.x;
  const Box3D * cur_box = boxes + cur_box_idx;
  std::uint64_t t = 0;
  std::size_t start = 0;
  if (row_start == col_start) {
    start = threadIdx.x + 1;
  }
  for (std::size_t i = start; i < col_size; i++) {
    if (dist2dPow(cur_box, block_boxes + i) < dist2d_pow_threshold) {
      t |= 1ULL << i;
    }
  }
  mask[cur_box_idx * col_blocks + col_start] = t;
关于CUDA编程时的block和thread理解:Grid,Block,thread都是线程的组织形式,最小的逻辑单位是一个thread,最小的硬件执行单位是thread warp,若干个thread组成一个block,block被加载到SM上运行,多个block组成一个Grid。所以核心思想就是把数据部署到具体的线程块上

至于circleNMS_launch则是一个核函数的接口,其实我感觉不屑写这个接口,直接调用效果也是一样的啊。。最后提供给其他函数的接口则是circleNMS,这里计算候选框数量和列块数量后,直接调用核函数的接口:
CHECK_CUDA_ERROR(
  circleNMS_launch(boxes3d, num_boxes3d, col_blocks, distance_threshold, mask_d, stream));
这里执行结束后,我们关注的就是这个mask_d,目前这个变量还是在GPU上,所以要先把变量移动到主机上,之后是否保留的判断标志则也是根据mask的值,把为1的留下来,不为1的去掉,所以这里应该是把需要进行极大值抑制的,也就是有重叠的先提取出来了
for (std::size_t i = 0; i < num_boxes3d; i++) {
  auto nblock = i / THREADS_PER_BLOCK_NMS;
  auto inblock = i % THREADS_PER_BLOCK_NMS;
  if (!(remv_h[nblock] & (1ULL << inblock))) {
    keep_mask_h[i] = true;
    num_to_keep++;
    std::uint64_t * p = &mask_h[0] + i * col_blocks;
    for (std::size_t j = nblock; j < col_blocks; j++) {
      remv_h[j] |= p[j];
    }
  } else {
    keep_mask_h[i] = false;
  }
}
non_maximum_suppression也是非极大值抑制的东西,可以看到这里使用到的方法是IoU_BEV, 所以应该是通过计算3D物体都转成鸟瞰图下后的IoU来判断是否进行非极大值抑制的。这里需要设置几个参数:
struct NMSParams
{
  NMS_TYPE nms_type_{};
  std::vector<std::string> target_class_names_{}; //  target class names
  double search_distance_2d_{};                   //  search distance for 2D
  double iou_threshold_{};                        //  IoU threshold
  // double distance_threshold_{};
};
这个参数结构也会作为参数传给NonMaximumSuppression::setParameters函数来设置对应的成员变量,而classNamesToBooleanMask函数则是用来判断输入的参数中的目标类名和实际支持的是否相同,并且把支持的类的mask值设置为true
IoU的具体计算包含在generateIoUMatrix函数之中,这里双层遍历输入的对象,如果两个对象是同一类的话,就计算两者之间的IoU值(调用common包中的函数),这里跳出循环的逻辑是,当对于一个target_obj已经有一个obj和他的IoU大于阈值了,那么这个肯定在后续会被抑制了,就没必要继续遍历下去了
const auto & target_obj = input_objects.at(target_i);
const auto & source_obj = input_objects.at(source_i);
if (!isTargetPairObject(target_obj, source_obj)) {
  continue;
}
if (params_.nms_type_ == NMS_TYPE::IoU_BEV) {
  const double iou = perception_utils::get2dIoU(target_obj, source_obj);
  triangular_matrix(target_i, source_i) = iou;
  // NOTE: If the target object has any objects with iou > iou_threshold, it
  // will be suppressed regardless of later results.
  if (iou > params_.iou_threshold_) {
    break;
  }
}
apply则是一个接口,通过对generateIoUMatrix函数的结果进行一次遍历,因为相当于每一个对象的所有IoU值是在一行上的,所以这里就是找到每一行的最大值,只要有一个大于阈值的就算作被抑制了。不然的话就加到output输出
postprocess_kernel是后处理的核函数了,在generateBoxes3D_kernel中,输入了一个out_heatmap,我的理解这个就是神经网络的输出,神经网络的输出通常是一个热力图(heatmap)。每个像素的值表示该位置有某个类别存在的概率。 这里会对输出的值利用sigmoid激活函数来进行激活,得到对应类别的置信度(也就是概率吧),然后找到最合适的标签
for (int ci = 0; ci < class_size; ci++) {
  float score = sigmoid(out_heatmap[down_grid_size * ci + idx]);
  if (score > max_score) {
    label = ci;
    max_score = score;
  }
}
剩下的就是对输出的3dbox进行赋值的操作了,最后的输出就是det_boxes3d。这里的接口函数是写成了一个类PostProcessCUDA,里面会输入整个CenterPointConfig,在构造函数里会对两个成员变量进行初始化。接口函数则是generateDetectedBoxes3D_launch,这里在调用的时候用到了一点CUDA的东西,之前的阈值和3DBOXES都是定义成vector的,这里用thrust::raw_pointer_cast把输入变成了指针
之后对所有的3D框进行处理,这里就是不停地判断-移动内存-判断-移动内存,最后的结果会给det_boxes3d
thrust::device_vector<Box3D> det_boxes3d_d(num_det_boxes3d);
thrust::copy_if(
  thrust::device, boxes3d_d_.begin(), boxes3d_d_.end(), det_boxes3d_d.begin(),
  is_score_greater(config_.score_threshold_));
// sort by score
thrust::sort(det_boxes3d_d.begin(), det_boxes3d_d.end(), score_greater());
// supress by NMS
thrust::device_vector<bool> final_keep_mask_d(num_det_boxes3d);
const auto num_final_det_boxes3d =
  circleNMS(det_boxes3d_d, config_.circle_nms_dist_threshold_, final_keep_mask_d, stream);
centerpoint_trt
这个是整个模型的一个部署的类,在CenterPointTRT类的构造函数中,初始化了很多成员变量
CenterPointTRT::CenterPointTRT(
  const NetworkParam & encoder_param, const NetworkParam & head_param,
  const DensificationParam & densification_param, const CenterPointConfig & config)
: config_(config)
{
  vg_ptr_ = std::make_unique<VoxelGenerator>(densification_param, config_); // 生成点云体素
  post_proc_ptr_ = std::make_unique<PostProcessCUDA>(config_);              // 后处理

  // encoder
  encoder_trt_ptr_ = std::make_unique<VoxelEncoderTRT>(config_, verbose_);  // 体素编码
  encoder_trt_ptr_->init(
    encoder_param.onnx_path(), encoder_param.engine_path(), encoder_param.trt_precision());
  encoder_trt_ptr_->context_->setBindingDimensions(
    0,
    nvinfer1::Dims3(
      config_.max_voxel_size_, config_.max_point_in_voxel_size_, config_.encoder_in_feature_size_));

  // head
  std::vector<std::size_t> out_channel_sizes = {
    config_.class_size_,        config_.head_out_offset_size_, config_.head_out_z_size_,
    config_.head_out_dim_size_, config_.head_out_rot_size_,    config_.head_out_vel_size_};
  head_trt_ptr_ = std::make_unique<HeadTRT>(out_channel_sizes, config_, verbose_);  // 头部处理
  head_trt_ptr_->init(head_param.onnx_path(), head_param.engine_path(), head_param.trt_precision());
  head_trt_ptr_->context_->setBindingDimensions(
    0, nvinfer1::Dims4(
         config_.batch_size_, config_.encoder_out_feature_size_, config_.grid_size_y_,
         config_.grid_size_x_));

  initPtr();  // 初始化一些数组,之后CUDA会调用对应的指针来访问数组

  cudaStreamCreate(&stream_);
}
然后也是分为预处理、推理和后处理三步
预处理preprocess中先把点云转换成了体素
bool is_success = vg_ptr_->enqueuePointCloud(input_pointcloud_msg, tf_buffer);
if (!is_success) {
  return false;
}
num_voxels_ = vg_ptr_->pointsToVoxels(voxels_, coordinates_, num_points_per_voxel_);
if (num_voxels_ == 0) {
  return false;
}
之后在确定数据有效之后,直接调用生成特征图的核函数接口
CHECK_CUDA_ERROR(generateFeatures_launch(
  voxels_d_.get(), num_points_per_voxel_d_.get(), coordinates_d_.get(), num_voxels_,
  config_.max_voxel_size_, config_.voxel_size_x_, config_.voxel_size_y_, config_.voxel_size_z_,
  config_.range_min_x_, config_.range_min_y_, config_.range_min_z_, encoder_in_features_d_.get(),
  stream_));
推理inference则是调用TensorRT库来执行推理的过程,这里分为了两个部分,一个是pillar encoder网络,用于将点云数据编码为特征;另一个是head网络,用于从特征中预测目标的位置和属性。
encoder_trt_ptr_->context_->enqueueV2(encoder_buffers.data(), stream_, nullptr);
接着,代码调用scatterFeatures_launch函数,将pillar encoder网络的输出特征散布到一个空间网格中。这个函数的参数包括pillar encoder网络的输出特征,点云数据的坐标,点云数据的数量,最大的体素大小,pillar encoder网络的输出特征大小,网格的大小,以及用于存储散布后的特征的设备内存。
然后,代码创建一个名为head_buffers的向量,用于存储head网络的输入和输出。并且调用推理:
head_trt_ptr_->context_->enqueueV2(head_buffers.data(), stream_, nullptr);
后处理postProcess则是根据输出的结果生成了Boxes3D,直接调用了接口
CHECK_CUDA_ERROR(post_proc_ptr_->generateDetectedBoxes3D_launch(
  head_out_heatmap_d_.get(), head_out_offset_d_.get(), head_out_z_d_.get(), head_out_dim_d_.get(),
  head_out_rot_d_.get(), head_out_vel_d_.get(), det_boxes3d, stream_));
至于detect就没什么好说的了,依次执行上边三个步骤就好了
node
终于看到node节点类了,首先加载了很多的参数
| Name | Type | Default Value | Description |
|---|---|---|---|
score_threshold |
float | 0.4 |
detected objects with score less than threshold are ignored |
densification_world_frame_id |
string | map |
the world frame id to fuse multi-frame pointcloud |
densification_num_past_frames |
int | 1 |
the number of past frames to fuse with the current frame |
trt_precision |
string | fp16 |
TensorRT inference precision: fp32 or fp16 |
encoder_onnx_path |
string | "" |
path to VoxelFeatureEncoder ONNX file |
encoder_engine_path |
string | "" |
path to VoxelFeatureEncoder TensorRT Engine file |
head_onnx_path |
string | "" |
path to DetectionHead ONNX file |
head_engine_path |
string | "" |
path to DetectionHead TensorRT Engine file |
iou_nms_target_class_names |
list[string] | - | target classes for IoU-based Non Maximum Suppression |
iou_nms_search_distance_2d |
double | - | If two objects are farther than the value, NMS isn’t applied. |
iou_nms_threshold |
double | - | IoU threshold for the IoU-based Non Maximum Suppression |
然后这里的订阅就是点云,输出就是检测到的objects
pointcloud_sub_ = this->create_subscription<sensor_msgs::msg::PointCloud2>(
  "~/input/pointcloud", rclcpp::SensorDataQoS{}.keep_last(1),
  std::bind(&LidarCenterPointNode::pointCloudCallback, this, std::placeholders::_1));
objects_pub_ = this->create_publisher<autoware_auto_perception_msgs::msg::DetectedObjects>(
  "~/output/objects", rclcpp::QoS{1});
然后具体的流程就在点云的回调函数里了,首先判断的是有多少对objects的订阅,没有订阅的时候就没必要执行了
const auto objects_sub_count =
  objects_pub_->get_subscription_count() + objects_pub_->get_intra_process_subscription_count();
if (objects_sub_count < 1) {
  return;
}
然后整个神经网络的流程直接调用detect
bool is_success = detector_ptr_->detect(*input_pointcloud_msg, tf_buffer_, det_boxes3d);
然后把得到的box3D变成object
for (const auto & box3d : det_boxes3d) {
  autoware_auto_perception_msgs::msg::DetectedObject obj;
  box3DToDetectedObject(box3d, class_names_, has_twist_, obj);
  raw_objects.emplace_back(obj);
}
- 之后才是执行NMS步骤,所以我之前理解circleNMS是挑出来要执行NMS的物体的理解应该是对的。最后就是把消息发布出去了,这里还是每太想明白
detection_class_remapper_这个的作用,这个是把output_msg中objects的classification.label赋值了,所以真的就是这么个作用么?
single_inference_node
这里可以看到,直接在构造函数里就执行detect函数了
detect(pcd_path, detections_path);
这个函数内部则是会调用detector_ptr_->detect(msg, tf_buffer_, det_boxes3d);来执行整个推理检测的过程。
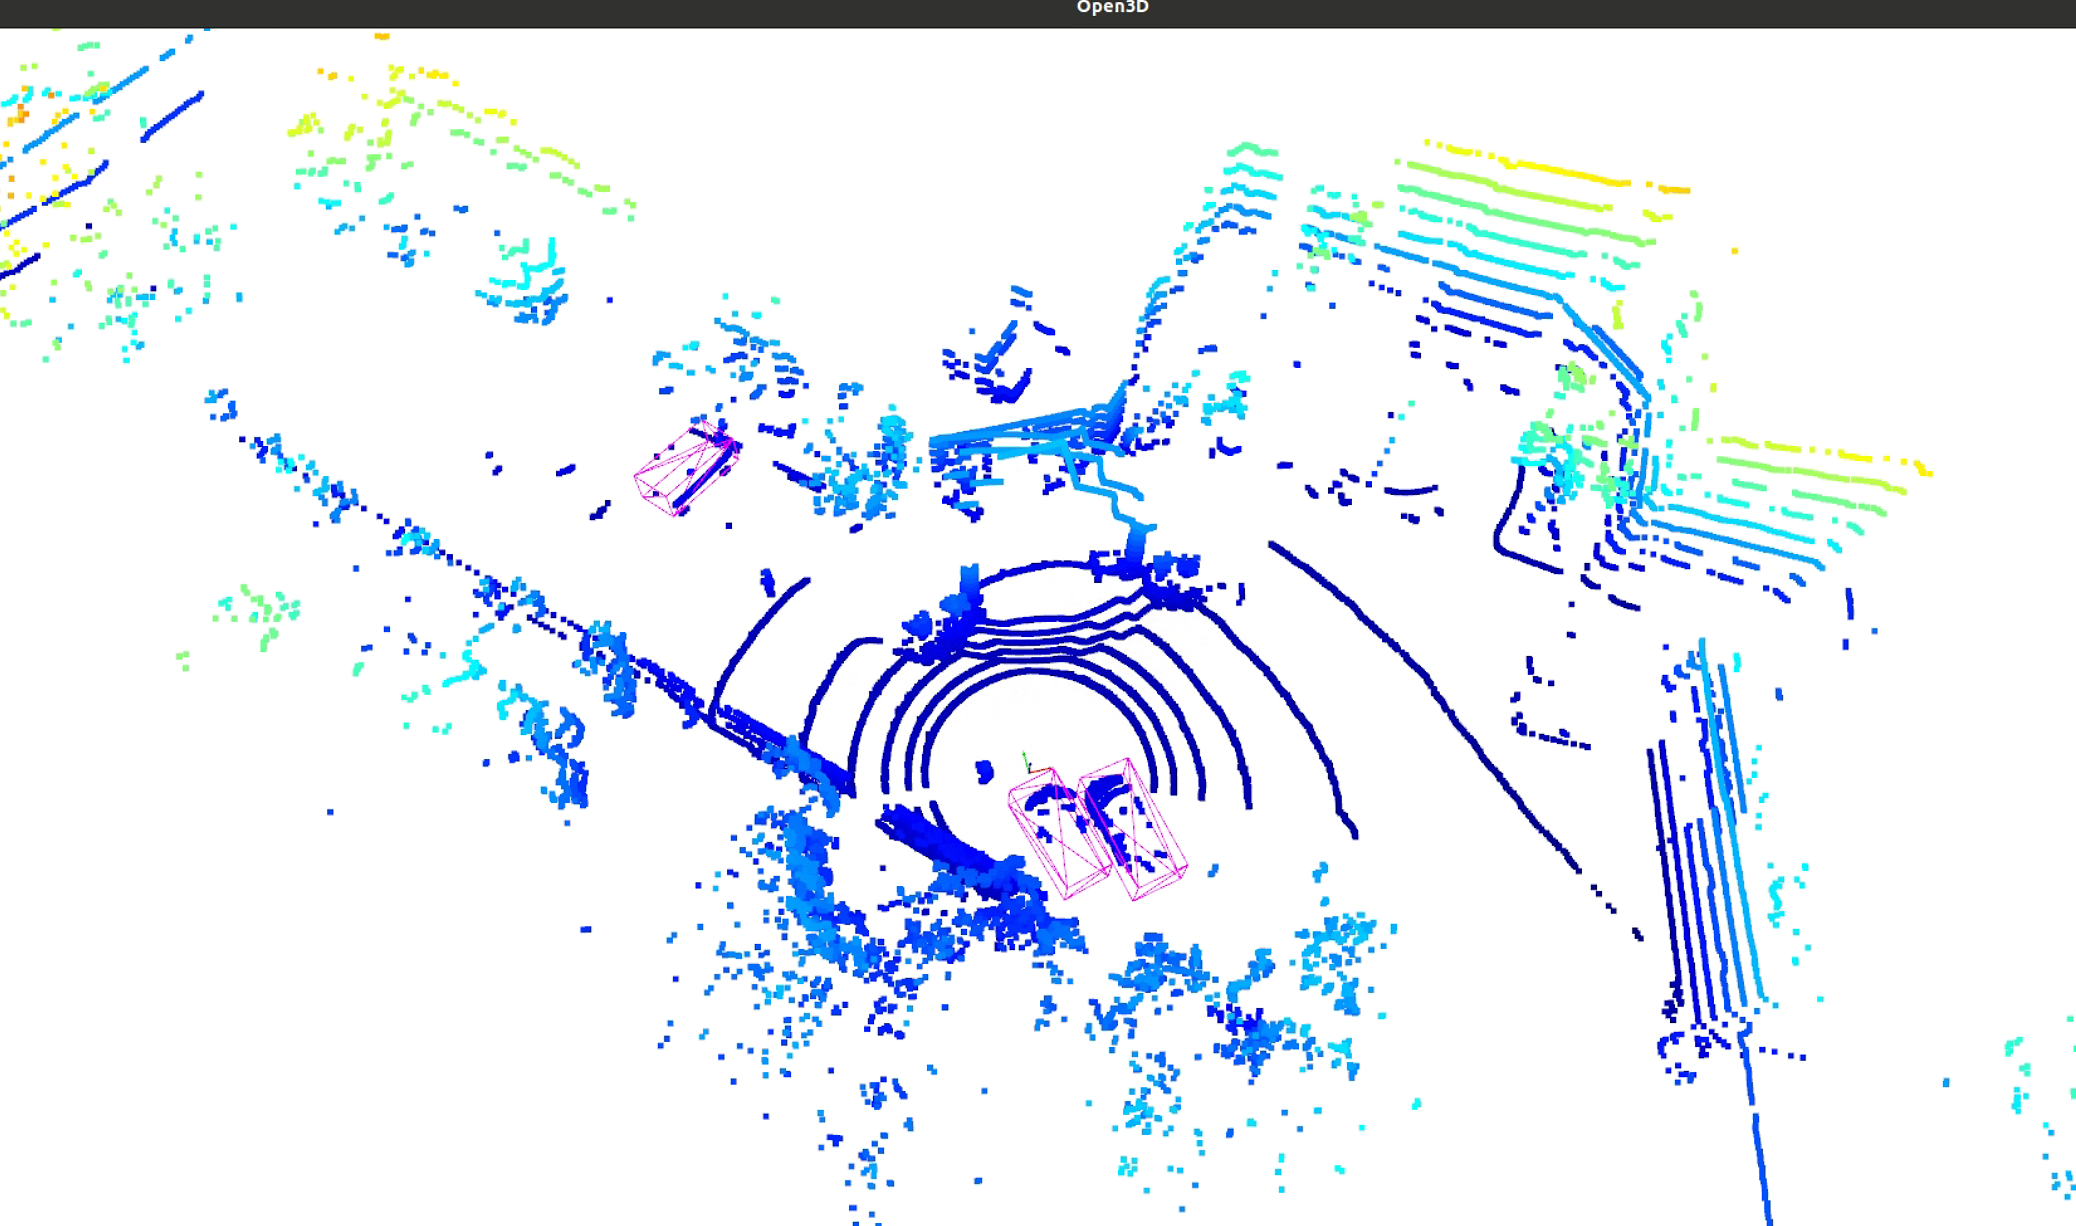
之后会执行dumpDetectionsAsMesh函数,这个就是存储对应的检测结果的部分了,这里就不过多记录。这个其实相当于是个测试的节点,就是对整个流程进行单次的调用,这里的launch文件都已经写好了,正好之前上高博的课的时候,高博有给过一些点云数据,这里直接拿来用一下,跑出来的效果大概就是这样的,可以看到几个车虽然点云不是很密集,但是都提取出来了
- 但是我生成ply结果文件的地方一直报错,因为感觉不是很重要,这里就暂时没管
lidar_centerpoint_tvm
接下来来看使用tvm部署的部分,不过这里有一个问题就是tvm部署在我看的这个galatic分支下似乎是有点问题的,和最新版的不太一样,目前还没找到具体怎么解决,所以还是先看一下代码,后边机会的话再实际移植或者想想办法试一下吧。然后这里也是有很多东西和上一个没什么区别的,这里重点记录一下有区别的一些东西吧
并行处理的区别
之前使用TensorRT实现的部署,所以用到了TensorRT库以及进行了CUDA编程的操作,而这里进行并行处理的时候,是使用到了threadPool来进行多线程的一个操作,当然具体的线程数也是要计算得到的
for (std::size_t idx = 0; idx < THREAD_NUM_VFE; idx++) {
  std::thread worker(
    generateFeatures_worker, std::ref(voxel_features), std::ref(voxel_num_points),
    std::ref(coords), num_voxels, std::ref(config), std::ref(features), idx, pillars_per_thread);
  threadPool.push_back(std::move(worker));
}
for (std::size_t idx = 0; idx < THREAD_NUM_VFE; idx++) {
  threadPool[idx].join();
}
至于这些函数之间的原理是没什么区别的,只是单纯的对线程的操作不同了。还有就是因为线程数变了,也没有block这个概念了,所以一些访问的下标也就跟着变了
centerpoint_tvm
之前有提过,这里的网络是分为了两个部分,一个是体素编码的网络VoxelEncoder,另一个则是推理处理的网络BackboneNeckHead,这里使用到了common/tvm_utility,所以分别定义了两个网络格子的预处理和后处理类,即tvm_utility::pipeline::PreProcessor和tvm_utility::pipeline::PostProcessor。
然后我们可以看到,其实在对应的地方都只是调用对应的函数就好了,整体流程是通过CenterPointTVM::detect函数来实现的,这里也是分别调用两个tvm_utility::pipeline::Pipeline对象就好了
bool CenterPointTVM::detect(
  const sensor_msgs::msg::PointCloud2 & input_pointcloud_msg, const tf2_ros::Buffer & tf_buffer,
  std::vector<Box3D> & det_boxes3d)
{
  std::fill(voxels_->begin(), voxels_->end(), 0);
  std::fill(coordinates_->begin(), coordinates_->end(), -1);
  std::fill(num_points_per_voxel_->begin(), num_points_per_voxel_->end(), 0);

  if (!preprocess(input_pointcloud_msg, tf_buffer)) { // 预处理
    RCLCPP_WARN_STREAM(
      rclcpp::get_logger("lidar_centerpoint"), "Fail to preprocess and skip to detect.");
    return false;
  }

  MixedInputs voxel_inputs{num_voxels_, *voxels_, *num_points_per_voxel_, *coordinates_};
  auto ve_output = ve_pipeline->schedule(voxel_inputs);     // 预测(encoder)

  MixedInputs pillar_inputs{num_voxels_, *ve_output, *num_points_per_voxel_, *coordinates_};
  auto bnh_output = bnh_pipeline->schedule(pillar_inputs);  // 预测(backboneneckhead)

  det_boxes3d = bnh_output;
  if (det_boxes3d.size() == 0) {
    RCLCPP_WARN_STREAM(rclcpp::get_logger("lidar_centerpoint_tvm"), "No detected boxes.");
  }

  return true;
}
问题分析
这里自己一直在说TVM没有部署好,那么这里就来仔细看一下具体是什么问题,其实在之前的common/tvm_utility中,是有使用过基于TVM部署的YOLO的,那么那个文件夹中除了模型之外,还有一个很核心的内容就是

没错,就是这个头文件内容,这里面是找不到的

那么这两个头文件又应该来自哪里呢?根据我努力地搜索,最后找到了这样一段话

OK,那么我们就去这个Model Zoo里面看一下,果然,里面其实是为自动驾驶中可能用到的各种神经网络准备的生成模型的地方啊!可以看到里面的onnx都在,所以理论上如果想要进行模型的部署,可以使用Model Zoo这个库预处理得到tvm处理好的东西,然后这里再直接调用就好了
然而另一个悲催的事情出现了,我无论如何都搞不好这个库。。主要里面需要用到docker,但这个docker镜像我又装不上。。在执行build.sh的时候,会报错
failed to solve: process "/bin/sh -c pip3 install --no-cache-dir --upgrade pip && pip3 install --no-cache-dir jinja2 onnx pytest pyyaml \"numpy<1.20.0,>=1.19.0\" \"tensorflow==2.7.*\"" did not complete successfully:
所以这里应该就是安装这几个库的时候网络连接超时,可以说是国内的老毛病了。这里既然直接这么装不行,那就用国内的源一个一个装好试一下,指定源也很简单,在后边加上链接就好了
pip3 install --no-cache-dir "tensorflow==2.7.*" -i https://pypi.tuna.tsinghua.edu.cn/simple
然后分开下又遇到了一个新的问题,就是几个库的版本可能会不兼容。所以兜兜转转我又去改Dockerfile了。然后网络问题解决了之后,又是奇奇怪怪的报错。。实在是有点费精力,所以暂时还没搞完
总的来说明白问题出现在哪里了,想要用这里的tvm的话就得自己先预训练好库和头文件,就上边那个图片展示的那种结构,然后应该就可以用了。不过这个模型的库现在我构建不出来,所以后边如果需要部署的时候,就是这里的库想办法构建出来就好了,不过这个应该也是个很复杂的总做就是了。。