一、字符设备驱动开发步骤
- 驱动模块的加载和卸载(将驱动编译模块,insmod加载驱动运行)
- 字符设备注册与注销(我们的驱动实际上是去操作底层的硬件,所以需要向系统注册一个设备,告诉Linux系统,我有这个设备,当驱动模块加载的时候我们去注册设备,当驱动模块卸载的时候我们注销设备)
- 实现设备的具体操作函数(我们注册完设备后,需要对设备进行读写操作,是通过一个结构体来进行的)
- 添加LICENSE 和作者信息
通过上面的字符设备的驱动开发步骤的了解,其实我们只需要掌握每一种设备的驱动框架按照框架去进行开发就行
1.1 设备号
Linux中每个设备都有一个设备号,设备号由主设备号和次设备号两部分组成,主设备号表示某一个具体的驱动,次设备号表示使用这个驱动的各个设备。 Linux提供了一个名为 dev_t的数据类型表示设备号
//设备号数据类型在内核中的定义
typedef __u32 __kernel_dev_t;
typedef __kernel_dev_t dev_t;
typedef unsigned int __u32;
//可以看到设备号就是一个u32的数据类型
32位的数据构成了主设备号和次设备号两部分,其中高12位为主设备号, 低 20位为次设备号。因此 Linux系统中主设备号范围为 0~4095
1.2 设备号的分配
(1)静态分配设备号
使用“ cat /proc/devices”命令即可查看当前系统中所有已经使用了的设备号,选择一个没有被使用的设备号进行使用即可
(2)动态分配设备号
设备号申请函数和设备号释放函数
/*
* alloc_chrdev_region() - register a range of char device numbers
 * @dev: output parameter for first assigned number
 * @baseminor: first of the requested range of minor numbers
 * @count: the number of minor numbers required
 * @name: the name of the associated device or driver
*/
int alloc_chrdev_region(dev_t *dev, unsigned baseminor, unsigned count,
			const char *name)
/*
 * __register_chrdev() - create and register a cdev occupying a range of minors
 * @major: major device number or 0 for dynamic allocation
 * @baseminor: first of the requested range of minor numbers
 * @count: the number of minor numbers required
 * @name: name of this range of devices
 * @fops: file operations associated with this devices
*/
int __register_chrdev(unsigned int major, unsigned int baseminor,
		      unsigned int count, const char *name,
		      const struct file_operations *fops)
1.3 file_operations
file_operations结构体就是设备的具体操作函数
struct file_operations {
	struct module *owner;
	loff_t (*llseek) (struct file *, loff_t, int);
	ssize_t (*read) (struct file *, char __user *, size_t, loff_t *);
	ssize_t (*write) (struct file *, const char __user *, size_t, loff_t *);
	ssize_t (*read_iter) (struct kiocb *, struct iov_iter *);
	ssize_t (*write_iter) (struct kiocb *, struct iov_iter *);
	int (*iterate) (struct file *, struct dir_context *);
	unsigned int (*poll) (struct file *, struct poll_table_struct *);
	long (*unlocked_ioctl) (struct file *, unsigned int, unsigned long);
	long (*compat_ioctl) (struct file *, unsigned int, unsigned long);
	int (*mmap) (struct file *, struct vm_area_struct *);
	int (*mremap)(struct file *, struct vm_area_struct *);
	int (*open) (struct inode *, struct file *);
	int (*flush) (struct file *, fl_owner_t id);
	int (*release) (struct inode *, struct file *);
	int (*fsync) (struct file *, loff_t, loff_t, int datasync);
	int (*aio_fsync) (struct kiocb *, int datasync);
	int (*fasync) (int, struct file *, int);
	int (*lock) (struct file *, int, struct file_lock *);
	ssize_t (*sendpage) (struct file *, struct page *, int, size_t, loff_t *, int);
	unsigned long (*get_unmapped_area)(struct file *, unsigned long, unsigned long, unsigned long, unsigned long);
	int (*check_flags)(int);
	int (*flock) (struct file *, int, struct file_lock *);
	ssize_t (*splice_write)(struct pipe_inode_info *, struct file *, loff_t *, size_t, unsigned int);
	ssize_t (*splice_read)(struct file *, loff_t *, struct pipe_inode_info *, size_t, unsigned int);
	int (*setlease)(struct file *, long, struct file_lock **, void **);
	long (*fallocate)(struct file *file, int mode, loff_t offset,
			  loff_t len);
	void (*show_fdinfo)(struct seq_file *m, struct file *f);
#ifndef CONFIG_MMU
	unsigned (*mmap_capabilities)(struct file *);
#endif
};
二、实战之驱动文件的编写
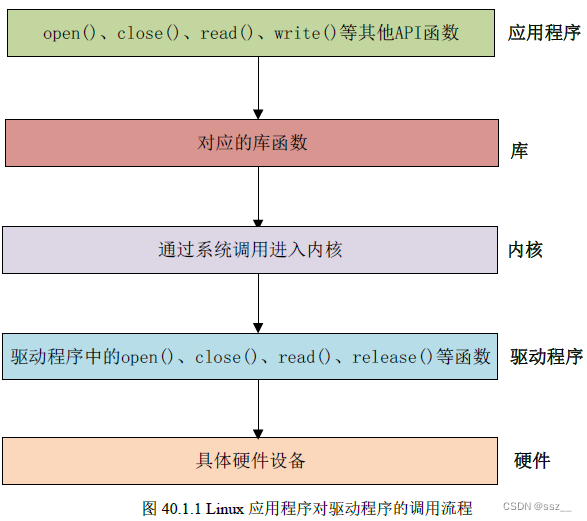
2.1 应用程序与驱动程序的交互方式
Linux 应用程序对驱动程序的调用

在Linux 中一切皆为文件,驱动加载成功以后会在“/dev”目录下生成一个相应的文件,应用程序通过对这个名为“/dev/xxx”(xxx 是具体的驱动文件名字)的文件进行相应的操作即可实现对硬件的操作。
应用程序运行在用户空间,而Linux 驱动属于内核的一部分,因此驱动运行于内核空间。当我们在用户空间想要实现对内核的操作,比如使用open 函数打开/dev/led 这个驱动,因为用户空间不能直接对内核进行操作,因此必须使用一个叫做“系统调用”的方法来实现从用户空间“陷入”到内核空间,这样才能实现对底层驱动的操作。
应用程序运行在用户空间,驱动是属于内核的一部分;我们的应用程序想对内核空间进行操作,就需要通过系统调用的方式(例如下面用户空间的open就需要通过系统调用,来通过file_operations结构体里面的open对设备进行具体)

2.2 驱动中的open、close、read、release函数介绍
/*
 * @description		: 打开设备
 * @param - inode 	: 传递给驱动的inode
 * @param - filp 	: 设备文件,file结构体有个叫做private_data的成员变量
 * 					  一般在open的时候将private_data指向设备结构体。
 * @return 			: 0 成功;其他 失败
 */
static int chrdevbase_open(struct inode *inode, struct file *filp);

/*
 * @description		: 从设备读取数据
 * @param - filp 	: 要打开的设备文件(文件描述符)
 * @param - buf 	: 返回给用户空间的数据缓冲区
 * @param - cnt 	: 要读取的数据长度
 * @param - offt 	: 相对于文件首地址的偏移
 * @return 			: 读取的字节数,如果为负值,表示读取失败
 */
static ssize_t chrdevbase_read(struct file *filp, char __user *buf, size_t cnt, loff_t *offt);

/*
 * @description		: 向设备写数据
 * @param - filp 	: 设备文件,表示打开的文件描述符
 * @param - buf 	: 要写给设备写入的数据
 * @param - cnt 	: 要写入的数据长度
 * @param - offt 	: 相对于文件首地址的偏移
 * @return 			: 写入的字节数,如果为负值,表示写入失败
 */
static ssize_t chrdevbase_write(struct file *filp, const char __user *buf, size_t cnt, loff_t *offt);

/*
 * @description		: 关闭/释放设备
 * @param - filp 	: 要关闭的设备文件(文件描述符)
 * @return 			: 0 成功;其他 失败
 */
static int chrdevbase_release(struct inode *inode, struct file *filp);
2.3 内核区与用户区数据交互
驱动不能直接访问应用程序的数据,应用程序也不能直接访问内核数据,必须借助其他函数
unsigned long copy_from_user(void *to, const void *from, unsigned long n);
//将用户空间的数据复制到内核空间

unsigned long copy_to_user(void *to, const void *from, unsigned long n);
//将内核空间的数据复制到用户空间
所以,我们的内核read的时候,应该使用copy_to_user;内核write的时候,应该使用copy_from_user;
2.4 chrdevbase.c和 chrdevbaseAPP.c
chrdevbase.c
#include <linux/init.h> //包含宏定义的头文件(printk的头文件)
#include <linux/module.h> //包含初始化加载模块的头文件
#include <linux/fs.h>//注册设备和注销设备的头文件
#include<linux/kernel.h>
#include <linux/ide.h>
#include <linux/types.h>

#define CHRDEVBASE_MAJOR 200 //主设备号
#define CHRDEVBASE_NAME  "chrdevbase"//设备名字

/*驱动不能直接访问应用程序的数据,应用程序也不能直接访问内核数据,必须借助其他函数(copy_from_user\copy_to_user)*/

/*我们的应用程序需要从驱动中去读取数据,并且还要向驱动写数据*/
    static char kenelreadbuf[100],kenelwritebuf[100];//我们驱动的读写缓冲区,file_operation结构体就是操作这两个
    static char keneldata[]={"keneldata data!"};//内核的数据,我们驱动read的时候就是把这个字符串返给应用程序


//从设备读数据
static ssize_t chrdevbase_read(struct file *filp, __user char *buf, size_t count,loff_t *ppos){
/*参数解释:
filp:要打开的设备文件(文件描述符),也就是驱动文件的fd,因为我们是应用程序去read驱动的数据
buf:发送的数据就发送到buf里面去(我们的应用程序提供了一个buf,我们的驱动程序写到那个buf里面去)
count:驱动程序需要向应用程序发送多少个字节的数据
*/

    int ret=0;

    memcpy(kenelreadbuf,keneldata,sizeof(keneldata));//把keneldata中的数据拷贝到kenelreadbuf中,最后一个参数是拷贝的长度

    ret=copy_to_user(buf,kenelreadbuf,count);//把内核数据给应用程序,函数中的buf和count都是由应用程序决定,返回值为0表示成功

	if(ret == 0){
        printk("kernel send data :%s\r\n",kenelreadbuf);
	}else{
		printk("kernel send data failed!\r\n");
	}

    return 0;
}
//向设备写数据(应用程序把数据写给驱动程序)
static ssize_t chrdevbase_write(struct file *filp, const char __user *buf,size_t count, loff_t *ppos){
    int ret=0;

    ret=copy_from_user(kenelwritebuf,buf,count);//把应用程序的数据给驱动,函数中的buf和count都是由应用程序决定

    if(ret == 0){
		printk("kernel receive data :%s\r\n",kenelwritebuf);
	}else{
		printk("kernel receive data failed!\r\n");
	}

    return 0;
}
//打开设备
static int chrdevbase_open(struct inode *inode, struct file *filp){
    return 0;
}
//关闭设备
static int chrdevbase_close(struct inode *inode, struct file *filp){
    return 0;
}
/*
字符设备:操作集合
*/
static const struct file_operations chrdevbase_fops = {
	.owner	= THIS_MODULE,//owner拥有该结构体的模块的指针,一般设置为 THIS_MODULE
	.read	= chrdevbase_read,
	.write	= chrdevbase_write,
	.open	= chrdevbase_open,
	.release= chrdevbase_close,
};

//驱动入口函数
static int __init chrdevbase_init(void)
{
     int ret=0;
    /*
    注册字符设备驱动函数:主设备号、设备名字、file_operations结构体
    */
    ret = register_chrdev(CHRDEVBASE_MAJOR, CHRDEVBASE_NAME, &chrdevbase_fops);
    //使用这个函数注册时,会把当前主设备号下的所有次设备号给占用
	if (ret<0)
    {
        printk("chrdevbase init failed!\r\n");
    }
    printk("module_init!\r\n");
    return 0;
}
//驱动出口函数
static void __exit chrdevbase_exit(void)
{
    //注销字符设备驱动
    unregister_chrdev(CHRDEVBASE_MAJOR,CHRDEVBASE_NAME);
    printk("module_exit!\r\n");
};
/*模块的出口与入口*/
module_init(chrdevbase_init);
module_exit(chrdevbase_exit);

MODULE_AUTHOR("Chao");//作者是谁
MODULE_LICENSE("GPL");//开源协议
chrdevbaseAPP.c
int atoi(const char *nptr);把输入的字符串转化为整型变量,因为我们的最后一个字符串1、2分别代表了对驱动设备的读写
#include "stdio.h"
#include "unistd.h"
#include "sys/types.h"
#include "sys/stat.h"
#include "fcntl.h"
#include "stdlib.h"
#include "string.h"

/*
/dev/chardevbase:驱动最终表现就是/dev/xxx文件,对文件的读写、打开关闭
argc:应用程序参数
argv[]:具体的参数内容,是以字符串形式
./chrdevbaseAPP  <filename>  <1:2>
./chrdevbaseAPP /dev/chardevbase 1表示向驱动里面读数据
./chrdevbaseAPP /dev/chardevbase 2表示向驱动里面写数据
*/
int main(int argc,char*argv[]){
    int ret=0;
    int fd=0;
    char*filename;//输入的字符串
    char readbuf[100],writebuf[100];
    static char usrdata[]={"usr data!"};

    if (argc!=3)//如果输入的参数不足三个打印错误
    {
        printf("Error usage!\r\n");
        return -1;
    }

    filename=argv[1];//驱动文件就是/dev/chardevbase,也就是输入的第二个字符串

    fd=open(filename,O_RDWR);//打开驱动文件
    if(fd < 0){
		printf("Can't open file %s\r\n", filename);
		return -1;
	}
if (atoi(argv[2])==1)//判断是不是读操作,atoi把字符串转化为整型变量
{
    //从驱动中读取数据
    ret = read(fd, readbuf, 50);//返回值是实际读取到的字节数
    /*这里我们从驱动中读取50个字节,把内容写到readbuf中*/
    if(ret < 0){
        printf("read file %s failed!\r\n", filename);
    }else{
        /*  读取成功,打印出读取成功的数据 */
        printf("read data:%s\r\n",readbuf);
    }

}


if (atoi(argv[2])==2){
    memcpy(writebuf,usrdata,sizeof(usrdata));//把usrdata内容拷贝到writebuf中
    //向驱动中写数据
    ret = write(fd, writebuf, 50);//返回值是实际写入的字节数
    /*这里我们从buf中的50个字节,把内容写到驱动中*/
    if(ret < 0){
        printf("write file %s failed!\r\n", filename);
    }else{
        /*  写入成功,打印出写入成功的数据 */
        printf("write data:%s\r\n",writebuf);
    }

}

	/* 关闭设备 */
	ret = close(fd);
	if(ret < 0){
		printf("Can't close file %s\r\n", filename);
		return -1;
	}

    return 0;
}
三、测试运行
(1)编译chrdevbase.c生成chrdevbase.ko文件
![]()
(2)编译 chrdevbaseAPP.c使用交叉编译工具链编程成chrdevbaseAPP可执行文件
arm-linux-gnueabihf-gcc chrdevbaseAPP.c -o chrdevbaseAPP(3)ls查看编译后的驱动文件和应用程序文件

(4)拷贝到/home/alientek/linux/nfs/rootfs/lib/modules/4.1.15文件下
这里存放着.ko文件
sudo cp chrdevbase.ko chrdevbaseAPP /home/alientek/linux/nfs/rootfs/lib/modules/4.1.15 -f
我们这里是使用nfs挂载根文件系统,所以我们使用串口终端去查看该目录下有没有对应的文件

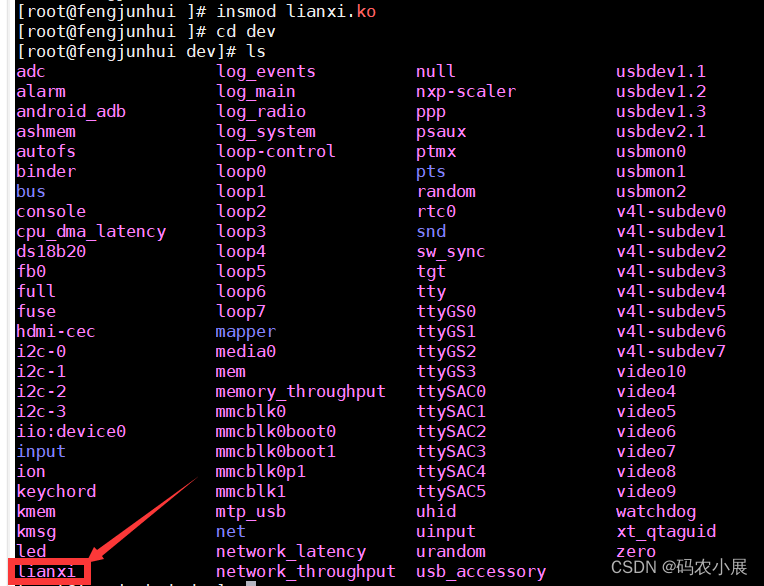
(5)加载驱动modprobe chrdevbase.ko

(6)输入命令“ cat /proc/devices”可以注册的设备号、设备名字是否正确
我们在模块加载时,已经注册字符设备,我们使用这个命令来看看内核中是否有200这个设备号,设备名字是否正确

(7) 创建设备节点文件
在 Linux 内核中,当使用
register_chrdev()函数,注册一个字符设备时,您实际上是在内核中注册了该设备的存在,并为其分配了一个主设备号;这个注册过程确保了内核知道如何处理对该设备的操作请求,但它并不在文件系统中创建任何可见的设备文件。设备文件(如
/dev/chrdevbase)是用户空间与内核中设备驱动程序进行交互的接口。这些文件不是普通的文件,而是特殊文件,通常称为设备特殊文件或设备节点。当您在用户空间中对这些文件执行读写操作时,内核会将这些操作转换为对相应设备驱动程序的调用。
因此,即使已经在内核中注册了设备并为其分配了主设备号,仍然需要在文件系统中创建对应的设备文件,以便用户空间程序能够访问它。这就是为什么在注册字符设备之后,还需要用 mknod 命令来创建设备文件的原因。
创建设备文件节点
mknod /dev/chrdevbase c 200 0![]()
其中“ mknod”是创建节点命令 ,“/dev/chrdevbase”是要创建的节点文件 c”表示这是个字符设备,“ 200”是设备的主设备号 0”是设备的次设备号。创建完成以后就会存在
查看/dev/目录下有没有对应的驱动文件(chrdevbase )
ls /dev/chrdevbase -l结果

(8)运行chrdevbaseAPP可执行文件
./chrdevbaseAPP /dev/chrdevbase 1 (向驱动中去读数据)

./chrdevbaseAPP /dev/chrdevbase 2 (向驱动中去写数据)

至此我们的字符设备驱动开发流程结束


![[图解]企业应用架构模式2024新译本讲解21-数据映射器3](https://img-blog.csdnimg.cn/direct/c25d74519d5a4690871c47a099d90e2d.png)


![和Bug较劲的第n天:[Error: Unable to open snapshot file: No such file or directory]](https://i-blog.csdnimg.cn/direct/488a032b2f024adf9d62a1211a7b4208.png)


