网络介绍
在ResNet网络提出之前,传统的卷积神经网络都是将一系列的卷积层和池化层堆叠得到的,但当网络堆叠到一定深度时,就会出现退化问题。
数据可视化
import matplotlib.pyplot as plt
import numpy as np

data_iter = next(dataset_train.create_dict_iterator())

images = data_iter["image"].asnumpy()
labels = data_iter["label"].asnumpy()
print(f"Image shape: {images.shape}, Label shape: {labels.shape}")

# 训练数据集中,前六张图片所对应的标签
print(f"Labels: {labels[:6]}")

classes = []

with open(data_dir + "/batches.meta.txt", "r") as f:
    for line in f:
        line = line.rstrip()
        if line:
            classes.append(line)

# 训练数据集的前六张图片
plt.figure()
for i in range(6):
    plt.subplot(2, 3, i + 1)
    image_trans = np.transpose(images[i], (1, 2, 0))
    mean = np.array([0.4914, 0.4822, 0.4465])
    std = np.array([0.2023, 0.1994, 0.2010])
    image_trans = std * image_trans + mean
    image_trans = np.clip(image_trans, 0, 1)
    plt.title(f"{classes[labels[i]]}")
    plt.imshow(image_trans)
    plt.axis("off")
plt.show()

部分网络实现
Building Block结构
from typing import Type, Union, List, Optional
import mindspore.nn as nn
from mindspore.common.initializer import Normal

# 初始化卷积层与BatchNorm的参数
weight_init = Normal(mean=0, sigma=0.02)
gamma_init = Normal(mean=1, sigma=0.02)

class ResidualBlockBase(nn.Cell):
    expansion: int = 1  # 最后一个卷积核数量与第一个卷积核数量相等

    def __init__(self, in_channel: int, out_channel: int,
                 stride: int = 1, norm: Optional[nn.Cell] = None,
                 down_sample: Optional[nn.Cell] = None) -> None:
        super(ResidualBlockBase, self).__init__()
        if not norm:
            self.norm = nn.BatchNorm2d(out_channel)
        else:
            self.norm = norm

        self.conv1 = nn.Conv2d(in_channel, out_channel,
                               kernel_size=3, stride=stride,
                               weight_init=weight_init)
        self.conv2 = nn.Conv2d(in_channel, out_channel,
                               kernel_size=3, weight_init=weight_init)
        self.relu = nn.ReLU()
        self.down_sample = down_sample

    def construct(self, x):
        """ResidualBlockBase construct."""
        identity = x  # shortcuts分支

        out = self.conv1(x)  # 主分支第一层:3*3卷积层
        out = self.norm(out)
        out = self.relu(out)
        out = self.conv2(out)  # 主分支第二层:3*3卷积层
        out = self.norm(out)

        if self.down_sample is not None:
            identity = self.down_sample(x)
        out += identity  # 输出为主分支与shortcuts之和
        out = self.relu(out)

        return out
BottleNet模块
class ResidualBlock(nn.Cell):
    expansion = 4  # 最后一个卷积核的数量是第一个卷积核数量的4倍

    def __init__(self, in_channel: int, out_channel: int,
                 stride: int = 1, down_sample: Optional[nn.Cell] = None) -> None:
        super(ResidualBlock, self).__init__()

        self.conv1 = nn.Conv2d(in_channel, out_channel,
                               kernel_size=1, weight_init=weight_init)
        self.norm1 = nn.BatchNorm2d(out_channel)
        self.conv2 = nn.Conv2d(out_channel, out_channel,
                               kernel_size=3, stride=stride,
                               weight_init=weight_init)
        self.norm2 = nn.BatchNorm2d(out_channel)
        self.conv3 = nn.Conv2d(out_channel, out_channel * self.expansion,
                               kernel_size=1, weight_init=weight_init)
        self.norm3 = nn.BatchNorm2d(out_channel * self.expansion)

        self.relu = nn.ReLU()
        self.down_sample = down_sample

    def construct(self, x):

        identity = x  # shortscuts分支

        out = self.conv1(x)  # 主分支第一层:1*1卷积层
        out = self.norm1(out)
        out = self.relu(out)
        out = self.conv2(out)  # 主分支第二层:3*3卷积层
        out = self.norm2(out)
        out = self.relu(out)
        out = self.conv3(out)  # 主分支第三层:1*1卷积层
        out = self.norm3(out)

        if self.down_sample is not None:
            identity = self.down_sample(x)

        out += identity  # 输出为主分支与shortcuts之和
        out = self.relu(out)

        return out在这里插入代码片
模型训练
# 开始循环训练
print("Start Training Loop ...")

for epoch in range(num_epochs):
    curr_loss = train(data_loader_train, epoch)
    curr_acc = evaluate(data_loader_val)

    print("-" * 50)
    print("Epoch: [%3d/%3d], Average Train Loss: [%5.3f], Accuracy: [%5.3f]" % (
        epoch+1, num_epochs, curr_loss, curr_acc
    ))
    print("-" * 50)

    # 保存当前预测准确率最高的模型
    if curr_acc > best_acc:
        best_acc = curr_acc
        ms.save_checkpoint(network, best_ckpt_path)

print("=" * 80)
print(f"End of validation the best Accuracy is: {best_acc: 5.3f}, "
      f"save the best ckpt file in {best_ckpt_path}", flush=True)
推理结果可视化
import matplotlib.pyplot as plt
def visualize_model(best_ckpt_path, dataset_val):
num_class = 10 # 对狼和狗图像进行二分类
net = resnet50(num_class)
# 加载模型参数
param_dict = ms.load_checkpoint(best_ckpt_path)
ms.load_param_into_net(net, param_dict)
# 加载验证集的数据进行验证
data = next(dataset_val.create_dict_iterator())
images = data["image"]
labels = data["label"]
# 预测图像类别
output = net(data['image'])
pred = np.argmax(output.asnumpy(), axis=1)
# 图像分类
classes = []
with open(data_dir + "/batches.meta.txt", "r") as f:
for line in f:
line = line.rstrip()
if line:
classes.append(line)
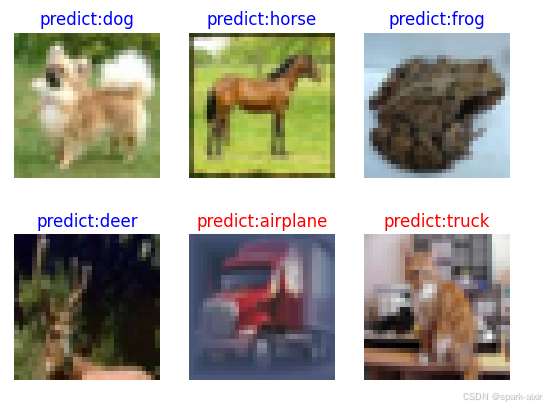
# 显示图像及图像的预测值
plt.figure()
for i in range(6):
plt.subplot(2, 3, i + 1)
# 若预测正确,显示为蓝色;若预测错误,显示为红色
color = 'blue' if pred[i] == labels.asnumpy()[i] else 'red'
plt.title('predict:{}'.format(classes[pred[i]]), color=color)
picture_show = np.transpose(images.asnumpy()[i], (1, 2, 0))
mean = np.array([0.4914, 0.4822, 0.4465])
std = np.array([0.2023, 0.1994, 0.2010])
picture_show = std * picture_show + mean
picture_show = np.clip(picture_show, 0, 1)
plt.imshow(picture_show)
plt.axis('off')
plt.show()
# 使用测试数据集进行验证
visualize_model(best_ckpt_path=best_ckpt_path, dataset_val=dataset_val)
学习总结
经学习,对resnet网络的优缺点进行总结,其中
优点
- 残差学习:ResNet引入了残差学习框架,允许网络学习输入和输出之间的残差函数,而不是直接学习映射关系,这使得网络能够训练更深的架构。
- 解决梯度消失问题:通过使用残差连接,ResNet缓解了深层网络训练中的梯度消失问题,使得网络可以有效地进行反向传播。
- 简化训练过程:ResNet的架构简化了网络的训练过程,因为每一层只需要学习输入和输出的残差,而不是整个映射。
- 提高性能:在多个视觉识别任务中,ResNet展示了其卓越的性能,包括ImageNet和COCO竞赛。
- 易于扩展:ResNet的设计允许通过简单地增加层的数量来扩展网络的深度,而无需重新设计网络架构。
- 泛化能力:ResNet在多种数据集和任务上展示了良好的泛化能力。
不足
- 计算资源消耗:由于ResNet包含大量的层,它需要较多的计算资源和内存,这可能限制了其在资源受限的环境中的应用。
- 过拟合风险:在数据量较小的情况下,ResNet由于其复杂性可能会过拟合,尤其是在没有足够正则化的情况下。
- 训练时间:相比于较浅的网络,ResNet的训练时间更长,因为它有更多的参数和层需要优化。
- 参数数量:ResNet的参数数量较多,这可能导致模型在某些任务上不够高效。
- 对超参数敏感:ResNet的性能可能对超参数(如学习率、批量大小等)的选择较为敏感,需要仔细调整以获得最佳性能。
此章节学习到此结束,感谢昇思平台。