一 图像轮廓
具有相同颜色或强度的连续点的曲线。
图像轮廓的作用
可以用于图像分析
物体的识别与检测
注意
为了检测的准确性,需要先对图像进行二值化或Canny操作。
画轮廓时会修改输入的图像。
轮廓查找的API
findContours(img,mode,ApproximationMode,...)
两个返回值,contours和hierarchy
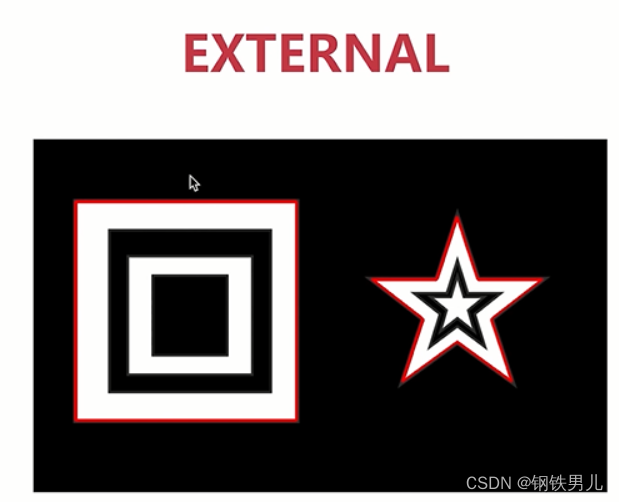
mode
RETR_EXTERNAL=0,表示只检测外轮廓。
RETR_LIST=1,检测的轮廓不建立等级关系
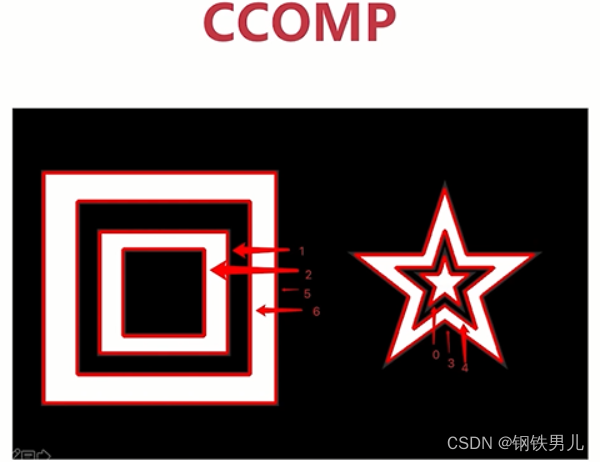
RETR_CCOMP=2,每层最多两级
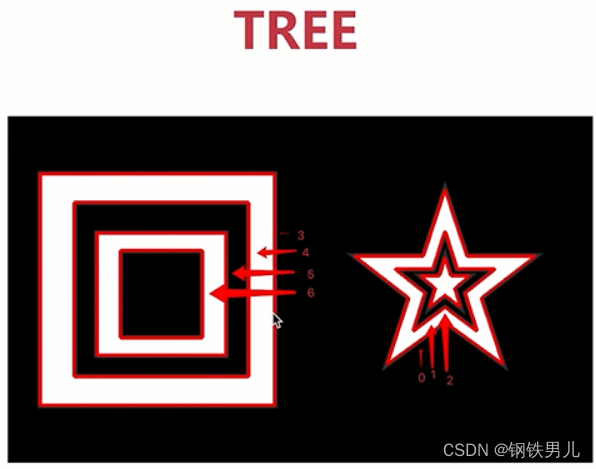
RETR_TREE=3,桉树形存储轮廓

ApproximationMode
CHAIN_APPROX_NONE,保存所有轮廓上的点
CHAIN_APPROX_SIMPLE,只保存角点
import cv2
import numpy as np

img=cv2.imread('./9615.jpg')
print(img.shape)

#转变成单通道
gray=cv2.cvtColor(img,cv2.COLOR_BGR2GRAY)
print(gray.shape)

#二值化
ret,binary=cv2.threshold(gray,150,255,cv2.THRESH_BINARY)

#轮廓查找
contours,hierarchy=cv2.findContours(binary,cv2.RETR_EXTERNAL,cv2.CHAIN_APPROX_SIMPLE)
print(contours)
cv2.imshow('img',img)
cv2.waitKey(0)
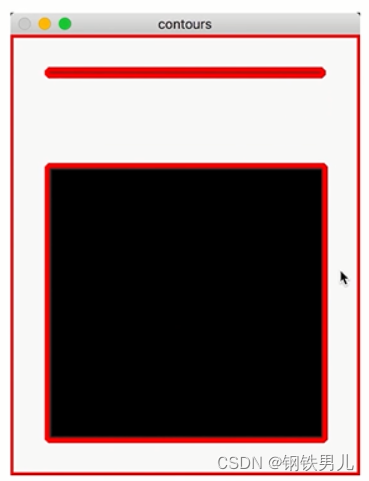
二 绘制轮廓
如何绘制轮廓
drawContours(img,contours,contourIdx,color,thickness...)
contourIdx,-1表示绘制所有轮廓
color,颜色(0,0,255)
thickness,线宽,-1是全部填充
import cv2
import numpy as np

img=cv2.imread('./9615.jpg')
print(img.shape)

#转变成单通道
gray=cv2.cvtColor(img,cv2.COLOR_BGR2GRAY)
print(gray.shape)

#二值化
ret,binary=cv2.threshold(gray,150,255,cv2.THRESH_BINARY)

#轮廓查找
contours,hierarchy=cv2.findContours(binary,cv2.RETR_EXTERNAL,cv2.CHAIN_APPROX_SIMPLE)
print(contours)

#绘制轮廓
img1=cv2.drawContours(img,contours,0,(0,0,255),5)

#cv2.imshow('img',img)
cv2.imshow('img1',img1)
cv2.waitKey(0)
三 轮廓的面积和周长
1 轮廓的面积
contourArea(contour)
contour:轮廓
2 轮廓的周长
arcLength(curve,closed)
curve:轮廓
closed:是否是闭合的轮廓
import cv2
import numpy as np

img=cv2.imread('./9615.jpg')
print(img.shape)

#转变成单通道
gray=cv2.cvtColor(img,cv2.COLOR_BGR2GRAY)
print(gray.shape)

#二值化
ret,binary=cv2.threshold(gray,150,255,cv2.THRESH_BINARY)

#轮廓查找
contours,hierarchy=cv2.findContours(binary,cv2.RETR_EXTERNAL,cv2.CHAIN_APPROX_SIMPLE)
print(contours)

#绘制轮廓
img1=cv2.drawContours(img,contours,0,(0,0,255),5)

#计算面积
area=cv2.contourArea(contours[0])
print("area=%d"%(area))

# 计算周长
len=cv2.arcLength(contours[0],True)
print("len=%d"%(len))
#cv2.imshow('img',img)
cv2.imshow('img1',img1)
cv2.waitKey(0)
四 多边形逼近与凸包
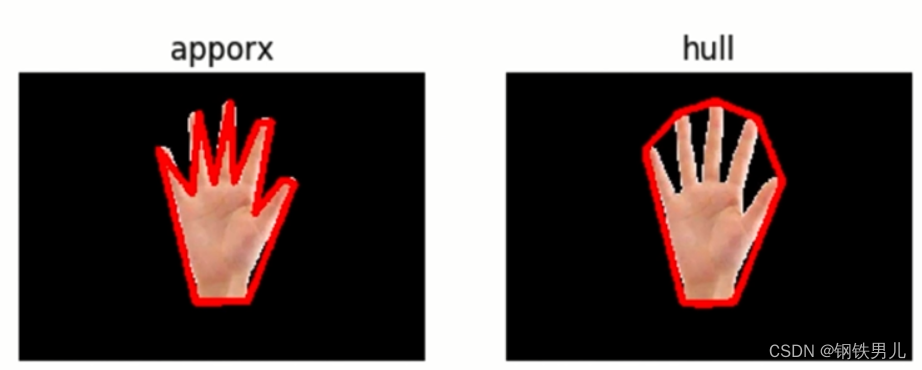
1 多边形逼近
approxPolyDP(curve,epsilon,closed)
curve:轮廓
epsilon
closed:是否是闭合的轮廓
2 凸包
convexHull(points,clockwise,...)
points:轮廓
clockwise:顺时针绘制
轮廓查找:
import cv2
import numpy as np
def drawShape(src,points):
i=0
while i<len(points):
if(i==len(points)-1):
x, y = points[i][0]
x1, y1 = points[0][0]
cv2.line(src, (x, y), (x1, y1), (0, 0, 255), 1)
else:
x, y = points[i][0]
x1, y1 = points[i + 1][0]
cv2.line(src, (x, y), (x1, y1), (0, 0, 255), 1)
i=i+1
img=cv2.imread('./palm.png')
#print(img.shape)
#转变成单通道
gray=cv2.cvtColor(img,cv2.COLOR_BGR2GRAY)
print(gray.shape)
#二值化
ret,binary=cv2.threshold(gray,150,255,cv2.THRESH_BINARY_INV)
#轮廓查找
contours,hierarchy=cv2.findContours(binary,cv2.RETR_CCOMP,cv2.CHAIN_APPROX_NONE)
#print(contours)
#绘制轮廓
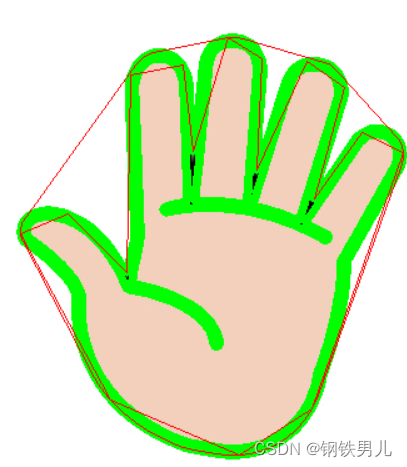
img1=cv2.drawContours(img,contours,-1,(0,255,0),5)
e=20
approx=cv2.approxPolyDP(contours[0],e,True)
drawShape(img,approx)
hull=cv2.convexHull(contours[0])
drawShape(img1,hull)
#cv2.imshow('img',img)
cv2.imshow('img1',img1)
cv2.waitKey(0)
凸包绘制
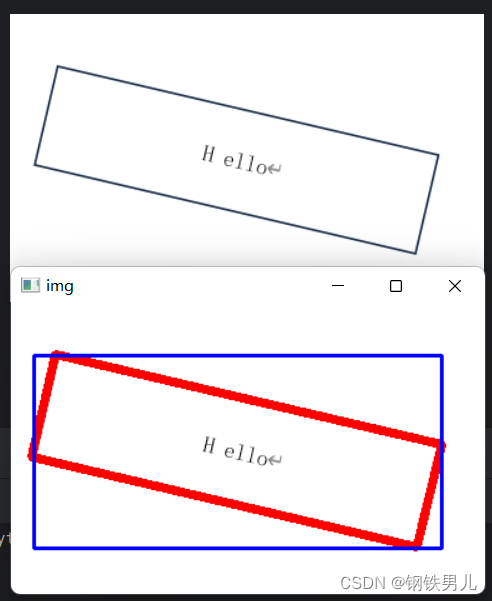
五 外接矩形
最小外接矩形
最大外接矩形
外接矩形
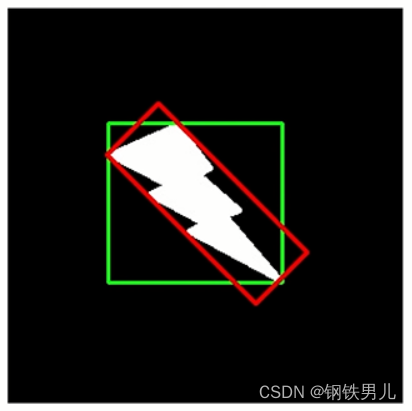
最小外接矩形
minAreaRect(points)
points:轮廓
返回值:RotatedRect
RotatedRect
x,y
width,height
angle
最大外接矩形
boundingRect(array)
array:轮廓
返回值:Rect
import cv2
import numpy as np

def drawShape(src,points):
    i=0
    while i<len(points):
        if(i==len(points)-1):
            x, y = points[i][0]
            x1, y1 = points[0][0]
            cv2.line(src, (x, y), (x1, y1), (0, 0, 255), 1)
        else:
            x, y = points[i][0]
            x1, y1 = points[i + 1][0]
            cv2.line(src, (x, y), (x1, y1), (0, 0, 255), 1)
        i=i+1

img=cv2.imread('./Hello.png')
#print(img.shape)

#转变成单通道
gray=cv2.cvtColor(img,cv2.COLOR_BGR2GRAY)
print(gray.shape)

#二值化
ret,binary=cv2.threshold(gray,150,255,cv2.THRESH_BINARY)
print(binary.shape)
#轮廓查找cv2.RETR_CCOMP CHAIN_APPROX_NONE
contours,hierarchy=cv2.findContours(binary,cv2.RETR_TREE,cv2.CHAIN_APPROX_SIMPLE)
#print(contours)

#绘制轮廓
#img=cv2.drawContours(img,contours,-1,(0,255,0),2)

r=cv2.minAreaRect(contours[1])
box=cv2.boxPoints(r)
box=np.int32(box)

cv2.drawContours(img,[box],0,(0,0,255),5)

x,y,w,h=cv2.boundingRect(contours[1])

cv2.rectangle(img,(x,y),(x+w,y+h),(255,0,0),2)


cv2.imshow('img',img)

cv2.waitKey(0)
六 车辆统计
窗口的展示
图像/视频的加载
基本图形的绘制
车辆识别
基本图像运算与处理
形态学
轮廓查找
1 涉及到的知识点
加载视频
通过形态学识别车辆
对车辆进行统计
显示车辆统计信息
import cv2
import numpy as np

cap=cv2.VideoCapture('video.mp4')

while True:
   ret,frame= cap.read()

   if(ret==True):
       cv2.imshow('video',frame)

   key=cv2.waitKey(1)
   if(key==27)
       break
cap.release()
cv2.destroyAllWindows()
形态学处理
import cv2
import numpy as np

cap=cv2.VideoCapture('video.mp4')

bgsubmog=cv2.bgsegm.createBackgroundSubtractorMOG()

#形态学kernel
kernel=cv2.getStructuringElement(cv2.MORPH_RECT,(5,5))

while True:
   ret,frame= cap.read()

   if(ret==True):
       #灰度
       cv2.cvtColor(frame,cv2.COLOR_BGR2GRAY)
       #去噪(高斯)
       blu=cv2.GaussianBlur(frame,(3,3),5)
       #去背影
       mask=bgsubmog.apply(blu)

       #腐蚀
       erode=cv2.erode(mask,kernel)

       #膨胀
       dilate=cv2.dilate(mask,kernel,iterations=2)

       #闭操作,去掉物体内部的小块
       close=cv2.morphologyEx(dilate,cv2.MORPH_CLOSE,kernel)

       cnts,h=cv2.findContours(close,cv2.RETR_TREE,cv2.CHAIN_APPROX_NONE)

       for(i,c)in enumerate(cnts):
           (x,y,w,h)=cv2.boundingRect(c)
           cv2.rectangle(frame,(x,y),(x+w,y+h),(0,255,0),2)

       cv2.imshow('mask',mask)
       cv2.imshow('erode',erode)
       cv2.imshow('video',frame)

   key=cv2.waitKey(1)
   if(key==27):
       break
cap.release()
cv2.destroyAllWindows()