Session是用于存放用户与web服务器之间的会话,即服务器为客户端开辟的存储空间。
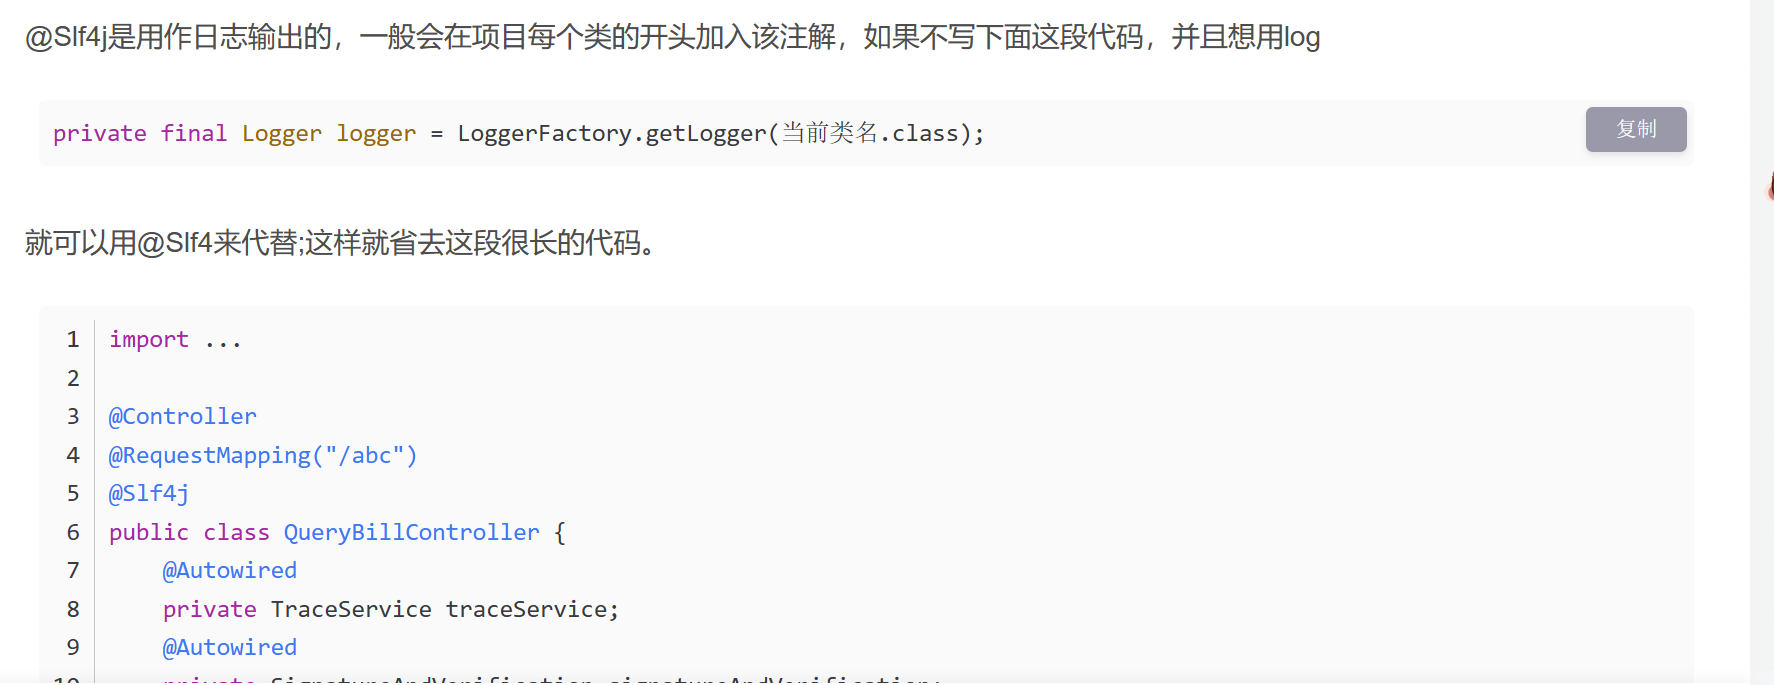
@Slf4j是用作日志输出的,一般会在项目每个类的开头加入该注解
可以配置静态资源的访问路径 这样访问任何的静态资源 但是每个页面都得改 麻烦


在Java Web开发中,request.setAttribute()是Servlet中的方法之一,用于在请求中设置属性。这些属性可以在请求的生命周期内共享,并且通常用于在不同组件之间传递数据。这种机制为开发人员提供了一种有效的方式来在请求处理过程中传递信息。
方法getRequestDispatcher()和sendRedirect()https://www.techguruspeaks.com/methods-getrequestdispatcher-and-sendredirect/
服务器端的重定向可以有两种方式,一是使用HttpServletResponse的sendRedirect()方法,一是使用RequestDispatcher的forward()方法.
【左京淳的JAVA WEB学习笔记】第四章转发、重定向、steam输出 https://ithelp.ithome.com.tw/articles/10255855
这篇比较通俗易解。
访问网站的时候,不经过login直接访问后续网页时不被允许的,可以先将登录信息放入session中,当访问后续页面的时候,看看session中是否有值就可以了,但是当页面多了,每个页面都得判断这就太麻烦了。用拦截器就方便多了。
重写上述三个方法,preHandle方法中获取session,如果为空则拦截,转发到login页面,并提示“请登录”,不为空则放行。那么在之前判断main中是否有session的地方直接这样写就行。后面的页面统一这样判断就可以了。
拦截器注册到容器中,实现WebMvcConfigurer的addInterceptors接口,指定拦截规则【如果拦截所有,静态资源也会被拦截】
WebMvcConfigurer实现定制了web功能的类,在类中重写了addInterceptors方法并将之前写的拦截器放入,并用这两个制定拦截规则addPathPatterns(“/“)//所有请求都被拦截包括静态资源了。 .excludePathPatterns(”/“,”/login","/css/”,“/fonts/“,”/images/”,“/js/**”);//设置要放行的页面。拦截所有并将静态资源放行(页面所需的css,js,image等)。
先preHandle,再目标方法mainPage,再postHandle,后afterCompletion

我感觉我真的需要三刷这个视频了,学的迷迷糊糊的。
SpringBoot实现文件上传功能(单文件、多文件)https://blog.csdn.net/weixin_47390965/article/details/122326369

Servlet 的doGet()方法 https://blog.csdn.net/qq_40395874/article/details/113885985
localhost拒绝访问的解决方法 https://blog.csdn.net/qq_41999455/article/details/86630916
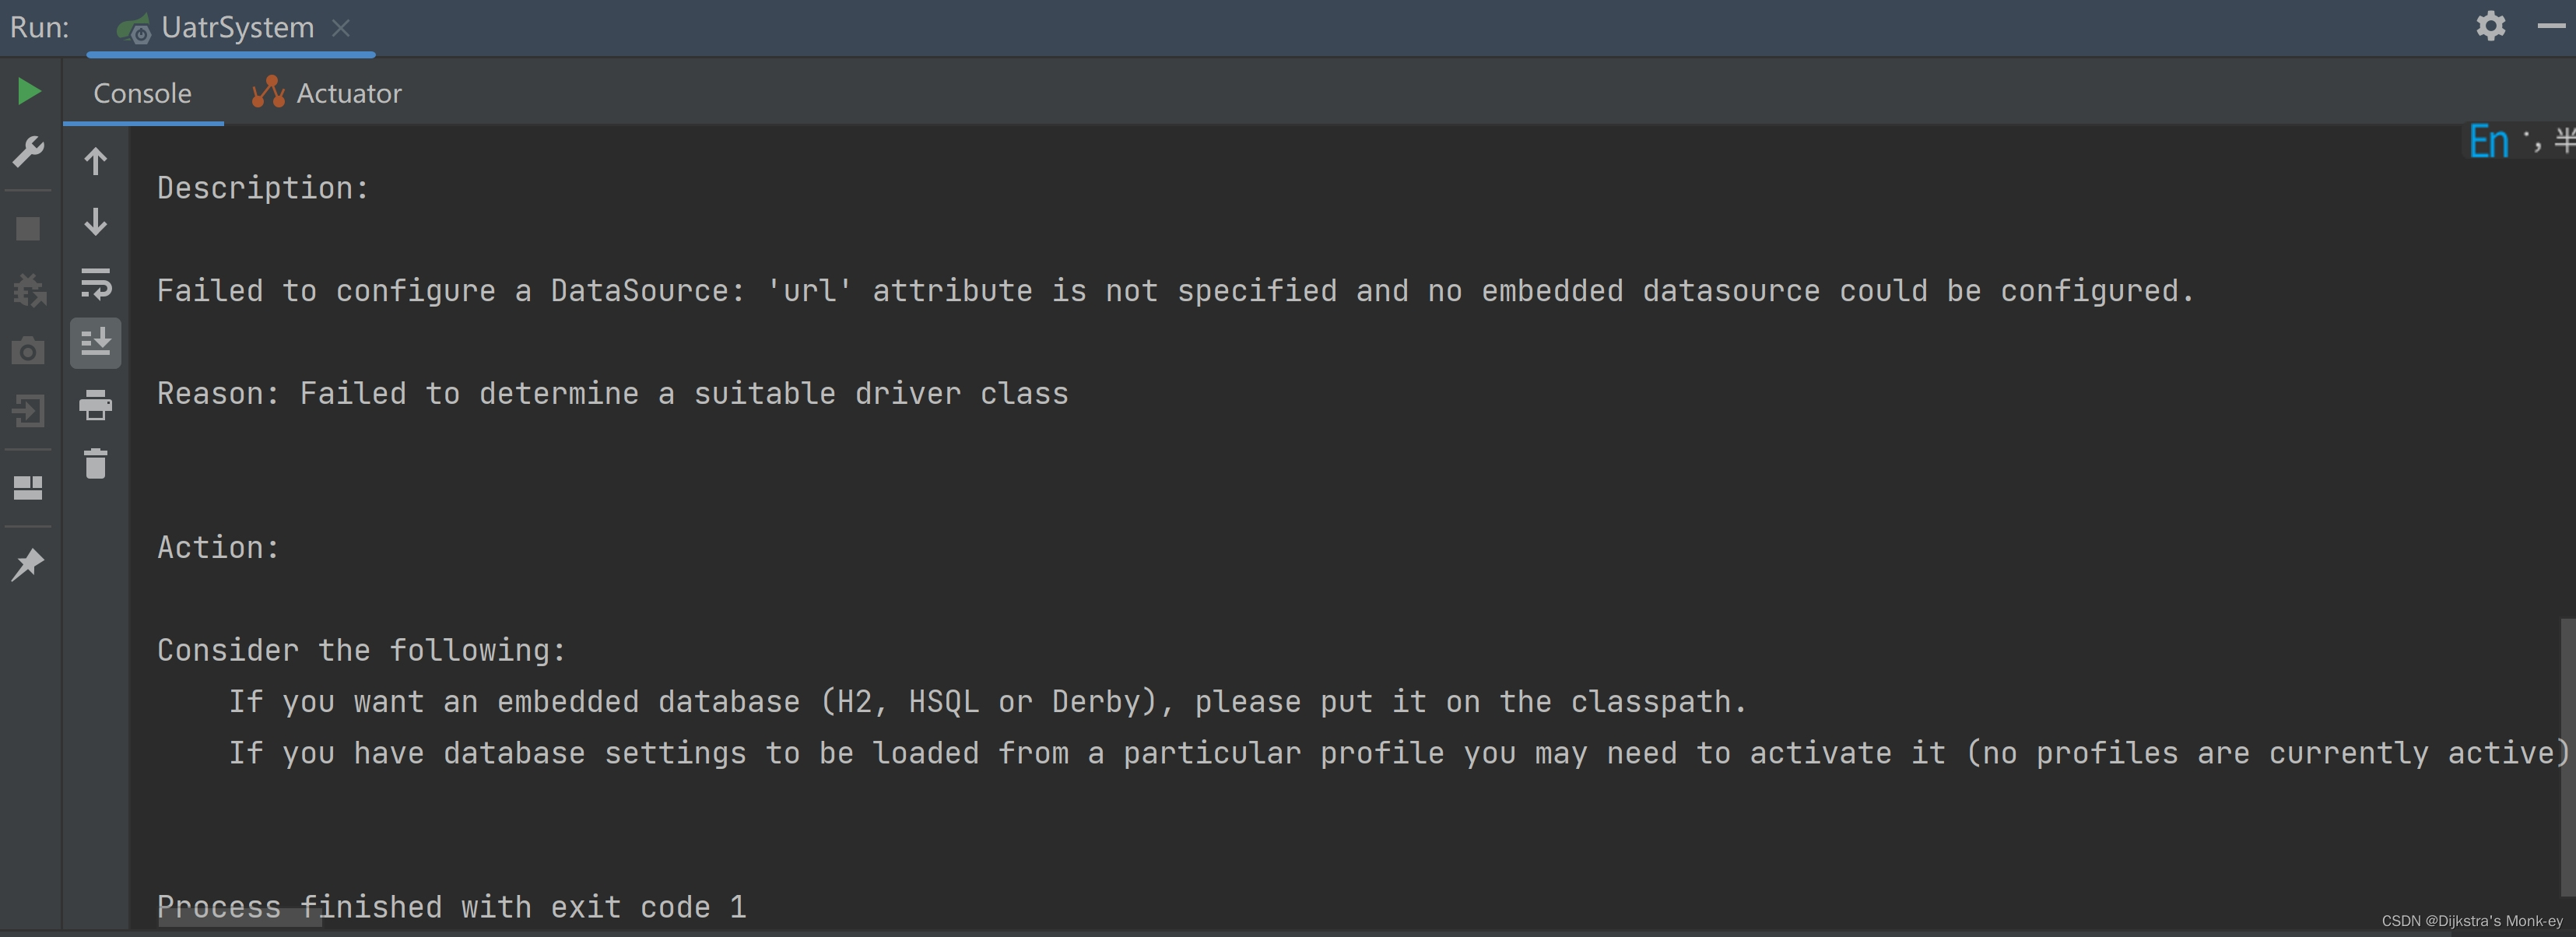
SpringBoot项目报错解决:“Error starting ApplicationContext. To display the conditions report re-run …”
Spring Boot 配置DataSource https://blog.csdn.net/qq_35760213/article/details/73863252
Javaweb——监听器
https://blog.csdn.net/pary__for/article/details/115032510
filter用于字符过滤
listener用于初始化作用域数据
innterceptor用于拦截请求
SpringBoot使用Druid连接池 + 配置监控页面(自定义版 + starter版)https://blog.csdn.net/yy8623977/article/details/127975428
Spring Boot2 —— Web原生组件注入及嵌入式容器https://blog.csdn.net/qq_35843514/article/details/115210069
命令行激活test/prod
java -jar xxx.jar --spring.profiles.active=prod --person.name=haha

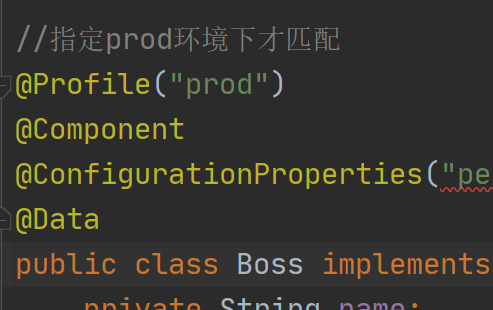
这里是boss的原因是因为

java运行时环境和操作系统信息等都能获取到


从上往下的顺序:
  package com.itheima.bean;

import lombok.Data;
import org.springframework.boot.context.properties.ConfigurationProperties;
import org.springframework.context.annotation.Profile;
import org.springframework.stereotype.Component;


@Profile({"prod","default"})
@Component
@ConfigurationProperties("person")
@Data
public class Boss implements Person{
    private String name;
    private Integer age;
}
package com.itheima.bean;

import lombok.Data;
import org.springframework.boot.context.properties.ConfigurationProperties;
import org.springframework.stereotype.Component;
public interface Person {

   String getName();
   Integer getAge();
}
package com.itheima.bean;

import lombok.Data;
import org.springframework.boot.context.properties.ConfigurationProperties;
import org.springframework.context.annotation.Profile;
import org.springframework.stereotype.Component;

@Profile("test")
@Component
@ConfigurationProperties("person")
@Data
public class Worker implements Person{
    private String name;
    private Integer age;
}
package com.itheima.config;

import com.itheima.bean.Color;
import org.springframework.context.annotation.Bean;
import org.springframework.context.annotation.Configuration;
import org.springframework.context.annotation.Profile;

@Configuration
public class Config {

    @Profile("prod")
    @Bean
    public Color red(){
        return new Color();
    }

    @Profile("test")
    @Bean
    public Color green(){
        return new Color();
    }
}
package com.itheima.demos.web.controller;
import com.itheima.bean.Person;
import org.springframework.beans.factory.annotation.Autowired;
import org.springframework.beans.factory.annotation.Value;
import org.springframework.web.bind.annotation.GetMapping;
import org.springframework.web.bind.annotation.RestController;
@RestController
public class HelloController {
@Value("${person.name:李四}")//这里的意思是不用再配.properties文件里面的person.name了
private String name;
//获取操作系统
@Value("${}")
private String osName;
@Autowired//自动注入
private Person person;
//环境变量
@Value("${MAVEN_HOME}")
private String msg;
@GetMapping("/")
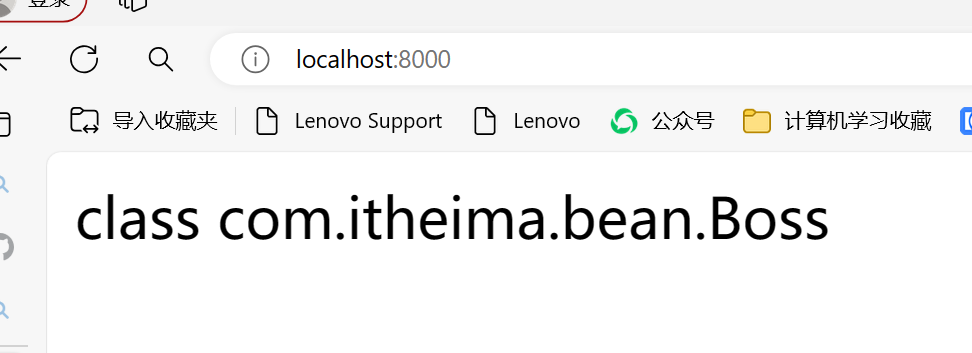
public String hello(){
return person.getClass().toString();
}
@GetMapping("/person")
public Person person(){
return person;
}
@GetMapping("/msg")
public String getMsg(){
return msg + "==>" +osName;
}
}
package com.itheima;

import org.springframework.boot.SpringApplication;
import org.springframework.boot.autoconfigure.SpringBootApplication;
import org.springframework.context.ConfigurableApplicationContext;
import org.springframework.core.env.ConfigurableEnvironment;

import java.util.Map;

@SpringBootApplication
public class BootzuihouApplication {

    public static void main(String[] args) {
        ConfigurableApplicationContext run = SpringApplication.run(BootzuihouApplication.class, args);

        //可获取到当前的环境
        ConfigurableEnvironment environment = run.getEnvironment();

        //环境里面包含系统的环境变量
        Map<String, Object> systemEnvironment = environment.getSystemEnvironment();

        //还有系统的属性
        Map<String, Object> systemProperties = environment.getSystemProperties();

        //输出
        System.out.println(systemEnvironment);
        System.out.println(systemProperties);
    }
}
applcation.yaml
person:
  age: 2222
  name: 2222
application.properties
server.port=8080

#\u6307\u5B9A\u6FC0\u6D3B\u7684\u73AF\u5883\u3002\u9ED8\u8BA4\u914D\u7F6E\u6587\u4EF6\u548C\u6307\u5B9A\u73AF\u5883\u7684\u914D\u7F6E\u6587\u4EF6\u90FD\u4F1A\u751F\u6548\u3002
#指定激活的环境。 默认配置文件和指定环境的配置文件都会生效
spring.profiles.active=myprod

##profiles\u5206\u7EC4\u529F\u80FD
spring.profiles.group.myprod[0]=ppd
spring.profiles.group.myprod[1]=prod

#批量加载
spring.profiles.group.mytest[0]=test

person.name=1111
person.age=1111
application-ppd.yaml
application-prod.yaml
application-test.yaml
person:
  age: 19
person:
  name: prod-张三
  age: 18

server:
  port: 8000
person:
name: test-张三
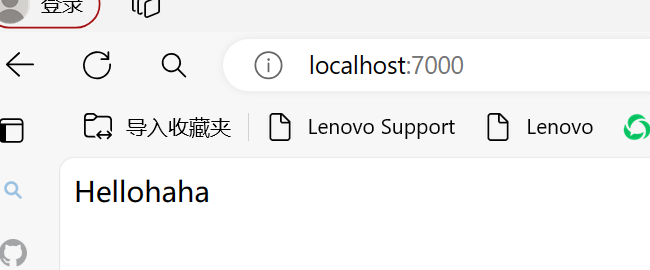
server:
port: 7000
好了好了完结撒花~后面的原理解析和源码解读等我有实力了又回来重新学吧。
本文由mdnice多平台发布


![高阶数据结构[2]图的初相识](https://img-blog.csdnimg.cn/direct/c4fda6629cc5432084fb59651eb3a82e.png)