第 3 章:Spring Framework 中的 AOP
讲完了 IoC,我们再来聊聊 Spring Framework 中的另一个重要内容——面向切面编程,即 AOP。它是框架中众多功能的基础,例如声明式事务就是依靠 AOP 来实现的。此外,Spring 还为我们提供了简单的方式来使用 AOP,这有助于简化业务代码中一些共性功能的开发。本章我们会一起去了解 AOP 的基本概念,以及 AOP 在 Spring Framework 中的实现,并学习如何通过使用注解和 XML 文件的方式来配置 AOP 相关的功能。
3.1 Spring 中的 AOP
为了能更好地理解 AOP,本节会先带大家了解一下什么是 AOP,它能做什么,随后展开解释其中的一些核心概念,最后再剖析一下 Spring Framework 中 AOP 的实现原理。
3.1.1 AOP 的核心概念
AOP 是 Aspect Oriented Programming(面向切面编程)的首字母缩写,是一种编程范式,它的目的是通过分离横切关注点(cross-cutting concerns)来提升代码的模块化程度。AOP 的概念最早是由 Xerox PARC提出的,我第一次接触到这个概念则是在 2004 年左右,当时我还在上大学,恰逢学院的一位博士生导师来给本科生上课,课程中他向我们介绍了 AOP,那时主要的 AOP 框架还是 AspectJ。
AOP 中提到的 关注点,其实就是一段 特定的功能,有些关注点出现在多个模块中,就称为 横切关注点。这么说可能有点抽象,举个例子,一个后台客服系统的每个模块都需要记录客服的操作日志,这就是一个能从业务逻辑中分离出来的横切关注点,完全不用交织在每个模块的代码中,可以作为一个单独的模块存在。
整理一下,可以发现 AOP 解决了两个问题:第一是 代码混乱,核心的业务逻辑代码还必须兼顾其他功能,这就导致不同功能的代码交织在一起,可读性很差;第二是 代码分散,同一个功能的代码分散在多个模块中,不易维护。在引入 AOP 之后,一切就变得不一样了。
虽然 AOP 同 OOP(Object-Oriented Programming,面向对象编程)一样,都是一种编程范式,但它并非站在 OOP 的对立面,而是对 OOP 的一个很好的补充。Spring Framework 就是一个例子,它很好地将两者融合在了一起。
在 AOP 中有几个重要的概念,在开始实践前,我们先通过表 3-1 来了解一下这些概念。
表 3-1 AOP 中的几个重要概念
| 概念 | 说明 |
|---|---|
| 切面(aspect) | 按关注点进行模块分解时,横切关注点就表示为一个切面 |
| 连接点(join point) | 程序执行的某一刻,在这个点上可以添加额外的动作 |
| 通知(advice) | 切面在特定连接点上执行的动作 |
| 切入点(pointcut) | 切入点是用来描述连接点的,它决定了当前代码与连接点是否匹配 |
借助表 3-1,我们可以将这些概念串联起来:通过切入点来匹配程序中的特定连接点,在这些连接点上执行通知,这种通知可以是在连接点前后执行,也可以是将连接点包围起来。
3.1.2 Spring AOP 的实现原理
在 Spring Framework 中,虽然 Spring AOP 的使用方式发生过很大的变化,但其背后的核心技术却从未改变,那就是 动态代理技术。代理模式是 GoF 提出的 23 种经典设计模式之一,我们可以为某个对象提供一个代理,控制对该对象的访问,代理可以在两个有调用关系的对象之间起到中介的作用——代理封装了目标对象,调用者调用了代理的方法,代理再去调用实际的目标对象,如图 3-1 所示。
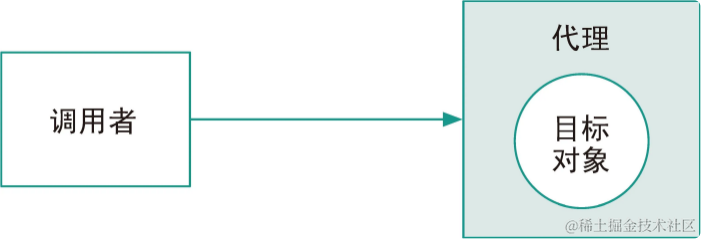
图 3-1 代理模式示意图
动态代理 就是在运行时动态地为对象创建代理的技术。在 Spring 中,由 AOP 框架创建、用来实现切面的对象被称为 AOP 代理(AOP Proxy),一般采用 JDK 动态代理或者是 CGLIB4 代理,两者在使用时的区别具体如表 3-2 所示。
表 3-2 JDK 动态代理与 CGLIB 代理的区别
| 必须要实现接口 | 支持拦截 public 方法 |
支持拦截 protected 方法 |
拦截默认作用域方法 | |
|---|---|---|---|---|
| JDK 动态代理 | 是 | 是 | 否 | 否 |
| CGLIB 代理 | 否 | 是 | 是 | 是 |
虽然 CGLIB 支持拦截非 public 作用域的方法调用,但在不同对象之间交互时,建议还是以 public 方法调用为主。
Spring 容器在为 Bean 注入依赖时,会自动将被依赖 Bean 的 AOP 代理注入进来,这就让我们感觉是在使用原始的 Bean,其实不然。
被切面拦截的对象称为 目标对象(target object)或 通知对象(advised object),因为 Spring 用了动态代理,所以目标对象就是要被代理的对象。
以 JDK 动态代理为例,假设我们希望在代码示例 3-1 的方法执行前后增加两句日志,可以采用下面这套代码,先实现调用 Hello 的主流程。
代码示例 3-1 要被动态代理的 Hello 接口及其实现片段
 public interface Hello {
     void say();
 }

 public class SpringHello implements Hello {
     @Override
     public void say() {
         System.out.println("Hello Spring!");
     }
 }
随后,我们可以像代码示例 3-2 那样设计一个 InvocationHandler,于是对代理对象的调用都会转为调用 invoke 方法,传入的参数中就包含了所调用的方法和实际的参数。
代码示例 3-2 在 Hello.say() 前后打印日志的 InvocationHandler
    public class LogHandler implements InvocationHandler {
        private Hello source;

        public LogHandler(Hello source) {
            this.source = source;
        }

        @Override
        public Object invoke(Object proxy, Method method, Object[] args) throws Throwable {
            System.out.println("Ready to say something.");
            try {
                return method.invoke(source, args);
            } finally {
                System.out.println("Already say something.");
            }
        }
    }
最后,再通过 Proxy.newProxyInstance() 为 Hello 实现类的 Bean 实例创建使用 LogHandler 的代理,如代码示例 3-3 所示。
代码示例 3-3 创建 JDK 动态代理并调用方法
    public class Application {
        public static void main(String[] args) {
            Hello original = new SpringHello();
            Hello target = (Hello) Proxy.newProxyInstance(Hello.class.getClassLoader(),
                original.getClass().getInterfaces(), new LogHandler(original));
            target.say();
        }
    }
这段代码的运行效果如下:
    Ready to say something.
    Hello Spring!
    Already say something.
Spring AOP 的实现方式与我们的例子大同小异,相信通过这个例子大家已经能够对其背后的实现原理了解一二了。感兴趣的朋友可以阅读一下 ProxyFactoryBean 的源码,若是采用 JDK 动态代理, AopProxyFactory 会创建 JdkDynamicAopProxy;若是采用 CGLIB 代理,则是创建 ObjenesisCglibAopProxy,前者的逻辑就和我们的例子差不多。
茶歇时间:使用代理模式过程中的小坑
在上面的例子中,我们调用的是代理对象
target上的方法,并不直接操作原始对象。在 Spring AOP 中,为了能用到被 AOP 增强过的方法,我们应该始终与代理对象交互。如果存在一个类的内部方法调用,这个调用的对象不是代理,而是其本身,则无法享受 AOP 增强的效果。比如,下面这个类中的
foo()方法调用了bar(),哪怕 Spring AOP 对bar()做了拦截,由于调用的不是代理对象,因而看不到任何效果,大家需要特别注意这种情况。public class Hello { public void foo() { bar(); } public void bar() {...} }
3.2 基于 @AspectJ 的配置
回想我第一次接触 AOP 时,AspectJ 的使用体验并不理想。AspectJ 不仅需要编写单独的 Aspect 代码,还要通过 ajc 命令做编译。当然,尽管现在的 AspectJ 也有了长足进步,但 Spring AOP 中所有的东西都是 Java 类,对开发者来说用起来更为统一,体验更好。Spring Framework 同时支持 @AspectJ 注解和 XML Schema 两种方式来使用 AOP,虽然官方并没有明显的偏好,但个人认为注解的方式更贴近 Java 的风格,所以先来介绍一下基于注解的方式。
首先,需要引入 org.springframework:spring-aspects 依赖,以便使用 AspectJ 相关的注解和功能。要开启 @AspectJ 支持,可以在 Java 配置类上增加 @EnableAspectJAutoProxy 注解,比如像下面这样:
    @Configuration
    @EnableAspectJAutoProxy
    public class Config {...}
@EnableAspectJAutoProxy 有两个属性, proxyTargetClass 用于选择是否开启基于类的代理(是否使用 CGLIB 来做代理); exposeProxy 用于选择是否将代理对象暴露到 AopContext 中,两者默认值都是 false。
我们也可以通过 XML Schema 的方式来实现相同的效果,如代码示例 3-4 所示,注意要正确地引入 aop 命名空间。
代码示例 3-4 通过 <aop:aspectj-autoproxy/> 开启 @AspectJ 支持
    <?xml version="1.0" encoding="UTF-8"?>
    <beans xmlns="http://www.springframework.org/schema/beans"
        xmlns:xsi="http://www.w3.org/2001/XMLSchema-instance"
        xmlns:aop="http://www.springframework.org/schema/aop"
        xsi:schemaLocation="
            http://www.springframework.org/schema/beans https://www.springframework.org/schema/beans/spring-beans.xsd
            http://www.springframework.org/schema/aop https://www.springframework.org/schema/aop/spring-aop.xsd">

        <aop:aspectj-autoproxy/>

    </beans>
接下来,在完成配置后,我们就可以使用 @Aspect 注解来声明切面了,将这个注解加到类上即可:
    @Aspect
    public class MyAspect {...}
注意 有两点内容需要重点说明。
(1) 添加
@Aspect注解只是告诉 Spring“这个类是切面”,但并没有把它声明为 Bean,因此需要我们手动进行配置,例如添加@Component注解,或者在 Java 配置类中进行声明。(2) Spring Framework 会对带有
@Aspect注解的类做特殊对待,因为其本身就是一个切面,所以不会被别的切面自动拦截。
在声明了切面后,我们就可以配置具体的切入点和通知了,本章的后面会对这些做具体的展开。
3.2.1 声明切入点
注解方式的切入点声明由两部分组成—— 切入点表达式 和 切入点方法签名。前者用来描述要匹配的连接点,后者可以用来引用切入点,方便切入点的复用,具体如代码示例 3-5 所示。
代码示例 3-5 一些简单的切入点声明
    package learning.spring.helloworld;

    public class HelloPointcut {
        @Pointcut("target(learning.spring.helloworld.Hello)")
        public void helloType() {} // 目标对象是learning.spring.helloworld.Hello类型

        @Pointcut("execution(public * say())")
        public void sayOperation() {} // 执行public的say()方法

        @Pointcut("helloType() && sayOperation()") // 复用其他切入点
        public void sayHello() {} // 执行Hello类型中public的say()方法
    }
@Pointcut 注解中使用的就是 AspectJ 5 的表达式,其中一些常用的 PCD(pointcut designator,切入点标识符)如表 3-3 所示。
表 3-3 @Pointcut 中的一些常用 PCD
| PCD | 说明 |
|---|---|
execution |
最常用的一个 PCD,用来匹配特定方法的执行 |
within |
匹配特定范围内的类型,可以用通配符来匹配某个 Java 包内的所有类 |
this |
Spring AOP 代理对象这个 Bean 本身要匹配某个给定的类型 |
target |
目标对象要匹配某个给定的类型,比 this 更常用一些 |
args |
传入的方法参数要匹配某个给定的类型,它也可以用于绑定请求参数 |
bean |
Spring AOP 特有的一个 PCD,匹配 Bean 的 ID 或名称,可以用通配符 |
因为 execution 用得非常多,下面详细描述一下它的表达式, [] 代表可选项, <> 代表必选项:
execution([修饰符] <返回类型> [全限定类名.]<方法>(<参数>) [异常])
其中,
- 每个部分都可以使用
*通配符 - 类名中使用
.*表示包中的所有类,..*表示当前包与子包中的所有类 - 参数主要分为以下几种情况:
()表示方法无参数(..)表示有任意个参数(*)表示有一个任意类型的参数(String)表示有一个String类型的参数(String,String)代表有两个String类型的参数
在 Java 中,为了方便标识,我们也经常使用注解,如果类上带了特定的注解,也可以用表 3-4 中的这些 PCD。
表 3-4 针对注解的常用 PCD
| PCD | 说明 |
|---|---|
@target |
执行的目标对象带有特定类型注解 |
@args |
传入的方法参数带有特定类型注解 |
@annotation |
拦截的方法上带有特定类型注解 |
切入点表达式支持与、或、非运算,运算符分别为 &&、||和 !,还可以进行灵活组合。
最后,我们再提供一些示例:
    // learning.spring.helloworld及其子包中所有类里的say方法
    // 该方法可以返回任意类型,第一个参数必须是String,后面可以跟任意参数
    execution(* learning.spring.helloworld..*.say(String,..))

    // learning.spring.helloworld及其子包
    within(learning.spring.helloworld..*)

    // 方法的参数仅有一个String
    args(java.lang.String)

    // 目标类型为Hello及其子类
    target(learning.spring.helloworld.Hello+)

    // 类上带有@AopNeeded注解
    @target(learning.spring.helloworld.AopNeeded)
茶歇时间:Spring AOP 与 AspectJ 中 PCD 的不同之处
Spring AOP 中虽然使用了 AspectJ 的切入点表达式,也共用了不少 AspectJ 的 PCD,但其实两者还是有区别的。比如,Spring AOP 中仅支持有限的 PCD,AspectJ 中还有很多 PCD 是 Spring AOP 不支持的。
由于 Spring AOP 的实现基于动态代理,因而只能匹配普通方法的执行,像静态初始化、静态方法、构造方法、属性赋值等操作都是拦截不到的。所以说相比 AspectJ 而言,Spring AOP 的功能弱很多,但在大部分场景下也基本够用。
出于上述差异,在表 3-4 中我们并没有列出
@within这个 PCD,因为在 Spring AOP 中,@target与@within两者在使用上感受不到什么区别。前者要求运行时的目标对象带有注解,这个注解的@Retention是RetentionPolicy.RUNTIME,即运行时的;后者要求被拦截的类上带有@Retention是RetentionPolicy.CLASS的注解。但 Spring AOP 只能拦截到非静态public方法的执行,两个 PCD 的效果一样,所以还是老老实实用@target吧。
3.2.2 声明通知
Spring AOP 中有多种通知类型,可以帮助我们在方法的各个执行阶段进行拦截,例如,可以在方法执行前、返回后、抛出异常后添加特定的操作,也可以完全替代方法的实现,甚至为一个类添加原先没有的接口实现。
前置通知
@Before注解可以用来声明一个前置通知,注解中可以引用事先定义好的切入点,也可以直接传入一个切入点表达式,在被拦截到的方法开始执行前,会先执行通知中的代码:@Aspect public class BeforeAspect { @Before("learning.spring.helloworld.HelloPointcut.sayHello()") public void before() { System.out.println("Before Advice"); } // 同一个切面类里还可以有其他通知方法 // 这就是一个普通的Java类,没有太多限制 }前置通知的方法没有返回值,因为它在被拦截的方法前执行,就算有返回值也没地方使用,但是它可以对被拦截方法的参数进行加工,通过
args这个 PCD 能明确参数,并将其绑定到前置通知方法的参数上。例如,要在sayHello(AtomicInteger)这个方法前对AtomicInteger类型的参数进行数值调整,就可以这样做:@Before("learning.spring.helloworld.HelloPointcut.sayHello() && args(count)") public void before(AtomicInteger count) { // 操作count }要是同时存在多个通知作用于同一处,可以让切面类实现
Ordered接口,或者在上面添加@Order注解。指定的值越低,优先级则越高,在最终的代理对象执行时也会先执行优先级高的逻辑。后置通知
在方法执行后,可能正常返回,也可能抛出了异常。如果想要拦截正常返回的调用,可以使用
@AfterReturing注解。例如像下面这样:@AfterReturning("execution(public * say(..))") public void after() {} @AfterReturning(pointcut = "execution(public * say(..))", returning = "words") public void printWords(String words) { System.out.println("Say something: " + words); }printWords()方法的参数words就是被拦截方法的返回值,而且此处限定了该通知只拦截返回值是String类型的调用。需要提醒的是,returning中给定的名字必须与方法的参数名保持一致。如果想要拦截抛出异常的调用,可以使用
@AfterThrowing注解,这个注解的用法与@AfterReturing极为类似。例如:@AfterThrowing("execution(public * say(..))") public void afterThrow() {} @AfterThrowing(pointcut = "execution(public * say(..))", throwing = "exception") public void printException(Exception exception) {}如果不关注执行是否成功,只是想在方法结束后做些动作,可以使用
@After注解:@After("execution(public * say(..))") public void afterAdvice() {}添加了
@After注解的方法必须要能够处理正常与异常这两种情况,但它又获取不到返回值或异常对象,所以一般只被用来做一些资源清理的工作。环绕通知
还有一种通知类型是环绕通知,它的功能比较强大,不仅可以在方法执行前后加入自己的逻辑,甚至可以完全替换方法本身的逻辑,或者替换调用参数。我们可以添加 @Around 注解来声明环绕通知,这个方法的签名需要特别注意,它的第一个参数必须是 ProceedingJoinPoint 类型的,方法的返回类型是被拦截方法的返回类型,或者直接用 Object 类型。
例如,我们希望统计
say()方法的执行时间,可以像代码示例 3-6 那样来声明环绕通知。代码示例 3-6 统计方法耗时的环绕通知
 @Aspect
 public class TimerAspect {
     @Around("execution(public * say(..))")
     public Object recordTime(ProceedingJoinPoint pjp) throws Throwable {
         long start = System.currentTimeMillis();
         try {
             return pjp.proceed();
         } finally {
             long end = System.currentTimeMillis();
             System.out.println("Total time: " + (end - start) + "ms");
         }
     }
 }
其中的
pjp.proceed()就是调用具体的连接点进行的处理,proceed()方法也接受Ojbect[]参数,可以替代原先的参数。环绕通知虽然很强大,但在日常开发过程中,我们选择能满足需求的通知类型就好,如果
@After够用,那就不用@Around了。引入通知
与前面介绍的几种相比,下面要介绍的最后一种 Spring AOP 通知不太常用。我们可以为 Bean 添加新的接口,并为新增的方法提供默认实现,这种操作被称为 引入(Introduction)。在切面类里声明一个成员属性,该属性的类型就是要引入的类型,在上面添加
@DeclareParents注解就可以声明引入,可以像下面这样为Hello及其子类实现GoodBye接口:@Aspect public class MyAspect { @DeclareParents(value = "learning.spring.helloworld.Hello+", defaultImpl = DefaultGoodByeImpl.class) private GoodBye goodBye; }引入其实是针对类型进行的增强,
value中仅可填入要匹配的类型,可以使用 AspectJ 类型匹配模式。引入声明后,在 Spring 容器中取到的 Bean 就已经完成了增强,哪怕在前置通知中也是如此。
3.2.3 基于 @AspectJ 的示例
为了便于大家能更好地掌握 Spring AOP 的用法,本节为大家准备了一个基于 @AspectJ 注解的 AOP 示例,如代码示例 3-7 所示,假设这里我们有一个 Hello 接口及其对应实现 SpringHello。
代码示例 3-7 Hello 接口及其实现代码片段
 public interface Hello {
     // 为了方便演示改变参数内容,此处使用StringBuffer
     String sayHello(StringBuffer words);
 }

 @Component
 public class SpringHello implements Hello {
     @Override
     public String sayHello(StringBuffer words) {
         return "Hello! " + words;
     }
 }
第一个切面拦截 Hello 类型中的方法执行,我们在传入的 StringBuffer 中追加了一段文字,为了演示多个通知的执行顺序,还增加了 @Order 注解,如代码示例 3-8 所示。
代码示例 3-8 HelloAspect 切面代码片段
    @Aspect
    @Component
    @Order(1)
    public class HelloAspect {
        @Before("target(learning.spring.helloworld.Hello) && args(words)")
        public void addWords(StringBuffer words) {
            words.append("Welcome to Spring! ");
        }
    }
第二个切面 SayAspect 中有三部分内容(如代码示例 3-9 所示):
(1) 拦截所有 say 打头的方法,在 StringBuffer 参数中追加目前为止说过的话的计数;
(2) 为 learning.spring.helloworld 包内的类引入了一个 GoodBye 接口;
(3) 通过环绕通知改变了 sayHello() 方法的执行结果,追加了对引入的 GoodBye 接口的调用。
代码示例 3-9 SayAspect 切面代码片段
    @Aspect
    @Component
    @Order(2)
    public class SayAspect {
        @DeclareParents(value = "learning.spring.helloworld.*",
                        defaultImpl = DefaultGoodBye.class)
        private GoodBye bye;
        private int counter = 0;

        @Before("execution(* say*(..)) && args(words)")
        public void countSentence(StringBuffer words) {
            words.append("[" + ++counter + "]\n");
        }

        @Around("execution(* sayHello(..)) && this(bye)")
        public String addSay(ProceedingJoinPoint pjp, GoodBye bye)
            throws Throwable {
            return pjp.proceed() + bye.sayBye();
        }

        public void reset() {
            counter = 0;
        }

        public int getCounter() {
            return counter;
        }
    }
这个切面中所引入的 GoodBye 接口及其默认实现内容如代码示例 3-10 所示。
代码示例 3-10 GoodBye 接口及其实现的代码片段
    public interface GoodBye {
        String sayBye();
    }

    public class DefaultGoodBye implements GoodBye {
        @Override
        public String sayBye() {
            return "Bye! ";
        }
    }
为了验证这个示例的运行结果是否如我们预期的那样,可以编写一个执行类,直接去调用 SpringHello 的 sayHello() 方法。但在实际工作中,大家要写的代码远比例子中的复杂,而且很多时候需要进行各种测试来做验证——有了充分的单元测试,才能保障代码质量。因此,从本节开始,我们的示例中会加入测试用例来验证代码是否符合预期。接下来,就让我们来看看这两种方式的代码该如何编写。
直接运行代码
我们通过
AnnotationConfigApplicationContext可以构建一个基于注解的 Spring 容器,再配合简单的 Java 配置类,这个代码就能运行了,如代码示例 3-11 所示。代码示例 3-11
Application类的代码片段@Configuration @EnableAspectJAutoProxy @ComponentScan("learning.spring.helloworld") public class Application { public static void main(String[] args) { AnnotationConfigApplicationContext applicationContext = new AnnotationConfigApplicationContext(Application.class); Hello hello = applicationContext.getBean("springHello", Hello.class); System.out.println(hello.sayHello(new StringBuffer("My Friend. "))); System.out.println(hello.sayHello(new StringBuffer("My Dear Friend. "))); } }上述代码的执行输出如下:
 Hello! My Friend. Welcome to Spring! [1]
 Bye!
 Hello! My Dear Friend. Welcome to Spring! [2]
 Bye
单元测试
直接运行代码,然后通过肉眼查看输出内容来判断逻辑是否正确,这种方法虽然简单直观,但不具备在大规模项目中使用的条件——每次改动代码都要人肉测试,既不高效,又浪费人力资源。所以,能用代码来验证的事,我们就要把它们写成自动化测试。
Maven 工程默认将生产代码和测试代码分开了,生产代码在
main目录中,而测试代码则写在test目录中。为了在项目中使用 JUnit 5 进行单元测试,pom.xml 文件需要引入spring-test和junit-jupiter依赖,就像下面这样:<dependencies> <!-- 省略其他内容 --> <dependency> <groupId>org.springframework</groupId> <artifactId>spring-test</artifactId> <version>5.3.15</version> <scope>test</scope> </dependency> <dependency> <groupId>org.junit.jupiter</groupId> <artifactId>junit-jupiter</artifactId> <version>5.8.2</version> <scope>test</scope> </dependency> </dependencies>下面我们编写一个
ApplicationTest类,通过其中的断言(assertion)来判断结果,如代码示例 3-12 所示。代码示例 3-12
ApplicationTest类的代码片段@ExtendWith(SpringExtension.class) @ContextConfiguration(classes = Application.class) // 这个@SpringJUnitConfig可以代替上述两行 // @SpringJUnitConfig(Application.class) public class ApplicationTest { @Autowired private Hello hello; @Autowired private SayAspect sayAspect; @BeforeEach public void setUp() { // Spring容器是同一个,因此SayAspect也是同一个 // 重置计数器,方便进行断言判断 sayAspect.reset(); } @Test @DisplayName("springHello不为空") public void testNotEmpty() { assertNotNull(hello); } @Test @DisplayName("springHello是否为GoodBye类型") public void testIntroduction() { assertTrue(hello instanceof GoodBye); } @Test @DisplayName("通知是否均已执行") public void testAdvice() { StringBuffer words = new StringBuffer("Test. "); String sentence = hello.sayHello(words); assertEquals("Test. Welcome to Spring! [1]\n", words.toString()); assertEquals("Hello! Test. Welcome to Spring! [1]\nBye! ", sentence); } @Test @DisplayName("说两句话,检查计数") public void testMultipleSpeaking() { assertEquals("Hello! Test. Welcome to Spring! [1]\nBye! ", hello.sayHello(new StringBuffer("Test. "))); assertEquals("Hello! Test. Welcome to Spring! [2]\nBye! ", hello.sayHello(new StringBuffer("Test. "))); } }在 IDEA 中执行测试后,可以看到如图 3-2 的测试结果。如果某项测试失败,那么对应测试就不会有绿色的对勾。大家可以通过点击选中某项测试,查看其具体执行情况。
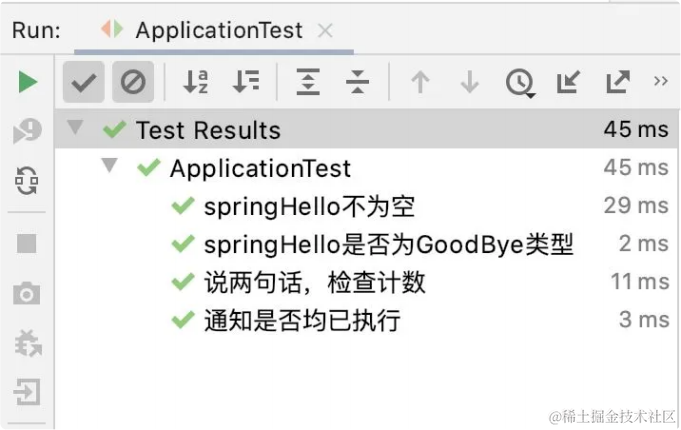
图 3-2 IDEA 中的测试结果也可以在命令行中通过 Maven 来执行测试,由于 JUnit 5 对 Maven 及其插件的版本有要求,测试者最好安装 3.6.0 版本以上的 Maven,并在 pom.xml 中修改 maven-surefire-plugin 的版本,比如使用 2.22.0 以上的版本,像下面这样:
   <build>
       <plugins>
           <!-- 为了支持JUnit 5, 使用2.22.0的插件 -->
           <plugin>
               <groupId>org.apache.maven.plugins</groupId>
               <artifactId>maven-surefire-plugin</artifactId>
               <version>2.22.0</version>
           </plugin>
       </plugins>
   </build>
随后在工程目录中执行
mvn test命令,如果一切顺利,我们就可以在输出中看到类似如下的内容(如果有断言失败,也会在输出中有所提示):[INFO] Tests run: 4, Failures: 0, Errors: 0, Skipped: 0, Time elapsed: 0.523 s - in learning.spring. helloworld.ApplicationTest [INFO] [INFO] Results: [INFO] [INFO] Tests run: 4, Failures: 0, Errors: 0, Skipped: 0
3.3 基于 XML Schema 的配置
Spring Framework 除了支持以 @AspectJ 注解的方式来配置 AOP,还支持通过 <aop/> XML Schema 的方式。如果大家习惯使用 XML,也可以考虑采用这种方式。
Spring AOP 相关的 XML 配置,都放在 <aop:config/> 中,比如要声明切面,就可以像代码示例 3-13 那样。切面类的内容和上一节介绍的类似,但无须添加注解。
代码示例 3-13 用 <aop:aspect/> 声明切面
    <?xml version="1.0" encoding="UTF-8"?>
    <beans xmlns="http://www.springframework.org/schema/beans"
            xmlns:xsi="http://www.w3.org/2001/XMLSchema-instance"
            xmlns:aop="http://www.springframework.org/schema/aop"
            xsi:schemaLocation="http://www.springframework.org/schema/beans https://www.springframework.org/schema/beans/spring-beans.xsd http://www.springframework.org/schema/aop https://www.springframework.org/schema/aop/spring-aop.xsd">

        <aop:config>
            <aop:aspect id="helloAspect" ref="aspectBean">
                <!-- 其他内容省略 -->
            </aop:aspect>
        </aop:config>

        <bean id="aspectBean" class="..." />
    </beans>
3.3.1 声明切入点
在 <aop:config/> 中,我们可以通过 <aop:pointcut/> 来配置切入点。它既可以配置在 <aop:config/> 中,也可以出现在 <aop:aspect/> 中。切入点的 id 可以方便复用, expression 中的切入点表达式就和 3.2.1 节中介绍的一致。例如像下面这样:
    <aop:config>
        <aop:aspect id="helloAspect" ref="aspectBean">
            <aop:pointcut id="helloType" expression="target(learning.spring.helloworld.Hello)" />
            <!-- 其他内容省略 -->
        </aop:aspect>
    </aop:config>
<aop:pointcut/> 的 expression 中既可以直接写表达式,也可以写带有 @Pointcut 注解的全限定方法。表达式同样支持运算,可以用 &&、 || 和 !,或者 and、 or 和 not 进行组合,考虑到 XML 中用前一种方式比较麻烦,这里建议大家还是尽量使用 and、 or 和 not。需要注意一点,组合表达式中不能通过 id 来引用其他已经定义的切入点。
3.3.2 声明通知
在 XML 中的通知也和 @AspectJ 注解的类似,只不过换成了 <aop:before/>、 <aop:after-returning/> 等 XML 而已。如果有多个通知要执行,可以让切面类实现 Ordered 接口或者添加 @Order 注解, <aop:aspect/> 中有一个 order 属性也可以配置切面的顺序。
前置通知
<aop:before/>可以用来声明前置通知,method属性的值是切面的具体方法,其中包含了前置通知的代码逻辑;pointcut属性的值是切入点表达式,也可以通过pointcut-ref属性来使用事先定义好的切入点。例如,代码示例 3-7 的前置通知,可以改写为如下 XML 格式:<aop:aspect id="beforeAspect" ref="beforeAspectBean"> <aop:before pointcut="learning.spring.helloworld.HelloPointcut.sayHello()" method="before" /> </aop:aspect>在
pointcut中也可以使用绑定的方式向方法传递参数,比如用args()、this()或target()。后置通知
与基于
@AspectJ注解的方式一样,基于 XML Schema 的后置通知同样分为三类。- 正常返回:
<aop:after-returning/>。 - 抛出异常:
<aop:after-throwing/>。 - 无所谓正常返回还是抛出异常:
<aop:after/>。
- 正常返回:
三个标签中都有 pointcut、 pointcut-ref 和 method 属性,其作用与 <aop:before/> 中介绍的一样。
<aop:after-returning/> 中还有一个 returning 属性,用来将方法的执行返回传递到通知方法中,属性值需要与方法的参数名一致。当然,我们也可以忽略这个属性,不关心返回值。3.2.2 节中的例子可以改写成下面这样:
<aop:after-returning pointcut="execution(public * say(..))" returning="words" method="printWords" />
<aop:after-throwing/> 中也与注解一样,有一个 throwing 属性,用来向通知方法中传递抛出的异常。3.2.2 节中的例子同样可以改写成下面这样:
 <aop:after-throwing pointcut="execution(public * say(..))" method="afterThrow" />

 <aop:after-throwing pointcut="execution(public * say(..))" throwing="exception" method="printException" />
<aop:after/> 则相对简单,没有额外的属性可以配置。上面的例子改写为 XML 后就像下面这样:
<aop:after pointcut="execution(public * say(..))" method="afterAdvice" />
环绕通知
环绕通知的代码实现与使用
@AspectJ注解时是一样的,只不过将注解换成了<aop:around/>的 XML,代码示例 3-8 的声明可以改写成如下 XML:<aop:around pointcut="execution(public * say(..))" method="recordTime" />至于具体的方法定义,可以回顾一下 3.2.2 节中的相关内容和代码示例 3-8。
引入通知
XML 中同样也可以声明引入,在
<aop:aspect/>中通过<aop:declare-parents/>就可以实现和@DeclareParents注解一样的效果,<aop:declare-parents/>里有三个属性。types-matching:用来匹配类型,比如learning.spring.helloworld.*+。implement-interface:要引入的接口。default-impl:接口的默认实现。
3.2.2 节中的 @DeclareParents 示例可以改写成下面这样:
   <aop:aspect id="myAspect" ref="myAspectBean">
       <aop:declare-parents types-matching="learning.spring.helloworld.Hello+"
           implement-interface="learning.spring.helloworld.GoodBye"
           default-impl="learning.spring.helloworld.DefaultGoodByeImpl"/>
       <!-- 其他省略 -->
   </aop:aspect>
3.3.3 通知器
如果觉得 XML Schema 的配置方式比较繁琐,在 <aop:config/> 中又有 <aop:aspect/>,又有 <aop:pointcut/>,还有各种通知。为此,Spring Framework 为我们提供了一套通知器(advisor)的 XML 元素,通过 <aop:advisor/> 可以简单地配置出一个仅包含单个通知的切面,通知器中引用的 Bean 要实现如下的 AOP 通知接口。
MethodInterceptor:环绕通知。MethodBeforeAdvice:前置通知。AfterReturningAdvice:正常返回的后置通知。ThrowsAdvice:抛出异常的后置通知。
随后,可以像下面这样来定义通知器:
   <aop:config>
       <aop:pointcut id="sayMethod" expression="execution(public * say(..))" />

       <aop:advisor pointcut-ref="sayMethod" advice-ref="aroundAdvice" />
   </aop:config>

   <bean id="aroundAdvice" class="learning.spring.helloworld.SayMethodInterceptor" />
3.3.4 基于 XML Schema 的示例
与 3.2 节一样,本节也提供了一个示例帮助大家理解并掌握基于 XML Schema 的 AOP 使用方式。有了 3.2.3 节的基础,本节的例子可以基本照搬 3.2.3 节中的代码,去除所有 @AspectJ 相关的注解,同时将 Bean 配置方式从注解换成 XML。
在项目的 resources 目录中添加一个 applicationContext.xml,内容如代码示例 3-14 所示。可以看到 XML 文件可以完全取代注解来实现 AOP 相关的配置。
代码示例 3-14 完整的 applicationContext.xml 文件
   <?xml version="1.0" encoding="UTF-8"?>
   <beans xmlns="http://www.springframework.org/schema/beans"
           xmlns:xsi="http://www.w3.org/2001/XMLSchema-instance"
           xmlns:aop="http://www.springframework.org/schema/aop"
           xsi:schemaLocation="
           http://www.springframework.org/schema/beans
           https://www.springframework.org/schema/beans/spring-beans.xsd
           http://www.springframework.org/schema/aop
           https://www.springframework.org/schema/aop/spring-aop.xsd">

       <aop:config>
           <aop:aspect ref="helloAspect" order="1">
               <aop:before pointcut="target(learning.spring.helloworld.Hello) and args(words)"
                           method="addWords"/>
           </aop:aspect>

           <aop:aspect ref="sayAspect" order="2">
               <aop:before pointcut="execution(* say*(..)) and args(words)" method="countSentence" />
               <aop:around pointcut="execution(* sayHello(..)) and this(bye)" method="addSay" />
               <aop:declare-parents types-matching="learning.spring.helloworld.*"
                   implement-interface="learning.spring.helloworld.GoodBye"
                   default-impl="learning.spring.helloworld.DefaultGoodBye" />
           </aop:aspect>
       </aop:config>

       <bean id="springHello" class="learning.spring.helloworld.SpringHello" />
       <bean id="helloAspect" class="learning.spring.helloworld.HelloAspect" />
       <bean id="sayAspect" class="learning.spring.helloworld.SayAspect" />

   </beans>
由于容器的配置使用了 XML 文件,所以在 Application 类中也要使用对应的类来加载容器配置,本次我们选择了 ClassPathXmlApplicationContext,具体的执行代码如代码示例 3-15 所示。运行后可以看到与 3.2.3 中一样的输出。
代码示例 3-15 Application 类的代码片段
   public class Application {
       public static void main(String[] args) {
           ApplicationContext applicationContext = new ClassPathXmlApplicationContext("applicationContext.xml");

           Hello hello = applicationContext.getBean("springHello", Hello.class);
           System.out.println(hello.sayHello(new StringBuffer("My Friend. ")));
           System.out.println(hello.sayHello(new StringBuffer("My Dear Friend. ")));
       }
   }
对于单元测试,我们需要做的改动也非常小,之前的 @ContextConfiguration 中给的是 Java 配置类,这次将其改为提供 CLASSPATH 中的 XML 配置文件,其余不动,具体如下所示:
   @ExtendWith(SpringExtension.class)
   @ContextConfiguration("classpath:applicationContext.xml")
   public class ApplicationTest {
       // 省略
   }
茶歇时间:超简洁的 JUnit 单元测试入门
在这两节的例子中,我们都使用了 JUnit 5 来进行自动化测试。有了自动化测试的保障,我们就可以在每次修改代码后快速进行验证,这样既能保障质量,又能节省大量人力。因此,很有必要为系统编写测试代码,其中单元测试和集成测试缺一不可。
通过代码示例 3-12 可以看到,带有
@Test注解的方法会被视为测试方法,在测试方法中务必使用断言进行判断,而不要用输出日志的方式进行人工观察,否则测试代码的价值会大打折扣。org.junit.jupiter.api.Assertions类中提供了大量的断言静态方法,比如:
- 判断两者是否相等的
assertEquals()和assertNotEquals();- 判断布尔值的
assertTrue()和assertFalse();- 判断对象是否为空的
assertNull()和assertNotNull()。在每个测试方法执行前后,都可以执行一些初始化和清理的逻辑:添加了
@BeforeEach和@AfterEach的方法会分别在测试方法执行前后被 JUnit 执行;如果要在所有测试方法执行前进行总的初始化,可以使用@BeforeAll注解,对应的还有所有测试方法执行后执行的@AfterAll。JUnit 5 可以通过
@ExtendWith注解来添加扩展,在我们的例子中,@ExtendWith(SpringExtension.class)就添加了 Spring 的测试支持,@ContextConfiguration注解指定了用来初始化 Spring 容器的配置类或配置文件。值得一提的是,JUnit 4 和 JUnit 5 在 API 层面存在不少差异,比如
@Before和@After分别对应了@BeforeEach和@AfterEach,@RunWith对应了@ExtendWith,两个版本的assertXxx()静态方法放在了不同的类里等。如果大家还在使用 JUnit 4,可以查阅官方文档了解具体的用法。鉴于 JUnit 5 在功能上更胜一筹,如果可以的话,建议大家还是使用 JUnit 5,在本书后面的章节也会有更多关于 Spring 的测试支持的例子。
3.4 小结
通过本章的学习,相信大家已经对 Spring AOP 有了一个基本的认识:了解了 AOP 的核心概念以及 Spring Framework 中 AOP 的实现原理;学习了 Spring Framework 提供的两种配置方式,大家可以根据实际情况选择使用基于 @AspectJ 注解的方式,或者基于 <aop/> XML Schema 的方式(无论哪种方式,其中对切面、切入点和通知的定义大同小异)。
此外,本章的两个 Hello 示例,都提供了基于 JUnit 5 的自动化测试代码,演示了如何通过单元测试来验证代码的逻辑。希望大家在日常工作中能更多地使用这种测试方式,本书后续章节也会有更多这方面的内容。
下一章,我们会从 Spring Framework 进入 Spring Boot 的领域,为大家介绍 Spring Boot 的几个核心功能。