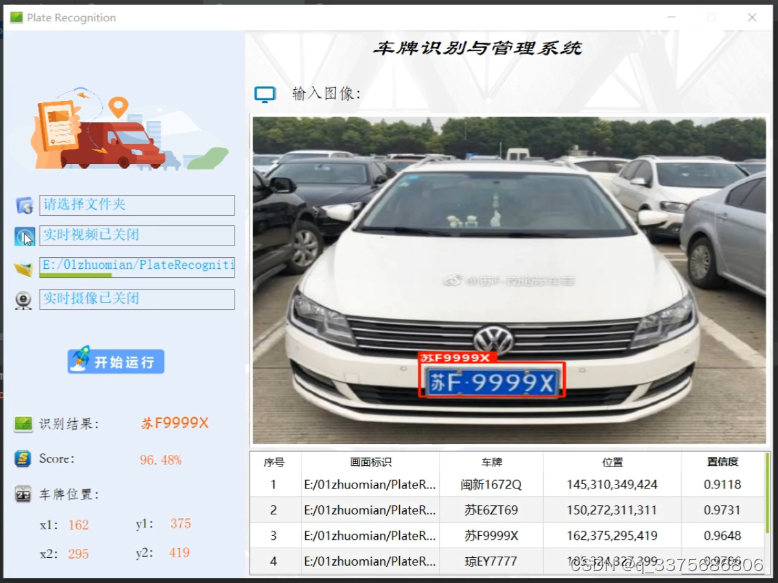
一、前言及思路简析
目前车牌识别系统在各小区门口随处可见,识别效果貌似都还可以。查阅资料后,发现整个过程又可以细化为车牌定位、畸变校正、车牌分割和内容识别四部分。本篇随笔主要介绍车牌定位及畸变校正两部分,在python环境下通过opencv实现。
1.1 车牌定位
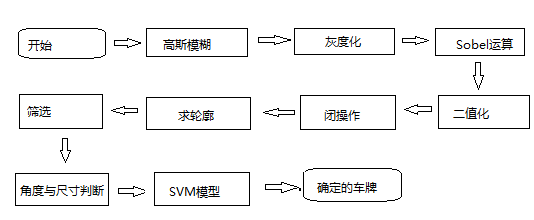
目前主流的车牌定位方法从大的方面来说可以分为两类:一种是基于车牌的背景颜色特征;另一种基于车牌的轮廓形状特征。基于颜色特征的又可分为两类:一种在RGB空间识别,另一种在HSV空间识别。经测试后发现,单独使用任何一种方法,效果均不太理想。目前比较普遍的做法是几种定位方法同时使用,或用一种识别,另一种验证。本文主要通过颜色特征对车牌进行定位,以HSV空间的H分量为主,以RGB空间的R分量和B分量为辅,后续再用车牌的长宽比例排除干扰。
1.2 畸变校正
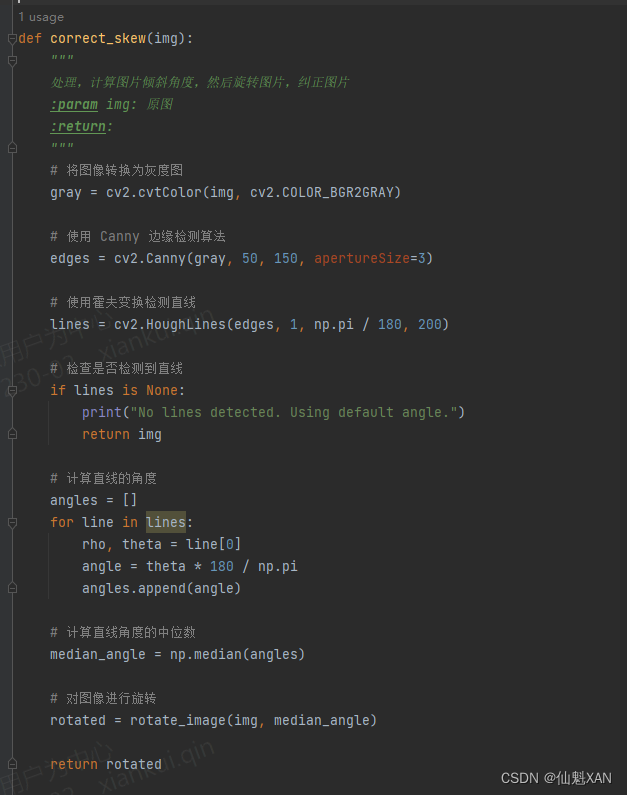
在车牌的图像采集过程中,相机镜头通常都不是垂直于车牌的,所以待识别图像中车牌或多或少都会有一定程度的畸变,这给后续的车牌内容识别带来了一定的困难。因此需要对车牌进行畸变校正,消除畸变带来的不利影响。
参考资料:https://www.cnblogs.com/HL-space/p/10588423.html
# https://www.cnblogs.com/HL-space/p/10588423.html
import os
import cv2
import numpy as np


# 预处理
def imgProcess(path):
    img = cv2.imread(path)
    # 统一规定大小
    img = cv2.resize(img, (640, 480))
    # 高斯模糊
    img_Gas = cv2.GaussianBlur(img, (5, 5), 0)
    # RGB通道分离
    img_B = cv2.split(img_Gas)[0]
    img_G = cv2.split(img_Gas)[1]
    img_R = cv2.split(img_Gas)[2]
    # 读取灰度图和HSV空间图
    img_gray = cv2.cvtColor(img_Gas, cv2.COLOR_BGR2GRAY)
    img_HSV = cv2.cvtColor(img_Gas, cv2.COLOR_BGR2HSV)
    return img, img_Gas, img_B, img_G, img_R, img_gray, img_HSV


# 初步识别
def preIdentification(img_gray, img_HSV, img_B, img_R):
    for i in range(480):
        for j in range(640):
            # 普通蓝色车牌,同时排除透明反光物质的干扰
            if ((img_HSV[:, :, 0][i, j]-115)**2 < 15**2) and (img_B[i, j] > 70) and (img_R[i, j] < 40):
                img_gray[i, j] = 255
            else:
                img_gray[i, j] = 0
    # 定义核
    kernel_small = np.ones((3, 3))
    kernel_big = np.ones((7, 7))

    img_gray = cv2.GaussianBlur(img_gray, (5, 5), 0) # 高斯平滑
    img_di = cv2.dilate(img_gray, kernel_small, iterations=5) # 腐蚀5次
    img_close = cv2.morphologyEx(img_di, cv2.MORPH_CLOSE, kernel_big) # 闭操作
    img_close = cv2.GaussianBlur(img_close, (5, 5), 0) # 高斯平滑
    _, img_bin = cv2.threshold(img_close, 100, 255, cv2.THRESH_BINARY) # 二值化
    return img_bin


# 定位
def fixPosition(img, img_bin):
    # 检测所有外轮廓,只留矩形的四个顶点
    contours, _ = cv2.findContours(img_bin, cv2.RETR_LIST, cv2.CHAIN_APPROX_SIMPLE)
    #形状及大小筛选校验
    det_x_max = 0
    det_y_max = 0
    num = 0
    for i in range(len(contours)):
        x_min = np.min(contours[i][ :, :, 0])
        x_max = np.max(contours[i][ :, :, 0])
        y_min = np.min(contours[i][ :, :, 1])
        y_max = np.max(contours[i][ :, :, 1])
        det_x = x_max - x_min
        det_y = y_max - y_min
        if (det_x / det_y > 1.8) and (det_x > det_x_max ) and (det_y > det_y_max ):
            det_y_max = det_y
            det_x_max = det_x
            num = i
    # 获取最可疑区域轮廓点集
    points = np.array(contours[num][:, 0])
    return points


def findVertices(points):
    # 获取最小外接矩阵,中心点坐标,宽高,旋转角度
    rect = cv2.minAreaRect(points)
    # 获取矩形四个顶点,浮点型
    box = cv2.boxPoints(rect)
    # 取整
    box = np.int0(box)
    # 获取四个顶点坐标
    left_point_x = np.min(box[:, 0])
    right_point_x = np.max(box[:, 0])
    top_point_y = np.min(box[:, 1])
    bottom_point_y = np.max(box[:, 1])

    left_point_y = box[:, 1][np.where(box[:, 0] == left_point_x)][0]
    right_point_y = box[:, 1][np.where(box[:, 0] == right_point_x)][0]
    top_point_x = box[:, 0][np.where(box[:, 1] == top_point_y)][0]
    bottom_point_x = box[:, 0][np.where(box[:, 1] == bottom_point_y)][0]
    # 上下左右四个点坐标
    vertices = np.array([[top_point_x, top_point_y], [bottom_point_x, bottom_point_y], [left_point_x, left_point_y], [right_point_x, right_point_y]])
    return vertices, rect


def tiltCorrection(vertices, rect):
    # 畸变情况1
    if rect[2] > -45:
        new_right_point_x = vertices[0, 0]
        new_right_point_y = int(vertices[1, 1] - (vertices[0, 0]- vertices[1, 0]) / (vertices[3, 0] - vertices[1, 0]) * (vertices[1, 1] - vertices[3, 1]))
        new_left_point_x = vertices[1, 0]
        new_left_point_y = int(vertices[0, 1] + (vertices[0, 0] - vertices[1, 0]) / (vertices[0, 0] - vertices[2, 0]) * (vertices[2, 1] - vertices[0, 1]))
        # 校正后的四个顶点坐标
        point_set_1 = np.float32([[440, 0],[0, 0],[0, 140],[440, 140]])
    # 畸变情况2
    elif rect[2] < -45:
        new_right_point_x = vertices[1, 0]
        new_right_point_y = int(vertices[0, 1] + (vertices[1, 0] - vertices[0, 0]) / (vertices[3, 0] - vertices[0, 0]) * (vertices[3, 1] - vertices[0, 1]))
        new_left_point_x = vertices[0, 0]
        new_left_point_y = int(vertices[1, 1] - (vertices[1, 0] - vertices[0, 0]) / (vertices[1, 0] - vertices[2, 0]) * (vertices[1, 1] - vertices[2, 1]))
        # 校正后的四个顶点坐标
        point_set_1 = np.float32([[0, 0],[0, 140],[440, 140],[440, 0]])

    # 校正前平行四边形四个顶点坐标
    new_box = np.array([(vertices[0, 0], vertices[0, 1]), (new_left_point_x, new_left_point_y), (vertices[1, 0], vertices[1, 1]), (new_right_point_x, new_right_point_y)])
    point_set_0 = np.float32(new_box)
    return point_set_0, point_set_1, new_box


def transform(img, point_set_0, point_set_1):
    # 变换矩阵
    mat = cv2.getPerspectiveTransform(point_set_0, point_set_1)
    # 投影变换
    lic = cv2.warpPerspective(img, mat, (440, 140))
    return lic


def main():
    path = os.getcwd()+"\\img\\0.jpg"
    # 图像预处理
    img, img_Gas, img_B, img_G, img_R, img_gray, img_HSV = imgProcess(path)
    # 初步识别
    img_bin  = preIdentification(img_gray, img_HSV, img_B, img_R)
    points = fixPosition(img, img_bin)
    vertices, rect = findVertices(points)
    point_set_0, point_set_1, new_box = tiltCorrection(vertices, rect)
    img_draw = cv2.drawContours(img.copy(), [new_box], -1, (0,0,255), 3)
    lic = transform(img, point_set_0, point_set_1)
    # 原图上框出车牌
    cv2.namedWindow("Image")
    cv2.imshow("Image", img_draw)
    # 二值化图像
    cv2.namedWindow("Image_Bin")
    cv2.imshow("Image_Bin", img_bin)
    # 显示校正后的车牌
    cv2.namedWindow("Lic")
    cv2.imshow("Lic", lic)
    # 暂停、关闭窗口
    cv2.waitKey(0)
    cv2.destroyAllWindows()


if __name__ == '__main__':
    main()