源代码:GitHub - QQQQQQBY/CrawlNYTimes: 使用scrapy爬虫爬取纽约时报、BBC、Snopes等网站数据
目录
架构组成
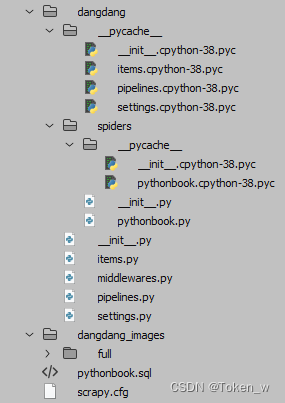
文件结构:
myproject/
    main.py
    scrapy.cfg
    myproject/
        __init__.py
        items.py
        middlewares.py
        pipelines.py
        settings.py
        spiders/
            __init__.py
            nytimes.py
scrapy.cfg
1. scrapy.cfg 是 Scrapy 项目配置文件,它用于定义项目的基本配置信息:
例如可以进行如下配置,这里的 myproject 是项目的名称,你需要将其替换为你自己的项目名称:
[settings]
default = myproject.settings

[deploy]
#url = http://localhost:6800/
project = myproject
items.py
2. items.py 是 Scrapy 项目中的一个文件,用于定义数据结构,也称为 "item"。在 Scrapy 中,items 是用来存储从网站提取的数据。每个 item 通常对应于你想从网站上抓取的一个对象,比如一篇文章、一个产品、一条新闻等等
例如,可以这样写, scrapy.Field() 是一个特殊的类型,表示这个字段是一个 Scrapy item 字段。"title, date"这些都是你自己定义的变量,将来需要被网站上抓取的内容赋值:
import scrapy

class SnopesItem(scrapy.Item):
    title = scrapy.Field()
    date = scrapy.Field()
    url = scrapy.Field()
    claim = scrapy.Field()
    rating = scrapy.Field()
    site = scrapy.Field()
    tag = scrapy.Field()
在 Scrapy 项目中,当你抓取到数据时,你会创建一个 item 对象,并将抓取到的数据赋值给相应的字段。例如:
import scrapy
from myproject.items import SnopesItem

class NYTimesSpider(scrapy.Spider):
    name = "nytimes"
    start_urls = ['https://www.nytimes.com/section/politics']

    def parse(self, response):
        for article in response.css('.css-18yolpw'):
            item = SnopesItem()
            item['title'] = article.css('h2::text').get()
            item['date'] = article.css('.css-1d8a290 span::text').get()
            item['url'] = response.urljoin(article.css('a::attr(href)').get())
            item['claim'] = article.css('p::text').get()
            item['rating'] = "True"
            item['site'] = "NYTimes"
            item['tag'] = "Politics"
            yield item
middlewares.py
3. middlewares.py 是 Scrapy 项目中的一个文件,用于定义中间件(middlewares)。中间件是在 Scrapy 中处理请求和响应的钩子(hooks),它们可以用于修改或处理 Scrapy 发出的每一个请求和收到的每一个响应。
- 请求预处理:在 Scrapy 发出请求之前,对请求进行修改或处理。例如,添加自定义的请求头、设置代理、处理 cookie 等。
- 响应预处理:在 Scrapy 收到响应之后,对响应进行修改或处理。例如,检查响应状态码、处理重定向、过滤不必要的响应等。
- 错误处理:在请求或响应过程中捕获并处理错误。例如,处理连接超时、重试失败的请求等。
例如:
from scrapy import signals
from fake_useragent import UserAgent

class MyCustomDownloaderMiddleware:

    def __init__(self):
        self.ua = UserAgent()

    @classmethod
    def from_crawler(cls, crawler):
        # This method is used by Scrapy to create your spiders.
        s = cls()
        crawler.signals.connect(s.spider_opened, signal=signals.spider_opened)
        return s

    def process_request(self, request, spider):
        # This method is called for each request that goes through the downloader middleware.
        # Here we can modify the request (e.g., set custom headers)
        request.headers['User-Agent'] = self.ua.random
        return None

    def process_response(self, request, response, spider):
        # This method is called with the response returned from the downloader.
        # Here we can modify the response (e.g., filter certain responses)
        if response.status != 200:
            spider.logger.warning(f"Non-200 response: {response.status} for {request.url}")
        return response

    def process_exception(self, request, exception, spider):
        # This method is called when an exception is raised during the request/response handling.
        # Here we can handle exceptions (e.g., retry the request)
        spider.logger.error(f"Request failed: {exception} for {request.url}")
        return None

    def spider_opened(self, spider):
        spider.logger.info('Spider opened: %s' % spider.name)
更详细的配置介绍可以看其他博客,例如scrapy中间件详解_scrapy 中间件-CSDN博客
pipelines.py
4. pipelines.py 是 Scrapy 项目中的一个文件,用于定义数据管道(Item Pipeline)。数据管道是在 Scrapy 中处理爬取到的数据(items)的组件。通过数据管道,你可以对爬取到的数据进行一系列的处理,例如清洗数据、验证数据、将数据保存到数据库等
- 数据清洗:对爬取到的数据进行清洗和规范化处理,例如去除空白字符、格式化日期等。
- 数据验证:验证爬取到的数据是否符合预期,例如检查字段是否为空、数值是否在合理范围内等。
- 数据存储:将爬取到的数据保存到数据库、文件或其他存储系统中,例如保存到 MySQL 数据库、MongoDB、JSON 文件等。
pipelines.py 文件的示例,展示了如何定义一个简单的数据管道,将爬取到的数据进行清洗并保存到 JSON 文件中:
import json

class JsonWriterPipeline:

    def open_spider(self, spider):
        # 当爬虫启动时,这个方法会被调用。我们在这里打开文件。
        self.file = open('items.json', 'w')

    def close_spider(self, spider):
        # 当爬虫关闭时,这个方法会被调用。我们在这里关闭文件。
        self.file.close()

    def process_item(self, item, spider):
        # 这个方法会处理每一个从爬虫传递过来的 item。
        # 我们在这里将 item 转换为 JSON 格式并写入文件。
        item["url"] = item["url"].strip(" \n\t\r")
        item["title"] = item["title"].strip().replace("\n", " ").replace("\r", " ").replace("\t", " ").replace("  ", " ")
        item["date"] = item["date"].strip(" \n\t\r")
        item["claim"] = item["claim"].strip().replace("\n", " ").replace("\r", " ").replace("\t", " ").replace("  ", " ")
        item["rating"] = item["rating"].strip(" \n\t\r")

        line = json.dumps(dict(item)) + "\n"
        self.file.write(line)
        return item
settings.py
5. settings.py 是 Scrapy 项目中的一个配置文件,用于定义和配置项目的各种设置和参数。这些设置包括爬虫的基本配置、并发请求数、下载延迟、用户代理、中间件和数据管道等
- 全局配置:定义全局的项目配置,例如项目名称、日志级别等。
- 爬虫配置:定义和控制爬虫的行为,例如并发请求数、下载延迟、超时设置等。
- 中间件配置:配置下载中间件、爬虫中间件和扩展。
- 数据管道配置:配置数据管道,以便对爬取到的数据进行处理和存储。
- 其他配置:包括代理设置、用户代理设置、请求头配置、禁止重定向等。
settings.py 配置示例:
# 项目名称
BOT_NAME = 'myproject'

# 定义爬虫模块
SPIDER_MODULES = ['myproject.spiders']
NEWSPIDER_MODULE = 'myproject.spiders'

# 遵守 robots.txt 规则
ROBOTSTXT_OBEY = True

# 并发请求数
CONCURRENT_REQUESTS = 16

# 下载延迟
DOWNLOAD_DELAY = 3

# 禁用 cookies
COOKIES_ENABLED = False

# 默认请求头
DEFAULT_REQUEST_HEADERS = {
    'Accept': 'text/html,application/xhtml+xml,application/xml;q=0.9,image/webp,*/*;q=0.8',
    'Accept-Language': 'en',
}

# 启用或禁用扩展
EXTENSIONS = {
    'scrapy.extensions.telnet.TelnetConsole': None,
}

# 启用或禁用下载中间件
DOWNLOADER_MIDDLEWARES = {
    'myproject.middlewares.MyCustomDownloaderMiddleware': 543,
}

# 启用或禁用爬虫中间件
SPIDER_MIDDLEWARES = {
    'myproject.middlewares.MyCustomSpiderMiddleware': 543,
}

# 启用或禁用数据管道
ITEM_PIPELINES = {
    'myproject.pipelines.MyCustomPipeline': 300,
}

# 启用自动限速扩展
AUTOTHROTTLE_ENABLED = True
AUTOTHROTTLE_START_DELAY = 5
AUTOTHROTTLE_MAX_DELAY = 60
AUTOTHROTTLE_TARGET_CONCURRENCY = 1.0
AUTOTHROTTLE_DEBUG = False

# 启用 HTTP 缓存
HTTPCACHE_ENABLED = True
HTTPCACHE_EXPIRATION_SECS = 0
HTTPCACHE_DIR = 'httpcache'
HTTPCACHE_IGNORE_HTTP_CODES = []
HTTPCACHE_STORAGE = 'scrapy.extensions.httpcache.FilesystemCacheStorage'
spiders/nytimes.py
6. spiders/nytimes.py 文件通常是一个 Scrapy 爬虫脚本,这里的示例用于定义从 New York Times 网站上爬取数据的爬虫。这个文件中会包含爬虫类、爬取逻辑、数据提取规则等。
这里将selenium包和scrapy包配合使用抓取网络数据,但有些网站是可以只使用scrapy就可以完成数据爬取的。
PS: 这是因为NYtimes网站的内容动态加载的,具体可以看https://www.nytimes.com/section/politics,网页向下滚动后加载接下来的内容,因此我们在抓取内容时也需要模拟人类向下滚动页面的操作,这就需要使用selenium包加载页面并滚动到底部,以触发动态内容加载:
# 导入所需的模块和库,包括 Scrapy、Selenium、以及项目中的 SnopesItem 数据结构
import scrapy
from snopes.items import SnopesItem
from fake_useragent import UserAgent
from selenium import webdriver
from selenium.webdriver.chrome.options import Options
from selenium.webdriver.chrome.service import Service
from scrapy.http import HtmlResponse
import time

# 定义爬虫的主要逻辑
class NYTimesSpider(scrapy.Spider):
    # 定义爬虫的名称,在命令行运行爬虫时使用
    name = "NYTimes"
    # 限定爬虫可以访问的域名和起始 URL
    allowed_domains = ["nytimes.com"]
    start_urls = ["https://www.nytimes.com/section/politics"]
    # 使用 fake_useragent 随机生成一个用户代理,以避免被网站屏蔽
    ua = UserAgent(browsers=["chrome"])


    # 初始化爬虫,包括配置 Selenium 的 ChromeDriver
    def __init__(self, *args, **kwargs):
        super(NYTimesSpider, self).__init__(*args, **kwargs)
        # 配置 Selenium 的 ChromeDriver
        chrome_driver_path = "C:/path/to/chromedriver" # chromedriver的路径,具体是你电脑中该执行器的位置

        # 设置浏览器选项,如禁用 GPU、无头模式、设置窗口大小等
        chrome_options = Options()
        chrome_options.add_argument("--headless")
        chrome_options.add_argument("--disable-gpu")
        chrome_options.add_argument("--no-sandbox")
        chrome_options.add_argument("--window-size=1920,1080")

        # 初始化 Selenium 的 ChromeDriver 实例
        self.service = Service(chrome_driver_path)

        # webdriver.Chrome 是 selenium.webdriver 模块中的类,用于启动和控制 Chrome 浏览器
        # options=chrome_options 用于传递浏览器配置选项,如禁用 GPU、无头模式、设置窗口大小等
        self.driver = webdriver.Chrome(service=self.service, options=chrome_options)


    # 负责请求起始 URL 并处理页面加载和滚动,以获取完整的页面内容
    def parse(self, response):
        # 将 Web 浏览器导航到响应的 URL
        self.driver.get(response.url)
        time.sleep(10)  # 等待页面加载

        # 检索网页的当前高度

        last_height = self.driver.execute_script("return document.body.scrollHeight")

        while True:

            # 获取当前页面的HTML内容并传递给Scrapy
            page_source = self.driver.page_source
            fake_response = HtmlResponse(url=self.driver.current_url, body=page_source, encoding='utf-8') # 使用 HTML 内容创建虚假响应
            yield from self.parse_articles(fake_response) # 解析相应中的文章,提取当前页面中需要的信息即item


            # 滚动到页面底部(下一页)
            self.driver.execute_script("window.scrollTo(0, document.body.scrollHeight);")
            time.sleep(5)  # 等待新内容加载

            # 检索网页的新高度,是last_height 的高度加上新内容的高度
            new_height = self.driver.execute_script("return document.body.scrollHeight")


            # 检查新高度是否与之前的高度相同,若相同,表示已经加载完毕

            if new_height == last_height:
                break
            last_height = new_height

    # 定义处理响应和提取数据的方法

    def parse_articles(self, page_source):

        # 迭代与 CSS 选择器匹配的每个文章元素
        for article in response.css('.css-18yolpw'):
            item = SnopesItem()

            # css选择器选择需要的内容
            item["title"] = article.css('div:nth-child(1) > article:nth-child(1) > a:nth-child(2) > h3:nth-child(1)::text').get()
            item["date"] = article.css('div:nth-child(1) > div:nth-child(2) > span:nth-child(1)::text').get()
            item["url"] = response.urljoin(article.css('div:nth-child(1) > article:nth-child(1) > a:nth-child(2)::attr(href)').get())
            item["claim"] = article.css('div:nth-child(1) > article:nth-child(1) > p:nth-child(3)::text').get()
            item["rating"] = "True"
            item["site"] = "NYTimes"
            item["tag"] = "NYTimes"

            # 执行完后是自动调用了pipeline.py 对数据进行清洗保存等
            yield item
只使用scrapy完成数据爬取案例:(点击网页中的下一页按钮,之后继续爬取)
import json

import scrapy
from fake_useragent import UserAgent

from snopes.items import SnopesItem


class SnopesFactSpider(scrapy.Spider):
    name = "snopes_fact" # specifies the name of the spider
    allowed_domains = ["www.snopes.com"] #  domain names that the spider is allowed to crawl
    # base_url = 'https://www.snopes.com/tag/joe-biden/?pagenum={}'
    base_url = 'https://www.snopes.com/'
    start_urls = ["https://www.snopes.com/tag/joe-biden/"] # URLs that the spider will start crawling from
    ua = UserAgent()

    # def start_requests(self):
    #     for page in range(2,7):
    #         url = self.base_url.format(page)
    #         yield scrapy.Request(url,callback=self.parse)


    def parse(self, response): #  processing responses and extracting data
        # follow links to article pages
        for href in response.css(".outer_article_link_wrapper::attr(href)"):
            yield response.follow(href, self.parse_article,
                                  headers={"User-Agent": self.ua.random},)
        # receives a Response object and should return either Item objects, Request objects, or an iterable of either
        # follow pagination links
        for href in response.css(".next-button::attr(href)"):
            yield response.follow(href, self.parse,
                                  headers={"User-Agent": self.ua.random},)

    def parse_article(self, response):
        item = SnopesItem()
        item["url"] = response.url
        item["title"] = response.css(".title-container > h1::text").extract_first("")
        try:
            item["date"] = json.loads(response.css("script[type='application/ld+json']::text").extract_first())[
                "datePublished"]
        except:
            item["date"] = ""
        item["claim"] = response.css(".claim_cont::text").extract_first("")
        item["rating"] = response.css(".rating_title_wrap::text").extract_first("")
        # item["head_image_url"] = response.css("#cover-main::attr(src)").extract_first("")
        # item["body"] = response.css("#fact_check_rating_container ~ *").extract()
        # item["sources"] = response.css("#sources_rows > p").extract()
        item["site"] = "snopes"
        item["tag"] = "joe-biden"
        yield item
        # pass
main.py
7. main.py 调用具体的爬虫类
例如:
# main.py
import sys
import os
from scrapy.cmdline import execute


def start_scrapy():
    # sys.path.append(os.path.dirname(os.path.abspath(__file__)))
    # sys.path.append("C:/Users/lenovo/Desktop/reddit_new/AgentReddit/snopes/")
    os.chdir(os.path.dirname(os.path.abspath(__file__)))
    # 运行单个爬虫
    execute(["scrapy", "crawl", "NYTimes"])


if __name__ == '__main__':
    start_scrapy()
只需要改动"NYTimes"就可以,这是与 spiders/nytimes.py中的"name"相对应。