文章目录
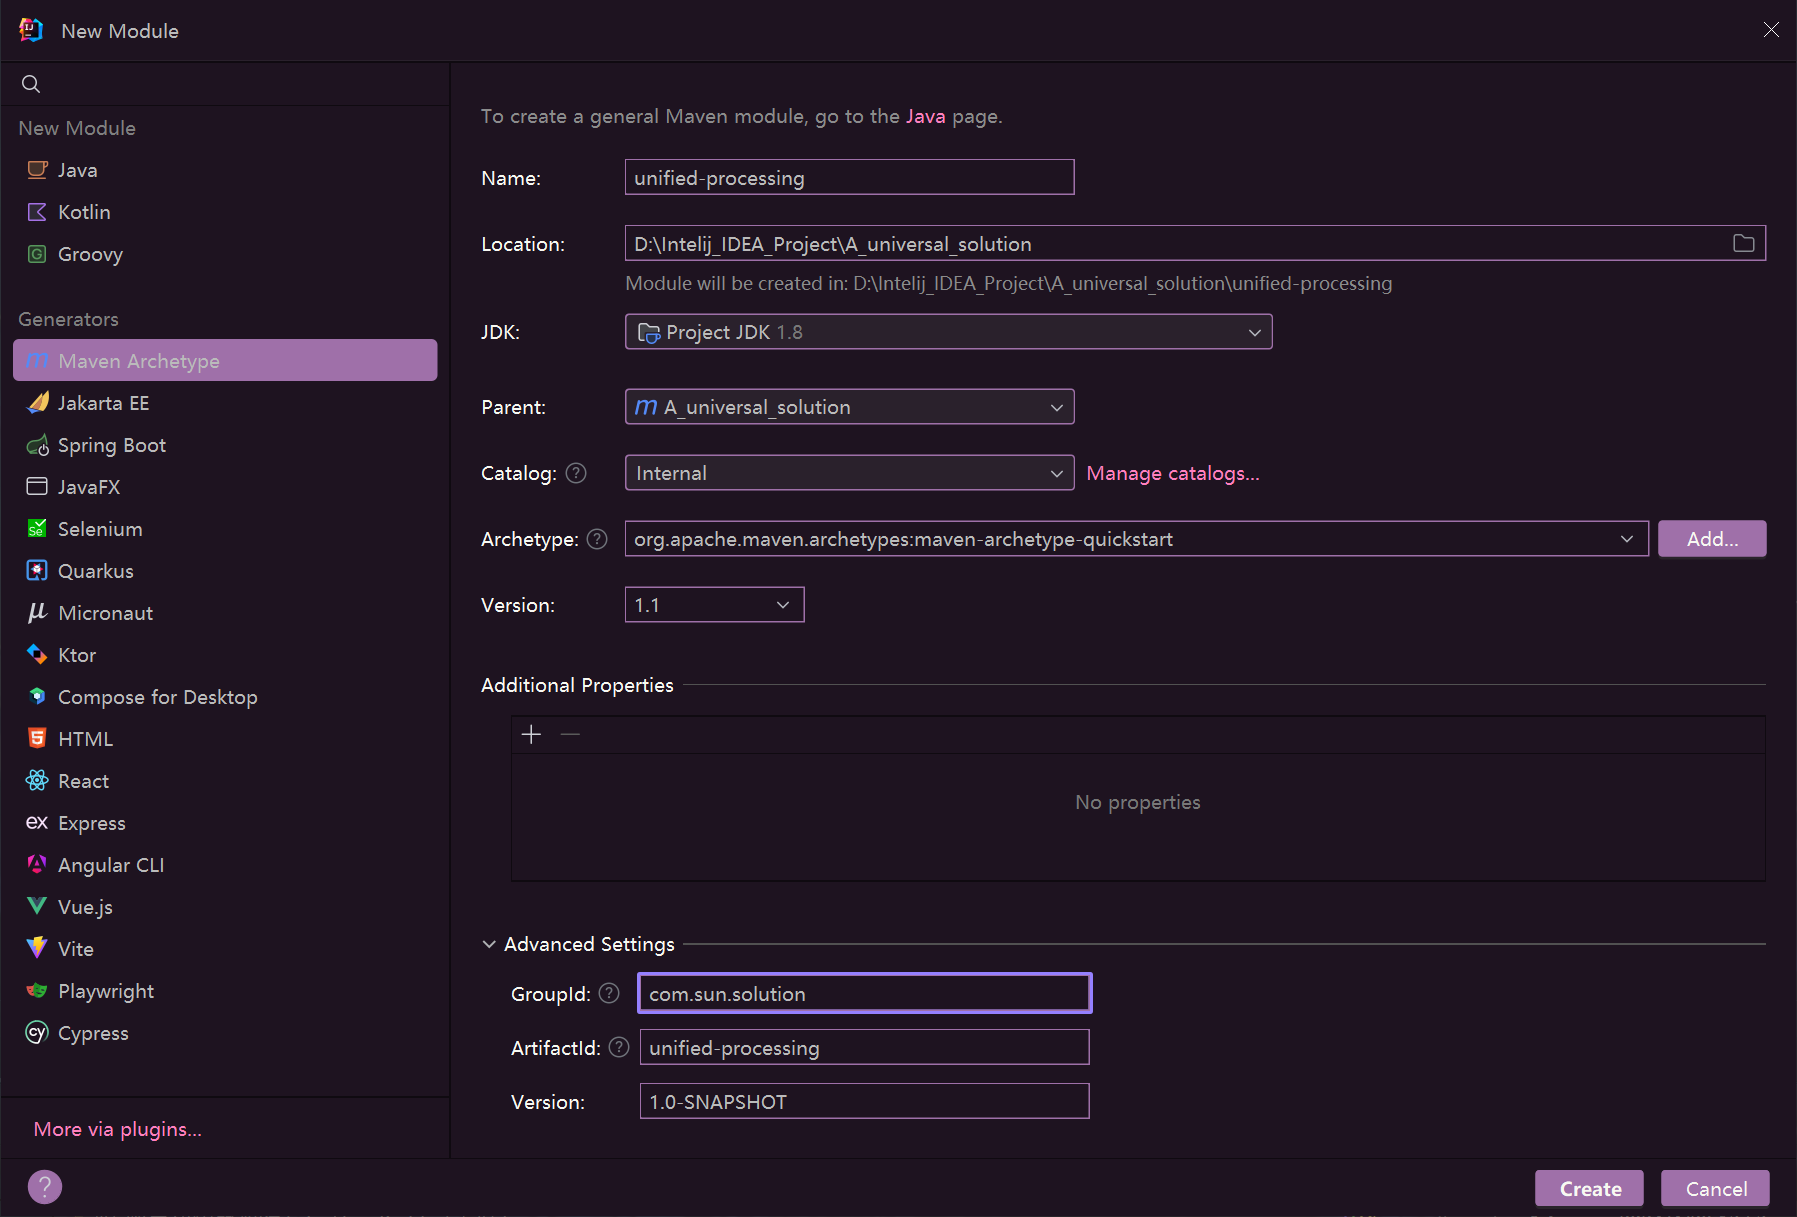
1.基本准备(构建一个SpringBoot模块)
1.在A_universal_solution模块下创建新的子模块unified-processing
2.pom.xml引入基本依赖
<project xmlns="http://maven.apache.org/POM/4.0.0" xmlns:xsi="http://www.w3.org/2001/XMLSchema-instance"
         xsi:schemaLocation="http://maven.apache.org/POM/4.0.0 http://maven.apache.org/xsd/maven-4.0.0.xsd">
    <modelVersion>4.0.0</modelVersion>

    <!-- 继承spring-boot父模块 -->
    <parent>
        <groupId>org.springframework.boot</groupId>
        <artifactId>spring-boot-starter-parent</artifactId>
        <version>2.5.4</version>
        <relativePath/> <!-- 如果交给父模块统一管理,但是又要继承springboot的父模块,就必须加这个 -->
    </parent>

    <artifactId>unified-processing</artifactId>
    <packaging>jar</packaging>

    <name>unified-processing</name>
    <url>http://maven.apache.org</url>


    <!-- 解决java: -source 1.5 中不支持 diamond 运算符 问题 -->
    <properties>
        <java.version>1.8</java.version>
        <maven.compiler.source>1.8</maven.compiler.source>
        <maven.compiler.target>1.8</maven.compiler.target>
    </properties>


    <dependencies>
        <!--validation 参数校验-->
        <dependency>
            <groupId>org.springframework.boot</groupId>
            <artifactId>spring-boot-starter-validation</artifactId>
            <version>2.4.5</version>
        </dependency>

        <!-- springboot两个常规配置 -->
        <!-- spring-boot-starter-web -->
        <dependency>
            <groupId>org.springframework.boot</groupId>
            <artifactId>spring-boot-starter-web</artifactId>
        </dependency>
        <!-- spring-boot-starter-test -->
        <dependency>
            <groupId>org.springframework.boot</groupId>
            <artifactId>spring-boot-starter-test</artifactId>
            <scope>test</scope>
        </dependency>

        <!-- lombok也是常规配置 -->
        <dependency>
            <groupId>org.projectlombok</groupId>
            <artifactId>lombok</artifactId>
            <optional>true</optional>
        </dependency>

        <!-- jupiter测试 -->
        <dependency>
            <groupId>org.junit.jupiter</groupId>
            <artifactId>junit-jupiter-api</artifactId>
            <version>5.7.2</version>
            <scope>compile</scope>
        </dependency>
    </dependencies>

    <!-- maven打包插件-->
    <build>
        <plugins>
            <plugin>
                <groupId>org.springframework.boot</groupId>
                <artifactId>spring-boot-maven-plugin</artifactId>
            </plugin>
        </plugins>
    </build>
</project>
3.编写springboot启动类
package com.sun.solution;

import org.springframework.boot.SpringApplication;
import org.springframework.boot.autoconfigure.SpringBootApplication;

/**
 * Description:
 *
 * @Author sun
 * @Create 2024/5/6 13:00
 * @Version 1.0
 */
@SpringBootApplication
public class UnifiedApplication {
    public static void main(String[] args) {
        SpringApplication.run(UnifiedApplication.class, args);
    }
}
4.启动测试

2.统一响应处理
1.首先定义一个响应枚举类 RespBeanEnum.java 每个枚举对象都有code和message
package com.sxs.seckill.vo;

import lombok.AllArgsConstructor;
import lombok.Getter;
import lombok.ToString;

/**
 * Description: 响应枚举类
 *
 * @Author sun
 * @Create 2024/5/5 15:15
 * @Version 1.0
 */

@Getter
@AllArgsConstructor
@ToString
public enum RespBeanEnum {
    // 通用
    SUCCESS(200, "SUCCESS"),
    ERROR(500, "服务端异常"),
    //登录模块
    LOGIN_ERROR(500210, "用户名或者密码错误"),
    MOBILE_ERROR(500211, "手机号码格式不正确"),
    BING_ERROR(500212, "参数绑定异常"),
    MOBILE_NOT_EXIST(500213, "手机号码不存在"),
    PASSWORD_UPDATE_FAIL(500214, "更新密码失败");
    //其他模块。。。

    // 响应码和响应信息
    private final Integer code;
    private final String message;
}
2.然后定义一个响应的Bean RespBean.java ,可以调用响应枚举类,进行响应
package com.sxs.seckill.vo;

import lombok.Getter;
import lombok.Setter;
import lombok.experimental.Accessors;

/**
 * 通用响应数据封装类。
 * 提供了构造函数和静态方法来创建响应对象,支持链式调用来设置属性。
 */
@Getter
@Setter
@Accessors(chain = true) // 支持链式调用
public class RespBean {
    private long code;
    private String message;
    private Object data;

    /**
     * 默认构造函数。
     */
    public RespBean() {}

    /**
     * 构造函数,初始化响应码和消息。
     * @param code 响应码。
     * @param message 响应消息。
     */
    public RespBean(long code, String message) {
        this.code = code;
        this.message = message;
    }

    /**
     * 构造函数,初始化响应码、消息和数据。
     * @param code 响应码。
     * @param message 响应消息。
     * @param data 响应数据。
     */
    public RespBean(long code, String message, Object data) {
        this.code = code;
        this.message = message;
        this.data = data;
    }

    /**
     * 成功响应,携带数据。
     * @param data 响应数据。
     * @return 生成的成功响应对象。
     */
    public static RespBean success(Object data) {
        return new RespBean(RespBeanEnum.SUCCESS.getCode(), RespBeanEnum.SUCCESS.getMessage(), data);
    }

    /**
     * 成功响应,不携带数据。
     * @return 生成的成功响应对象。
     */
    public static RespBean success() {
        return new RespBean(RespBeanEnum.SUCCESS.getCode(), RespBeanEnum.SUCCESS.getMessage(), null);
    }

    /**
     * 错误响应,只携带错误枚举。
     * @param respBeanEnum 错误枚举,包含错误码和消息。
     * @return 生成的错误响应对象。
     */
    public static RespBean error(RespBeanEnum respBeanEnum) {
        return new RespBean(respBeanEnum.getCode(), respBeanEnum.getMessage(), null);
    }

    /**
     * 错误响应,携带错误枚举和额外数据。
     * @param respBeanEnum 错误枚举,包含错误码和消息。
     * @param data 额外数据。
     * @return 生成的错误响应对象。
     */
    public static RespBean error(RespBeanEnum respBeanEnum, Object data) {
        return new RespBean(respBeanEnum.getCode(), respBeanEnum.getMessage(), data);
    }

    /**
     * 设置响应数据。
     * @param data 响应数据。
     * @return 当前对象,支持链式调用。
     */
    public RespBean withData(Object data) {
        this.data = data;
        return this;
    }

    /**
     * 设置响应消息。
     * @param message 响应消息。
     * @return 当前对象,支持链式调用。
     */
    public RespBean withMessage(String message) {
        this.message = message;
        return this;
    }
}
3.测试使用
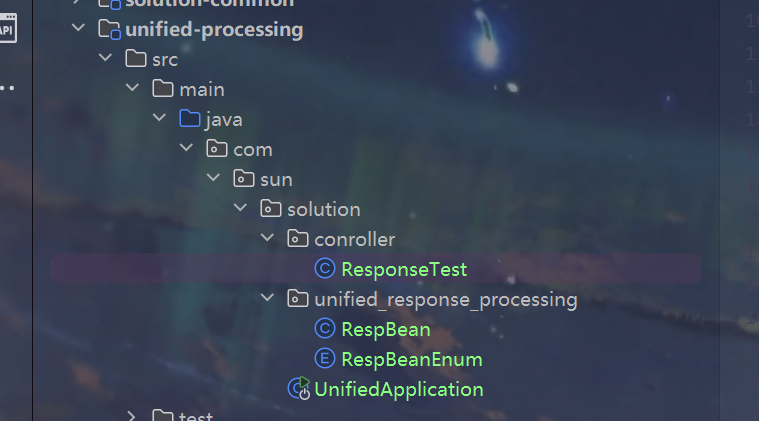
1.目录结构
2.ResponseTest.java
package com.sun.solution.conroller;
import com.sun.solution.unified_response_processing.RespBean;
import com.sun.solution.unified_response_processing.RespBeanEnum;
import org.springframework.web.bind.annotation.RequestMapping;
import org.springframework.web.bind.annotation.RestController;
/**
* Description:
*
* @Author sun
* @Create 2024/5/6 13:07
* @Version 1.0
*/
@RestController
public class ResponseTest {
/**
* 成功响应,不携带数据。
*
* @return
*/
@RequestMapping("/success1")
public RespBean success1() {
return RespBean.success();
}
/**
* 成功响应,携带数据。
*
* @return
*/
@RequestMapping("/success2")
public RespBean success2() {
return RespBean.success("成功响应,携带数据。");
}
/**
* 失败响应,不携带数据。
*
* @return
*/
@RequestMapping("/error1")
public RespBean error1() {
return RespBean.error(RespBeanEnum.ERROR);
}
/**
* 失败响应,携带数据。
*
* @return
*/
@RequestMapping("/error2")
public RespBean error2() {
return RespBean.error(RespBeanEnum.ERROR, "失败响应,携带数据。");
}
/**
* 测试withData方法
*
* @return
*/
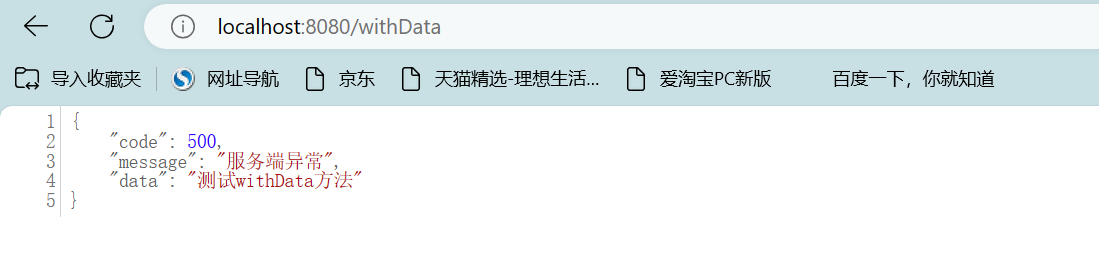
@RequestMapping("/withData")
public RespBean withData() {
return RespBean.error(RespBeanEnum.ERROR).withData("测试withData方法");
}
/**
* 测试withMessage方法
*
* @return
*/
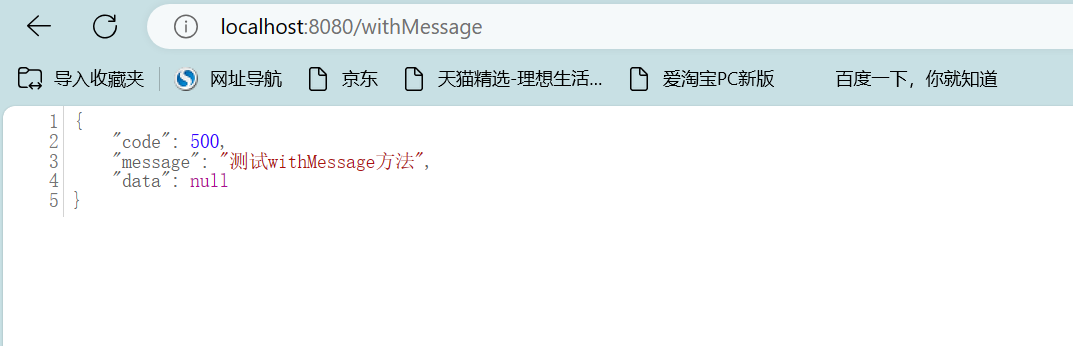
@RequestMapping("/withMessage")
public RespBean withMessage() {
return RespBean.error(RespBeanEnum.ERROR).withMessage("测试withMessage方法");
}
}
3.浏览器测试
1.成功响应,不携带数据。
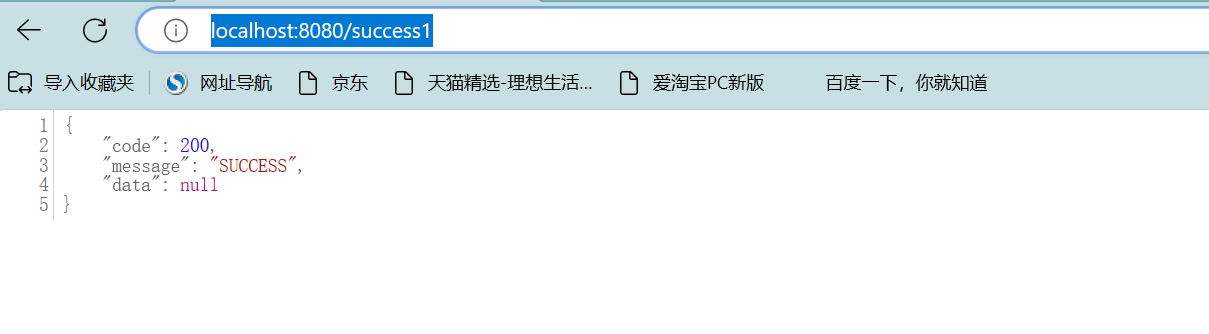
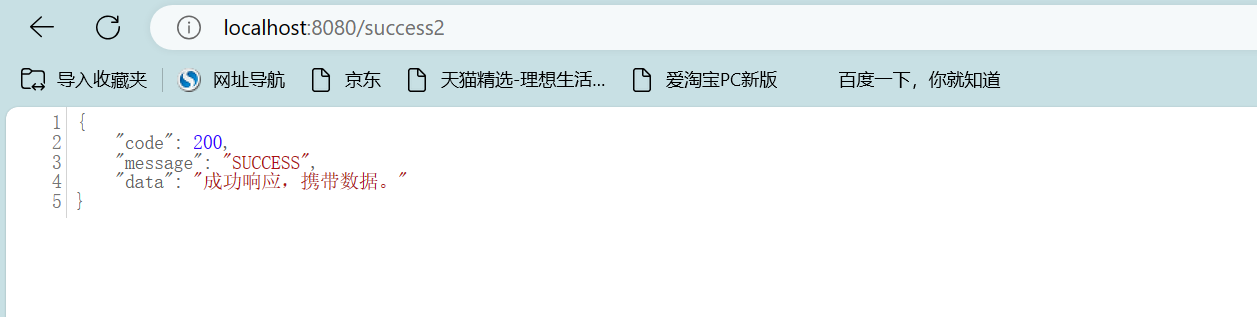
2.成功响应,携带数据。
3.失败响应,不携带数据。

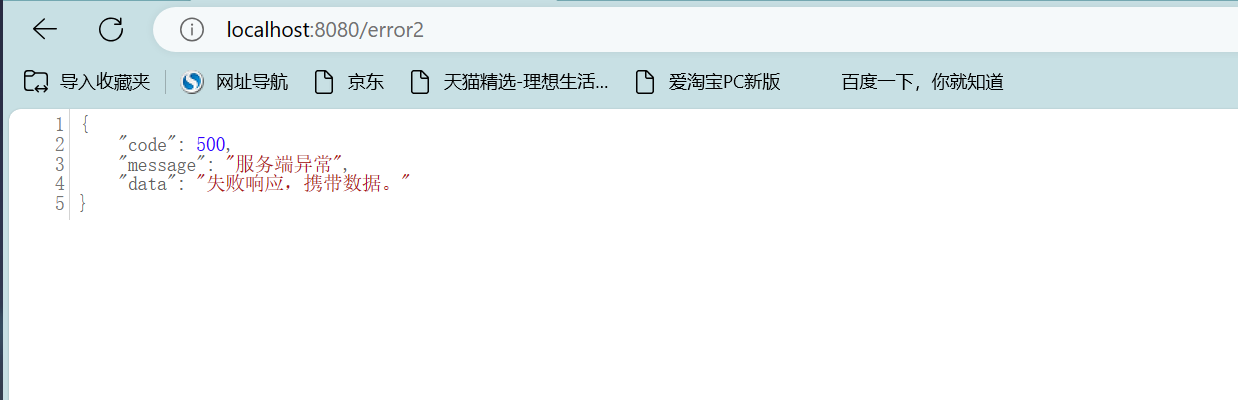
4.失败响应,携带数据。
5.测试withData方法。
6.测试withMessage方法。
3.自定义校验器
1.首先编写一个Bean测试使用,LoginVo.java
package com.sun.solution.vo;

import lombok.Data;

/**
 * Description:
 *
 * @Author sun
 * @Create 2024/5/6 13:29
 * @Version 1.0
 */
@Data
public class LoginVo {
    private String mobile;
    private String password;
}
2.需求分析
自定义校验器来校验手机号和密码
3.通用校验器模板
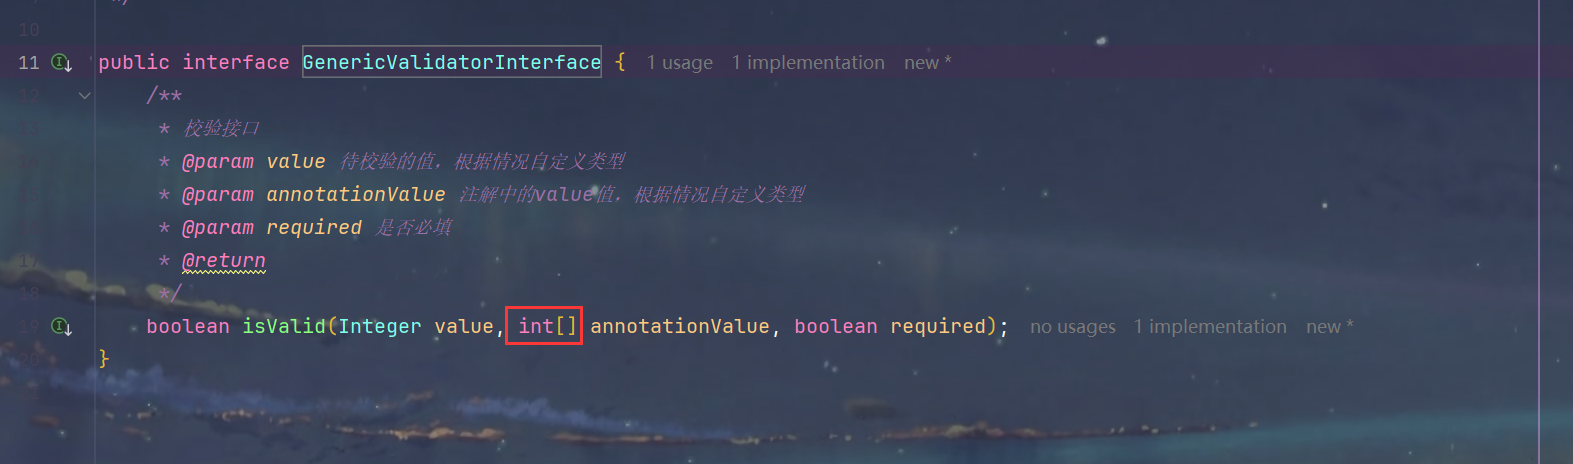
1.定义通用校验器接口 GenericValidatorInterface.java
package com.sun.solution.validator;
/**
* Description: 通用校验器接口,用于重新定义校验方法,使其更加灵活
*
* @Author sun
* @Create 2024/5/6 13:34
* @Version 1.0
*/
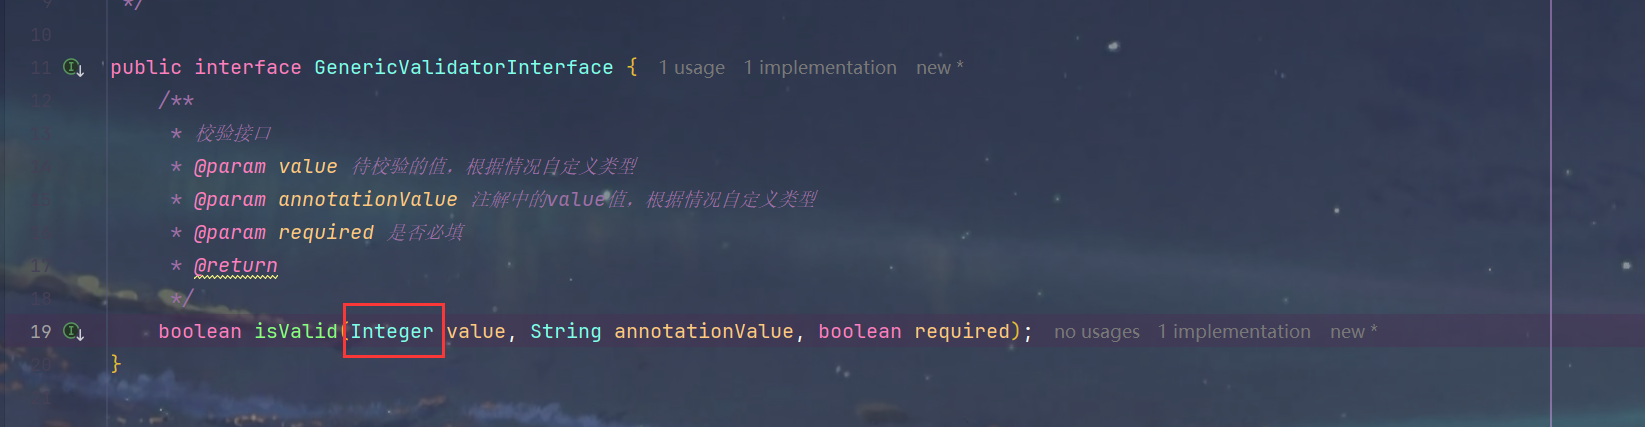
public interface GenericValidatorInterface {
/**
* 校验接口
* @param value 待校验的值,根据情况自定义类型
* @param annotationValue 注解中的value值,根据情况自定义类型
* @param required 是否必填
* @return
*/
boolean isValid(String value, String annotationValue, boolean required);
}
2.自定义校验注解 GenericValidation.java
package com.sun.solution.validator;

import javax.validation.Constraint;
import javax.validation.Payload;
import java.lang.annotation.*;

/**
 * Description: 自定义校验注解
 *
 * @Author sun
 * @Create 2024/5/6 13:38
 * @Version 1.0
 */
@Documented
@Constraint(validatedBy = GenericValidatorImpl.class) // 1.这里是校验器的实现类
@Target({ ElementType.FIELD, ElementType.METHOD, ElementType.PARAMETER })
@Retention(RetentionPolicy.RUNTIME)
public @interface GenericValidation {
    // 2.这里是注解的属性
    // message是校验失败时的提示信息
    String message() default "校验失败!";
    // value是注解的值,可以根据情况自定义类型,类型改变则校验器也需要改变
    String value() default "";
    // required是是否必填
    boolean required() default true;

    // 下面这两个属性必须添加,是默认属性
    Class<?>[] groups() default {};
    Class<? extends Payload>[] payload() default {};
}
3.通用校验器实现类 GenericValidatorImpl.java
package com.sun.solution.genericvalidator;

import org.springframework.util.StringUtils;

import javax.validation.ConstraintValidator;
import javax.validation.ConstraintValidatorContext;

/**
 * Description: 通用校验器实现类,ConstraintValidator<TestValidation, String>中的两个参数分别是注解和校验的值类型
 *
 * @Author sun
 * @Create 2024/5/6 13:42
 * @Version 1.0
 */
public class GenericValidatorImpl implements ConstraintValidator<GenericValidation, String>, GenericValidatorInterface {

    // 注解中的value值,根据情况自定义类型
    private String annotationValue;
    // 注解中的required值,表示是否必填
    private boolean required;

    /**
     * 初始化方法,获取注解中的value值和required值
     * @param annotation
     */
    @Override
    public void initialize(GenericValidation annotation) {
        this.annotationValue = annotation.value();
        this.required = annotation.required();
    }

    /**
     * 初始的校验方法
     * @param value
     * @param context
     * @return
     */
    @Override
    public boolean isValid(String value, ConstraintValidatorContext context) {
        return isValid(value, annotationValue, required);
    }

    /**
     * 增强的校验方法
     * @param value 待校验的值
     * @param annotationValue 注解中的value值,根据情况自定义类型
     * @param required 是否必填
     * @return
     */
    @Override
    public boolean isValid(String value, String annotationValue, boolean required) {
        // 校验逻辑编写,根据三个参数进行校验
        return false;
    }
}
4.使用方式
1.需求分析
假设,要校验的字段类型是Integer类型,注解中的value是int数组类型
2.将模板复制一份,放到validator包下,准备进行修改

3.要校验的字段为Integer类型,也就是修改value类型
GenericValidatorInterface.java
GenericValidatorImpl.java
4.注解中的value是int数组类型,也就是修改annotationValue的类型
GenericValidation.java
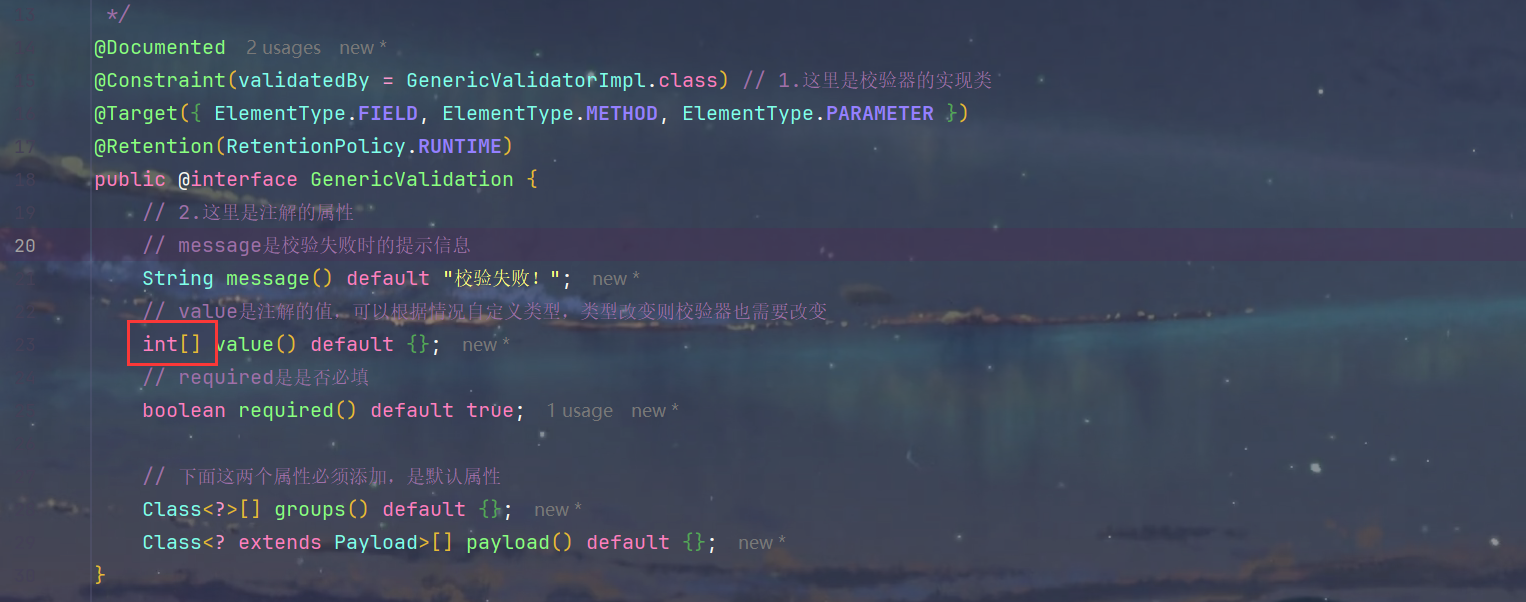
GenericValidatorImpl.java
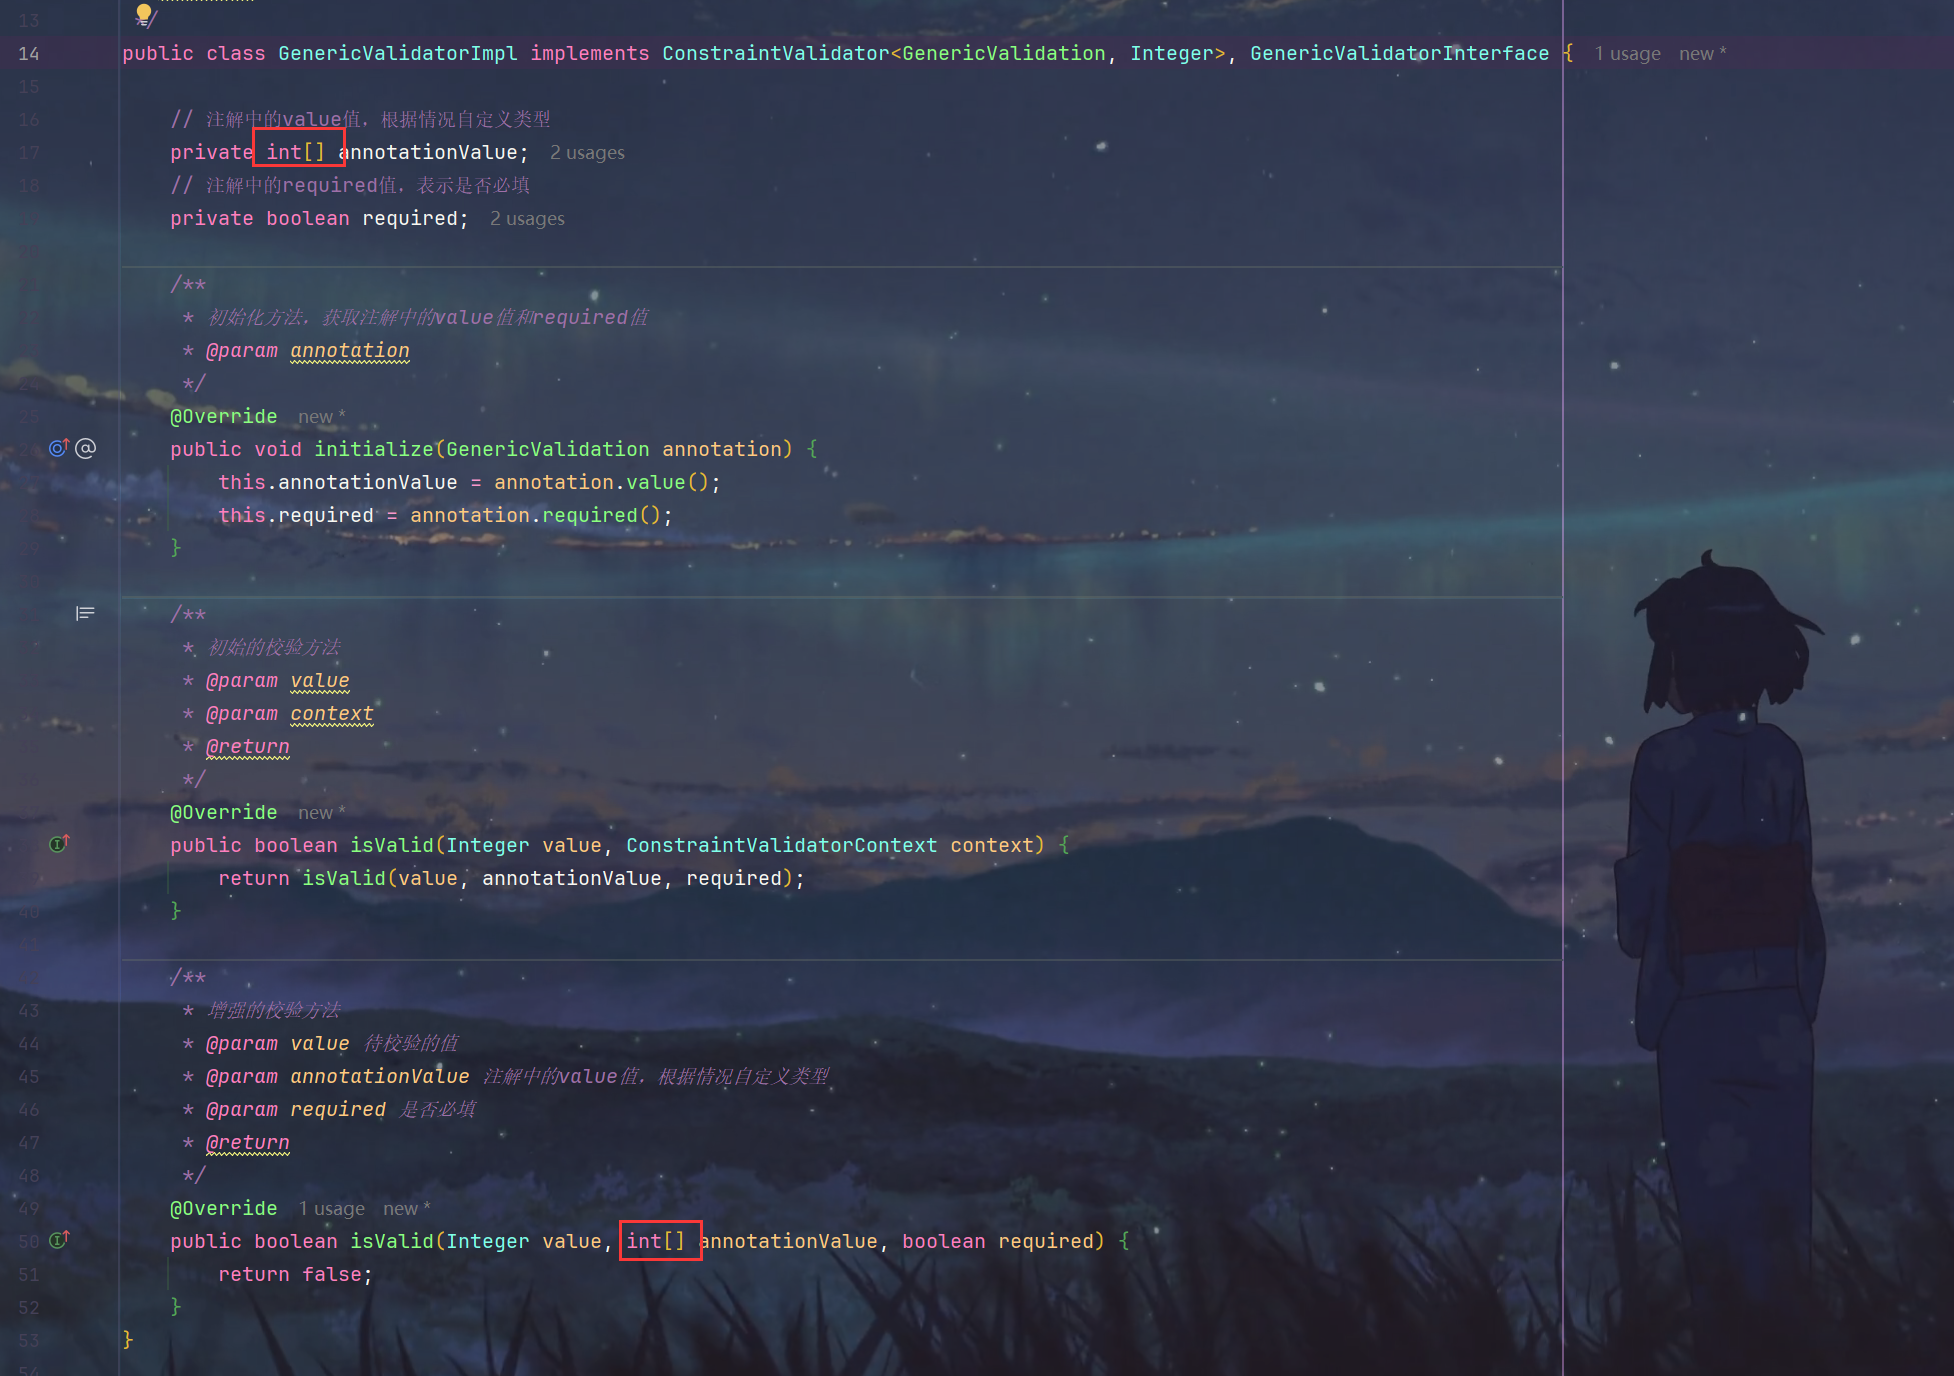
GenericValidatorInterface.java
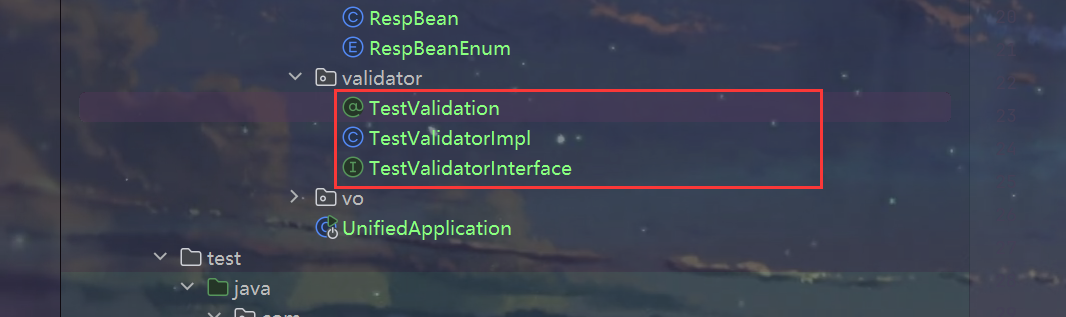
5.修改三个类的名字前缀为Test,直接修改然后alter +enter 让IDEA自动修改
6.TestValidatorImpl.java编写校验逻辑
    /**
     * 增强的校验方法
     * @param value 待校验的值
     * @param annotationValue 注解中的value值,根据情况自定义类型
     * @param required 是否必填
     * @return
     */
    @Override
    public boolean isValid(Integer value, int[] annotationValue, boolean required) {
        // 如果不是必填项,且值为空,则直接返回true
        if (!required && value == null) {
            return true;
        }
        // 如果是必填项,且值为空,则直接返回false
        if (required && value == null) {
            return false;
        }
        // 如果注解中的value值不为空,且待校验的值不在value值中,则返回false
        if (annotationValue.length > 0) {
            for (int i : annotationValue) {
                if (value == i) {
                    return true;
                }
            }
            return false;
        }
        return true;
    }
7.修改LoginVo.java 添加测试校验字段
package com.sun.solution.vo;

import com.sun.solution.validator.TestValidation;
import lombok.Data;

/**
 * Description:
 *
 * @Author sun
 * @Create 2024/5/6 13:29
 * @Version 1.0
 */
@Data
public class LoginVo {
    private String mobile;
    private String password;
    @TestValidation(value = {1, 2, 3}, required = true)
    private Integer test;
}
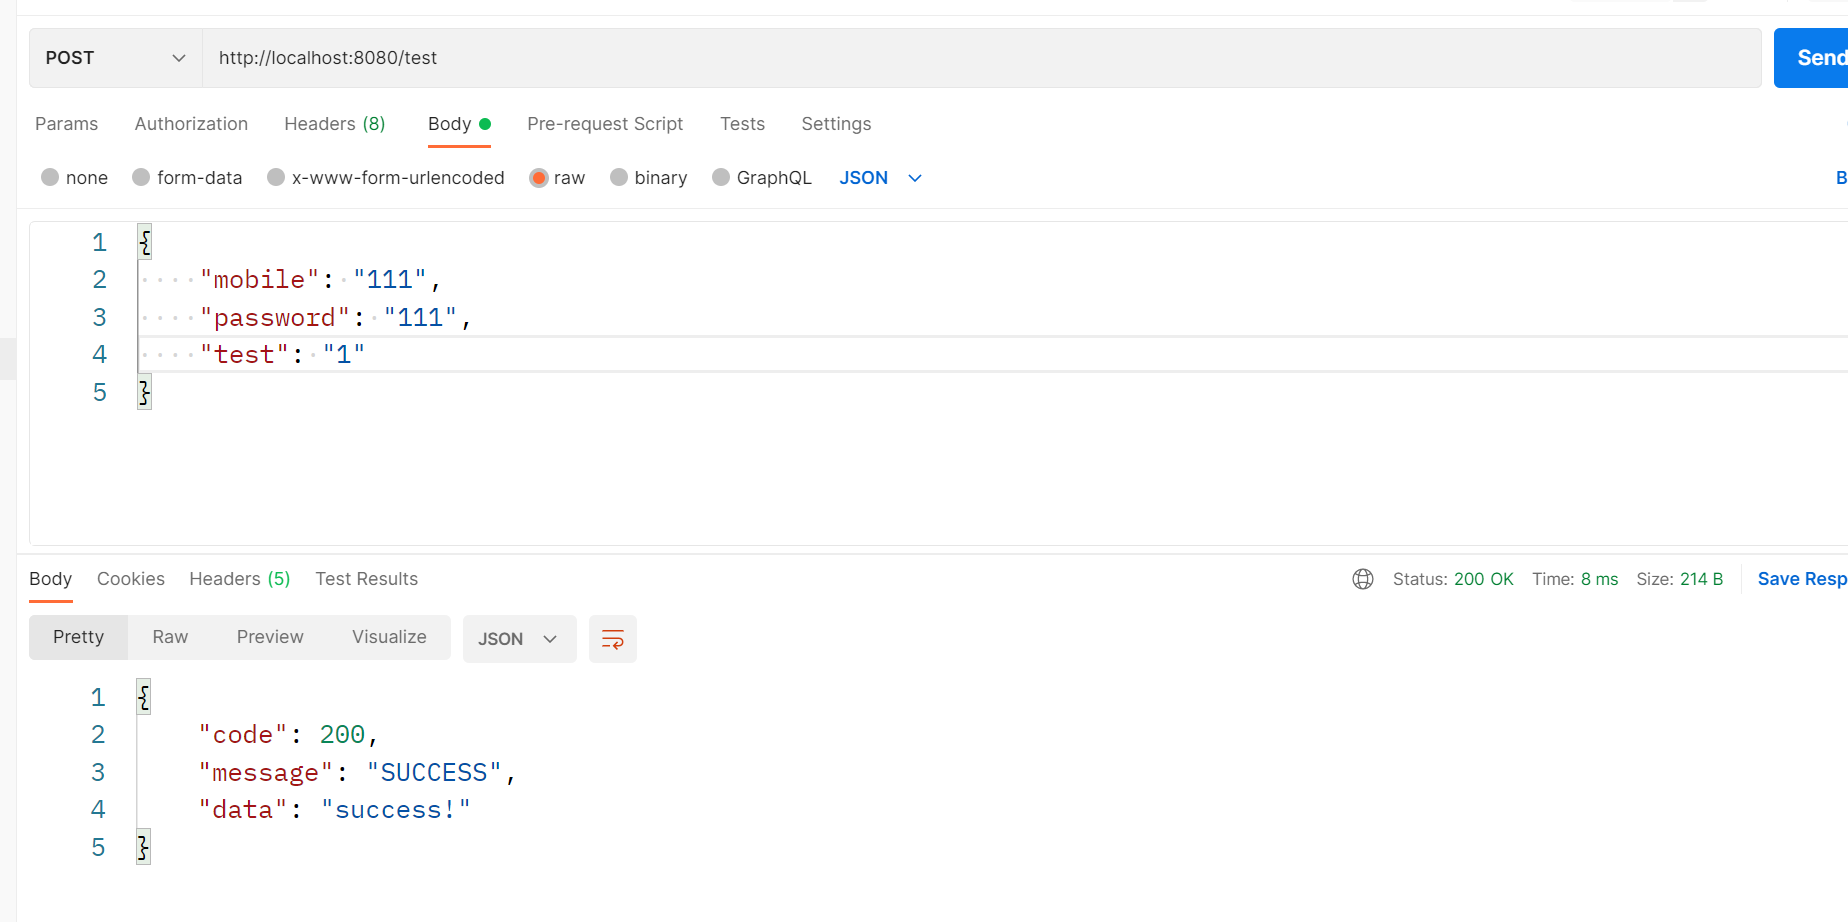
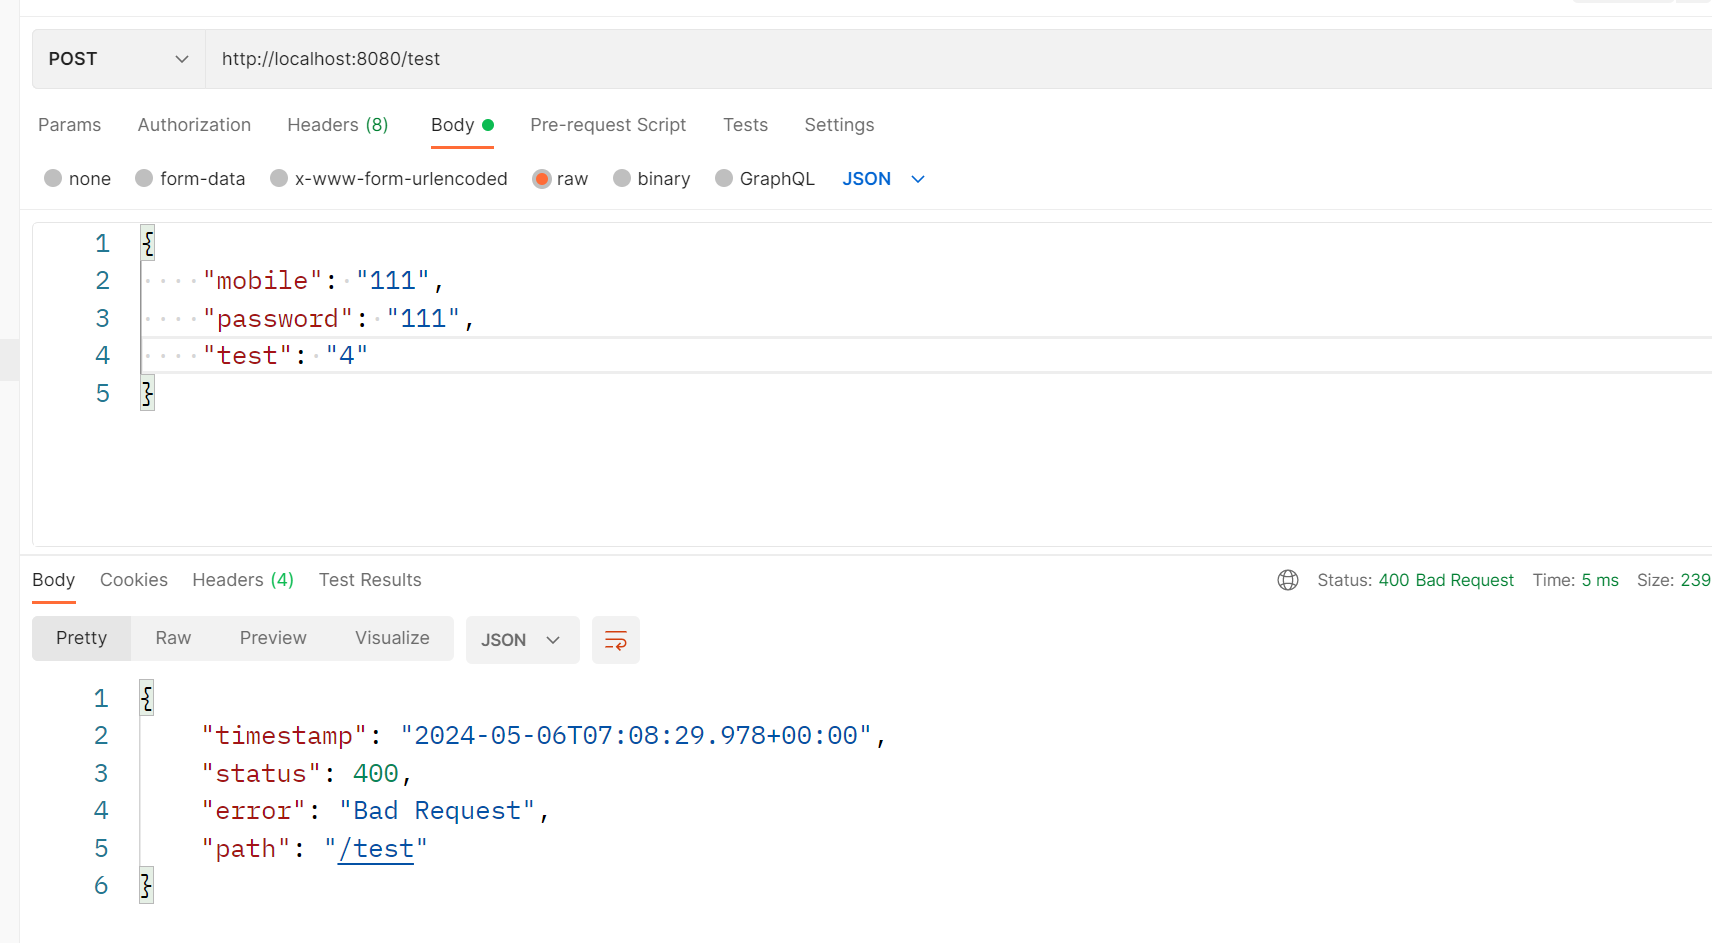
8.编写controller加上@Valid字段进行校验
package com.sun.solution.conroller;
import com.sun.solution.unified_response_processing.RespBean;
import com.sun.solution.vo.LoginVo;
import org.springframework.web.bind.annotation.*;
import javax.validation.Valid;
/**
* Description:
*
* @Author sun
* @Create 2024/5/6 14:56
* @Version 1.0
*/
@RestController
public class ValidationTest {
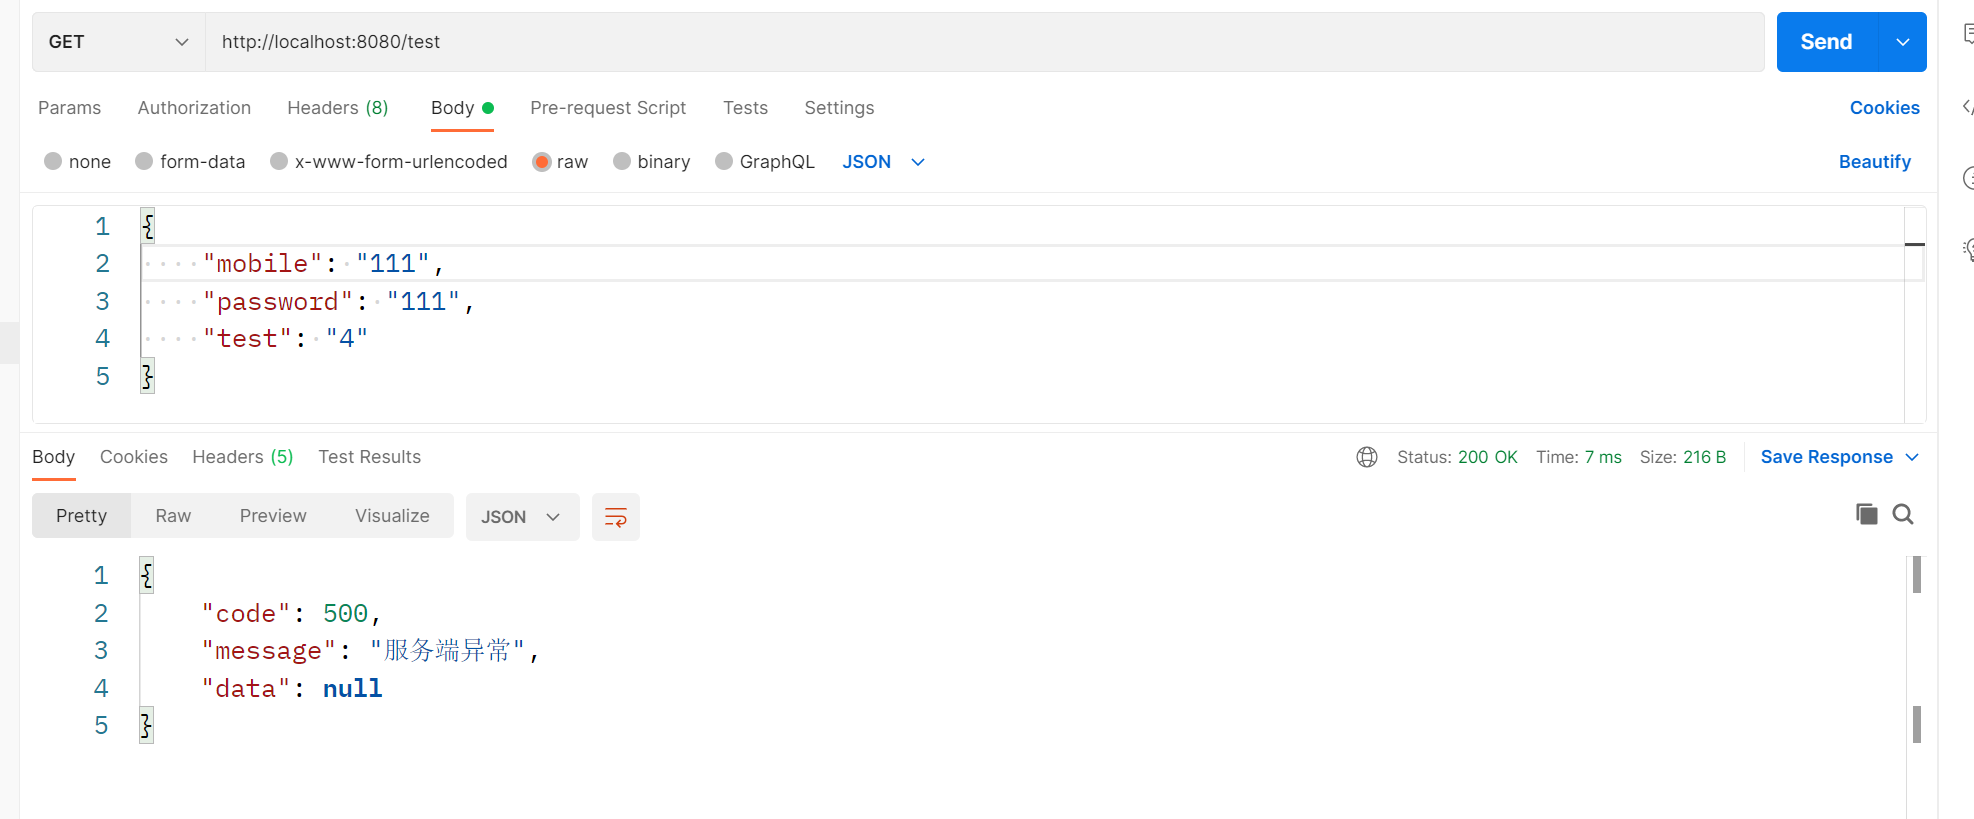
@PostMapping("/test")
public RespBean test(@Valid @RequestBody LoginVo loginVo) {
return RespBean.success("success!");
}
}
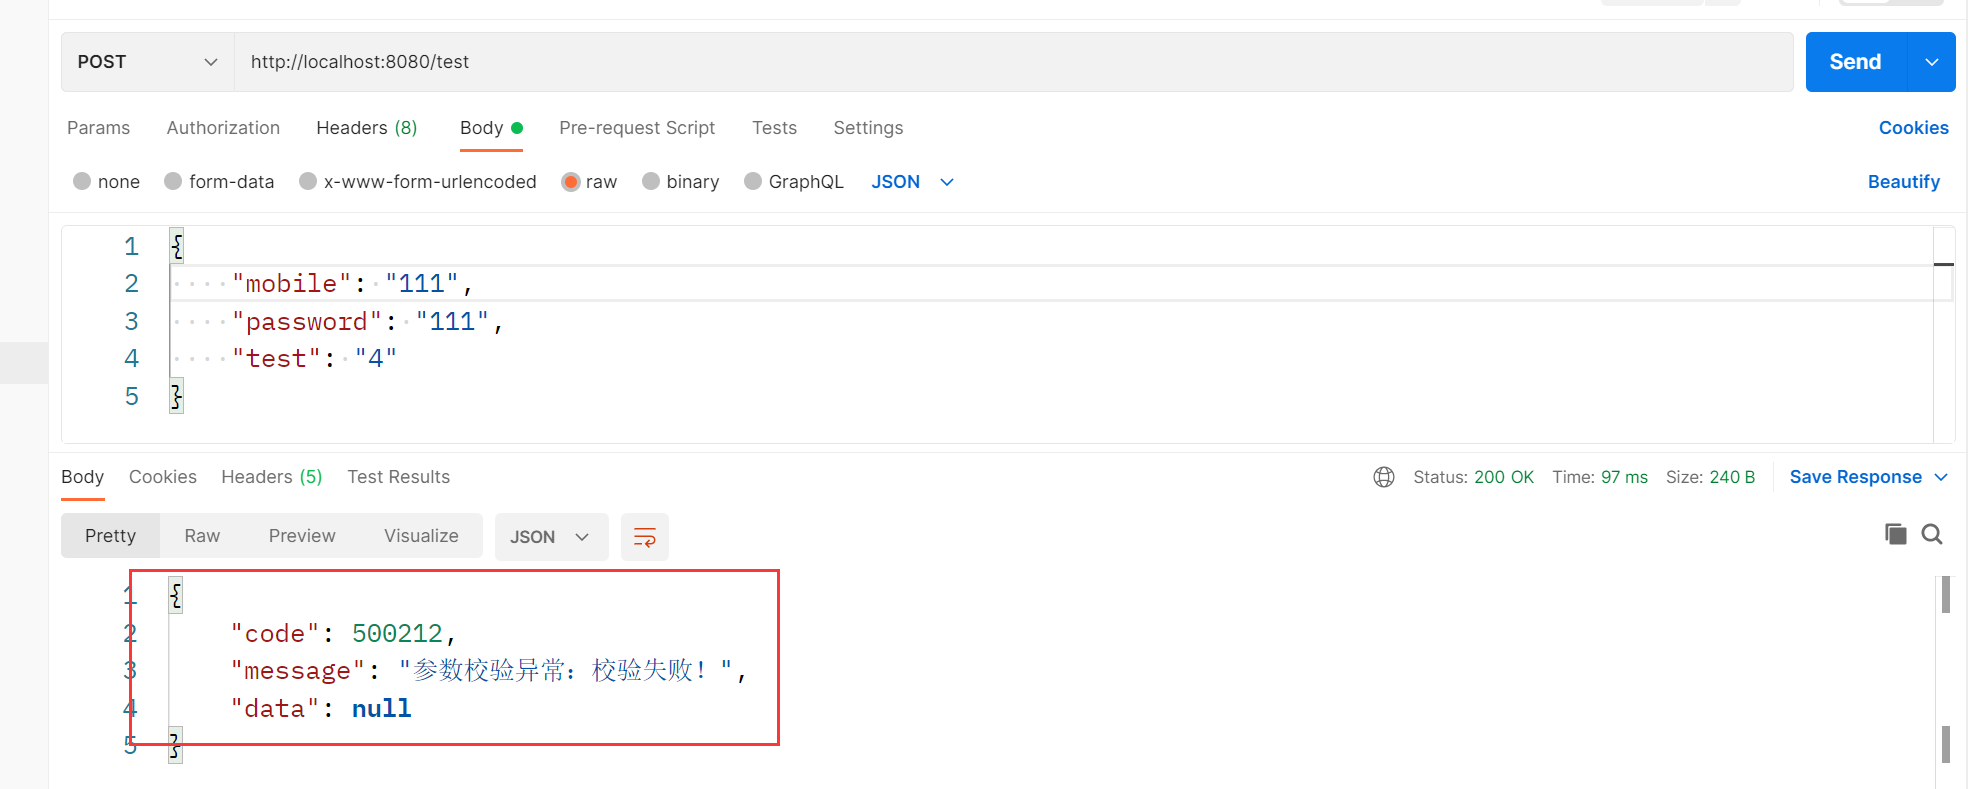
9.测试
4.统一异常处理器整合自定义校验器
1.编写自定义异常携带响应枚举对象 CustomException.java
package com.sun.solution.exception;

import com.sun.solution.unified_response_processing.RespBeanEnum;
import lombok.AllArgsConstructor;
import lombok.Data;
import lombok.NoArgsConstructor;

/**
 * Description: 自定义异常类,具有响应枚举的属性。
 *
 * @Author sun
 * @Create 2024/5/6 15:15
 * @Version 1.0
 */
@Data
@NoArgsConstructor
@AllArgsConstructor
public class CustomException extends RuntimeException{
    private RespBeanEnum respBeanEnum;
}
2.编写全局异常处理器 GlobalExceptionHandler.java
package com.sun.solution.exception;

import com.sun.solution.unified_response_processing.RespBean;
import com.sun.solution.unified_response_processing.RespBeanEnum;
import lombok.extern.slf4j.Slf4j;
import org.springframework.validation.BindException;
import org.springframework.web.bind.annotation.ExceptionHandler;
import org.springframework.web.bind.annotation.RestControllerAdvice;

/**
 * Description:
 *
 * @Author sun
 * @Create 2024/5/6 15:16
 * @Version 1.0
 */
@RestControllerAdvice
@Slf4j
public class GlobalExceptionHandler {
    // 处理所有的异常
    @ExceptionHandler(Exception.class)
    public RespBean exceptionHandler(Exception e) {
        // 日志记录异常信息及堆栈
        log.error("Exception caught: ", e);

        // 如果得到的是自定义异常的对象,那么直接返回这个异常的响应枚举类信息
        if (e instanceof CustomException) {
            CustomException ex = (CustomException) e;
            return RespBean.error(ex.getRespBeanEnum());
        } else if (e instanceof BindException) {
            // 如果是绑定异常,就获取绑定异常的message信息,返回给前端
            // 需要获取改异常 BindException,进行打印
            BindException ex = (BindException) e;
            // 获取绑定异常的信息
            RespBean respBean = RespBean.error(RespBeanEnum.BING_ERROR).withMessage("参数校验异常:" +
                    ex.getBindingResult().getAllErrors().get(0).getDefaultMessage());
            return respBean;
        }

        // 如果不是自定义异常,那么返回服务端异常
        return RespBean.error(RespBeanEnum.ERROR);
    }
}
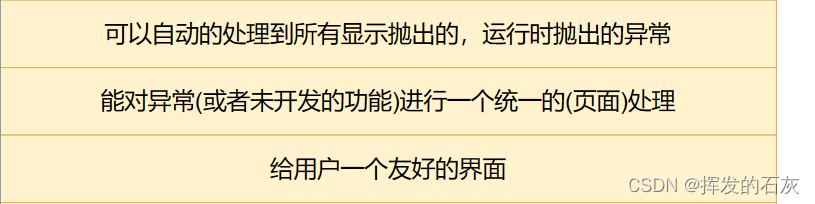
3.最佳实践
1.当需要响应error时直接抛出自定义异常对象,指定响应枚举对象
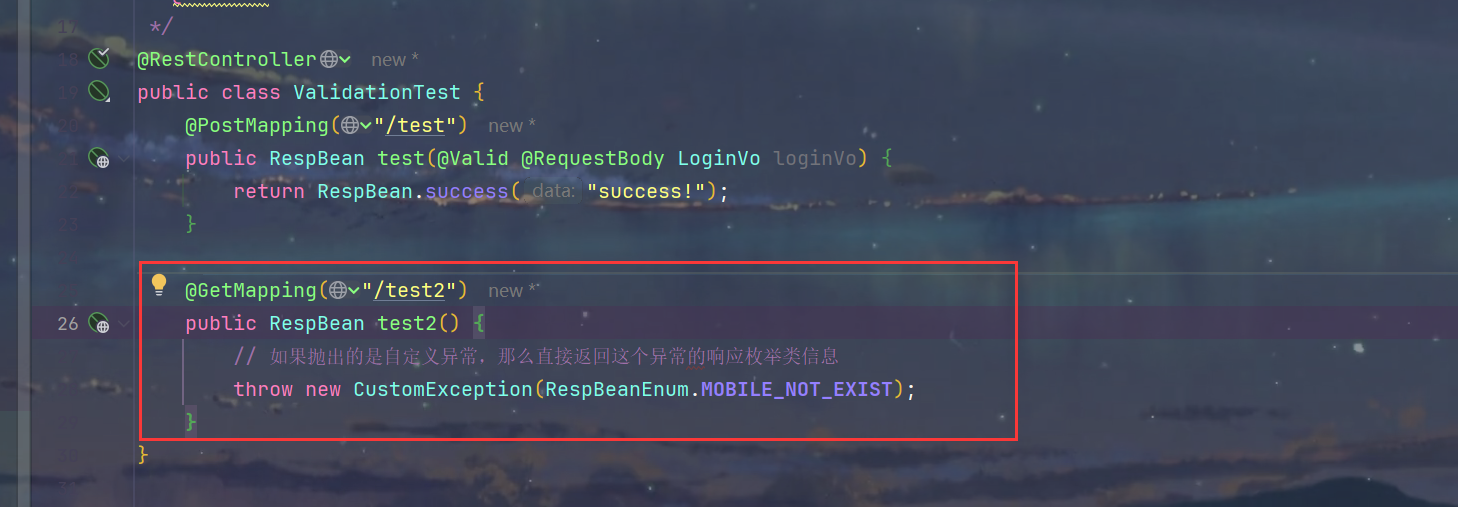
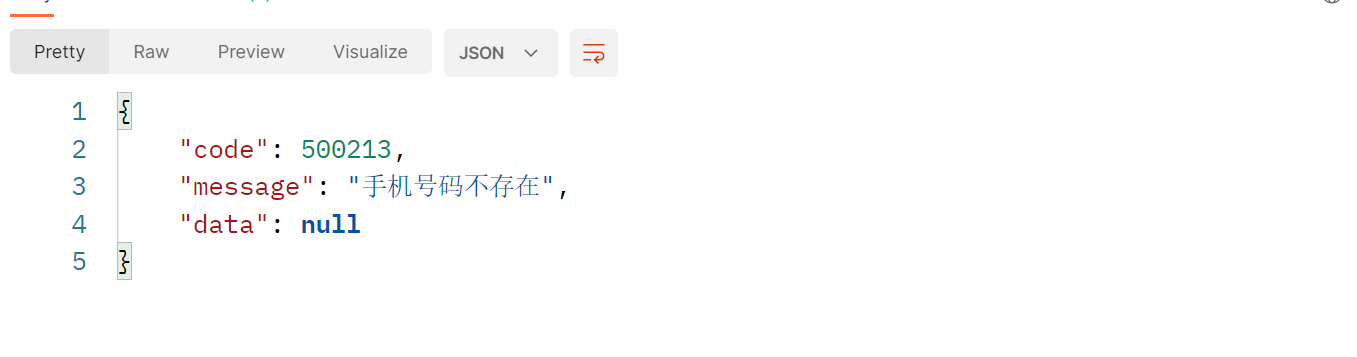
2.此时当出现参数绑定异常时也会交给统一异常处理解决
3.当出现其他异常时,就会响应服务端异常,控制台也会打印错误信息