前言
之前写项目一直用的是MVC架构,现在来学一下MVP与MVVM两种架构,当然还有VIPER架构,如果有时间后面会单独学习
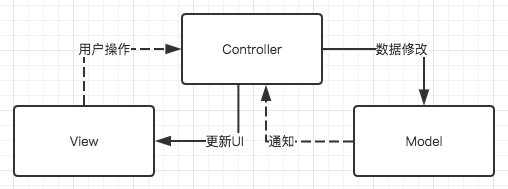
一、MVC
MVC架构先前已经详细讲述,这里不再赘述,我们主要讲一下MVC的优化【iOS】MVC
众所周知,MVC最大的问题是我们的C层十分臃肿,因为所有的事件处理逻辑都写在了C层
我们分几步来解决这个问题:
- 业务逻辑分离:将业务逻辑移出视图控制器,放入单独的模型或管理类中。例如,数据处理、网络请求和数据转换等应该在模型或专门的业务逻辑类中处理。
例如我们可以单独抽象出来一个单例Manager类负责网络请求
- 委托和数据源分离:尽量将
UITableView或UICollectionView的dataSource和delegate方法移到其他类中,比如创建专门的类来处理这些逻辑。
例如可以单独抽象出一个类负责协议处理
TableViewDataSourceAndDelegate.h
#import <Foundation/Foundation.h>
#import <UIKit/UIKit.h>

@interface TableViewDataSourceAndDelegate : NSObject <UITableViewDataSource, UITableViewDelegate>

@property (strong, nonatomic) NSArray *data;

- (instancetype)initWithData:(NSArray *)data;

@end
TableViewDataSourceAndDelegate.m
#import "TableViewDataSourceAndDelegate.h"

@implementation TableViewDataSourceAndDelegate

- (instancetype)initWithData:(NSArray *)data {
    self = [super init];
    if (self) {
        _data = data;
    }
    return self;
}

- (NSInteger)tableView:(UITableView *)tableView numberOfRowsInSection:(NSInteger)section {
    return self.data.count;
}

- (UITableViewCell *)tableView:(UITableView *)tableView cellForRowAtIndexPath:(NSIndexPath *)indexPath {
    static NSString *cellIdentifier = @"Cell";
    UITableViewCell *cell = [tableView dequeueReusableCellWithIdentifier:cellIdentifier forIndexPath:indexPath];
    cell.textLabel.text = self.data[indexPath.row];
    return cell;
}

// Implement other delegate methods as needed
- (void)tableView:(UITableView *)tableView didSelectRowAtIndexPath:(NSIndexPath *)indexPath {
    NSLog(@"Selected row at index path: %@", indexPath);
}

@end
使用这个类
ViewController.m
#import "ViewController.h"

@implementation ViewController

- (void)viewDidLoad {
    [super viewDidLoad];

    // Initialize the tableView
    self.tableView = [[UITableView alloc] initWithFrame:self.view.bounds style:UITableViewStylePlain];
    [self.tableView registerClass:[UITableViewCell class] forCellReuseIdentifier:@"Cell"];
    [self.view addSubview:self.tableView];

    // Initialize and set the tableView helper
    NSArray *data = @[@"Item 1", @"Item 2", @"Item 3"]; // Data for the tableView
    self.tableViewHelper = [[TableViewDataSourceAndDelegate alloc] initWithData:data];
    self.tableView.dataSource = self.tableViewHelper;
    self.tableView.delegate = self.tableViewHelper;
}
@end
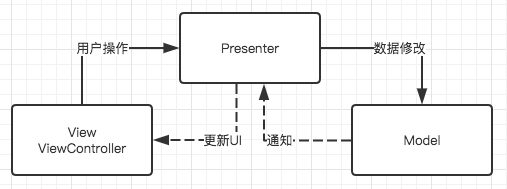
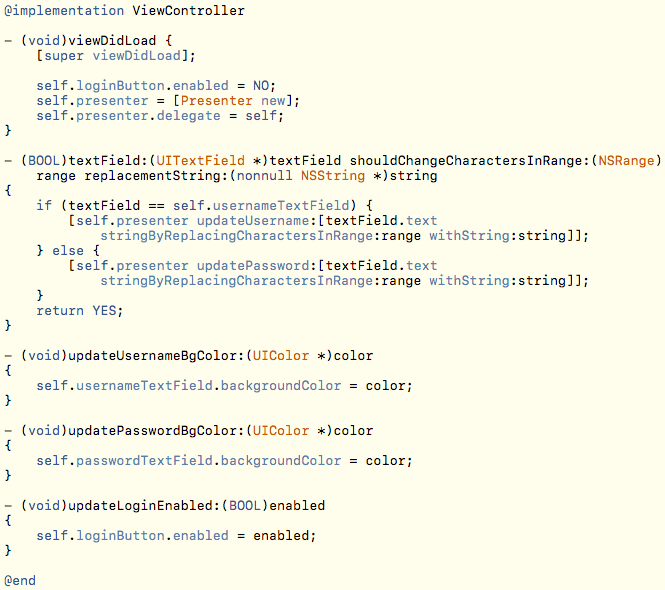
二、MVP
所谓设计模式,就是设计过程中为了解决普遍性问题提出的方案,我们当前的问题就是MVC的C层十分臃肿,为了解决这个问题我们提出了MVP
看上去与MVC相似,但是实际上表示的意义是
View层持有Presenter层,Presenter层持有Model层,View层并不可直接访问到Model层
其本质就是我们抽象出一个Presenter层去处理用户操作以及更新UI的逻辑,以减少V层的代码量,现在的V层就是View+ViewController层
首先我们需要定义一个PresenterDelegate来抽象出一些UI交互的方法,例如点击按钮更新UI或是数据
@protocol PresenterProtocol <NSObject>

@required

@optional
-(void)didClickAddBtnWithNum:(int)num indexPath:(NSIndexPath *)indexPath;
-(void)reloadUI;
@end
然后我们即可以在V层去实现协议中的方法,也可以在P层去实现方法,当然也可以将方法定义在P层去实现,例如
V层发生的变化通知P层后,由P层去处理这些变化,处理完毕后再回调给V层更新UI,同时更新M层中的数据
例如这段P层代码中这个方法
//P层
-(void)didClickAddBtnWithNum:(int)num indexPath:(NSIndexPath *)indexPath {
    @synchronized (self) {
    // 处理数据
        if (indexPath.row < self.dataArray.count) {
            UserInfoModel *model = self.dataArray[indexPath.row];
            model.num = [NSString stringWithFormat:@"%d",num];
        }
        if (num == 100) {
            UserInfoModel *model = self.dataArray[indexPath.row];
            [self.dataArray removeAllObjects];
            [self.dataArray addObject:model];

//处理完毕后进行回调
		if(self.delegate && [self.delegate respondsToSelector:@selector(reloadUI)]) {
                [self.delegate reloadUI];
            }
        }
    }
}

//V层
//在这里需要更新Model层数据, 通过中介presenter来把数据变化信息传递给Model层
-(void)setNum:(int)num {
    _num = num;
    self.numLabel.text = [NSString stringWithFormat:@"%d",num];
    if ((self.delegate) && [self.delegate respondsToSelector:@selector(didClickAddBtnWithNum:indexPath:)]) {
        [self.delegate didClickAddBtnWithNum:num indexPath:self.indexPath];
    }
}
可以看到现在的P层就是把原来V层的代码单独抽象出一个类,就像我们之前的网络请求单例类,然后让V层持有这个类,需要更新的时候调用P层中的方法,然后P层回调更新UI
同时P层因为只包含逻辑,所以更好进行测试,也就是使用断点等工具

MVP优缺点
- UI布局和数据逻辑代码划分界限更明确。
- 理解难度尚可,较容易推广。
- 解决了Controller的臃肿问题。
- Presenter-Model层可以进行单元测试。
- 需要额外写大量接口定义和逻辑代码(或者自己实现KVO监视)。
在MVP中,
View和Presenter之间通常是双向的。View通过接口将用户操作传递给Presenter,Presenter处理完毕后,再通过接口更新View。
三、MVVM
随着UI交互的复杂,MVP的缺点也暴露了出来,就是会出现十分多的借口,同时每一次更新P层都会进行回调,同时回调需要细细处理
此时P层也会变得十分臃肿,这个时候就出现了MVVM
Model:同样负责应用的数据和业务逻辑。
View:负责展示界面,不处理任何逻辑,只负责将用户操作传递给ViewModel。
ViewModel:作为数据转换器,负责逻辑和数据的转换,以便数据可以方便地显示在View上。它反映了特定View的数据状态
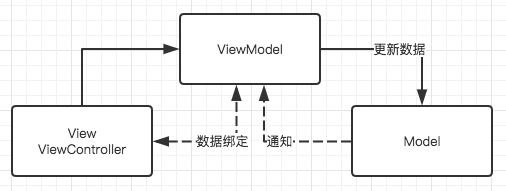
这张图的基本逻辑还是没变,就是将我们的P层改成了ViewModel层
首先ViewModel-Model层和之前的Present-Model层一样,没有什么大的变化。View持有ViewModel,这个和MVP也一样。变化主要在两个方面:
- MVP在处理逻辑时并不会存储数据,但是MVVM中的
ViewModel会对处理的数据进行一个存储 - View与ViewModel实现了数据绑定,
View不需要传递操作来控制ViewModel,同时ViewModel也不会直接回调来修改View
MVVM的亮点在于:
View和ViewModel之间主要通过数据绑定(Data
Binding)进行通信。ViewModel不直接引用View,任何状态的改变都通过绑定机制自动更新到View上,这减少了大量的胶水代码。
甚至有很多人觉得应该称MVVM为MVB(Model-View-Binder)。
我们在这里多次提到了数据绑定,那么在iOS中我们使用什么来实现数据绑定呢
这里有两种方式,一种是RAC编程,后面会专门讲
我们来讲一下用KVO实现数据绑定
示例:简单的用户界面和用户数据交互
我们将构建一个小应用,显示一个用户的名字和年龄,并允许通过界面更新名字。
- Model
模型层保持简单,只包含基本的用户数据
// UserModel.h
#import <Foundation/Foundation.h>

@interface UserModel : NSObject

@property (strong, nonatomic) NSString *firstName;
@property (strong, nonatomic) NSString *lastName;
@property (assign, nonatomic) NSInteger age;

- (instancetype)initWithFirstName:(NSString *)firstName lastName:(NSString *)lastName age:(NSInteger)age;

@end

// UserModel.m
#import "UserModel.h"

@implementation UserModel

- (instancetype)initWithFirstName:(NSString *)firstName lastName:(NSString *)lastName age:(NSInteger)age {
    self = [super init];
    if (self) {
        _firstName = firstName;
        _lastName = lastName;
        _age = age;
    }
    return self;
}

@end
- 创建ViewModel
ViewModel将使用KVO来通知视图关于数据变化。
// UserViewModel.h
#import <Foundation/Foundation.h>
#import "UserModel.h"

@interface UserViewModel : NSObject
@property (strong, nonatomic) UserModel *user;
@property (strong, nonatomic, readonly) NSString *userInfo;
- (instancetype)initWithUser:(UserModel *)user;
@end

// UserViewModel.m
#import "UserViewModel.h"

@implementation UserViewModel

- (instancetype)initWithUser:(UserModel *)user {
    if (self = [super init]) {
        _user = user;
        [self.user addObserver:self forKeyPath:@"name" options:NSKeyValueObservingOptionNew context:nil];
        [self.user addObserver:self forKeyPath:@"age" options:NSKeyValueObservingOptionNew context:nil];
    }
    return self;
}

- (void)dealloc {
    [self.user removeObserver:self forKeyPath:@"name"];
    [self.user removeObserver:self forKeyPath:@"age"];
}

- (void)observeValueForKeyPath:(NSString *)keyPath ofObject:(id)object change:(NSDictionary<NSKeyValueChangeKey,id> *)change context:(void *)context {
    if ([keyPath isEqualToString:@"name"] || [keyPath isEqualToString:@"age"]) {
        [self updateUserInfo];
    }
}

- (void)updateUserInfo {
    self->_userInfo = [NSString stringWithFormat:@"%@, %ld years old", self.user.name, (long)self.user.age];
}

@end
- 配置ViewController
在视图控制器中,我们将使用ViewModel,并观察ViewModel的userInfo属性
// ViewController.m
#import "ViewController.h"
#import "UserViewModel.h"
#import "UserModel.h"

@interface ViewController ()
@property (strong, nonatomic) UserViewModel *viewModel;
@property (strong, nonatomic) UILabel *userInfoLabel;
@end

@implementation ViewController

- (void)viewDidLoad {
    [super viewDidLoad];

    // Setup user and viewModel
    UserModel *user = [[UserModel alloc] init];
    user.name = @"John";
    user.age = 30;
    self.viewModel = [[UserViewModel alloc] initWithUser:user];

    // Setup UI
    self.userInfoLabel = [[UILabel alloc] initWithFrame:CGRectMake(20, 100, 300, 20)];
    [self.view addSubview:self.userInfoLabel];

    // Bind ViewModel to the label
    [self.viewModel addObserver:self forKeyPath:@"userInfo" options:NSKeyValueObservingOptionNew context:nil];
    [self updateUserInfoDisplay];
}

- (void)dealloc {
    [self.viewModel removeObserver:self forKeyPath:@"userInfo"];
}

- (void)updateUserInfoDisplay {
    self.userInfoLabel.text = self.viewModel.userInfo;
}

- (void)observeValueForKeyPath:(NSString *)keyPath ofObject:(id)object change:(NSDictionary<NSKeyValueChangeKey,id> *)change context:(void *)context {
    if ([keyPath isEqualToString:@"userInfo"]) {
        [self updateUserInfoDisplay];
    }
}

@end
这段代码中就是ViewModel监听Model,View监听ViewModel从而实现自动更新变化,避免了重复的接口定义以及回调
上面的代码时ViewModel->View的绑定,那么如何实现View->ViewModel呢,接下来也有一个例子
- ViewModel
// UserViewModel.h
#import <Foundation/Foundation.h>
#import "UserModel.h"

@interface UserViewModel : NSObject
@property (strong, nonatomic) UserModel *user;
- (instancetype)initWithUser:(UserModel *)user;
- (void)updateUsername:(NSString *)username;
- (void)updatePassword:(NSString *)password;
@end

// UserViewModel.m
#import "UserViewModel.h"

@implementation UserViewModel

- (instancetype)initWithUser:(UserModel *)user {
    if (self = [super init]) {
        _user = user;
    }
    return self;
}

- (void)updateUsername:(NSString *)username {
    self.user.username = username;
}

- (void)updatePassword:(NSString *)password {
    self.user.password = password;
}

@end
- VC
// ViewController.h
#import <UIKit/UIKit.h>
#import "UserViewModel.h"

@interface ViewController : UIViewController
@property (strong, nonatomic) UserViewModel *viewModel;
@property (strong, nonatomic) UITextField *usernameField;
@property (strong, nonatomic) UITextField *passwordField;
@end

// ViewController.m
#import "ViewController.h"

@implementation ViewController

- (void)viewDidLoad {
    [super viewDidLoad];

    UserModel *user = [[UserModel alloc] init];
    self.viewModel = [[UserViewModel alloc] initWithUser:user];

    self.usernameField = [[UITextField alloc] initWithFrame:CGRectMake(20, 100, 280, 40)];
    self.passwordField = [[UITextField alloc] initWithFrame:CGRectMake(20, 150, 280, 40)];

    [self.view addSubview:self.usernameField];
    [self.view addSubview:self.passwordField];

    [self.usernameField addTarget:self action:@selector(usernameDidChange:) forControlEvents:UIControlEventEditingChanged];
    [self.passwordField addTarget:self action:@selector(passwordDidChange:) forControlEvents:UIControlEventEditingChanged];
}

- (void)usernameDidChange:(UITextField *)textField {
    [self.viewModel updateUsername:textField.text];
}

- (void)passwordDidChange:(UITextField *)textField {
    [self.viewModel updatePassword:textField.text];
}

@end
VC层的控件的变化会让ViewModel层的数据自动变化
MVVM 的优势
低耦合:View 可以独立于Model变化和修改,一个 viewModel 可以绑定到不同的 View 上
可重用性:可以把一些视图逻辑放在一个 viewModel里面,让很多 view 重用这段视图逻辑
独立开发:开发人员可以专注于业务逻辑和数据的开发 viewModel,设计人员可以专注于页面设计
可测试:通常界面是比较难于测试的,而 MVVM 模式可以针对 viewModel来进行测试
MVVM 的弊端
数据绑定使得Bug 很难被调试。你看到界面异常了,有可能是你 View 的代码有 Bug,也可能是 Model 的代码有问题。数据绑定使得一个位置的 Bug 被快速传递到别的位置,要定位原始出问题的地方就变得不那么容易了。


![NSSCTF | [第五空间 2021]WebFTP](https://img-blog.csdnimg.cn/direct/d090359c45154c338c89363996fd479c.png)