0. 引言
在业务系统开发中,我们经常遇到excel导入导出的业务场景,普通的excel导入导出我们可以利用 apache poi、jxl以及阿里开源的easyexcel来实现,特别easyexcel更是将excel的导入导出极大简化,但是对于一些负载的表格形式,比如一条数据中再包含了多条子表数据的一对多场景,还有多对多场景,这类场景时easyexcel相对支持较弱。
于是今天我们就来看看如何通过apache easy-poi库来实现excel一对多、多对多导入导出的功能
1. easy-poi介绍
easy-poi是一个基于Apache POI的Java端Excel 操作工具库,目的是为了简化java程序对excel文件的操作。该库提供了简单的API接口,支持excel的读写、格式化等,以及excel数据导出到pdf、word等文件。
官方地址:https://gitee.com/lemur/easypoi
easy-poi提供了3个版本的工具库:
- easypoi-base:
easypoi-base 是 easypoi的核心模块,提供了基本的 Excel 处理功能,如读取、写入、转换等。
它不依赖于 Spring Boot,可以在任何 Java 项目中使用。
这个模块主要包含了 EasyPOI 的核心 API,如 ExcelReader、ExcelWriter、SXSSFSheet 等。 - easypoi-web:
easypoi-web 是基于 Spring Boot 的 Web 模块,它扩展了 easypoi-base 的功能,主要用于在 Web 环境中处理 Excel 文件。
这个模块提供了基于 Spring MVC 的控制器和方法,使得可以通过 HTTP 请求来上传和下载 Excel 文件。
easypoi-web 支持文件上传、文件下载、Excel 表单提交等功能,适用于需要在前端界面和后端服务之间传输 Excel 文件的应用场景。 - easypoi-annotation:
easypoi-annotation 是 easypoi 的注解模块,它提供了一系列注解,用于简化对象与 Excel 表格之间的映射。
通过使用这些注解,可以非常方便地将 Java 对象转换为 Excel 文件,或者从 Excel 文件中读取数据到 Java 对象。
这个模块特别适合于需要将数据库表结构映射为 Excel 文件或者将 Excel 文件数据导入到数据库表中的场景。
2. 导入功能实现
作者提供使用案例:https://gitee.com/lemur/easypoi/blob/master/basedemo.md
2.1 一对一导入
1、引入easypoi依赖,这里我们项目环境是springboot 2.6.13,java 1.8版本,因为已经引入了spring-web依赖,这里就单独引入easypoi-base核心库即可
        <dependency>
            <groupId>cn.afterturn</groupId>
            <artifactId>easypoi-base</artifactId>
            <version>4.2.0</version>
        </dependency>
另外引入下依赖hibernate-validator,用于支持校验注解,否则会报错
Unable to create a Configuration, because no Bean Validation provider could be found. Add a provider
		<dependency>
            <groupId>org.hibernate</groupId>
            <artifactId>hibernate-validator</artifactId>
            <version>5.4.1.Final</version>
        </dependency>
2、创建实体类,通过@Excel注解标注excel列表和实体类字段的绑定关系,其中name属性要与导入的excel列名保持完全一致
@Data
public class DataInfo {

    @Excel(name = "姓名" )
    private String name;

    @Excel(name = "数量" )
    private Integer number;

    @Excel(name = "地址" )
    private String address;

    @Excel(name = "创建日期", format="yyyy-MM-dd", width = 24)
    private Date createDate;

}
3、创建导入接口, 通过ExcelImportUtil.importExcel接口即可实现导入excel数据解析
@PostMapping("import")
    public List<DataInfo> importData(MultipartFile file) throws Exception {
        ImportParams params = new ImportParams();
        params.setTitleRows(1);
        params.setHeadRows(2);
        params.setNeedVerify(true);
        List<DataInfo> dataInfos = ExcelImportUtil.importExcel(file, DataInfo.class, params);
        return dataInfos;
    }
需要注意的是这里的TitleRows表示的是excel导入文件中的标题行的所在行数,HeadRows表示的是表头行的所在行数
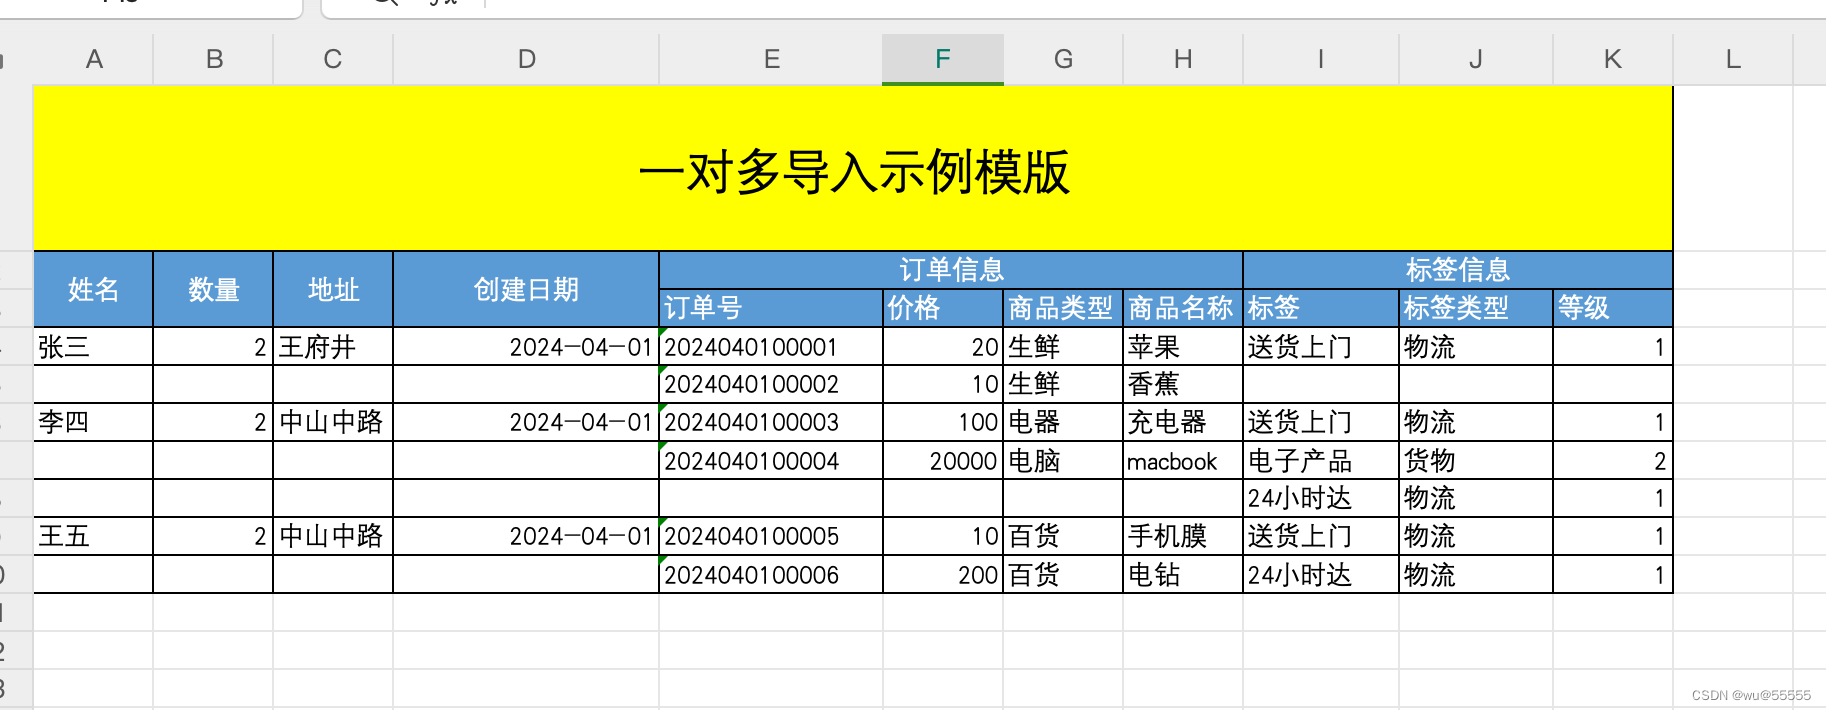
如下图黄色部分所示,就是excel的标题行,蓝色部分就是表头行,如果没有标题,将其值设置为0或不设置即可(该值默认为0)
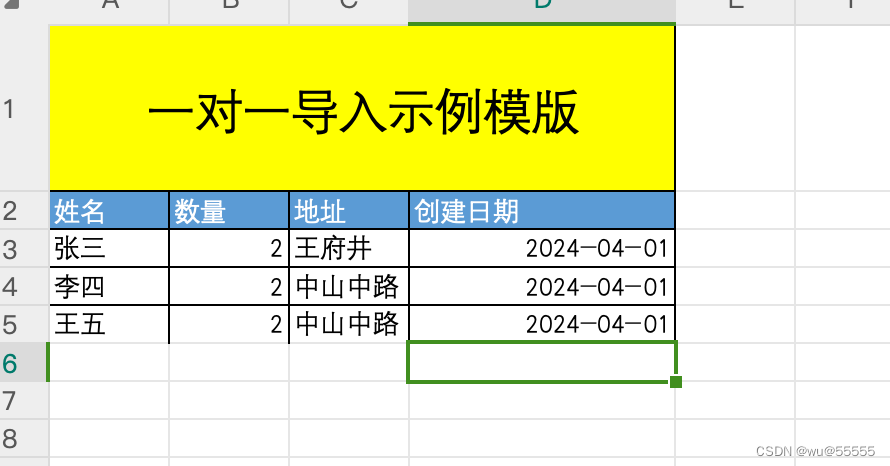
4、所用的模版文件如上图所示,注意列名与实体类中的name属性保持一致,否则会识别不到
2.2 一对多,多对多导入
1、要实现一对多导入,就需要通过ExcelImportUtil.importExcelMore方法,该方法返回一个ExcelImportResult对象:
该对象中的list字段就是解析出来的数据,failList是解析失败时的数据,verifyFail表示验证是否失败。workbook和failWorkbook就是对应解析成功和失败时的表格体对象

2、我们利用该方法书写一个工具类,实现导入方法
public static <T> List<T> importExcel(MultipartFile file, Integer titleRows, Integer headerRows,
                                          Class<T> clazz) {
        if (file == null) {
            return null;
        }
        ImportParams params = new ImportParams();
        params.setTitleRows(titleRows);
        params.setHeadRows(headerRows);
        params.setNeedVerify(true);
        ExcelImportResult<T> result = null;
        try {
            InputStream inputStream = file.getInputStream();
            result = ExcelImportUtil.importExcelMore(inputStream, clazz, params);
        } catch (NoSuchElementException e) {
            // 日志记录错误
            log.error(String.format("导入数据为空: %s", ExceptionUtils.getStackTrace(e)));
            throw new RuntimeException("导入数据为空");
        } catch (Exception e) {
            // 日志记录错误
            log.error(String.format("导入失败: %s", ExceptionUtils.getStackTrace(e)));
            throw new RuntimeException("导入失败");
        }
        if (result == null) {
            return null;
        }
        if (result.isVerifyFail()) {
            // 如有需要,可以根据result.getFailWorkbook();获取到有错误的数据
            throw new RuntimeException("校验出错");
        }
        return result.getList();
    }
3、实体类中我们创建子类实体
@Data
public class DataInfoOrder {

    @Excel(name = "订单号")
    private String orderNo;

    @Excel(name = "价格")
    private BigDecimal price;

    @Excel(name = "商品类型")
    private String type;

    @Excel(name = "商品名称")
    private String name;
}
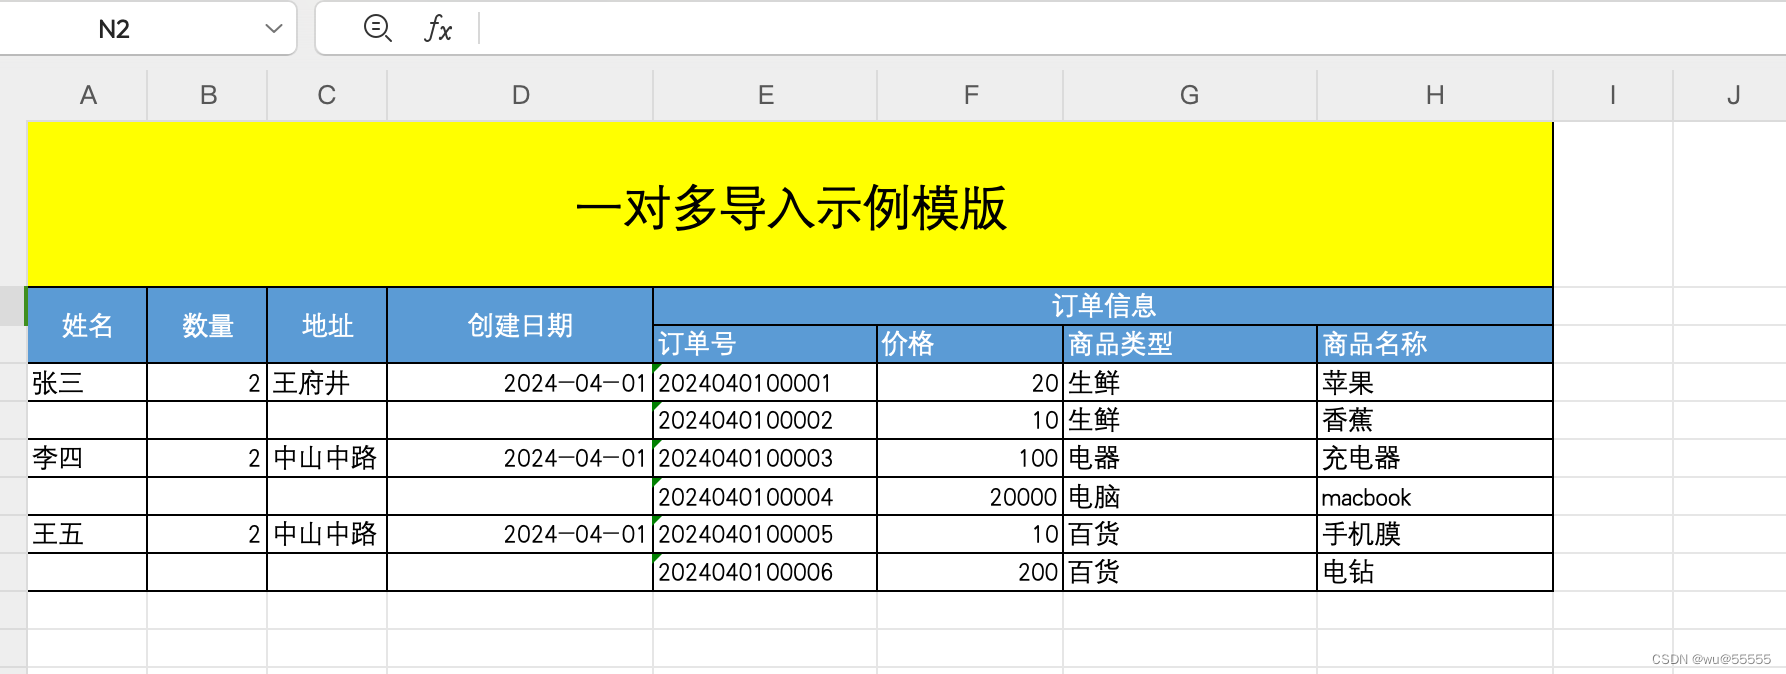
4、主类实体中通过@ExcelCollection注解声明子类,且在需要合并表头的单元格中添加needMerge = true,注意一对多的字段要写到最后
@Data
public class DataInfo {

    @Excel(name = "姓名" , needMerge = true)
    private String name;

    @Excel(name = "数量" , needMerge = true)
    private Integer number;

    @Excel(name = "地址" , needMerge = true)
    private String address;

    @Excel(name = "创建日期", format="yyyy-MM-dd", width = 24,needMerge = true)
    private Date createDate;

    @ExcelCollection(name = "订单信息")
    private List<DataInfoOrder> orderList;
其对应的导入模版如下图,可以看到需要合并的就是前面一对一的字段
5、如果需要多对多,则再添加一个@ExcelCollection即可
@Data
public class DataInfo {

    @Excel(name = "姓名" , needMerge = true)
    private String name;

    @Excel(name = "数量" , needMerge = true)
    private Integer number;

    @Excel(name = "地址" , needMerge = true)
    private String address;

    @Excel(name = "创建日期", format="yyyy-MM-dd", width = 24,needMerge = true)
    private Date createDate;

    @ExcelCollection(name = "订单信息")
    private List<DataInfoOrder> orderList;

    @ExcelCollection(name = "标签信息")
    private List<DataInfoTag> tagList;
}
模版如下,注意这里故意模拟了3种多对多产生的数据空缺情况:后者空缺、前者空缺、都不空缺,待会我们看看解析的数据是怎么样的
6、修改一下导入接口
	@PostMapping("import")
    public List<DataInfo> importData(MultipartFile file) throws Exception {
        List<DataInfo> dataInfos = ExcelUtil.importExcel(file, 1, 2, DataInfo.class);
        return dataInfos;
    }
7、测试调用

8、解析返回数据如下,可以看到实际上表格中的空行子数据,也添加了一个空子对象,因为easypoi本身是通过构建识别workbook表格对象的方式来解析数据的,因为这些空行属于中间空行,上下都有值,因此会被识别为空对象,这算是一个待优化项,但主体数据正确解析了,实际我们再通过一个非空判断就可以过滤这些空子对象,也很好处理。
[
	{
		"name": "张三",
		"number": 2,
		"address": "王府井",
		"createDate": "2024-03-31T16:00:00.000+00:00",
		"orderList": [
			{
				"orderNo": "2024040100001",
				"price": 20,
				"type": "生鲜",
				"name": "苹果"
			},
			{
				"orderNo": "2024040100002",
				"price": 10,
				"type": "生鲜",
				"name": "香蕉"
			}
		],
		"tagList": [
			{
				"tag": "送货上门",
				"type": "物流",
				"level": 1
			},
			{
				"tag": null,
				"type": null,
				"level": null
			}
		]
	},
	{
		"name": "李四",
		"number": 2,
		"address": "中山中路",
		"createDate": "2024-03-31T16:00:00.000+00:00",
		"orderList": [
			{
				"orderNo": "2024040100003",
				"price": 100,
				"type": "电器",
				"name": "充电器"
			},
			{
				"orderNo": "2024040100004",
				"price": 20000,
				"type": "电脑",
				"name": "macbook"
			},
			{
				"orderNo": null,
				"price": null,
				"type": null,
				"name": null
			}
		],
		"tagList": [
			{
				"tag": "送货上门",
				"type": "物流",
				"level": 1
			},
			{
				"tag": "电子产品",
				"type": "货物",
				"level": 2
			},
			{
				"tag": "24小时达",
				"type": "物流",
				"level": 1
			}
		]
	},
	{
		"name": "王五",
		"number": 2,
		"address": "中山中路",
		"createDate": "2024-03-31T16:00:00.000+00:00",
		"orderList": [
			{
				"orderNo": "2024040100005",
				"price": 10,
				"type": "百货",
				"name": "手机膜"
			},
			{
				"orderNo": "2024040100006",
				"price": 200,
				"type": "百货",
				"name": "电钻"
			}
		],
		"tagList": [
			{
				"tag": "送货上门",
				"type": "物流",
				"level": 1
			},
			{
				"tag": "24小时达",
				"type": "物流",
				"level": 1
			}
		]
	}
]
3. 导出功能实现
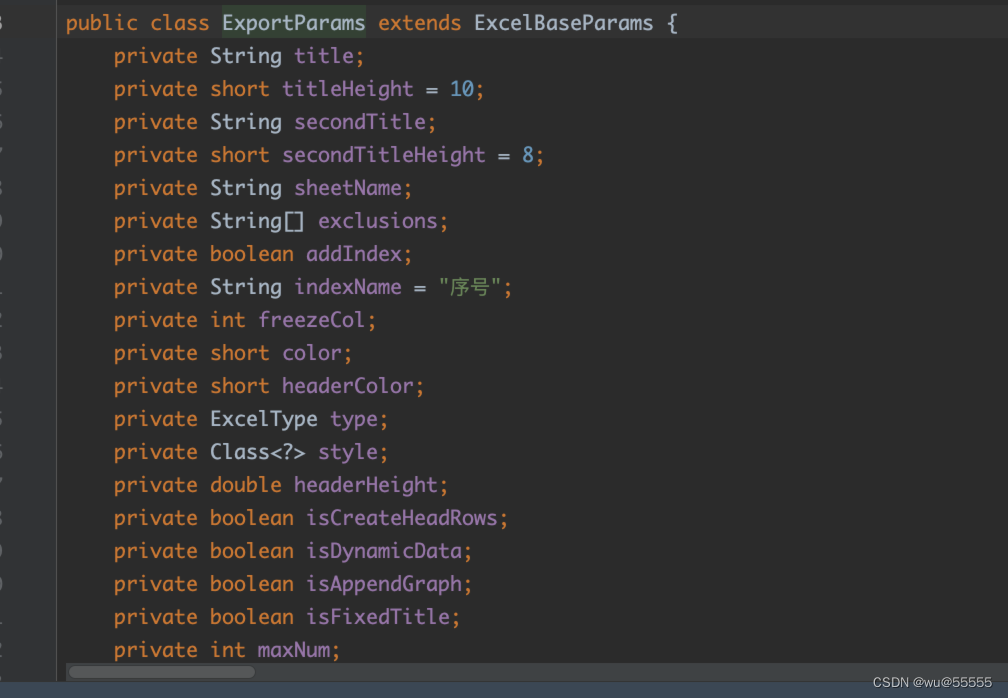
1、导入实现了,导出的实现就相对更加简单了,只需要调用ExcelExportUtil.exportExcel方法即可, 该方法需要三个参数:
- ExportParams对象,我们自己new一个,如果有导出样式要求,可以在该对象中定义
- Class 导出的实体类class,与导入时创建的实体类一个用法,字段上声明
@Excel注解,可以在其中声明数据格式、表格高度、宽度等,如果有一对多、多对多的子表导出,那么通过@ExcelCollection声明即可 - Collection<?> dataSet, 要导出的数据,其结构体与上述class参数保持一致
2、当然该方法是构建了一个Workbook对象,如果我们需要excel文件导出到浏览器,就需要将其文件数据输出为文件流,响应给前端,那么还需要用到响应体HttpServletResponse,以及Workbook的write方法,同时声明好数据类型content-Type为文件流
基础示例代码如下:
 public static <T> void downLoadExcel(String fileName, HttpServletResponse response,Class clazz,Workbook workbook) throws RuntimeException{
        ExportParams params = new ExportParams();
        params.setSheetName("data");//设置sheet名
        try {
            // 兼容中文
            fileName = new String(fileName.getBytes(StandardCharsets.UTF_8), StandardCharsets.ISO_8859_1);
            response.setCharacterEncoding("utf-8");
            response.setHeader("content-Type", "application/octet-stream");
            response.setHeader("Content-Disposition", "attachment;filename=" + fileName);
            workbook.write(response.getOutputStream());
        } catch (IOException e) {
            // 一个自定义枚举 错误信息的
            e.printStackTrace();
            throw new RuntimeException("下载出错");
        }
    }
3、导出接口封装,同时造一下假数据:
@GetMapping("export")
    public void exportData(HttpServletResponse response){
        List<DataInfo> dataInfos = new ArrayList<>();
        for (int i = 1; i <= 10; i++) {
            DataInfo info = new DataInfo();
            info.setName("数据"+i);
            info.setAddress("地址"+i);
            info.setNumber(i);
            info.setCreateDate(new Date());
            Random rand = new Random();
            int num = rand.nextInt(5) + 1;
            int num2 = rand.nextInt(5) + 1;
            List<DataInfoOrder> orderList = new ArrayList<>(num);
            for (int j = 1; j <= num; j++) {
                DataInfoOrder order = new DataInfoOrder();
                order.setPrice(new BigDecimal(j));
                order.setName("商品"+j);
                order.setOrderNo("订单号"+j);
                order.setType("类型"+j);
                orderList.add(order);
            }
            List<DataInfoTag> tagList = new ArrayList<>();
            for (int j = 1; j <= num2; j++) {
                DataInfoTag tag = new DataInfoTag();
                tag.setTag("标签"+j);
                tag.setLevel(j);
                tag.setType("标签类型"+j);
                tagList.add(tag);
            }
            info.setOrderList(orderList);
            info.setTagList(tagList);
            dataInfos.add(info);
        }
        ExcelUtil.downLoadExcel("导出数据.xlsx", response, DataInfo.class, dataInfos);
    }
4、浏览器直接调用该导出接口

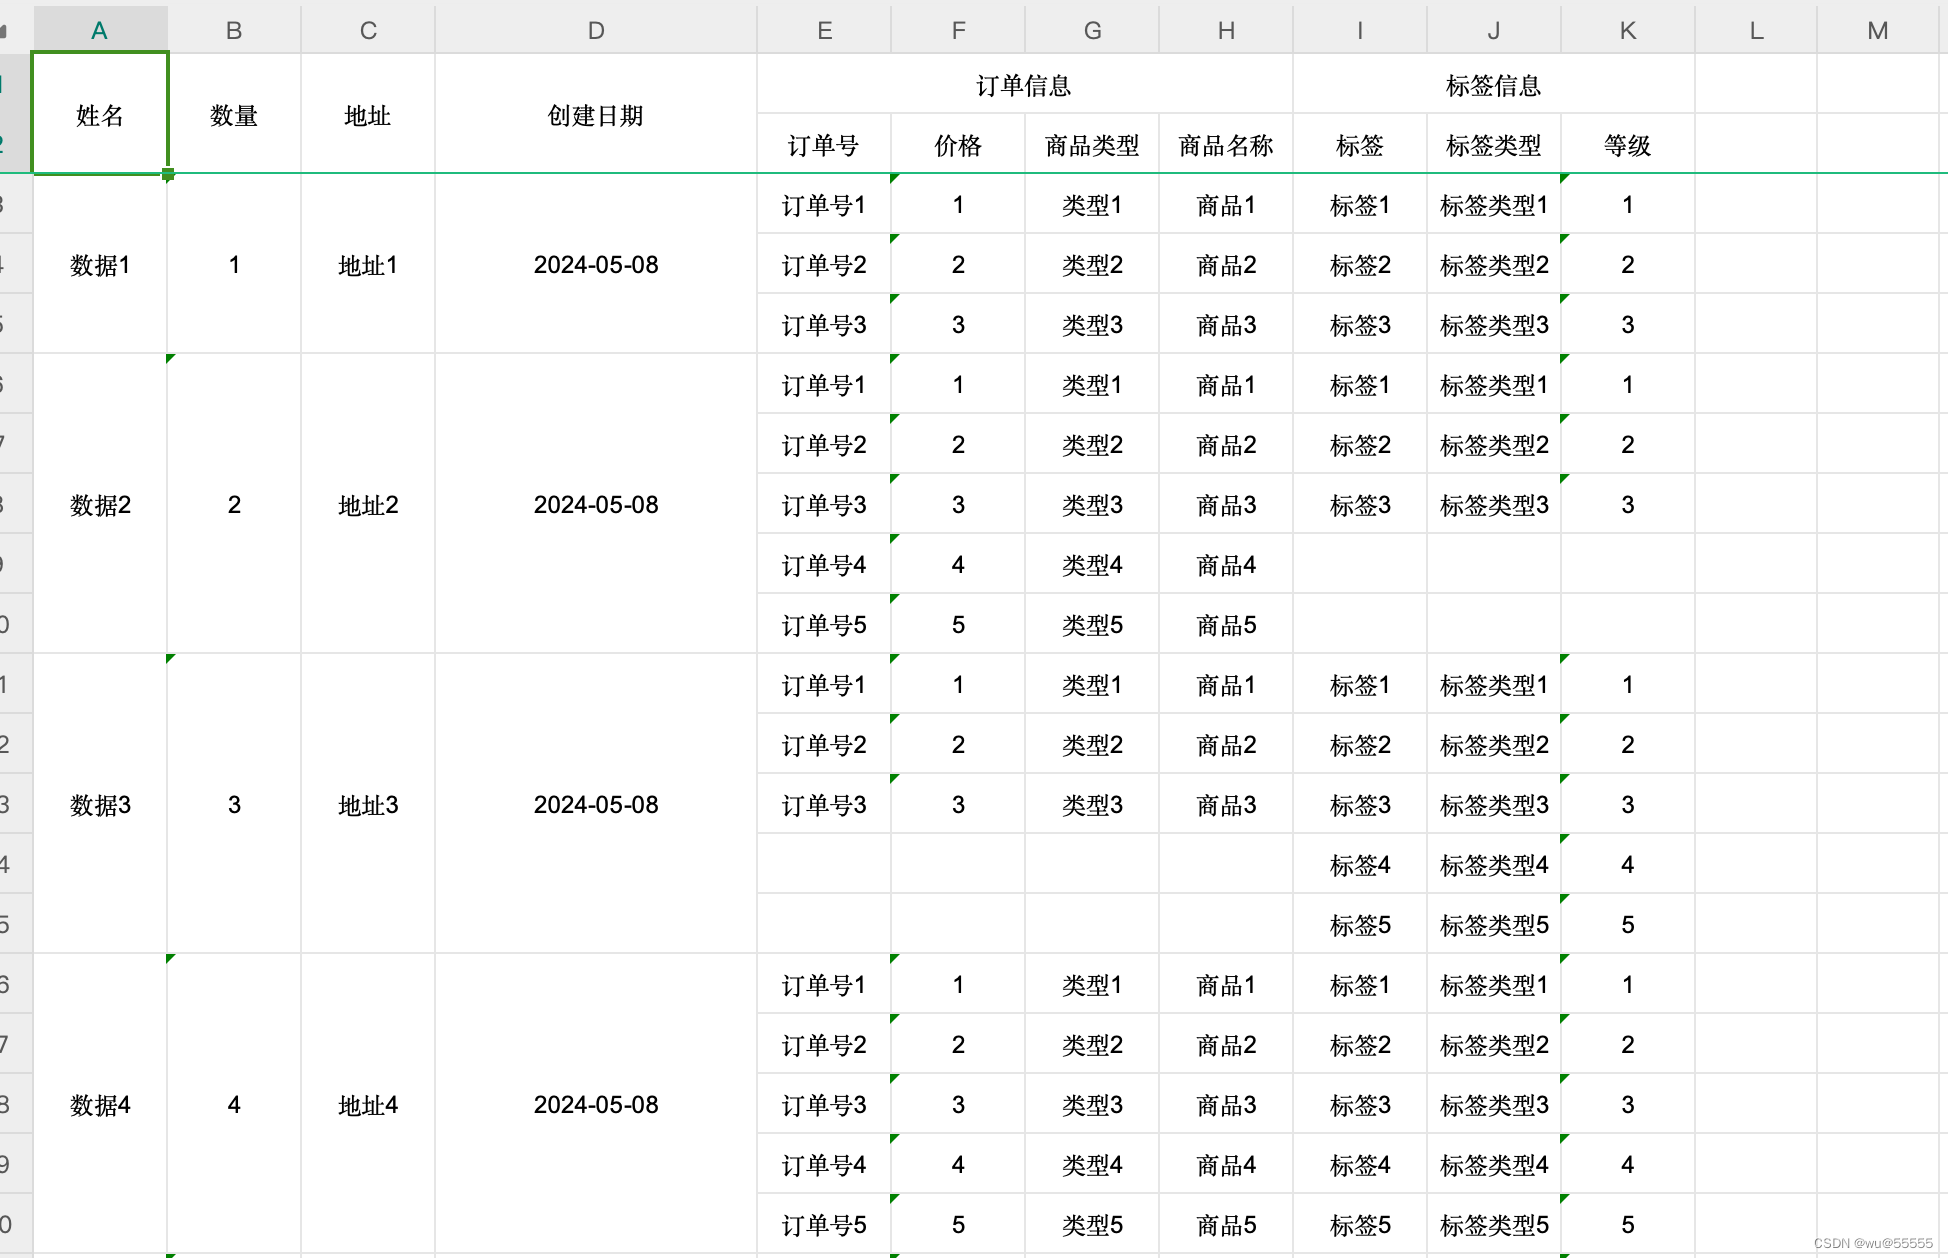
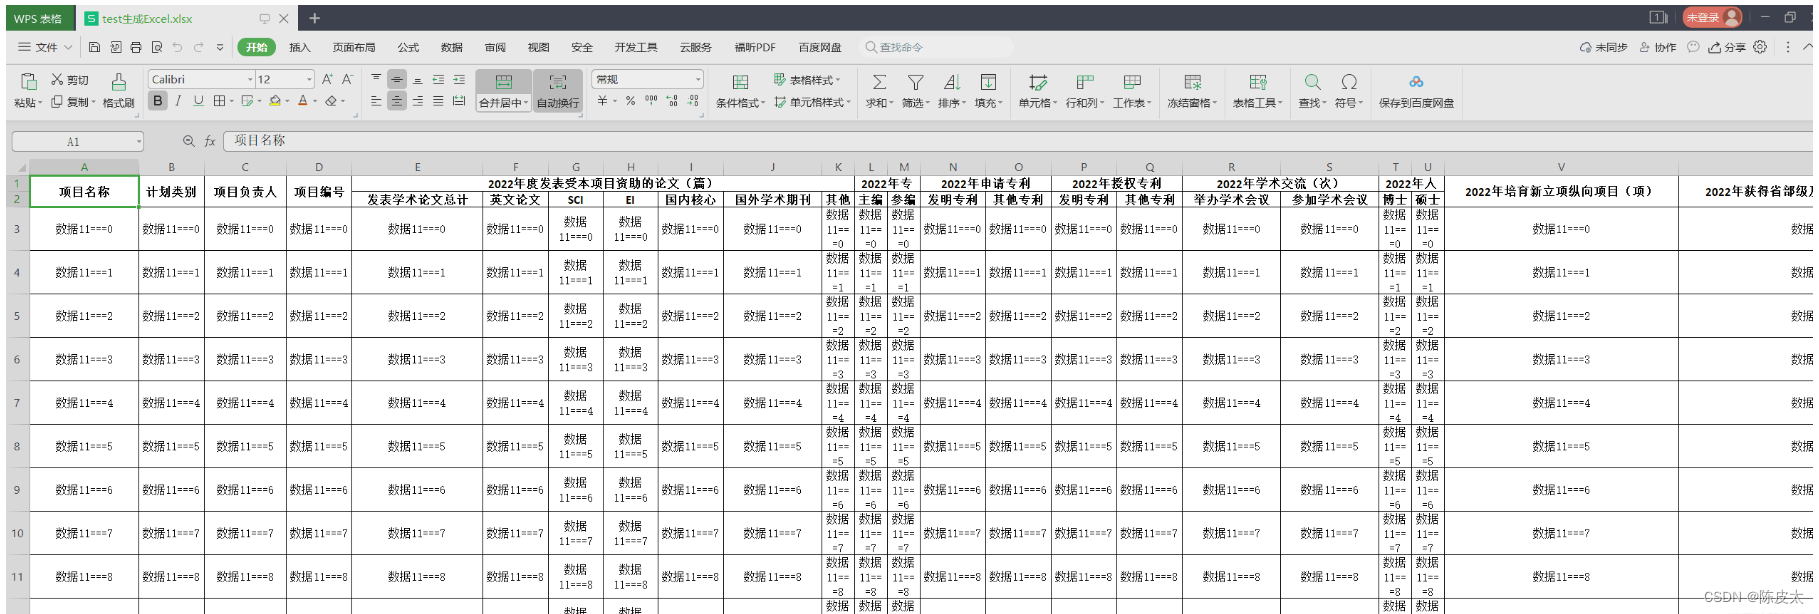
5、导出生成的excel如下图所示,有样式需要的,大家自行在ExportParams参数中调整即可
总结
如上,我们就实现了针对excel的一对一、一对多、多对多的导入导出功能,实际使用时,大家可以将方法进行二次封装,实现更加简洁方便的API
本文演示代码见:https://gitee.com/wuhanxue/wu_study/tree/master/demo/excel_import_demo


![[沫忘录]MySQL 锁](https://img-blog.csdnimg.cn/direct/e04c2e48c755451e8e24e93d50dea0f1.png)