多级缓存
初识 OpenResty
基于 Nginx的高性能 Web 平台,用于方便地搭建能够处理超高并发、扩展性极高的动态 Web 应用、Web 服务和动态网关。
- 具备Nginx的完整功能
- 基于Lua语言进行扩展,集成了大量精良的 Lua 库、第三方模块
- 允许使用Lua自定义业务逻辑、自定义库

OpenResty 的安装
安装
首先你的Linux虚拟机必须联网
1)安装开发库
首先要安装OpenResty的依赖开发库,执行命令:
yum install -y pcre-devel openssl-devel gcc --skip-broken
2)安装OpenResty仓库
你可以在你的 CentOS 系统中添加 openresty 仓库,这样就可以便于未来安装或更新我们的软件包(通过 yum check-update 命令)。运行下面的命令就可以添加我们的仓库:
yum-config-manager --add-repo https://openresty.org/package/centos/openresty.repo
如果提示说命令不存在,则运行:
yum install -y yum-utils
然后再重复上面的命令
3)安装OpenResty
然后就可以像下面这样安装软件包,比如 openresty:
yum install -y openresty
4)安装opm工具
opm是OpenResty的一个管理工具,可以帮助我们安装一个第三方的Lua模块。
如果你想安装命令行工具 opm,那么可以像下面这样安装 openresty-opm 包:
yum install -y openresty-opm
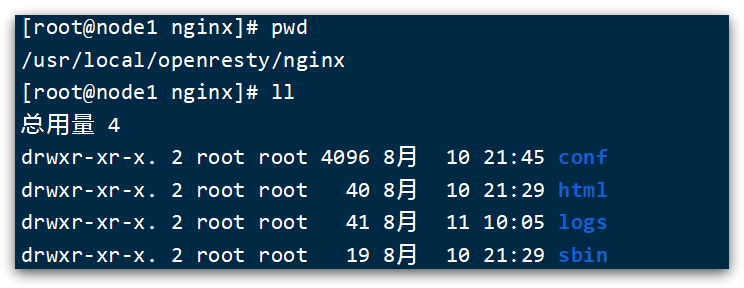
5)目录结构
默认情况下,OpenResty安装的目录是:/usr/local/openresty
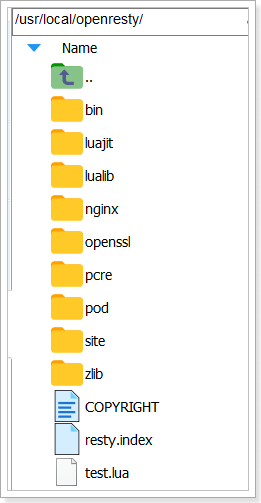
看到里面的nginx目录了吗,OpenResty就是在Nginx基础上集成了一些Lua模块。
6)配置nginx的环境变量
打开配置文件:
vi /etc/profile
在最下面加入两行:
export NGINX_HOME=/usr/local/openresty/nginx
export PATH=${NGINX_HOME}/sbin:$PATH
NGINX_HOME:后面是OpenResty安装目录下的nginx的目录
然后让配置生效:
source /etc/profile
启动和运行
OpenResty底层是基于Nginx的,查看OpenResty目录的nginx目录,结构与windows中安装的nginx基本一致:
所以运行方式与nginx基本一致:
# 启动nginx
nginx
# 重新加载配置
nginx -s reload
# 停止
nginx -s stop
nginx的默认配置文件注释太多,影响后续我们的编辑,这里将nginx.conf中的注释部分删除,保留有效部分。
修改/usr/local/openresty/nginx/conf/nginx.conf文件,内容如下:
#user  nobody;
worker_processes  1;
error_log  logs/error.log;

events {
    worker_connections  1024;
}

http {
    include       mime.types;
    default_type  application/octet-stream;
    sendfile        on;
    keepalive_timeout  65;

    server {
        listen       8081;
        server_name  localhost;
        location / {
            root   html;
            index  index.html index.htm;
        }
        error_page   500 502 503 504  /50x.html;
        location = /50x.html {
            root   html;
        }
    }
}
在Linux的控制台输入命令以启动nginx:
nginx
然后访问页面:http://192.168.150.101:8081,注意ip地址替换为你自己的虚拟机IP:
OpenResty快速入门
1、在nginx.conf的http下面,添加对OpenResty的Lua模块的加载
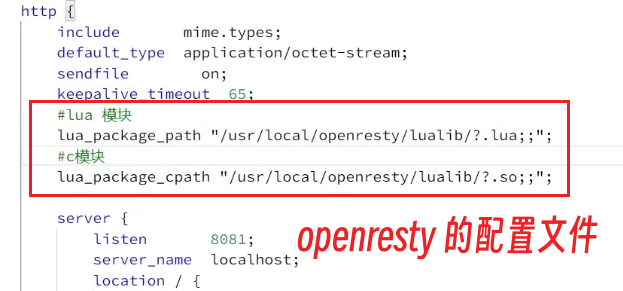
#lua 模块
lua_package_path "/usr/local/openresty/lualib/?.lua;;";
#c模块
lua_package_cpath "/usr/local/openresty/lualib/?.so;;";
2、在nginx.conf的server下面,添加对/api/item这个路径的监听
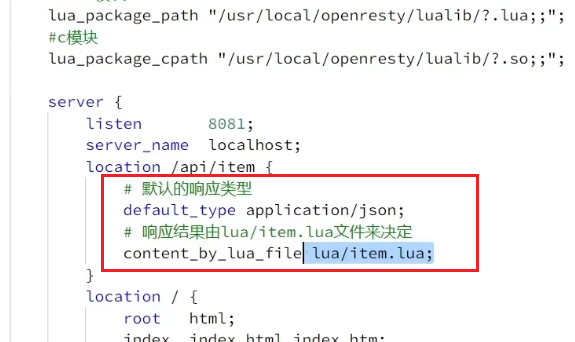
location /api/item {
    # 响应类型,这里返回json
    default_type application/json;
    # 响应数据由 lua/item.lua这个文件来决定
    content_by_lua_file lua/item.lua;
}
3、在nginx目录创建文件夹:lua,在lua文件夹下,新建文件:item.lua
-- 返回假数据,这里的ngx.say()函数,就是写数据到Response中
ngx.say('{"id":10001,"data":"hello"}')
4、重新加载配置
nginx -s reload
请求参数处理
路径占位符 /item/1001
# 1.正则表达式匹配:
location ~ /item/(\d+) {
    content_by_lua_file lua/item.lua;
}
-- 2. 匹配到的参数会存入ngx.var数组中,
-- 可以用角标获取
local id = ngx.var[1]
请求头 id: 1001
-- 获取请求头,返回值是table类型
local headers = ngx.req.get_headers()
Get请求参数 ?id=1001
-- 获取GET请求参数,返回值是table类型
local getParams = ngx.req.get_uri_args()
Post表单参数 id=1001
-- 读取请求体
ngx.req.read_body()
-- 获取POST表单参数,返回值是table类型
local postParams = ngx.req.get_post_args()
JSON参数 {“id”: 1001}
-- 读取请求体
ngx.req.read_body()
-- 获取body中的json参数,返回值是string类型
local jsonBody = ngx.req.get_body_data()
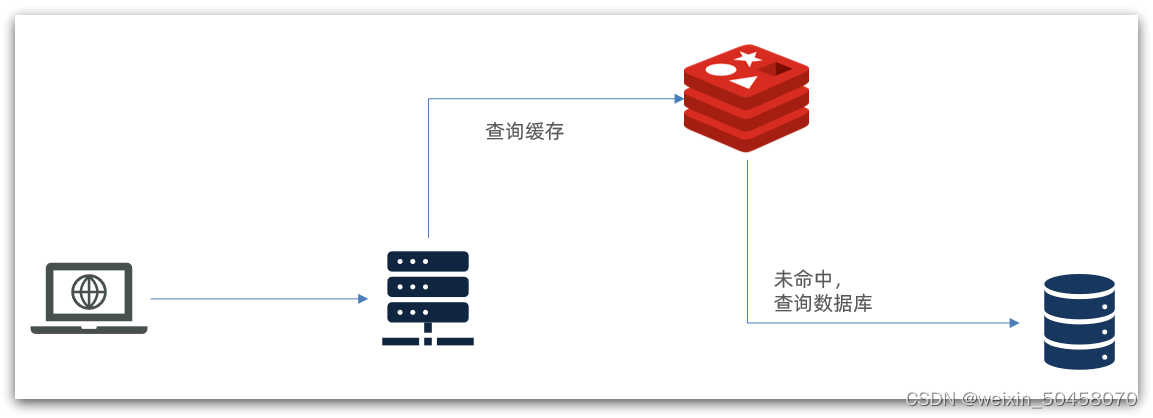
查询Tomcat
nginx内部发送Http请求
nginx提供了内部API用以发送http请求
local resp = ngx.location.capture("/path",{
        method = ngx.HTTP_GET,   -- 请求方式
        args = {a=1,b=2},  -- get方式传参数
        body = "c=3&d=4" -- post方式传参数
    })
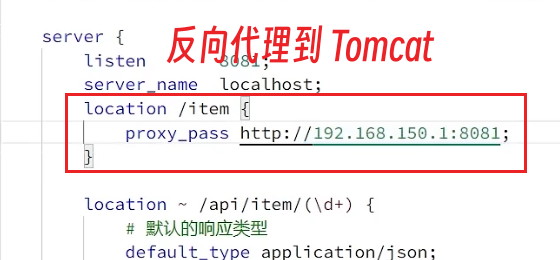
注意:这里的path是路径,并不包含IP和端口。这个请求会被nginx内部的server监听并处理。
但是我们希望这个请求发送到Tomcat服务器,所以还需要编写一个server来对这个路径做反向代理:
封装http查询的函数
把http查询的请求封装为一个函数,放到OpenResty函数库中
在/usr/local/openresty/lualib目录下创建common.lua文件
-- 封装函数,发送http请求,并解析响应
local function read_http(path, params)
    local resp = ngx.location.capture(path,{
            method = ngx.HTTP_GET,
            args = params,
        })
    if not resp then
        -- 记录错误信息,返回404
        ngx.log(ngx.ERR, "http not found, path: ", path , ", args: ", args)
        ngx.exit(404)
    end
    return resp.body
end

-- 将方法导出
local _M = {
    read_http = read_http
}
return _M
使用Http函数查询数据
修改item.lua文件
-- 引入自定义工具模块
local common = require("common")
local read_http = common.read_http

-- 获取路径参数
local id = ngx.var[1]

-- 根据id查询商品
local itemJSON = read_http("/item/".. id, nil)
-- 根据id查询商品库存
local itemStockJSON = read_http("/item/stock/".. id, nil)
JSON结果处理
OpenResty提供了一个cjson的模块用来处理JSON的序列化和反序列化。
openresty/lua-cjson: Lua CJSON is a fast JSON encoding/parsing module for Lua (github.com)
-- 引入cjson模块
local cjson = require "cjson"

-- 序列化
local obj = {
    name = 'jack',
    age = 21
}
local json = cjson.encode(obj)

-- 反序列化
local json = '{"name": "jack", "age": 21}'
local obj = cjson.decode(json);
print(obj.name)
Tomcat集群的负载均衡
# 反向代理配置,将/item路径的请求代理到tomcat集群
location /item {
proxy_pass http://tomcat-cluster;
}
# tomcat集群配置
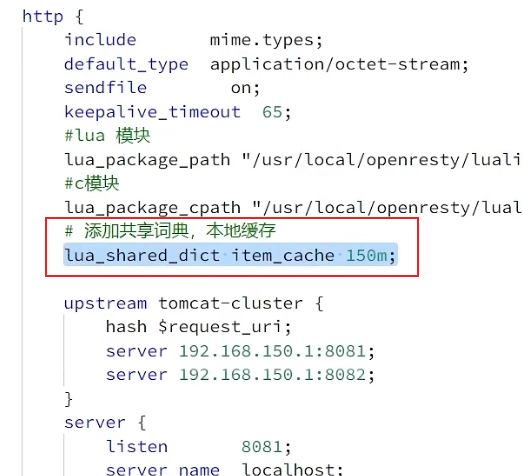
upstream tomcat-cluster{
# 对请求的 URI 进行哈希处理
hash $request_uri;
server 192.168.150.1:8081;
server 192.168.150.1:8082;
}

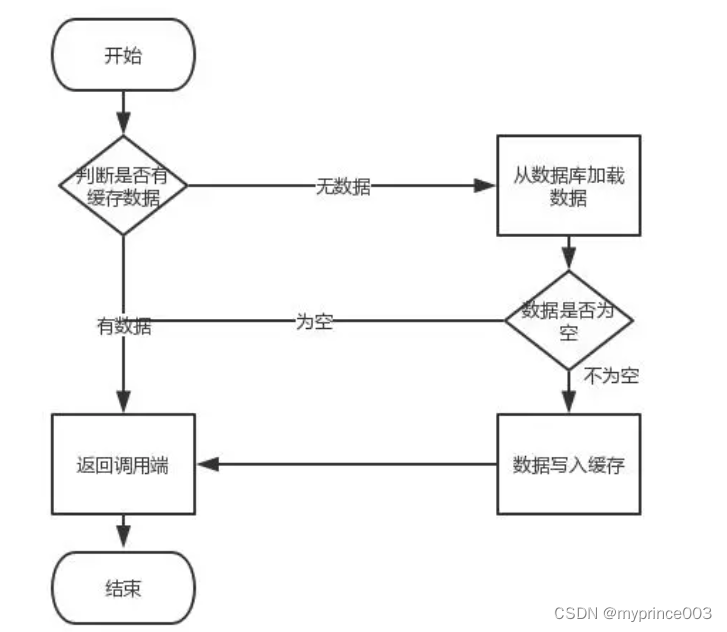
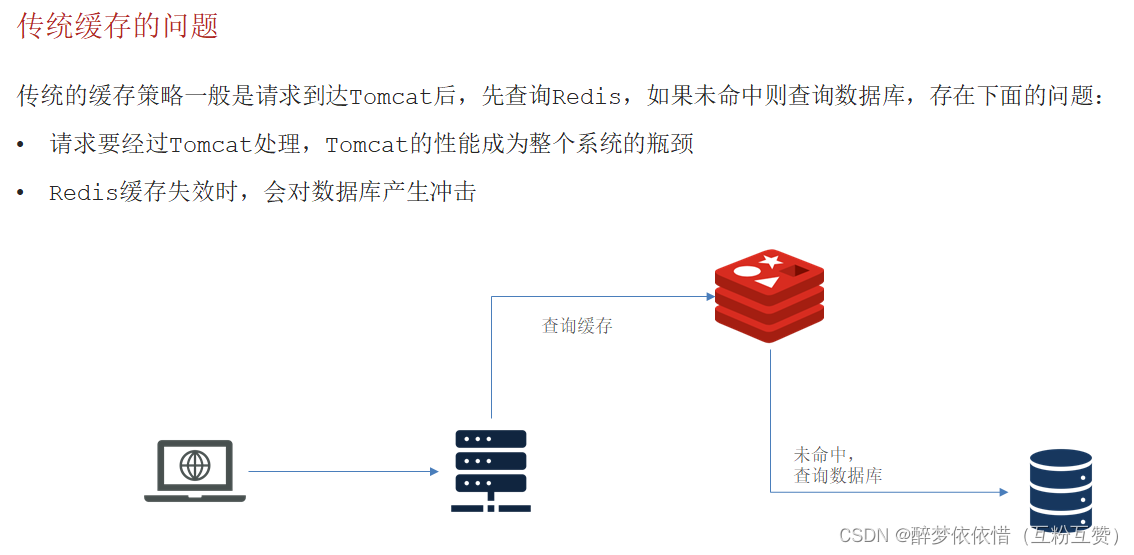
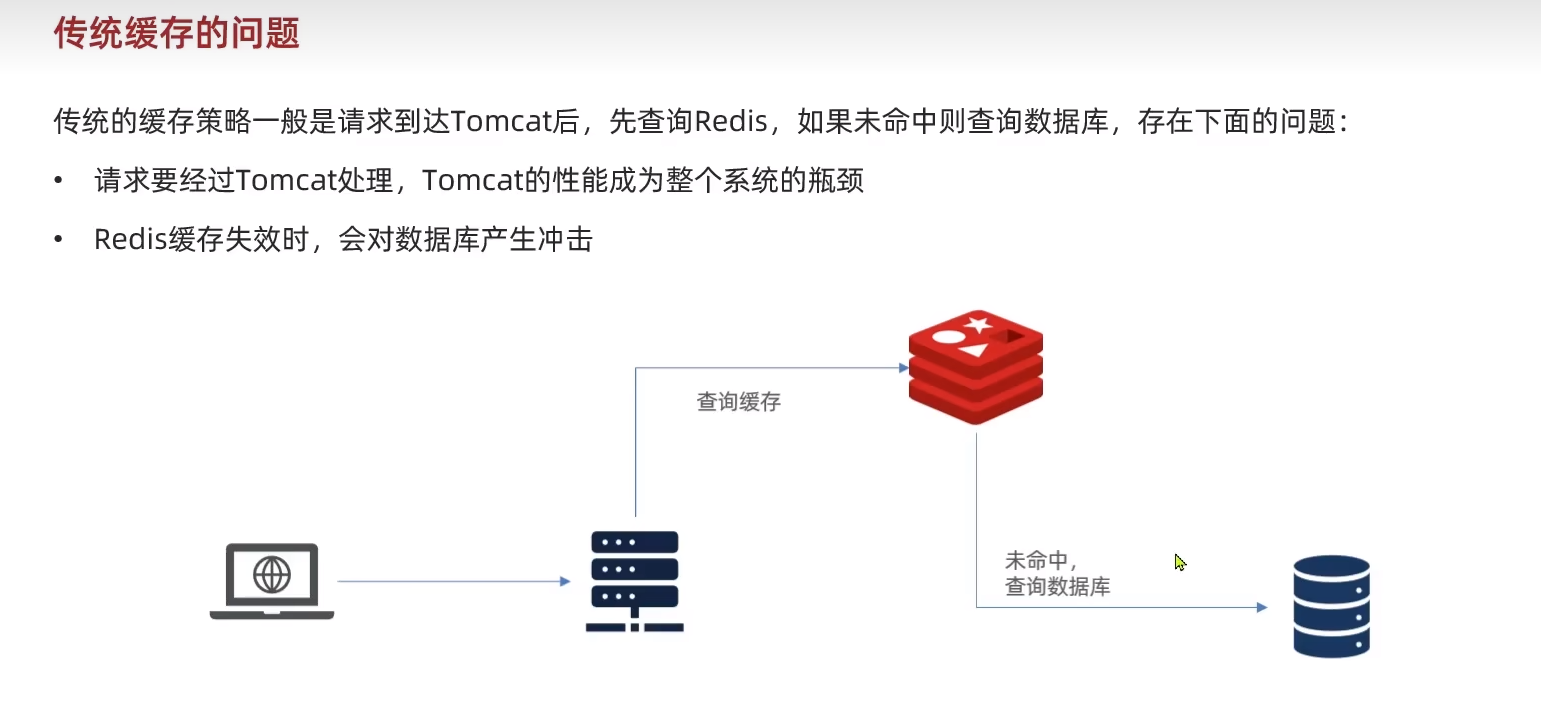
Redis缓存预热
冷启动:服务刚刚启动时,Redis中并没有缓存,如果所有商品数据都在第一次查询时添加缓存,可能会给数据库带来较大压力。
缓存预热:在实际开发中,我们可以利用大数据统计用户访问的热点数据,在项目启动时将这些热点数据提前查询并保存到Redis中。
@Component
public class RedisHandler implements InitializingBean {
    @Autowired
    private StringRedisTemplate redisTemplate;
    @Override
    public void afterPropertiesSet() throws Exception {
        // 初始化缓存 ...
    }
}
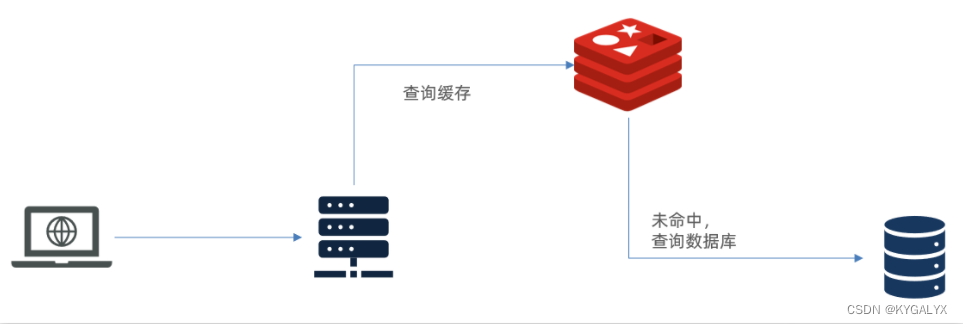
查询Redis缓存
OpenResty的Redis模块
OpenResty提供了操作Redis的模块
-- 引入redis模块
local redis = require("resty.redis")
-- 初始化Redis对象
local red = redis:new()
-- 设置Redis超时时间
red:set_timeouts(1000, 1000, 1000)
封装函数,用来释放Redis连接,其实是放入连接池
-- 关闭redis连接的工具方法,其实是放入连接池
local function close_redis(red)
    local pool_max_idle_time = 10000 -- 连接的空闲时间,单位是毫秒
    local pool_size = 100 --连接池大小
    local ok, err = red:set_keepalive(pool_max_idle_time, pool_size)
    if not ok then
        ngx.log(ngx.ERR, "放入Redis连接池失败: ", err)
    end
end
封装函数,从Redis读数据并返回
-- 查询redis的方法 ip和port是redis地址,key是查询的key
local function read_redis(ip, port, key)
    -- 获取一个连接
    local ok, err = red:connect(ip, port)
    if not ok then
        ngx.log(ngx.ERR, "连接redis失败 : ", err)
        return nil
    end
    -- 查询redis
    local resp, err = red:get(key)
    -- 查询失败处理
    if not resp then
        ngx.log(ngx.ERR, "查询Redis失败: ", err, ", key = " , key)
    end
    --得到的数据为空处理
    if resp == ngx.null then
        resp = nil
        ngx.log(ngx.ERR, "查询Redis数据为空, key = ", key)
    end
    close_redis(red)
    return resp
end
业务实现
-- 封装函数,先查询redis,再查询http
local function read_data(key, path, params)
    -- 查询redis
    local resp = read_redis("127.0.0.1", 6379, key)
    -- 判断redis是否命中
    if not resp then
        -- Redis查询失败,查询http
        resp = read_http(path, params)
    end
    return resp
end
Nginx本地缓存
开启共享词典,在nginx.conf的http下添加配置:
# 共享字典,也就是本地缓存,名称叫做:item_cache,大小150m
lua_shared_dict item_cache 150m;
操作共享字典
-- 获取本地缓存对象
local item_cache = ngx.shared.item_cache
-- 存储, 指定key、value、过期时间,单位s,默认为0代表永不过期
item_cache:set('key', 'value', 1000)
-- 读取
local val = item_cache:get('key')
修改后的查询逻辑
-- 封装函数,先查询本地缓存,再查询redis,再查询http
local function read_data(key, expire, path, params)
    -- 读取本地缓存
    local val = item_cache:get(key)
    if not val then
        -- 缓存未命中,记录日志
        ngx.log(ngx.ERR, "本地缓存查询失败, key: ", key , ", 尝试redis查询")
        -- 查询redis
        val = read_redis("127.0.0.1", 6379, key)
        -- 判断redis是否命中
        if not val then
            ngx.log(ngx.ERR, "Redis缓存查询失败, key: ", key , ", 尝试http查询")
            -- Redis查询失败,查询http
            val = read_http(path, params)
        end
    end
    -- 写入本地缓存
    item_cache:set(key, val, expire)
    return val
end
-- 根据id查询商品
local itemJSON = read_data('item:id:' .. id, 1800, "/item/".. id, nil)
-- 根据id查询商品库存
local itemStockJSON = read_data('item:stock:id:' .. id, 60, "/item/stock/".. id, nil)