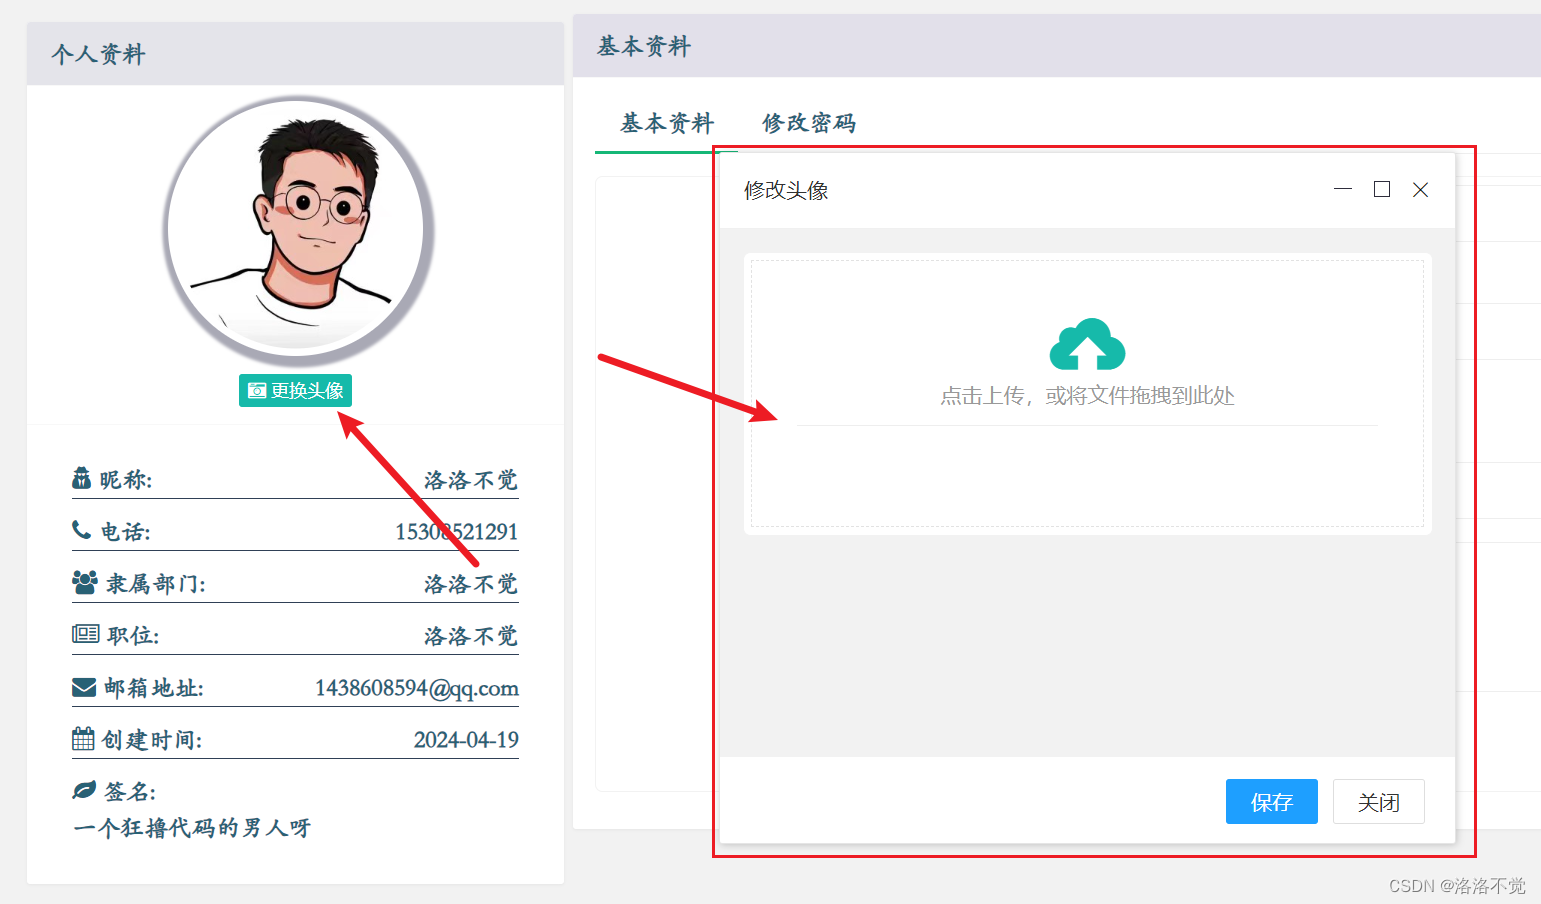
SpringBoot+layui实现个人信息头像的更改
该文章适合对SpringBoot,Thymeleaf,layui入门的小伙伴
废话不多说,直接上干货
Springboot+layui实现头像更换
前端公共部分代码
HTML页面代码
 	 <div class="layui-card-header" style="height: 215px">
                <div id="div-avatar">
                    <a th:href="${'../'+session.account.getAvatar()}" target="_blank">
                        <img id="img" th:src="${'../'+session.account.getAvatar()}" alt="暂无图片">
                    </a>
                </div>
                <button style="display: block; margin: 12px auto;"
                        class="layui-btn layui-bg-green layui-btn-xs avatar" lay-on="avatarBtn">
                    <i class="fa fa-camera-retro"></i> 更换头像
                </button>
            </div>

js部分代码(点击更换头像按钮弹出上传图片的弹窗,点击保存按钮实现图片的更新操作)
<script th:src="@{../dist/notify/notify.js}"></script>
<script>
    layui.use(['form', 'miniTab','notify'], function () {
        var form = layui.form,
            layer = layui.layer,
            miniTab = layui.miniTab;
        var util = layui.util;
        var notify=layui.notify;


        /*
        * lay-on实现关闭按钮,及头像修改界面
        * */
        util.on('lay-on', {

            /*
            * 点击avatarBtn弹出头像修改界面
            * */
            "avatarBtn": function () {
                layer.open({
                    type: 2 //此处以iframe举例
                    , title: '修改头像'
                    , area: ['490px', '460px']
                    , shade: 0
                    , maxmin: true
                    , offset: 'auto' //为了演示,这里设置不固定]
                    , content: '/page/upload'
                    , btn: ['保存', '关闭'] //只是为了演示
                    , yes: function () {
                        notify.loading("正在验证头像图片合法性,请稍后","vcenter","shadow",false)
                        setTimeout(function () {
                            notify.destroyAll();//关闭loading
                            $.ajax({
                                type: 'PUT',
                                url: "/auth/updateAvatar",//实现头像
                                success: function (d) { // 返回的RequestResult的json对象
                                    if (d.code === 0) {
                                        //弹出成功提示框,
                                        notify.success(d.msg,"vcenter","shadow",false);
                                    }else if (d.code === 1){
                                        //如果信息一致,弹出提示框
                                        notify.warning(d.msg, "vcenter","shadow",false);
                                    }
                                    else {
                                        notify.error(d.msg,"vcenter","shadow",false);
                                    }
                                },
                            }).done(function () {
                                setTimeout(function () {
                                    notify.destroyAll(); //全部关闭
                                    setTimeout(function () {
                                        miniTab.deleteCurrentByIframe();
                                    }, 1000);
                                }, 2500);
                            });
                        }, 3000);
                        return false;
                    }
                    , btn2: function () {
                        layer.closeAll();
                    }
                });
            }
        });
    });
</script>
<!--第三方插件介绍使用
    1、notify.info("提示消息");
    2、notify.warning("警告消息");
    3、notify.success("成功消息");
    4、notify.loading("加载中");
    5、notify.error("失败消息");
    6、notify.info("不显示关闭按钮", false);
    7、notify.warning("提示消息", function () {
        alert("回调成功");
    });
    8、notify.destroyAll(); //全部关闭
    9、notify.success("指定位置显示", "topLeft"); //参数:topLeft、topCenter、topRight、bottomLeft、bottomCenter、bottomRight、vcenter
    10、notify.alert("模态框", "vcenter","shadow"); //参数:shadow 显示遮罩
    11、notify.confirm("确认框", "vcenter","shadow",function(){
            alert("回调方法")
        }); //参数:shadow 显示遮罩 、function 确定后回调方法
-->
上传图片的upload.html文件
<!DOCTYPE html>
<html class="x-admin-sm" xmlns:th="http://www.thymeleaf.org">
<head>
    <meta charset="UTF-8">
    <title>头像上传</title>
    <link rel="shortcut icon" href="../resources/favicon.ico" th:href="@{/static/favicon.ico}"/>
    <link rel="stylesheet" th:href="@{../layui/css/layui.css}">
    <link rel="stylesheet" th:href="@{../css/public.css}" media="all">
</head>
<body>
<div class="layuimini-container">
    <div class="layuimini-main">
        <div class="layui-upload-drag" style="display: block;" id="upload-avatar">
            <i class="layui-icon layui-icon-upload"></i>
            <div>点击上传,或将文件拖拽到此处</div>
            <div class="layui-upload-list">
                <hr> <img class="layui-upload-img" id="upload-preview" style="max-height: 260px;max-width: 260px">
                <p id="avatarText"></p>
            </div>
        </div>
    </div>
</div>
<script th:src="@{../layui/layui.js}" charset="utf-8"></script>
<script th:src="@{../js/jquery-3.7.1.min.js}"></script>
<script type="text/javascript">
    layui.use(function(){
        var upload = layui.upload;
        var $ = layui.$;
        // 渲染
        var uploadInst = upload.render({
            elem: '#upload-avatar'
            //只要是上传图片 都用这一个接口
            ,url: "/auth/uploadImage"
            ,before: function(obj){
                //预读本地文件示例,不支持ie8
                obj.preview(function(index, file, result){
                    $('#upload-preview').attr('src', result); //图片链接(base64)
                    console.log(result)
                });
            }
            ,done: function(res){
                //如果上传失败
                if(res.code >0)
                {
                    return layer.msg('上传失败');
                }
                //上传成功
                else
                {
                    layer.msg('上传成功');
                    console.log(res.data.src)
                }
            }
            ,error: function(){
                //演示失败状态,并实现重传
                var avatarText = $('#avatarText');
                avatarText.html('<span style="color: #FF5722;">上传失败</span> <a class="layui-btn layui-btn-xs demo-reload">重试</a>');
                avatarText.find('.demo-reload').on('click', function(){
                    uploadInst.upload();
                });
            }
        });

    });
</script>

</body>
</html>

图片上传点击js中的保存按钮实现图片的更新保存( 公共后端代码)
controller
 /*
    * 更新头像
    * updateAvatar
    * */
    @PutMapping("/updateAvatar")
    public ResultUtil updateAvatar() {
        // 获取当前登录人的信息
        ServletRequestAttributes attributes = (ServletRequestAttributes) RequestContextHolder.getRequestAttributes();
        // 获取请求
        HttpServletRequest request = attributes.getRequest();
        // 获取当前登录人的信息
        UserEntity userEntity = (UserEntity) request.getSession().getAttribute("account");
        // 获取头像
        String avatar = (String) request.getSession().getAttribute("filename");
        // 打印测试
        System.out.println("头像:"+avatar);
        if (userEntity != null) {
           if (avatar != null){
               // 设置头像
               String avatarPath= "images/avatar/"+avatar;
               userEntity.setAvatar(avatarPath);
               // 更新头像
               userService.accountInformation(userEntity);
               // 返回成功信息
               return ResultUtil.ok(0, "头像修改成功");
           }
           return ResultUtil.warning(1,"头像不能为空哦!");
        }
        // 返回失败信息
        return ResultUtil.error("头像修改失败");
    }
方法一(上传图片在项目中)
loginController代码
 /*
    * 个人头像图片上传
    * 方法一对应WebConfigurer 中的方法一
    * */
    @PostMapping("/uploadImage")
    public Map<String, Object> image(@RequestParam(value = "file") MultipartFile file,
                                     HttpSession session)
    {

        Map<String, Object> map2 = new HashMap<String, Object>();
        Map<String, Object> map = new HashMap<String, Object>();
        String filename = "";
        //存放上传的图片在项目中的路径
        String localPath = System.getProperty("user.dir") + "/src/main/resources/static/images/avatar/";
        try {
            if (file != null) {
                //生成uuid作为文件名称
                String uuid = UUID.randomUUID().toString().replaceAll("-", "");
                //获得文件类型(可以判断如果不是图片,禁止上传)
                String contentType = file.getContentType();
                //获得文件后缀名
                String suffixName = contentType.substring(contentType.indexOf("/") + 1);
                //得到 文件名(随机数+uuid+后缀)
                filename = (int)((Math.random())*100000000) + uuid + "." + suffixName;
                //将生成的图片名称保存到session中
                session.setAttribute("filename", filename);
                //复制到项目中的文件夹
                Path path = Paths.get(localPath + filename);
                session.setAttribute("path", path);
                System.out.println("图片上传路径:"+path);
                Files.write(path, file.getBytes());
            }
        } catch (Exception e) {
            map.put("code", 1);
            map.put("msg", "");
            map.put("data", map2);
            map2.put("src", filename);
            return map;
        }
        map.put("code", 0);
        map.put("msg", "");
        map.put("data", map2);
        map2.put("src", filename);
        return map;
    }
WebConfigurer 拦截器中的方法将静态资源释放否则项目上传以后无法进行访问会出现404
   /*
    * 方法一:配置图片的虚拟路径
    * */
    @Override
    public void addResourceHandlers(ResourceHandlerRegistry registry) {
        //这里配置图片的虚拟路径 注意数据库存放的图片是 images/avatar/***.jpg 这种格式"file:E:/IDEAWork/ERP_Project/src/main/resources/static/images/avatar/"
        registry.addResourceHandler("/images/avatar/**").addResourceLocations("file:E:/IDEAWork/ERP_Project/src/main/resources/static/images/avatar/");

    }
方法二(单独新建文件夹来存放照片)
controller代码
 @RequestMapping(value = "/uploadImage", method = {RequestMethod.POST})
    public Map<String, Object> upload(MultipartFile file,HttpServletRequest request ,HttpSession session){
        String filename=file.getOriginalFilename();
        String uuid = UUID.randomUUID()+"";
        //这里填上传到本地的路径
        File dest = new File(new File("D:\\erp_img").getAbsolutePath()+ "/" + uuid+"-"+filename);
        if (!dest.getParentFile().exists()) {
            dest.getParentFile().mkdirs();
        }
        try {
            file.transferTo(dest);
            String path="images/avatar/"+uuid+"-"+filename;
            session.setAttribute("path",path);
            System.out.println(path);
            Map<String,Object> map2=new HashMap<>();
            Map<String,Object> map=new HashMap<>();
            map.put("code",0);
            map.put("msg","");
            map.put("data",map2);
            map2.put("src",path);
            return map;
        } catch (IllegalStateException e) {
            e.printStackTrace();
        } catch (IOException e) {
            e.printStackTrace();
        }
        Map<String,Object> map=new HashMap<>();
        map.put("code",1);
        map.put("msg","");
        return map;
    }
WebConfigurer
 @Override
    public void addResourceHandlers(ResourceHandlerRegistry registry) {
        //这里配置图片的虚拟路径 注意数据库存放的图片是 images/avatar/***.jpg 这种格式
        registry.addResourceHandler("/images/avatar/**").addResourceLocations("file:D:/erp_img/");

    }