本篇和Mycat(二)中搭建一主一从内容上部分重合,记录一下集群配置
https://www.bilibili.com/video/BV1iT41157JX/
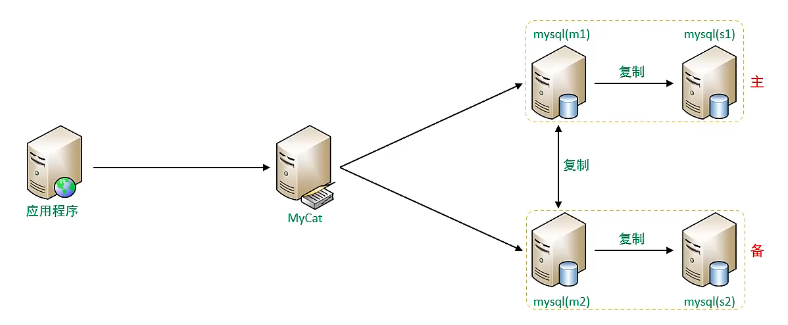
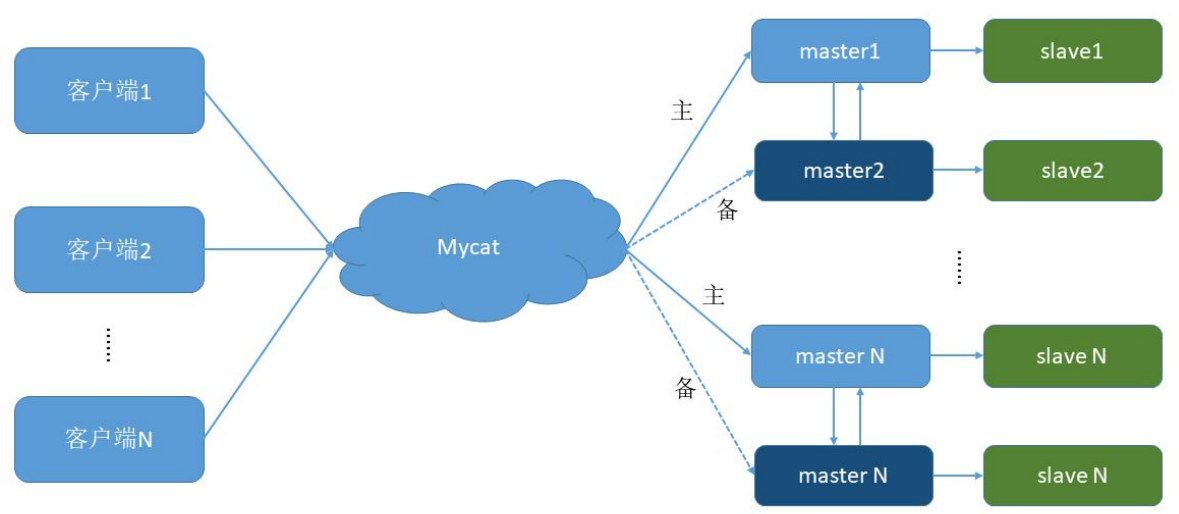
搭建双主双从
一个主机 m1 用于处理所有写请求,它的从机 s1 和另一台主机 m2 还有它的从机 s2负责所有读请求。当 m1 主机宕机后,m2 主机负责写请求,m1、m2 互为备机。
| 编号 | 角色 | IP 地址 | 机器名 |
|---|---|---|---|
| 1 | Master1 | 192.168.140.100 | atguigu01 |
| 2 | Slave1 | 192.168.140.99 | atguigu02 |
| 3 | Master2 | 192.168.140.98 | atguigu03 |
| 4 | Slave2 | 192.168.140.97 | atguigu04 |
双主机配置
可参考Mycat(二)中的配置,注意log-slave-updates、auto-increment-increment、auto-increment-offset
Master1配置
#主服务器唯一ID
server-id=1
#启用二进制日志
log-bin=mysql-bin
# 设置不要复制的数据库(可设置多个)
binlog-ignore-db=mysql
binlog-ignore-db=information_schema
#设置需要复制的数据库(不填即全部)
binlog-do-db=需要复制的主数据库名字
#设置logbin格式
binlog_format=STATEMENT
# 在作为从数据库的时候,有写入操作也要更新二进制日志文件
log-slave-updates
#表示自增长字段每次递增的量,指自增字段的起始值,其默认值是1,取值范围是
1 .. 65535
auto-increment-increment=2
# 表示自增长字段从哪个数开始,指字段一次递增多少,他的取值范围是1 .. 65535
auto-increment-offset=1
Master2配置
vim /etc/my.cnf
#主服务器唯一ID
server-id=3
#启用二进制日志
log-bin=mysql-bin
# 设置不要复制的数据库(可设置多个)
binlog-ignore-db=mysql
binlog-ignore-db=information_schema
#设置需要复制的数据库
binlog-do-db=需要复制的主数据库名字
#设置logbin格式
binlog_format=STATEMENT
# 在作为从数据库的时候,有写入操作也要更新二进制日志文件
log-slave-updates
#表示自增长字段每次递增的量,指自增字段的起始值,其默认值是1,取值范围是
1 .. 65535
auto-increment-increment=2
# 表示自增长字段从哪个数开始,指字段一次递增多少,他的取值范围是1 .. 65535
auto-increment-offset=2
双从机配置
vim /etc/my.cnf
#从服务器唯一ID
server-id=2
#启用中继日志
relay-log=mysql-relay
Slave2配置
修改配置文件:vim /etc/my.cnf
#从服务器唯一ID
server-id=4
#启用中继日志
relay-log=mysql-relay
双主机、双从机重启 mysql 服务
主机从机都关闭防火墙
在两台主机上建立帐户并授权 slave
#在主机MySQL里执行授权命令
CREATE USER 'slave2'@'%' IDENTIFIED BY '123123';
GRANT REPLICATION SLAVE ON *.* TO 'slave2'@'%';
#此语句必须执行。否则见下面。
ALTER USER 'slave2'@'%' IDENTIFIED WITH mysql_native_password BY '123123';
#查询Master1的状态
show master status;

#查询Master2的状态
show master status;
分别记录下File和Position的值
执行完此步骤后不要再操作主服务器MYSQL,防止主服务器状态值变化
双从配置
Slava1 复制 Master1,Slava2 复制 Master2
Slava1的复制命令
#复制主机的命令
CHANGE MASTER TO MASTER_HOST='主机的IP地址',
MASTER_USER='slave',
MASTER_PASSWORD='123123',
MASTER_LOG_FILE='mysql-bin.具体数字',MASTER_LOG_POS=具体值;
Slava1的复制命令

Slava2的复制命令

#启动两台从服务器复制功能
start slave;
#查看从服务器状态
show slave status\G;
#下面两个参数都是Yes,则说明主从配置成功!
# Slave_IO_Running: Yes
# Slave_SQL_Running: Yes
两个主机互相复制
Master2 复制 Master1,Master1 复制 Master2
Master2的复制命令

Master1的复制命令

#启动两台从服务器复制功能
start slave;
#查看从服务器状态
show slave status\G;
停止从服务复制功能
stop slave;
重新配置主从
stop slave;
reset master;
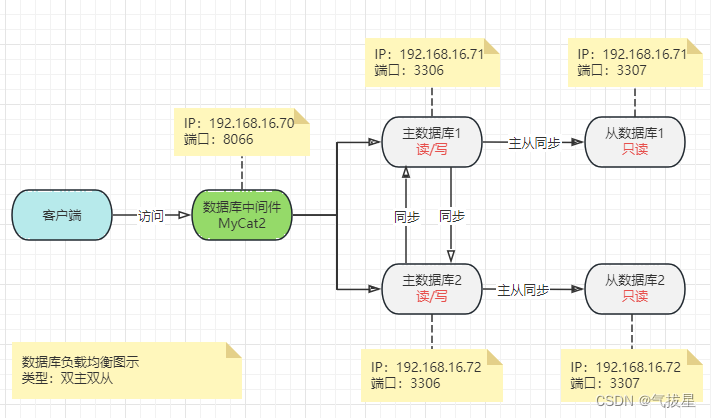
修改 Mycat 的集群配置实现多种主从
Mycat2.0的特点是集群概念,和mysql主从复制、集群配合实现多节点读写分离
双主双从集群角色划分
*m1:主机
*m2:备机,也负责读
*s1,s2:从机
增加两个数据源
/*+ mycat:createDataSource{ "name":"rwSepw2",
"url":"jdbc:mysql://192.168.140.98:3306/mydb1?useSSL=false&characterEncodin
g=UTF-8&useJDBCCompliantTimezoneShift=true", "user":"root",
"password":"123123" } */;
/*+ mycat:createDataSource{ "name":"rwSepr2",
"url":"jdbc:mysql://192.168.140.97:3306/mydb1?useSSL=false&characterEncodin
g=UTF-8&useJDBCCompliantTimezoneShift=true", "user":"root",
"password":"123123" } */;
修改集群配置文件
vim /usr/local/mycat/conf/clusters/prototype.cluster.json
{
    "clusterType": "MASTER_SLAVE",
    "heartbeat": {
        "heartbeatTimeout": 1000,
        "maxRetryCount": 3,
        "minSwitchTimeInterval": 300,
        "slaveThreshold": 0
    },
    "masters": [
        "rwSepw",
        "rwSepw2"
    ],
    "replicas": [
        "rwSepw2",
        "rwSepr",
        "rwSepr2"
    ],
    "maxCon": 200,
    "name": "prototype",
    "readBalanceType": "BALANCE_ALL",
    "switchType": "SWITCH",
    "timer": {
        "initialDelay": 30,
        "period": 5,
        "timeUnit": "SECONDS"
    }
}
重启Mycat生效
读写分离配置扩展
通过对集群配置的修改,可以根据需求实现更多种情况的读写分离配置,总结如下
(1)读写分离(一主一从,无备)(m是主,s是从)
{
    "clusterType": "MASTER_SLAVE",
    "heartbeat": {
        "heartbeatTimeout": 1000,
        "maxRetryCount": 3,
        "minSwitchTimeInterval": 300,
        "slaveThreshold": 0
    },
    "masters": [
        "m"
    ],
    "replicas": [
        "s"
    ],
    "maxCon": 200,
    "name": "prototype",
    "readBalanceType": "BALANCE_ALL",
    "switchType": "SWITCH",
    "timer": {
        "initialDelay": 30,
        "period": 5,
        "timeUnit": "SECONDS"
    }
}
(2)读写分离(一主一从,一备)(m是主,s是从备)
{
    "clusterType": "MASTER_SLAVE",
    "heartbeat": {
        "heartbeatTimeout": 1000,
        "maxRetryCount": 3,
        "minSwitchTimeInterval": 300,
        "slaveThreshold": 0
    },
    "masters": [
        "m",
        "s"
    ],
    "replicas": [
        "s"
    ],
    "maxCon": 200,
    "name": "prototype",
    "readBalanceType": "BALANCE_ALL",
    "switchType": "SWITCH",
    "timer": {
        "initialDelay": 30,
        "period": 5,
        "timeUnit": "SECONDS"
    }
}
(3)读写分离(一主一从,一备)(m是主,s是从,b是备)
{
    "clusterType": "MASTER_SLAVE",
    "heartbeat": {
        "heartbeatTimeout": 1000,
        "maxRetryCount": 3,
        "minSwitchTimeInterval": 300,
        "slaveThreshold": 0
    },
    "masters": [
        "m",
        "b"
    ],
    "replicas": [
        "s"
    ],
    "maxCon": 200,
    "name": "prototype",
    "readBalanceType": "BALANCE_ALL",
    "switchType": "SWITCH",
    "timer": {
        "initialDelay": 30,
        "period": 5,
        "timeUnit": "SECONDS"
    }
}
(4)MHA(一主一从,一备)(m是主,s是从,b是备,READ_ONLY判断主)
{
    "clusterType": "MHA",
    "heartbeat": {
        "heartbeatTimeout": 1000,
        "maxRetryCount": 3,
        "minSwitchTimeInterval": 300,
        "slaveThreshold": 0
    },
    "masters": [
        "m",
        "b"
    ],
    "replicas": [
        "s"
    ],
    "maxCon": 200,
    "name": "prototype",
    "readBalanceType": "BALANCE_ALL",
    "switchType": "SWITCH",
    "timer": {
        "initialDelay": 30,
        "period": 5,
        "timeUnit": "SECONDS"
    }
}
(5)MGR(一主一从,一备)(m是主,s是从,b是备,READ_ONLY判断主)
{
    "clusterType": "MGR",
    "heartbeat": {
        "heartbeatTimeout": 1000,
        "maxRetryCount": 3,
        "minSwitchTimeInterval": 300,
        "slaveThreshold": 0
    },
    "masters": [
        "m",
        "b"
    ],
    "replicas": [
        "s"
    ],
    "maxCon": 200,
    "name": "prototype",
    "readBalanceType": "BALANCE_ALL",
    "switchType": "SWITCH",
    "timer": {
        "initialDelay": 30,
        "period": 5,
        "timeUnit": "SECONDS"
    }
}
(6)GARELA_CLUSTER(一主一从,一备)(m是主,s是从,b多主)
{
    "clusterType": "GARELA_CLUSTER",
    "heartbeat": {
        "heartbeatTimeout": 1000,
        "maxRetryCount": 3,
        "minSwitchTimeInterval": 300,
        "slaveThreshold": 0
    },
    "masters": [
        "m",
        "b"
    ],
    "replicas": [
        "s"
    ],
    "maxCon": 200,
    "name": "prototype",
    "readBalanceType": "BALANCE_ALL",
    "switchType": "SWITCH",
    "timer": {
        "initialDelay": 30,
        "period": 5,
        "timeUnit": "SECONDS"
    }
}