一、 简述
VSCode的自定义代码片段功能允许开发者根据自己的需求定义和使用自己的代码片段,从而提高编码效率。
优点:
- 提高效率: 自定义代码片段能够减少重复输入的工作量,特别是对于经常使用的代码模式或者特定的代码结构。
- 规范代码风格: 可以定义统一的代码风格和命名规范,让团队成员在编码过程中更加一致。
- 易于维护: 用户代码片段文件可以轻松地进行编辑和管理,可以随时添加、删除或修改代码片段。
- 适应个性化需求: 开发者可以根据自己的习惯和需求定制代码片段,使得编码过程更符合个人的工作流程。
- 跨平台支持: VSCode跨平台,并且用户代码片段可以在不同的操作系统上共享和使用。
二 、 基础使用说明
2.1 新建一个代码块工作区间
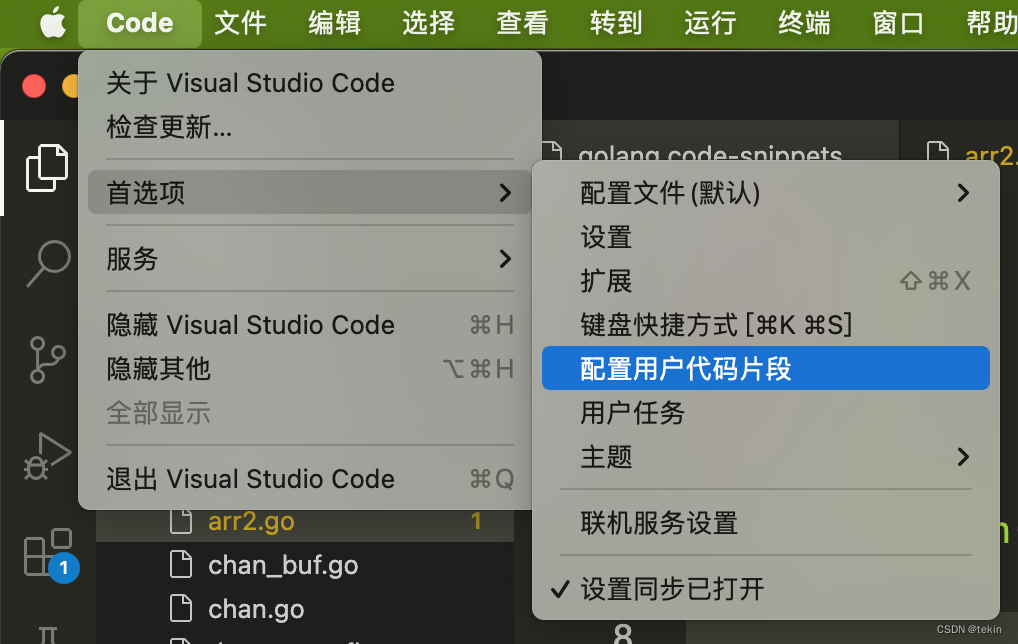
点击左下角的设置

点击用户代码片段
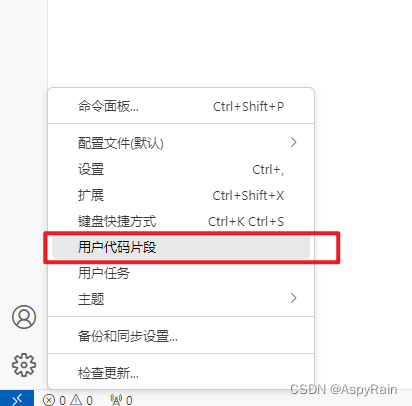
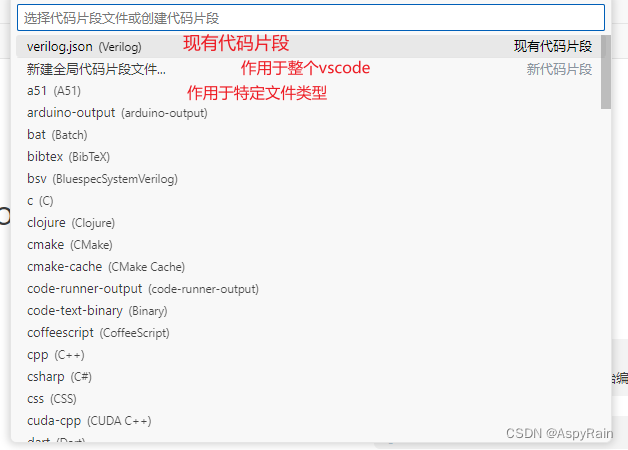
选择新建全局代码片段
输入文件名称

2.2 语法
以下是snippets模板文件的示例代码
	Example:
	"Print to console": {
		"scope": "javascript,typescript",
		"prefix": "log",
		"body": [
			"console.log('$1');",
			"$2"
		],
		"description": "Log output to console"
	}
- “Print to console” : 代码片段的名称,显示在代码片段提示列表中。
- “prefix” : 代码片段的触发前缀,当你键入这个前缀时,VSCode会自动提示该代码片段。
- “body” : 代码片段的实际内容,以数组的形式列出。在数组中,可以使用 $1、$2 等占位3. 符来表示光标停留的位置,方便用户进行填写和编辑。
- “description” : 代码片段的描述,当你在代码片段提示列表中看到该片段时,会显示该描述。
在上面的示例中,当你键入 log 后按下 Tab 键时,就会展开为 console.log(‘’);,其中的单引号之间是光标所在位置,方便你直接输入要打印的内容。再次按下 Tab 键,光标移动到 $2 所在的位置,方便你继续编辑后续代码。
body内介绍
Ⅰ 规则
	Example:

		"body": [
			"1",
			"2",
			"3",
			"4","5",
			   "6",
			"7"
		],
以双引号框住,逗号分隔为实际代码里的一行,在引号外的空格回车皆不会影响引号内的格式
如若需要进行特殊对齐缩进需要在引号内部操作,如在引号内部使用
“\t”制表符进行对齐
		"begin and end": {
			"prefix": "bend",
			"body": [
				"begin",
				"\tbegin",
				"\tend",
				"end"
			],
			"description": "begin and end"
		},
Ⅱ 方法
① 光标位置控制
		"Cursor Position": {
			"prefix": "var",
			"body": [
				"const haha = '$1';",
				"const xixi = '$2'.toUpperCase();",
				"$3"
			],
			"description": "Variable Replacement"
		}
输入关键词 var 然后 回车 或者 TAB 展开代码段后,光标会移动至 $[数字] 的位置(优先较 小 数字),而后在不通过 方向键 或者鼠标移动光标位置的情况下,继续按 TAB 就会移动至下一个较小数字
② 变量替换
    "Replace console.log with debug function": {
        "prefix": "clog",
        "body": [
            "debug(${variable1}, ${variable1}, ${variable2});"
        ],
        "description": "Replace console.log with debug function and multiple variables"
    }
展开代码片段后光标移动至变量位置,输入内容即可将相同变量同时替换为相同内容
③ 二者结合
    "Replace console.log with debug function": {
        "prefix": "clog~",
        "body": [
            "debug(${2:variable1}, ${3:variable2}, ${1:variable3});"
        ],
        "description": "Replace console.log with debug function and multiple variables"
    }
只需在变量名称前添加 [数字] : 即可通过 TAB 按照数字顺序移动光标
三、 示例
① verilog计数器
{
	// Place your snippets for verilog here. Each snippet is defined under a snippet name and has a prefix, body and
	// description. The prefix is what is used to trigger the snippet and the body will be expanded and inserted. Possible variables are:
	// $1, $2 for tab stops, $0 for the final cursor position, and ${1:label}, ${2:another} for placeholders. Placeholders with the
	// same ids are connected.
	"计数器": {
		"prefix": "cnt",
		"body": [
		"reg         [${2:cnt_width}-1:0]      cnt_${1:cnt_name}    ; //计数器",
    	"wire                    add_cnt_${1:cnt_name}; //开始计数",
    	"wire                    end_cnt_${1:cnt_name}; //计数器最大值",
		"always @(posedge sys_clk or negedge sys_rst_n) begin",
    	"\tif (!sys_rst_n)begin",
        "\t\t cnt_${1:cnt_name} <= ${2:cnt_width}'b0;",
		"\tend",
    	"\telse if (add_cnt_${1:cnt_name})begin",
        "\t\tif (end_cnt_${1:cnt_name})begin",
        "\t\t\tcnt_${1:cnt_name}<=${2:cnt_width}'b0;",
        "\t\tend",
        "\t\telse begin",
        "\t\t\tcnt_${1:cnt_name} <= cnt_${1:cnt_name} +1'd1;",
        "\t\tend",
    	"\tend",
    	"\telse begin",
        "\t\tcnt_${1:cnt_name} <= cnt_${1:cnt_name};",
    	"\tend",
		"end",
		"assign add_cnt_${1:cnt_name} = ${3:param3};",
		"assign end_cnt_${1:cnt_name} = add_cnt_${1:cnt_name} && (${4:param4});"
		],
		"description": "计数器模板"
	}
}
② ros有关代码片段(待补全)
{
	// Place your 全局 snippets here. Each snippet is defined under a snippet name and has a scope, prefix, body and
	// description. Add comma separated ids of the languages where the snippet is applicable in the scope field. If scope
	// is left empty or omitted, the snippet gets applied to all languages. The prefix is what is
	// used to trigger the snippet and the body will be expanded and inserted. Possible variables are:
	// $1, $2 for tab stops, $0 for the final cursor position, and ${1:label}, ${2:another} for placeholders.
	// Placeholders with the same ids are connected.
	// Example:
	"link": {
		"scope": "xml",
		"prefix": "<link",
		"body": [
			"<link name=\"$1\">",
			"\t<visual>",
			"\t\t<geometry>",
			"\t\t</geometry>",
			"\t\t<origin xyz=\"$2\" rpy=\"$3\"/>",
			"\t\t<material name=\"$4\">",
			"\t\t\t<color rgba=\"$5\"/>",
			"\t\t</material>",
			"\t</visual>",
			"</link>"
		],
		"description": "link"
	},
	"robot": {
		"scope": "xml",
		"prefix": "<robot",
		"body": [
			"<robot name=\"$1\">",
			"</robot>"
		],
		"description": "robot"
	},
	"launch to rivz": {
		"scope": "xml",
		"prefix": "<launchrivz",
		"body": [
			"<launch>",
			"\t<param name=\"robot_description\" textfile=\"$1.urdf\" />",
			"\t<node pkg=\"rviz\" type=\"rviz\" name=\"rviz\" args=\"$2.rviz\"/>",
			"</launch>"
		],
		"description": "launch"
	},
	"launch to gazebo": {
		"scope": "xml",
		"prefix": "<launchgaze",
		"body": [
			"<launch>",
			"\t<param name=\"${name}\" textfile=\"${urdf_path}.urdf\" />",
			"<!-- 启动gazebo仿真环境 -->",
			"\t<include file=\"$(find gazebo_ros)/launch/empty_world.launch\"/>",
			"<!-- 在Gazebo中添加机器人模型 -->",
			"<node pkg=\"gazebo_ros\" type=\"spawn_model\" name=\"${spawn_name}\" args=\"-urdf -model mycar -param ${name}\"/>",
			"</launch>"
		],
		"description": "launch with gazebo"
	},
	"node": {
		"scope": "xml",
		"prefix": "<node",
		"body": [
			"<node pkg=\"$1\" type=\"$2\" name=\"$3\"/>"
		],
		"description": "node"
	},
	"joint": {
		"scope": "xml",
		"prefix": "<joint",
		"body": [
			"<joint name=\"$1\" type=\"$2\">",
			"\t<parent link=\"$3\"/>",
			"\t<child link=\"$4\"/>",
			"\t<origin xyz=\"$5\" rpy=\"$6\"/>",
			"\t<!-- <axis xyz=\"$7\"/> -->",
			"</joint>"
		],
		"description": "joint"
	},
	"xacro": {
		"scope": "xml",
		"prefix": "<xarobot",
		"body": [
			"<robot name=\"$1\" xmlns:xacro=\"http://wiki.ros.org/xacro\">",
			"\t$2",
			"</robot>"
		],
		"description": "xacro"
	},
	"xacro:property": {
		"scope": "xml",
		"prefix": "<xp",
		"body": [
			"<xacro:property name=\"$1\" value=\"$2\" />"
		],
		"description": "property"
	},
	"xacro:macro": {
		"scope": "xml",
		"prefix": "<xm",
		"body": [
			"<xacro:macro name=\"$1\" params=\"$2\">",
			"\t$3",
			"</xacro:macro>"
		],
		"description": "macro"
	},
	"gazebo label": {
		"scope": "xml",
		"prefix": "<Gazs",
		"body": [
		"<!-- 1.设置碰撞参数 -->",
		"<collision>",
        "\t<geometry>",
        "\t\t<box size= \"$1\" />",
        "\t</geometry>",
        "<origin xyry>",
        "<origin xyz=\"$2\" rpy=\"$3\"/>",
    	"</collision>",
        "<!-- 2.设置惯性矩镇 -->",
        "<inertial>",
        "\t<origin xyz=\"$4\"/>",
        "\t<mass value=\"$5\"/>",
        "\t<inertia ixx=\"$6\" ixy=\"$7\" ixz=\"$8\" iyy=\"$9\" izy=\"$10\" izz=\"$11\" />",
        "</inertial>",
		"<gazebo reference=\"$12\">",
        "\t<material>Gazebo/$13</material>",
    	"</gazebo>"
		],
		"description": "gazebo "
	},

}
四、 参考链接
1.https://blog.csdn.net/qq_33463449/article/details/103928634