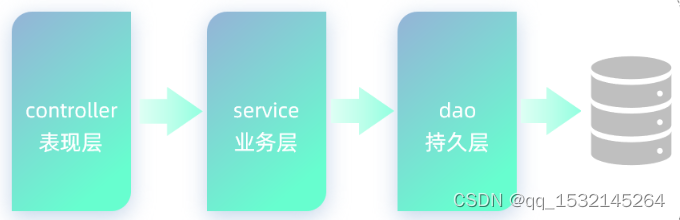
1、Mybatis概述
概念
MyBatis本是apache的一个开源项目iBatis, 2010年这个项目由apache software foundation迁移到了google code,并且改名为MyBatis. 2013年11月迁移到Github. iBATIS 一词来源于"internet"和"abatis"的组合,是一个基于Java的持久层框架。iBATIS 提供的持久层框架包括SQL Maps和Data Access Objects (DAO)。
Mybatis基于java的持久层框架,它的内部封装了JDBC,让开发人员只需要关注SQL语句本身,不需要花费精力在驱动的加载、连接的创建、Statement的创建等
复杂的过程。
Mybatis通过XML或注解的方式将要执行的各种的statement配起来,并通过java对象和statement中的sq|的动态参 数进行映射生成最终执行的SQL语句,最后由mybatis框架执行SQL,并将结果直接映射为java对象。
采用了ORM思想解决了实体类和数据库表映射的问题。对JDBC进行了封装,屏蔽了JDBC API底层的访问细节,避免我们与jdbc的api打交道, 就能完成对数据的持久化操作。
o--0bject java对象
R--Relation 关系,就是数据库中的一张表
M--mapping映射
Mybatis解决的问题
1、数据库连接的创建、释放连接的频繁操作造成资源的浪费从而影响系统的性能。
2、SQL语句编写在代码中,硬编码造成代码不容易维护,实际应用中SQL语句变化的可能性比较大,一旦变动就需要改变]ava类。
3、使用preparedStatement的时候传递参数使用占位符,也存在硬编码,因为SQL语句变化,必须修改源码。
4、对结果集的解析中也存在硬编码。
2、Mybatis案例项目
创建数据库和表
CREATE TABLE team (
    `teamId` int NOT NULL AUTO_INCREMENT COMMENT '球队ID',
    `teamName` varchar(50) DEFAULT NULL COMMENT '球队名称',
    `location` varchar(50) DEFAULT NULL COMMENT '球队位置',
    `createTime` date DEFAULT NULL COMMENT '球队建立时间',
    PRIMARY KEY (`teamId`)
) ENGINE=InnoDB AUTO_INCREMENT=1003 DEFAULT CHARSET=utf8mb4 COLLATE=utf8mb4_0900_ai_ci;
创建maven项目,引入依赖
<dependencies>
  <dependency>
    <groupId>org.mybatis</groupId>
    <artifactId>mybatis</artifactId>
    <version>3.5.6</version>
  </dependency>
  <dependency>
    <groupId>mysql</groupId>
    <artifactId>mysql-connector-java</artifactId>
    <version>8.0.23</version>
  </dependency>
  <dependency>
    <groupId>junit</groupId>
    <artifactId>junit</artifactId>
    <version>4.12</version>
    <scope>test</scope>
  </dependency>
</dependencies>

<build>
  <plugins>
    <plugin>
      <groupId>org.apache.maven.plugins</groupId>
      <artifactId>maven-compiler-plugin</artifactId>
      <version>3.8.0</version>
      <configuration>
        <source>1.8</source>
        <target>1.8</target>
      </configuration>
    </plugin>
  </plugins>
</build>
编写Mybatis的配置文件
一般情况下配置文件的名称可以自定义,这里使用mybatis.xml。配置文件放在java/resources中。
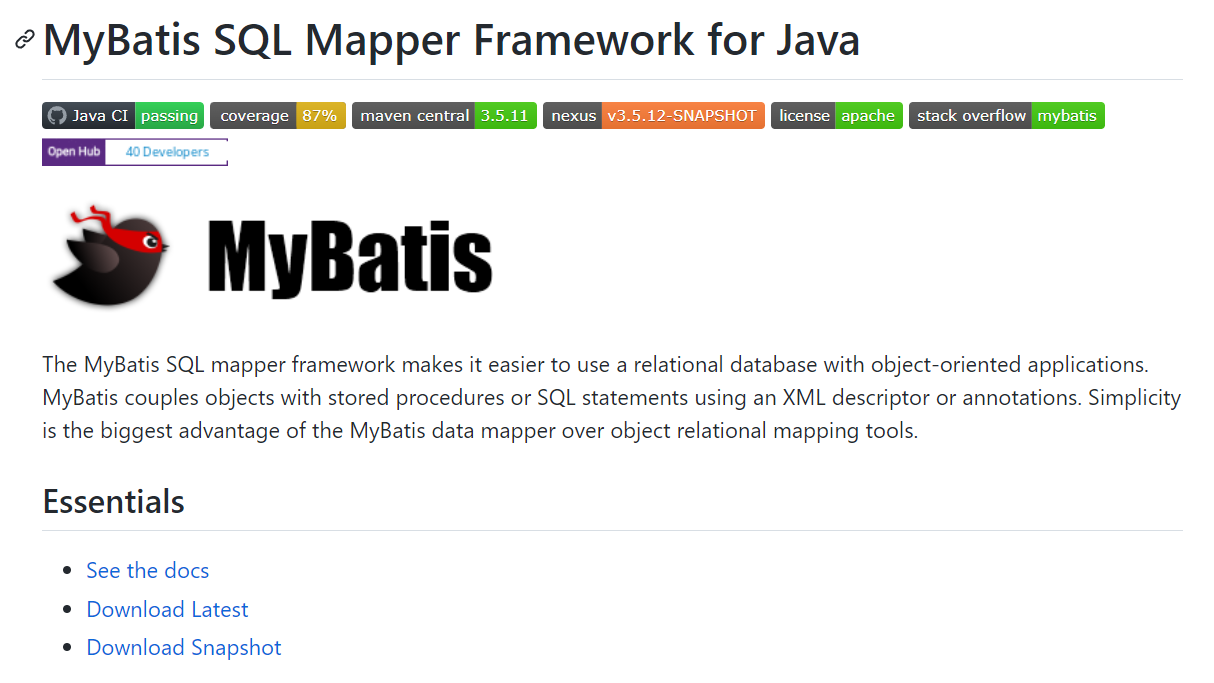
头文件取官网中复制粘贴(Mybatis官网)
<?xml version="1.0" encoding="UTF-8" ?>
<!DOCTYPE configuration
PUBLIC "-//mybatis.org//DTD Config 3.0//EN"
"http://mybatis.org/dtd/mybatis-3-config.dtd">
<!--mybatis全局配置文件的根节点:configuration-->
<configuration>
<!--配置mybatis的环境-->
<environments default="development">
<!--id:数据源名称-->
<environment id="development">
<!--事务的类型:JDBC,使用Connection 对象的提交和回滚的方法-->
<transactionManager type="JDBC"/>
<!--创建数据源:POOLED方式 使用连接-->
<dataSource type="POOLED">
<!--创建数据源的必备四参数
注意这里的数据库版本是8,如果是5的话,driver和url都不一样-->
<property name="driver" value="com.mysql.cj.jdbc.Driver"/>
<property name="url" value="jdbc:mysql://localhost:3306/mydb?usUnicode=true&characterEncoding=utf-8&useSSL=false&serverTimezone=GMT"/>
<property name="username" value="root"/>
<property name="password" value="123456"/>
</dataSource>
</environment>
</environments>
<!--在配置文件中注册映射文件:因为程序运行时只读取配置文件-->
<mappers>
<mapper resource="com/zx/pojo/team.xml"/>
</mappers>
</configuration>
实体类
创建Team实体类,和数据库中的表结构保持一致
ORM映射文件
com.zx.pojo.team.xml顾名思义,此文件专门用于做关于team表和Team类的映射、CRUD
<?xml version="1.0" encoding="UTF-8" ?>
<!DOCTYPE mapper
        PUBLIC "-//mybatis.org//DTD Mapper 3.0//EN"
        "http://mybatis.org/dtd/mybatis-3-mapper.dtd">
<!--映射文件:实体类与数据库表的映射 ORM思想 object relation mapping
        SQL语句从代码的硬编码中抽取出来了
-->
<!--namespace="实体类的完全限定名"-->
<mapper namespace="com.zx.pojo.Team">
    <!--id:自定义,不能重复,相当于原来的dao中的方法名
        resultType=“返回的类型,如果是集合,写的是集合中元素的类型”;使用要求:实体类中的属性和表中的列名一致
        -->
    <select id="queryAll" resultType="com.zx.pojo.Team">
        select * from team;
    </select>
</mapper>
注册映射文件
程序运行时只会扫描配置文件mybatis.xml,因此需要在mybatis.xm注册映射文件team.xml
<!--在配置文件中注册映射文件:因为程序运行时只读取配置文件-->
<mappers>
    <mapper resource="com/zx/pojo/team.xml"/>
</mappers>
在pom文件中添加配置映射文件的扫描位置
添加在标签下
<resources>
  <resource>
    <directory>src/main/java</directory><!--所在的目录-->
    <includes>
      <include>**/*/properties</include>
      <include>**/*.xml</include>
    </includes>
    <filtering>false</filtering>
  </resource>
</resources>
测试类
查询所有
//编写before和after,在所有测试方法执行前获取连接并在方法执行后关闭连接。
/**
 * 类名: TestTeam
 * 作者:  ZX
 * 简介: 测试类
 */
public class TestTeam {
    private String resource = "mybatis.xml";
    SqlSession sqlSession = null;
    @Before
    public void before(){
        //读取配置文件
        Reader reader = null;
        try {
            reader = Resources.getResourceAsReader(resource);
        } catch (IOException e) {
            e.printStackTrace();
        }
        //创建工厂
        SqlSessionFactory factory = new SqlSessionFactoryBuilder().build(reader);//根据图纸创建出工厂
        //获取连接
        sqlSession = factory.openSession();
    }
}
@Test
    public void test01()  {
            //执行sql
            List<Team> teamList = sqlSession.selectList("com.zx.pojo.Team.queryAll");
            //遍历结果
            for(Team team : teamList){
                System.out.println(team);
            }
    }
根据id查询单个
<!--parameterType:表示参数的类型,参数唯一是使用,可以省略,框架可以自己判定参数类型
    #{自定义的参数名称} 该名称没有实际意义,符合命名规则就好
-->
<select id="queryById" parameterType="java.lang.Integer" resultType="com.zx.pojo.Team">
    select * from team where teamId=#{id};
</select>
@Test
public void test02()  {
        Team team = sqlSession.selectOne("com.zx.pojo.Team.queryById",2);
        System.out.println(team);
}
增删改
insert
<!--添加一个对象
    parameterType="com.zx.pojo.Team" 将对象作为参数
    #{值}必须是实体类中的属性名称
-->
<insert id="add" parameterType="com.zx.pojo.Team">
    INSERT INTO `mydb`.`team` (`teamName`, `location`, `createTime`)
    VALUES (#{teamName}, #{location}, #{createTime});
</insert>
@Test
public void test02()  {
    Team team = new Team();
    team.setTeamName("猴子队");
    team.setLocation("北京");
    team.setCreateTime(new Date());
    sqlSession.insert("com.zx.pojo.Team.add",team);//增删改必须手动提交事务,否则不生效
    //sqlSession.commit();//提交事务
}
注意,由于mybatis之前我们配置的事务类型
JDBC会将事务的自动提交设置为false,所以增删改操作必须手动提交事务才能生效。
当然,如果不想手动提交,也可以设置为true,在获取连接时设置参数true
 //获取连接
        sqlSession = factory.openSession(true);
日志的使用
引入依赖,然后再resources添加log4j.properties文件
<dependency>
  <groupId>log4j</groupId>
  <artifactId>log4j</artifactId>
  <version>1.2.17</version>
</dependency>
# Global logging configuration info warning error
#日志级别
log4j.rootLogger=DEBUG,stdout
#Console output...
log4j.appender.stdout=org.apache.log4j.ConsoleAppender
log4j.appender.stdout.layout=org.apache.log4j.PatternLayout
log4j.appender.stdout.layout.ConversionPattern=%5p [%t] - %m%n
mybatis.xml中添加配置
<!--配置日志:要注意顺序:settings节点要在environments节点之前-->
    <!--节点的顺序参考:按住ctrl+configuration节点,进入文件就能看到顺序-->
    <settings>
        <setting name="logImpl" value="LOG4J"/>
    </settings>
update/delete
<update id="update">
    update team set teamName=#{teamName},location=#{location}
    where teamId=#{teamId};
</update>

<update id="delete">
    delete from team where teamId=#{teamId};
</update>
@Test
public void testupdate()  {
    Team team =new Team();
    team.setTeamId(1003);
    team.setTeamName("张三的球队");
    team.setLocation("张三球队地址");
    team.setCreateTime(new Date());
    int i = sqlSession.update("com.zx.pojo.Team.update",team);
    sqlSession.commit();
    System.out.println(i);

}
@Test
public void testdelete()  {
    Team team =new Team();
    team.setTeamId(1003);
    team.setTeamName("张三的球队");
    team.setLocation("张三球队地址");
    team.setCreateTime(new Date());
    int i = sqlSession.delete("com.zx.pojo.Team.delete",team);
    sqlSession.commit();
    System.out.println(i);
}
3、Mybatis对象分析
3.1 Resources
Resources类,顾名思义就是资源,用于读取资源文件。其有很多方法通过加载并解析资源文件,返回不同类型的IO流对象。
3.2 SqlSessionFactoryBuilder
SqlSessionFactory的创建,需要使用SqlSessionFactoryBuilder对象的build0方法。事实上使用SqlSessionFactoryBuilder的原因是将SqlSessionFactory这个复杂对象的创建交由Builder来执行,也就是使用了建造者设计模式。
	建造者模式:又称生成器模式,是-种对象的创建模式。可以将一个产品的内部表象与产品的生成过程分割开来,从而可以使一个建造过程生成具有不同的内部表象的产品(将一个复杂对象的构建与它的表示分离,使得同样的构建过程可以创建不同的表示), 这样用户只需指定需要建造的类型就可以得到具体产品,而不需要了解具体的建造过程和细节。
	在建造者模式中,角色分指导者(Director )与建造者(Builder):用户联系指导者,指导者指挥建造者,最后得到产品。建造者模式可以强制实行一种分步骤进行的建造过程。
3.3 SqlSessionFactory
SqlSessionFactory接口对象是一个重量级对象(系统开销大的对象),是线程安全的,所以一个应用只需要一个该对象即可。 创建SqISession需要使用SqlSessionFactory接口的的openSession()方法。
默认的openSession(方法没有参数, 它会创建有如下特性的sqlSession:
    1、会开启一个事务(也就是不自动提交)。
    2、将从由当前环境配置的DataSource实例中获取Connection 对象。事务隔离级别将会使用驱动或数据源的默认设置。
    3、预处理语句不会被复用,也不会批量处理更新。

openSession(true):创建一个有自动提交功能的sqlSession
openSession(false):创建一个非自动提交功能的SqlSession, 需手动提交
openSession():同openSession(false)
3.4 SqlSession
SqlSession接口对象用于执行持久化操作。一个SqlSession对应着一次数据库会话,一次会话以SqlSession 对象的创建开始,以SqlSession对象的关闭结束。
SqlSession接口对象是线程不安全的,所以每次数据库会话结束前,需要马上调用其close(方法,将其关闭。再次需要会话,再次创建。SqlSession 在方法内部创建,使用完毕后关闭。
SqISession类中有超过20个方法,我们常用的几乎都是执行语法相关的方法。
这些方法被用来执行定义在SQL映射的XML文件中的SELECT、INSERT. UPDATE 和DELETE语句。它们都会自行解释,每句都使用语句的ID属性和参数对象,参数可以是原生类型(自动装箱或包装类)、JavaBean、POJO 或Map.
<T> T selectOne(String statement, Object parameter)
<E> List<E> selectList(String statement, Object parameter )
<K,V> Map<K,V> selectMap(String statement, Object parameter, String mapKey)
int insert(String statement, Object parameter)
int update(String statement, Object parameter)
int delete(String statement, Object parameter)
/*
	selectOne和selectList的不同仅仅是selectOne必须返回一个对象或null值。如果近回值多于一个, 那么就会抛出异常。
    selectMap稍微特殊一点, 因为它会将返回的对象的其中一个属性作为key值,将对象作为value 值,从而将多结果集转为Map类型值。
    因为并不是所有语句都需要参数,所以这些方法都重载成不需要参数的形式。
*/
3.5 Mybatis架构

1、Mybatis.xml文件是mybatis框架的全局配置文件,配置了mybatis框架运行的环境等信息。
	Mapper1.xml.....是SQL的映射文件,文件中配置了所有的操作数据库的sql语句,这些文件需要在全局配置文件中加载。
2、通过mybatis环境等配置信息构建SqlSessionFactory,相当于是产生连接池
3、由会话工厂创建SqlSession即会话(连接),操作数据库需要通过sqlSession进行的。
4、Mybatis底层自定义了Executor执行器的接口操作数据库,Executor接口有两个实现,一个基本的执行器,一个是缓存的执行器。
5、Mapped statement 也是mybatis框架一个底层的封装对象,他包装了mybatis配置信息以及sql映射信息。Mapper.xml文件中的一个SQL语句对应一个Mapped statement对象,sql的id就是Mapped statement的id.
6、Mapped statement对SQL执行输入参数的定义,输入参数包括HashMap、基本类型、pojo,Executor通过Mapped statement躺在执行SQL语句前将输入java对象映射到sql语句中,执行完毕SQL之后,输出映射就是JDBC编码中的对preparedstatement执行结果的定义。
4、使用原有的Dao方式开发
创建工具类
ThreadLocal
ThreadLocal并非是一个线程的本地实现版本, 它并不是一个Thread, 而是threadlocalvariable(线程局部变量)。 也许把它命名为ThreadLocalVar更加合适。 线程
局部变量(ThreadLocal)其实的功用非常简单,就是为每个使用该变量的线程都提供一个变量值的副本, 是Java中一 种较为特殊的线程绑定机制, 是每一个线程都
可以独立地改变自己的副本,而不会和其它线程的副本冲突。
ThreadLocal类似List,可以将其看作一个容器,只不过这个容器只能装一个元素。
由于之前提到的SqlSession时线程不安全的,所以需要使用ThreadLocal来对其线程安全问题进行优化。
使用了ThreadLocal的Mybatis工具类如下:
package com.zx.util;

import org.apache.ibatis.io.Resources;
import org.apache.ibatis.session.SqlSession;
import org.apache.ibatis.session.SqlSessionFactory;
import org.apache.ibatis.session.SqlSessionFactoryBuilder;

import java.io.IOException;
import java.io.Reader;

/**
 * 类名: MybatisUtil
 * 作者:  ZX
 * 简介: Mybatis工具类:获取连接和关闭连接
 */
public class MybatisUtil {
    private static ThreadLocal<SqlSession> sqlSessionThreadLocal = new ThreadLocal<>();
    private static SqlSessionFactory factory;
    static {
        Reader reader = null;
        try {
            reader = Resources.getResourceAsReader("mybatis.xml");
        } catch (IOException e) {
            e.printStackTrace();
        }
        //创建工厂
        factory = new SqlSessionFactoryBuilder().build(reader);
    }

    /**
     * 获取连接
     * @return
     */
    public static SqlSession getSqlSession(){
        //从ThreadLocal中获取
        SqlSession sqlSession  = sqlSessionThreadLocal.get();
        if(sqlSession == null) {
            //创建sqlSession
            sqlSession = factory.openSession();
            //将SqlSession与线程绑定
            sqlSessionThreadLocal.set(sqlSession);
        }
        return sqlSession;
    }

    /**
     * 关闭连接
     */
    public static void closeSqlSession(){
        //从ThreadLocal中获取
        SqlSession sqlSession = sqlSessionThreadLocal.get();
        if(sqlSession != null){
            sqlSession.close();
            sqlSessionThreadLocal.remove();
        }
    }

}
在Dao的实现类中使用此工具类获取连接对数据库进行操作即可。
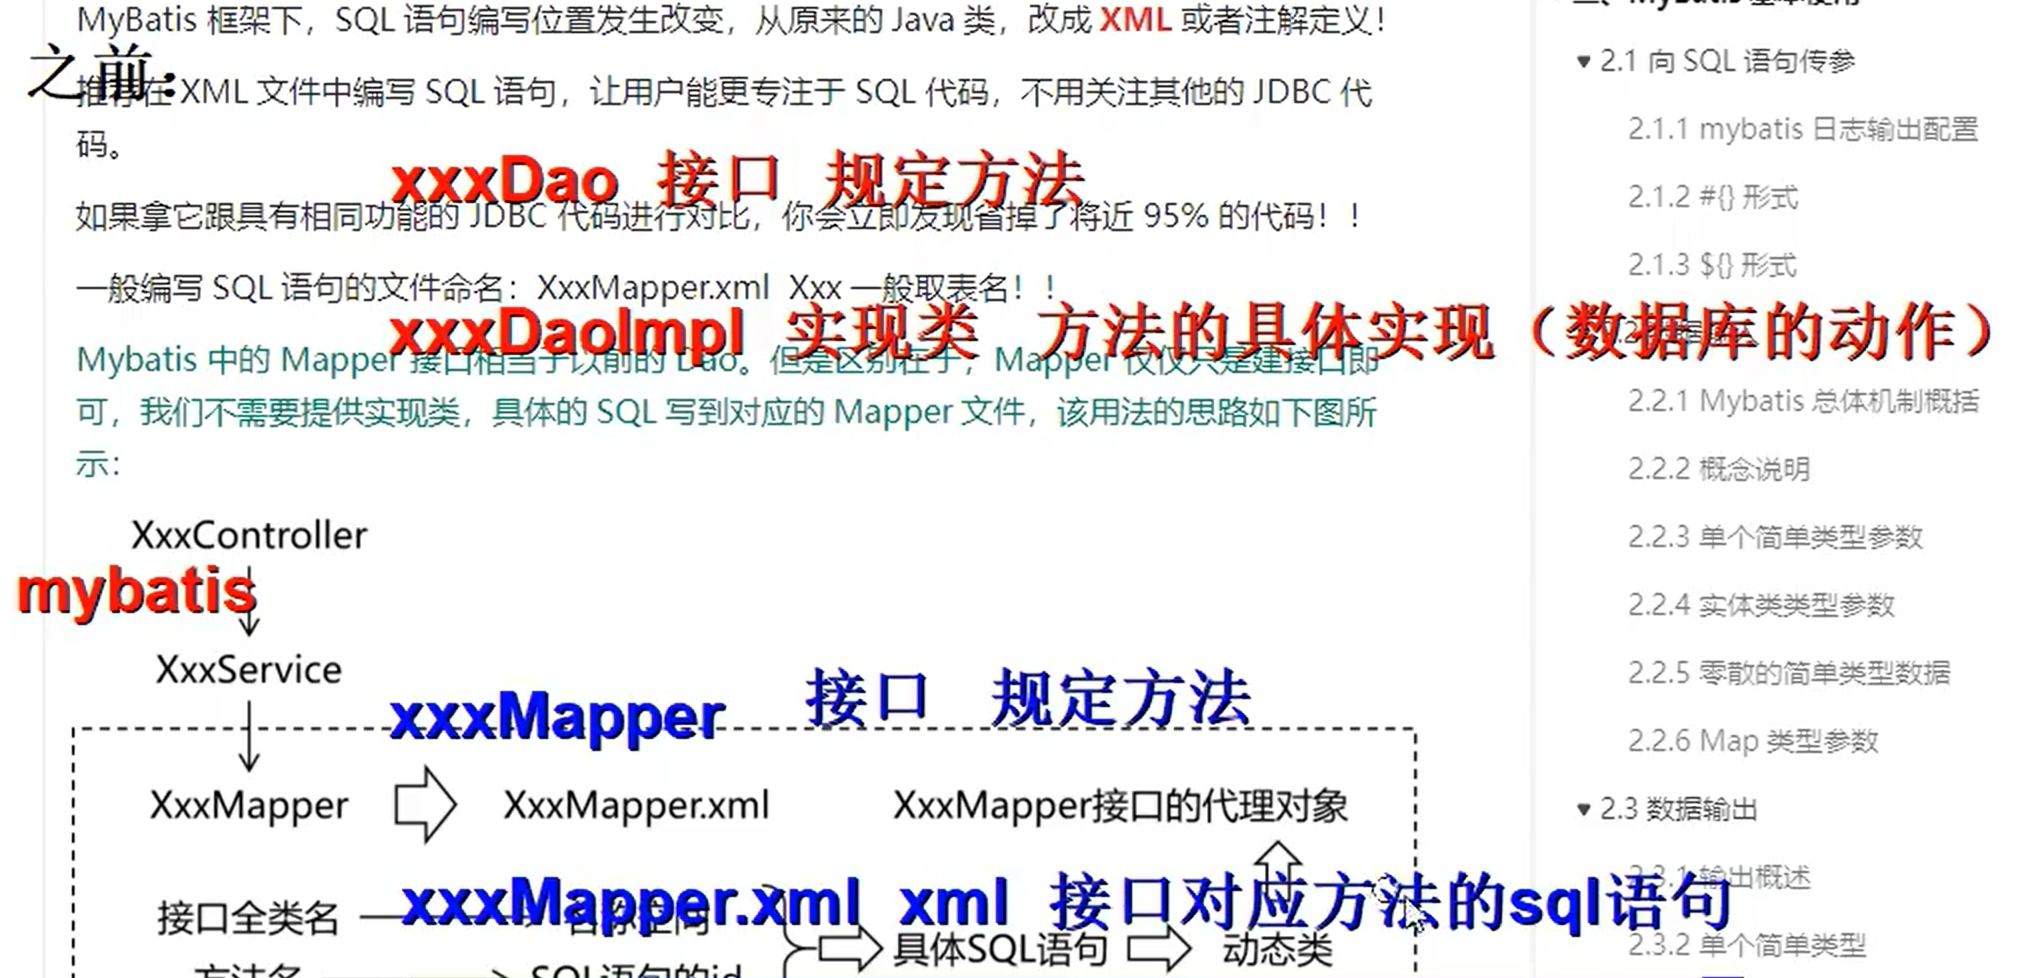
5、使用Mapper的接口编写Mybatis项目
什么是Mapper接口
通过上面原有Dao方式开发,我们发现,Dao似乎并没有做什么实质性的工作,连接是由工具类完成的,与数据库的交互是由配置文件mapper中相应的sql语句完成的,dao层完全可以省略。
所以Mybatis框架抛开了Dao的实现类,直接定位到映射文件mapper中相应的sql语句,对DB进行操作,这种对Dao的实现方式称为Mapper接口的动态代理方式。
Mapper的动态代理方式无需程序员实现Dao接口,接口是由Mybatis结合映射文件自动生成的动态代理实现的。
实现方式
理解:使用Mapper接口的方式,就是定义一个Mapper接口,内容和dao接口完全一致,但是它没有实现类,实现它的方式就是同名的xml映射文件Mapper.xml
//编写Mapper接口
package com.zx.mapper;

public interface TeamMapper {
    List<Team> queryAll();
    Team queryById(Integer teamId);
    int add(Team team);
    int update(Team team);
    int del(Integer teamId) ;
}
Mapper.xml必须与Mapper接口同包同名,如果要将Mapper.xml放在resources文件夹下,也要创建相同路径的包
注意,与src/main/java文件夹不同,resources文件夹下的包路径要一层层创建才可以。
<?xml version="1.0" encoding="UTF-8" ?>
<!DOCTYPE mapper
        PUBLIC "-//mybatis.org//DTD Mapper 3.0//EN"
        "http://mybatis.org/dtd/mybatis-3-mapper.dtd">

<!--namespace="接口的完全限定名"-->
<mapper namespace="com.zx.mapper.TeamMapper">

    <select id="queryAll" resultType="com.zx.pojo.Team">
        select * from team;
    </select>

    <select id="queryById" parameterType="java.lang.Integer" resultType="com.zx.pojo.Team">
        select * from team where teamId=#{id};
    </select>

    <insert id="add" parameterType="com.zx.pojo.Team">
        INSERT INTO `mydb`.`team` (`teamName`, `location`, `createTime`)
        VALUES (#{teamName}, #{location}, #{createTime});
    </insert>

    <update id="update">
        update team set teamName=#{teamName},location=#{location}
        where teamId=#{teamId};
    </update>

    <update id="del">
        delete from team where teamId=#{teamId};
    </update>
</mapper>
可以将Mapper.xml理解为Mapper接口的实现类,它是由系统在运行时根据映射文件内容动态生成。
测试类:
public class TestTeamMapper {
    //通过动态代理的方式产生实现类
    private TeamMapper teamMapper = MybatisUtil.getSqlSession().getMapper(TeamMapper.class);

    @Test
    public void testQueryByID(){
        Team team = teamMapper.queryById(1005);
        System.out.println(team);
    }
    @Test
    public void testDelete(){
        int i = teamMapper.del(1005);
        MybatisUtil.getSqlSession().commit();//事务提交
        System.out.println(i);
    }
}
动态代理源码分析
getMapper方法的底层是通过jdk的动态代理实现的
获取自增的id值
id为整数
在insert一条数据后,一般情况下我们不会插入id值,因为它是自增的,数据库会自动生成。如何实现插入一条数据后立即获取到它的id值呢?
实现方法:insert中添加一个标签selectKey,使用mysql中的方法LAST_INSERT_ID()获取最后一条插入的id
<insert id="add" parameterType="com.zx.pojo.Team">
    <!--新增成功之后将自增的ID赋值给参数属性teamId
    keyProperty:表示新增的id值赋值到哪个属性中
    order:AFTER/BRFORE两个取值,表示selectKey中的sql语句在insert语句之前还是之后执行
    resultType:表示返回值类型
    -->
    <selectKey keyProperty="teamId" order="AFTER" resultType="java.lang.Integer">
        select LAST_INSERT_ID()
    </selectKey>
    INSERT INTO `mydb`.`team` (`teamName`, `location`, `createTime`)
    VALUES (#{teamName}, #{location}, #{createTime});
</insert>
@Test
public void testAdd(){
    Team team = new Team();
    team.setTeamName("猴子队");
    team.setLocation("北京");
    team.setCreateTime(new Date());
    teamMapper.add(team);
    System.out.println(team.getTeamId());//这里就可以获取到刚刚新增数据的id了
    MybatisUtil.getSqlSession().commit();//事务提交
}
id为字符串
借助mysql的方法select UUID(),可以生成一条随机的字符串类型id,selectKey参数使用BEFORE,在insert语句之前生成,并将其赋值给GameRecord的主键recordId
</insert>
<insert id= "add" parameterType= "com.kkb.pojo.GameRecord">
<selectKey keyProperty="recordId" order="BEFORE" resultType="java.Lang.String">
    select UUID()
</selectKey>
INSERT INTO `mydb`.`gamerecord` ( `recordId`,`homeTeamId`, `score`, `visitingTeamId` )
VALUES (#{recordId}, #{homeTeamId}, #{score}, #{visitingTeamId})
6、输入映射parameterType传递多个参数
当sql语句需要传递多个对象的参数时,应该如何操作
方法1:
List<Team> queryByRange1(Integer min,Integer max);//TeamMapper接口代码
当参数有多个时,直接使用#{arg0} #{arg1}…或者#{param1} #{param2}…按顺序接受参数即可
<!--细节1:
mybatis3.3版本之前:可以直接写#{0} #{1}
从mybatis3.4开始:要写#{arg0} #{arg1}...或者#{param1} #{param2}...
细节2:
sql语句中不能使用小于号“<”,要使用转义符号,大于号没有限制,也可以使用转义符号
"<" = <
">" = >
-->
<select id="queryByRange1" resultType="com.zx.pojo.Team">
select * from team
where teamId>=#{arg0} and teamId<=#{arg1}
</select>
@Test
public void test01(){
    List<Team> teams = teamMapper.queryByRange1(1008,1009);
    teams.forEach(team -> System.out.println(team));
}
当然,我们开发时希望能够更直观地看到当前接收的是哪一个参数,因此还可以使用注解的方式:
方法2*(常用):
//使用Param("")注解,value为要映射到xml中的参数名
List<Team> queryByRange2(@Param("min") Integer min, @Param("max")Integer max);
<!--#{}中的名称必须与接口的方法中的参数注解@Param("")的value保持一致-->
<select id="queryByRange2" resultType="com.zx.pojo.Team">
select * from team
where teamId>=#{min} and teamId<=#{max}
</select>
@Test
public void test02(){
    List<Team> teams = teamMapper.queryByRange2(1008,1009);
    teams.forEach(team -> System.out.println(team));
}
方法3:
还可以传入集合Map,要求#{}中的名称必须与Map中的key保持一致
List<Team> queryByRange3(Map<String, Object> map);
<!--#{}中的名称必须与Map中的key保持一致-->
<select id="queryByRange3" resultType="com.zx.pojo.Team">
select * from team
where teamId>=#{min} and teamId<=#{max}
</select>
@Test
public void test03(){
    Map<String,Object> map = new HashMap<>();
    map.put("min",1008);
    map.put("max",1009);
    List<Team> teams = teamMapper.queryByRange3(map);
    teams.forEach(team -> System.out.println(team));
}
方法4:
这种方法就类似于之前使用过的传入的单个对象参数Team,当时是可以将Team的所有属性都作为参数传入的,只要#{}中的名称=属性名即可建立映射。
于是我们可以重新创建一个类专门用来存储要传递的参数,直接传入这个类的对象作为参数,xml文件中直接使用#{属性名}接收即可。
代码略,参考5-实现方式中Team属性参数的传递。
7、#{}和${}的区别(面试)
#{}表示占位符
${}表示直接替换字符串
实例:
<!--这里的column和columnValue都是字符串类型
    #{}相当于占位符?,最终封装为sql字符串中的占位符?,使用columnValue的值填充参数
    ${}表示直接替换字符串,其值直接拼接到sql字符串中
    -->
<select id="queryByField" resultType="com.zx.pojo.Team">
    select * from team
    where ${column}=#{columnValue}
</select>
List<Team> queryByField(@Param("column")String column,@Param("columnValue")String columnValue);
//测试
@Test
    public void test04(){
        List<Team> teams = teamMapper.queryByField("location","北京");
        teams.forEach(team -> System.out.println(team));
    }
//运行时会将sql字符串变成下面的样子:
//DEBUG [main] - ==>  Preparing: select * from team where location=?
8、输出映射
resultType
<!--resultType=“返回的类型,如果是集合,写的是集合中元素的类型”;使用要求:实体类中的属性和表中的列名一致
    -->
<select id="queryAll" resultType="com.zx.pojo.Team">
    select * from team;
</select>
1.返回类型为基本类型(前提:结果必须单行)
当查询的结果为单行单列,即只有一个数据时,可以直接使用基本类型作为返回值
<select id="***" resultType="java.lang.Integer">
当结果为单行多列时,使用基本类型,只会显示第一列。
如果查询结果返回了多行,则会报异常:TooManyResultException
2.返回类型为Map(查询结果为单行多列)
当查询结果为单行多列,可以使用Map作为返回类型
<select id="***" resultType="java.util.HashMap">
返回结果也直接用Map类型获取
Map<String,Object> ***();
返回的数据map中,key就是列名,value就是该数据该列的值
返回类型为Map
3.返回类型同样为Map(查询结果为多行多列)
当查询结果为多行多列,也可以使用Map作为返回类型。
<select id="***" resultType="java.util.HashMap">
但是返回结果用List<Map<String,Object>>来获取,因为结果是多行。
并且之前提过,resultType属性:如果返回结果是集合,写的是集合中元素的类型
resultMap
使用resultType,就相当于默认表中的列名与对应得实体类属性名是一致的。
创建resultMap,相当于自己编写表中的列与实体类中属性的映射关系。
resultMap和resultType不能同时出现。
resultMap的使用方式:
首先建立映射关系,也就是创建一个创建resultMap:
<!--创建resultMap:数据库表的列 和 实体类的属性 的映射关系
    id:resultMap的名称,自定义,唯一
    type:要映射的java实体类
-->
<resultMap id="baseResultMap" type="com.zx.pojo.Team">
    <!--一般主键用id标签,其余的列用result标签
        column属性:表示数据库表的列名,不区分大小写
        property属性:表示实体类中的对应的属性名,区分大小写
        javaType属性:实体类中的对应属性的类型,可以省略,mybatis会自己推断
        jdbcType属性:数据库中的列的类型 一般省略
        -->
    <id column="teamId" property="teamId" javaType="java.lang.Integer"></id>
    <result column="teamName" property="teamName" javaType="java.lang.String"></result>
    <result column="location" property="location" javaType="java.lang.String"></result>
    <result column="createTime" property="createTime" javaType="java.util.Date"></result>
</resultMap>
然后在select语句中引用它的id,这里以queryAll为例
之前的queryAll
<select id="queryAll" resultType="com.zx.pojo.Team">
    select * from team;
</select>
将resultType改为resultMap,并引用刚才创建的resultMap的id
<select id="queryAll2" resultMap="baseResultMap">
    select * from team;
</select>
测试
@Test
public void testQueryAll2(){
    List<Team> teams  = teamMapper.queryAll2();
    teams.forEach(team -> System.out.println(team));
}
Mybatis中属性名与列名不一致的解决方案
方案一:resultType 和 sql语句中的别名 结合使用
比如数据库中列名为user_id,对应数据库中的属性名为userId。
我们返回类型还是使用resultType指定实体类,但是在编写select语句时,这样编写
select user_id as userId from 表名;
如上,查询到的视图列名就和数据库中的属性名一致了
方案二:使用resultMap自行映射列名和属性的关系
实例:
select标签中引用下面的resultMap
<resultMap id="baseMap" type="com.zx.pojo.Users">
	<id coLumn="user_id" property="userId"/>
</resuleMap>
9、Mybatis的全局配置文件
案例中使用的mybatis .xml就是Mybatis的全局配置文件。
全局配置文件需要在头部使用约束文件
<?xml version="1.0" encoding="UTF-8" ?>
<!DOCTYPE configuration
        PUBLIC "-//mybatis.org//DTD Config 3.0//EN"
        "http://mybatis.org/dtd/mybatis-3-config.dtd">
9.1配置的内容
MyBatis的配置文件包含了会深深影响MyBatis行为的设置和属性信息。配置文档的顶层结构如下:
configuration (配置)
    properties--属性:加载外部的配置文件,例如加载数据库的连接信息
    Settings--全局配置参数:例如日志配置
    typeAliases--类型别名
    typeHandlers----类型处理器
    objectFactor-----对象工厂
    Plugins------插件:例如分页插件
    Environments----环境集合属性对象
   		environment (环境变量)
    		transactionManager (事务理器)
    		dataSource (数据源)
    Mappers---映射器:注册映射文件用
9.2 properties–属性
属性可以在外部进行配置,并可以进行动态替换。我们既可以在properties元素的子元素中设置(例如DataSource节点中的properties节点) ,也可以在Java属性文件中配这些属性。
数据源中有连接数据库的四个参数数据,我们一般都是放在专门的属性文件中,mybatis的全局配置文件直接从属性文件中读取数据即可。
1、在resources目录创建jdbc.properties文件,文件名称可以自定义。注意这里的&就是&,不需要用转义符
jdbc.driver=com.mysql.cj.jdbc.Driver
jdbc.url=jdbc:mysql://localhost:3306/mydb?usUnicode=true&characterEncoding=utf-8&useSSL=false&serverTimezone=GMT
jdbc.username=root
jdbc.password=123456
2、mybatis的全局配置文件引入属性文件
<properties resource="jdbc.properties"/>
3、使用属性文件中的值
<dataSource type="POOLED">
    <property name="driver" value="${jdbc.driver}"/>
    <property name="url" value="${jdbc.url}"/>
    <property name="username" value="${jdbc.username}"/>
    <property name="password" value="${jdbc.password}"/>
</dataSource>
9.3Settings–全局配置参数
MyBatis中极为重要的调整设置,它们会改变MyBatis的运行时行为,例如我们配的日志就是应用之一。其余内容参考官网文档
<settings>
    <setting name="logImpl" value="LOG4J"/>
</settings>
一个配置完整的 settings 元素的示例如下(官网上的):
<settings>
  <setting name="cacheEnabled" value="true"/>
  <setting name="lazyLoadingEnabled" value="true"/>
  <setting name="multipleResultSetsEnabled" value="true"/>
  <setting name="useColumnLabel" value="true"/>
  <setting name="useGeneratedKeys" value="false"/>
  <setting name="autoMappingBehavior" value="PARTIAL"/>
  <setting name="autoMappingUnknownColumnBehavior" value="WARNING"/>
  <setting name="defaultExecutorType" value="SIMPLE"/>
  <setting name="defaultStatementTimeout" value="25"/>
  <setting name="defaultFetchSize" value="100"/>
  <setting name="safeRowBoundsEnabled" value="false"/>
  <setting name="mapUnderscoreToCamelCase" value="false"/>
  <setting name="localCacheScope" value="SESSION"/>
  <setting name="jdbcTypeForNull" value="OTHER"/>
  <setting name="lazyLoadTriggerMethods" value="equals,clone,hashCode,toString"/>
</settings>
9.4 typeAliases–类型别名
类型别名可为 Java 类型设置一个缩写名字。 它仅用于 XML 配置,意在降低冗余的全限定类名书写。例如:
<typeAliases>
  <!--当这样配置时,`Blog` 可以用在任何使用 domain.blog.Blog 的地方。-->
  <typeAlias alias="Blog" type="domain.blog.Blog"/>

  <!--也可以指定一个包名,MyBatis会在包名下面搜索需要的Java Bean,使用别名时直接使用类名的首字母大小写形式都可以-->
  <package name="domain.blog"/>
</typeAliases>
每一个在包 domain.blog 中的 Java Bean,在没有注解的情况下,会使用 Bean 的首字母小写的非限定类名来作为它的别名。 比如 domain.blog.Author 的别名为 author;若有注解,则别名为其注解值。见下面的例子:
@Alias("author")
public class Author {
    ...
}
Mybatis中已经默认设置的别名
| 别名 | 映射的类型 |
|---|---|
| _byte | byte |
| _long | long |
| _short | short |
| _int | int |
| _integer | int |
| _double | double |
| _float | float |
| _boolean | boolean |
| string | String |
| byte | Byte |
| long | Long |
| short | Short |
| int | Integer |
| integer | Integer |
| double | Double |
| float | Float |
| boolean | Boolean |
| date | Date |
| decimal | BigDecimal |
| bigdecimal | BigDecimal |
| object | Object |
| map | Map |
| hashmap | HashMap |
| list | List |
| arraylist | ArrayList |
| collection | Collection |
| iterator | Iterator |
9.5映射器Mappers
配置有多种方式,选哪种都可以
使用相对于类路径的资源引用
<mappers>
  <mapper resource="org/mybatis/builder/PostMapper.xml"/>
</mappers>
使用映射器接口实现类的完全限定类名
要求接口和映射文件同包同名(同包指的是路径相同)
<mappers>
  <mapper class="org.mybatis.builder.PostMapper"/>
</mappers>
将包内的映射器接口实现全部注册为映射器
要求接口和映射文件同包同名(同包指的是路径相同)
<mappers>
  <package name="org.mybatis.builder"/>
</mappers>
9.6dataSource (数据源)
Mybatis中访问数据库支持连接池技术,而且是采用的自己的连接池技术。在Mybatis的mybatis.xml配置文件中,通过来实现Mybatis中连接池的配置。MyBatis 在初始化时,根据的type属性来创建相应类型的的数据源DataSource.
Mybatis的数据源分为三类:
UNPOOLED:不使用连接池的数据源
POOLED:使用连接池的数据源
JNDI:使用INDI实现的数据源
前两个数据源都实现javax.sql.DataSource接口
9.7事务
默认是需要手动提交事务的
Mybatis框架是对JDBC的封装,所以Mypatis框架的事务控制方式,本身也是用JDBC的Connection对象的commit). rollback) .Connection对象的setAutoCommit()方法来设置事务提交方式的。自动提交和手工提交
该标签用于指定MyBatis所使用的事务管理器。MyBatis 支持两种事务管理器类型: JDBC 与MANAGED.
JDBC:使用DBC的事务管理机制,通过Connection对象的 commit(方法提交,通过rollback(方法回滚。默认情况下,mybatis将自动提交功能关闭了,改为了手动提交,观察日志可以看出,所以我们在程序中都需要自己提交事务或者回滚事务。
MANAGED:由容器来管理事务的整个生命周期(如Spring容器)。
自动提交事务
SqlSessionFactory的openSession方法由重载,可以设置自动提交的方式。
如果sqlSession = sqlSessionFactory.openSession(true);参数设置为true,再次执行增删改的时候就不需要执行session.commit()方法,事务会自动提交。
10、Mybatis关系映射
对一关系的映射处理方式
实体类
观察下面的实体类,显然,我们这节的目的就是:
在查询时,将查询的球员信息映射给Player对象的属性;同时,将该球员所在球队的信息映射给Player对象种的Team。
public class Player{
    private  int playerId;
    private String playerName;
    private int playerNum;
    private int teamId;
    //关系字段:多个球员可以属于同意球队
    //多方(球员)持有一方(球队)的对象
    private Team team1;
    private Team team2;
    private Team team3;
    ...
}
mapper接口
public interface PlayerMapper {
    Player queryById(int playerId);
    Player queryById1(int playerId);
    Player queryById2(int playerId);
    Player queryById3(int playerId);
}
先建立Player实体类到数据库的字段映射
<resultMap id="baseResultMap" type="Player">
    <id column="playerId" property="playerId"/>
    <result column="playerName" property="playerName"/>
    <result column="playerNum" property="playerNum"/>
    <result column="teamId" property="teamId"/>
</resultMap>
那么,如何将球员所在球队的信息映射给Team呢
方法1
通过 对象.属性直接映射列名
要求:必须连接查询
一般会自定义结果映射
<resultMap id="joinTeamResult" type="Player" extends="baseResultMap">
        <result column="teamId" property="team1.teamId"/>
        <result column="teamName" property="team1.teamName"/>
        <result column="location" property="team1.location"/>
        <result column="createTime" property="team1.createTime"/>
</resultMap>

<select id="queryById1" resultMap="joinTeamResult">
    SELECT * FROM `player` p INNER JOIN team t
    on t.teamId=p.teamId
    where playerId=#{id}
</select>
方法2
直接引用关联对象的Mapper映射
要求:必须使用连接查询
<resultMap id="joinTeamResult2" type="Player" extends="baseResultMap">
        <association property="team2" javaType="Team" resultMap="com.zx.mapper.TeamMapper.baseResultMap"/>
</resultMap>

<select id="queryById2" resultMap="joinTeamResult2">
    SELECT * FROM `player` p INNER JOIN team t
        on t.teamId=p.teamId
    where playerId=#{id}
</select>
方法3
使用关联对象的单独的查询语句的查询结果
要求: 不需要连接查询,需要关联对象中存在对应的查询语句
如下,joinTeamResult3映射需要一个Team对象作为映射,而queryById的查询结果刚好是一个Team对象,所以直接传输参数,引用queryById的查询结果。
<resultMap id="joinTeamResult3" type="Player" extends="baseResultMap">
    <!--column:引用的关联对象中的查询所需要的参数-->
    <association property="team3" javaType="Team" column="teamId"
                 select="com.zx.mapper.TeamMapper.queryById"/>
</resultMap>

<select id="queryById3" resultMap="joinTeamResult3">
    SELECT * FROM `player`  where playerId=#{id}
</select>
对多关系映射
其实就是对一映射反过来,之前是站在球员的角度,多个球员属于一个球队。
现在就是站在球队的角度,一个球队可以有多个球员。
查询的需求就是,我们在查询出一个球队Team信息的时候,也能够将此球队所有的球员信息查询出来。
两种方式,所以在Team实体类中添加两个属性playerList、playerList2
public class Team {
    private Integer teamId;
    private String teamName;
    private String location;
    private Date createTime;
    //关系字段:一个球队可以拥有多个球员
    //一方(球队)持有多方(球员)的集合
    private List<Player> playerList;
    private List<Player> playerList2;
}
Team和数据库的字段映射关系
<resultMap id="baseResultMap" type="com.zx.pojo.Team">
    <id column="teamId" property="teamId" javaType="java.lang.Integer"></id>
    <result column="teamName" property="teamName" javaType="java.lang.String"></result>
    <result column="location" property="location" javaType="java.lang.String"></result>
    <result column="createTime" property="createTime" javaType="java.util.Date"></result>
</resultMap>
方法一:
连接查询+引用关联对象的结果映射
<!--先创建引用关联对象的映射-->
<resultMap id="joinPlayerMap1" type="Team" extends="baseResultMap">
        <!--collection:对多的映射节点
                property:实体类中要查询的集合属性
                javaType:集合类型
                ofType:集合中元素的类型
                resultMap:引用的关联对象中结果映射(集合中的元素)
        -->
        <collection property="playerList" javaType="java.util.ArrayList" ofType="Player"
                    resultMap="com.zx.mapper.PlayerMapper.baseResultMap"/>
    </resultMap>

<select id="queryById1" resultMap="joinPlayerMap1">
    select * from team t inner join player p
    on t.teamId=p.teamId where t.teamId=#{id}
</select>
方法二:
使用关联对象的单独的查询语句,它要求关联对象中有相应的查询语句
这里我们的映射需要的是球员信息,就需要关联对象中有查询结果为球员信息的查询语句。我们这里给它添加一个这样的查询:
PlayerMapper.xml:

<select id="queryByTeamId" resultMap="baseResultMap">
    select * from player where teamId=#{i}
</select>
于是下面就可以直接借用球员信息的查询来映射team内部的playerList2的的属性
<resultMap id="joinPlayerMap2" type="Team" extends="baseResultMap">
        <collection property="playerList2" javaType="arraylist" ofType="Player"
                    select="com.zx.mapper.PlayerMapper.queryByTeamId" column="teamId"/>
</resultMap>

<select id="queryById2" resultMap="joinPlayerMap2">
    select * from team where teamId=#{id}
</select>
11、动态SQL
Mybatis中提供了完成动态sql的标签
查询条件参数类:
public class QueryTeamVo {
    private String name;
    private Date beginTime;
    private Date endTime;
    private String location;
}
where/if标签
<select id="queryByVo" parameterType="QueryTeamVo" resultMap="baseResultMap">
select * from team
<where>
<if test="name!=null">
teamName like concat(concat('%',#{name}),'%')
</if>
<if test="beginTime!=null">
and createTime>=#{beginTime}
</if>
<if test="endTime!=null">
and createTime<=#{endTime}
</if>
<if test="location!=null">
and location=#{location}
</if>
</where>
</select>
update/set标签
<update id="update1" parameterType="Team">
    update team
    <set>
        <if test="teamName!=null">
            teamName=#{teamName},
        </if>
        <if test="location!=null">
            location=#{location},
        </if>
        <if test="createTime!=null">
            createTime=#{createTime},
        </if>
    </set>
    where teamId=#{teamId}
</update>
批量操作foreach标签
批量插入数据
<insert id="addList" parameterType="arraylist">
    insert into team (teamName,location) values
    <!-- collection:要遍历的集合:参数是集合类型,直接写list
        item:便利的集合中的没有个数据
        separator:将便利的结果用,分割
    -->
    <foreach collection="list" item="t" separator=",">
        (#{t.teamName},#{t.location})
    </foreach>
</insert>
批量删除数据
<delete id="delList">
    delete from team where teamId in
    <!--collection:要遍历的集合,参数是集合类型,直接写list
        item:便利的集合中的每一个数据
        separator:遍历的结果用,分割
        open="(" close=")":表示将遍历结果用open close包裹起来
    -->
    <foreach collection="list" item="teamId" separator="," open="(" close=")">
        #{teamId}
    </foreach>
</delete>
12、分页插件的使用
第一步引入依赖:
<dependency>
  <groupId>com.github.pagehelper</groupId>
  <artifactId>pagehelper</artifactId>
  <version>5.1.10</version>
</dependency>
第二步在mybatis.xml中配置插件plugins(注意顺序)
<!--配置分页插件-->
<plugins>
    <!--5.0版本之前使用的PageHelper,5.0之后使用PageInterceptor-->
    <plugin interceptor="com.github.pagehelper.PageInterceptor">
        <!--reasonable可以省略,分页合理化,默认false-->
        <property name="reasonable" value="true"/>
    </plugin>
</plugins>
测试:注意由于mybatis要对查询语句进行拼接,这里的queryAll语句后面不要加分号
@Test
    public void testqueryByPage(){
        //使用分页时PageHelper.startPage必须紧邻查询语句,而且只对它之后的第一条查询生效
        PageHelper.startPage(2,2);
        List<Team> teamList = teamMapper.queryAll();
        teamList.forEach(team -> System.out.println(team));
        //插件提供了PageInfo类,可以获取分页信息
        PageInfo<Team> info = new PageInfo<>(teamList);
        System.out.println("分页信息如下:");
        System.out.println("总页数:"+info.getPages());
        System.out.println("当前页是第"+info.getPageNum()+"页");
        System.out.println("前一页是第"+info.getPrePage()+"页");
        System.out.println("后一页是第"+info.getNextPage()+"页");
        for(int num : info.getNavigatepageNums()){
            System.out.println(num);
        }
    }
13、Mybatis缓存
缓存是一般的ORM 框架都会提供的功能,目的就是提升查询的效率和减少数据库的压力。将经常查询的数据存在缓存(内存)中,用户查询该数据的时候不需要
从磁盘(关系型数据库文件)上查询,而是直接从缓存中查询,提高查询效率,解决高并发问题。
MyBatis也有一级缓存和二级缓存,并且预留了集成第三方缓存的接口。
Mybatis的缓存结构体系:

一级缓存:自动开启,SqISession级别的缓存
在操作数据库时需要构造sqlSession对象,在对象中有一个(内存区域)数据结构 (HashMap) 用于存储缓存数据。不同的sqlSession之间的缓存数据区域
(HashMap)是互相不影响的。
一级缓存的作用域是同一 个SqlSession, 在同一个sqlSession中两次执行相同的sq|语句,第- -次执行完毕会将数据库中查询的数据写到缓存(内存),第二次会从缓存中获取数据将不再从数据库查询,从而提高查询效率。
当一个sqlSession结束后该sqlSession中的一级缓存也就不存在了。
Mybatis默认开启一级缓存, 存在内存中(本地缓存)不能被关闭,可以调用clearCache()来清空本地缓存, 或者改变缓存的作用域。
一级缓存分析
工作原理图:

测试思路:开启日志,随便一个查询语句,连着查询两个,发现输出两次结果中间并没有日志打印,说明第二次查询并没有进行连接数据库等操作,而是直接从内存中拿的数据。
清空缓存的方式
1、sqlsession.clearCache( );
2、execute update(增删改);
3、sqlsession.close( );
4、xml配置 flushCache=“true” ;
5、rollback;
6、commit.
二级缓存:Mapper级别的缓存
多个SqlSession去操作同一个Mapper的sql语句, 多个SqlSession去操作数据库得到数据会存在二级缓存区域, 多个SqlSession可以共用二级缓存, 二级缓存是跨SqISession的。
二级缓存是多个SqlSession共享的,其作用域是mapper的同一个namespace.
不同的sqlSession两次执行相同namespace下的sql语句参数相同即最终执行相同的sql语句,第一次执行完毕会将数据库中查询的数据写到缓存(内存),第二次会从缓存中获取数据将不再从数据库查询,从而提高查询效率。
Mybatis默认没有开启二级缓存, 需要在setting全局参 数中配置开启级缓存。
如果缓存中有数据就不用从数据库中获取,大大提高系统性能。

二级缓存的使用
二级缓存是mapper范围级别的,默认不启用
1、在Mybatis框架的全局配置文件中开启二级缓存
<settings>
    <setting name="logImpl" value="LOG4J"/>
    <!--是否开启二级缓存,默认false:不开启,true:开启-->
    <setting name="cacheEnabled" value="true"/>
</settings>
2、在需要二级缓存的Mapper中添加缓存标志

3、实体类必须实现Serializable接口

4、测试
增删改会清空二级缓存、关闭连接会清空一级但不会清空二级缓存。
二级缓存的禁用
对于变化比较频繁的SQL,可以禁用二级缓存。
在开始了二级缓存的XML中对应的statement中设置useCache=false禁用当前Select语句的二级缓存,意味着该SQL语句每次只需都去查询数据库,不会查询缓存。
useCache默认值是true,对于一些很重要的数据尽量不放在二级缓存中。
示例:
<select id="queryById1" resultMap="joinPlayerMap1" useCache="false">
    select * from team t inner join player p
    on t.teamId=p.teamId where t.teamId=#{id}
</select>
缓存的属性配置
<cache>
<property name="eviction" value="LRU"/><!--回收策略为LRU-->
<property name="flushInterval" value="60000" /><!--自动刷新时间间隔为605-->
<property name="size" value="1024"/><!--最多缓存1024个引用对象,如果超出,就使用回收策略回收-->
<property name="readonly" value="true"/><!--只读-->
</cache>
源码:
@Documented
@Retention(RetentionPolicy.RUNTIME)
@Target({ElementType.TYPE})
public @interface CacheNamespace {
    Class<? extends Cache> implementation() default PerpetualCache.class;
    Class<? extends Cache> eviction() default LruCache.class;
    long flushInterval() default 0L;
    int size() default 1024;
    boolean readWrite() default true;
    boolean blocking() default false;
    Property[] properties() default {};
}
/**属性介绍:
    1.映射语句文件中的所有select语句将会被缓存:
    2.映射语句文件中的所有CUD操作将会刷新缓存,
    3.缓存会默认使用LRU (Least Recently Used) 算法来收回;
        3.1、LRU -最近最少使用的:移除最长时间不被使用的对象。
        3.2、FIFO -先进先出:按对象进入缓存的顺序来移除它们。
        3.3、SOFT -软引用:移除基于垃圾回收器状态和软引用规则的对象。
        3.4、WEAK -弱引用:更积极地移除基于垃圾收集器状态和弱引用规则的对象。
    4.缓存会根据指定的时间间隔来刷新(默认情况下没有刷新间隔,缓存仅仅调用语句时刷新);
    5.缓存会存储列表集合或对象(无论查询方法返回什么),默认存储1024个对象。
    6.缓存会被视为是read/write (可读/可写)的缓存,意味着检索对象不是共享的,而且可以安全地被调用者修改,而不干扰其他调用者或线程所做的潜在修改。
*/
如果想在命名空间中共享其它命名空间的缓存配置,可以使用cache-ref元素来引用另一个缓存配置,例如:
<cache-ref namespace="com.zx.mapper.TeamMapper" />
//引用TeamMapper命名空间中的cache配置
14、反向生成插件
在pom文件的build和plugins添加配置
<!--反向生成插件-->
<plugin>
  <groupId>org.mybatis.generator</groupId>
  <artifactId>mybatis-generator-maven-plugin</artifactId>
  <version>1.3.5</version>
  <configuration>
    <!--配置文件的路径-->
    <configurationFile>src/main/resources/generatorConfig.xml</configurationFile>
    <overwrite>true</overwrite>
  </configuration>
  <dependencies>
    <dependency>
      <groupId>org.mybatis.generator</groupId>
      <artifactId>mybatis-generator-core</artifactId>
      <version>1.3.5</version>
    </dependency>
  </dependencies>
</plugin>
generatorConfig.xml的内容
<?xml version="1.0" encoding="UTF-8"?>
<!DOCTYPE generatorConfiguration
PUBLIC "-//mybatis.org//DTD MyBatis Generator Configuration 1.0//EN"
"http://mybatis.org/dtd/mybatis-generator-config_1_0.dtd">
<!-- 配置生成器:标了序号的部分都需要修改为自己的内容-->
<generatorConfiguration>
<!--1、数据库驱动jar:添加自己的jar路径-->
<classPathEntry
location="D:\WorkSpace\Maven\MyRepository\mysql\mysql-connector-java\8.0.23\mysql-connector-java-8.0.23.jar" />
<context id="MyBatis" targetRuntime="MyBatis3">
<!--去除注释-->
<commentGenerator>
<property name="suppressAllComments" value="true" />
</commentGenerator>
<!--2、数据库连接-->
<jdbcConnection driverClass="com.mysql.cj.jdbc.Driver"
connectionURL="jdbc:mysql://localhost:3306/mydb?usUnicode=true&characterEncoding=utf-8&useSSL=false&serverTimezone=GMT"
userId="root"
password="123456">
</jdbcConnection>
<!-- 默认false,把JDBC DECIMAL 和NUMERIC 类型解析为Integer;
为true 时把JDBC DECIMAL 和NUMERIC类型解析为java.math.BigDecimal -->
<javaTypeResolver>
<property name="forceBigDecimals" value="false" />
</javaTypeResolver>
<!--3、 生成实体类指定包名以及生成的地址 (可以自定义地址,但是路径不存在不会自动创建
使用Maven生成在target目录下,会自动创建) -->
<javaModelGenerator targetPackage= "com.zx.pojo"
targetProject="src\main\java">
<property name="trimStrings" value="true" />
</javaModelGenerator>
<!--4、生SQLmapper.xml映射文件-->
<sqlMapGenerator targetPackage="com.zx.mapper"
targetProject="src\main\resources">
</sqlMapGenerator>
<!--5、 生成Dao (Mapper)接口文件,-->
<javaClientGenerator type="XMLMAPPER"
targetPackage="com.zx.mapper"
targetProject="src\main\java">
</javaClientGenerator>
<!--6、 要生成哪些表(更改tableName和domainObjectName就可以) -->
<!-- tableName:要生成的表名
enableCountByExample : Count语句中加入where条件查询,默认为true开启
enableUpdateByExample : Update语句中加入where条件查询,默以为true开启
enableDeleteByExample :Delete语句中加入where条件查询,默认为true开启
enableSelectByExample:Select多条语句中加入where条件查询,默认为true开启
selectByExampleQueryId:Select单个对象语句中加入where条件查询,默认为true开启
-->
<table tableName= "stu"
enableCountByExample="false"
enableUpdateByExample="false"
enableUpdateByPrimaryKey="false"
enableDeleteByExample="false"
enableDeleteByPrimaryKey="false"
enableSelectByExample="false"
selectByExampleQueryId="false">
<!--生成的字段区分大小写,符合java命名规范-->
<property name="useActualColumnNames" value="true"/>
</table>
</context>
</generatorConfiguration>