1. 准备环境
本文中Elasticsearch版本为7.12.0,JDK版本为1.8.0,Linux环境部署。
扩展:
(1)查看Elasticsearch对应的常用的jdk版本如下:(详情可看官网的支持一览表)
(2)JDK1.8在Linux服务器上的安装步骤如下: JDK部署(Linux)
Elasticsearch and JVM
Oracle/OpenJDK**/AdoptOpenJDK 1.8.0 Oracle/OpenJDK**
11Oracle/OpenJDK**/Temurin
17Elasticsearch 5.0.x-6.8.x √ Elasticsearch 7.0.x-7.17.x √ √ Elasticsearch 8.0.x-8.13.x √ https://blog.csdn.net/qq_39512532/article/details/135133353
2. 软件下载
Elasticsearch软件官网下载地址:https://www.elastic.co/cn/downloads/past-releases#elasticsearch

3. 上传服务器并解压缩
将 elasticsearch-7.12.0-linux-x86_64.tar.gz压缩包上传到Linux服务器的自定义路径 /opt/software 下
解压缩Elasticsearch压缩包到 自定义路径 /opt/module下:
[root@linux100 software]# tar -zxvf elasticsearch-7.12.0-linux-x86_64.tar.gz -C /opt/module解压后的Elasticsearch的目录结构如下:
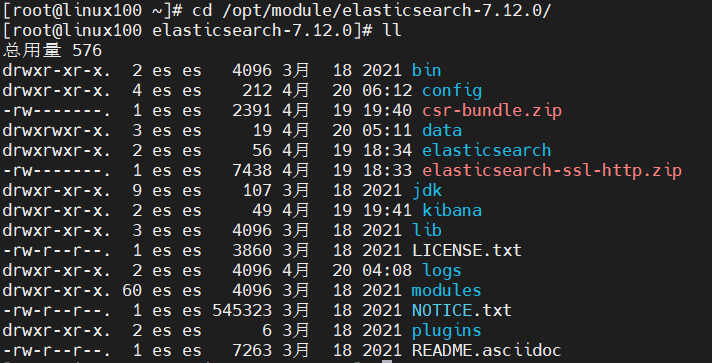
| 目录 | 含义 |
| bin | 可执行脚本目录 |
| config | 配置目录 |
| jdk | 内置JDK目录 |
| lib | 类库 |
| logs | 日志目录 |
| modules | 模块目录 |
| plugins | 插入目录 |
4. 创建用户
创建Linux新用户 es,并修改Elasticsearch文件拥有者。
# 新增es用户
[root@linux100 ~]# useradd es

# 设置es用户密码
[root@linux100 ~]# passwd es
更改用户 es 的密码 。
新的 密码:
重新输入新的 密码:
passwd:所有的身份验证令牌已经成功更新。

#修改文件夹所有者
[root@linux100 ~]# chown -R es:es /opt/module/elasticsearch-7.12.0
[root@linux100 ~]# ll
总用量 4
drwxr-xr-x.  9  es     es      155 3月  18 2021 elasticsearch-7.12.0
drwxr-xr-x. 13 hadoop hadoop  218 12月  4 19:53 hadoop-3.1.3
drwxrwxr-x. 8 hadoop hadoop 4096 11月 21 16:11 jdk1.8.0_391扩展:如果设置用户有问题时,可通过userdel命令删除用户
[root@linux100 ~]# userdel -r es5. 修改配置文件
(1)修改主配置文件elasticsearch.yml
[root@linux100 ~]# cd /opt/module/elasticsearch-7.12.0/config

[root@linux100 config]# vim elasticsearch.yml
在配置文件中加入以下内容:
# 集群名称,一个 Elasticsearch 集群有一个唯一的名字标识,默认就是elasticsearch
cluster.name: elasticsearch
# 节点名称,如果未设置,默认为随机生成的名称
node.name: node-1# 数据存储路径
path.data: /path/to/data
# 日志文件路径
path.logs: /path/to/logs
# 网络绑定地址,监听的IP地址,默认为 localhost
network.host: 192.168.243.100# HTTP接口端口,默认为9200
http.port: 9200#初始主节点的名称或ID,可放集群中可知的node.name
cluster.initial_master_nodes: ["node-1"]
(2)修改配置文件/etc/security/limits.conf
[root@linux100 config]# vim /etc/security/limits.conf在配置文件中加入以下内容:
# 每个进程可以打开的文件数的限制
es soft nofile 65536
es hard nofile 65536
(3)修改配置文件/etc/security/limits.d/20-nproc.conf
[root@linux100 config]# vim /etc/security/limits.d/20-nproc.conf在配置文件中加入以下内容:
# 每个进程可以打开的文件数的限制
es soft nofile 65536
es hard nofile 65536# 操作系统级别对每个用户创建的进程数的限制
* hard nproc 4096
# 注:* 带表 Linux 所有用户名称
(4)修改配置文件/etc/sysctl.conf
[root@linux100 config]# vim /etc/sysctl.conf在配置文件中加入以下内容:
# 一个进程可以拥有的 VMA(虚拟内存区域)的数量,默认值为 65536
vm.max_map_count=655360
(5)重新加载
[root@linux100 config]# sysctl -p6. 启动软件
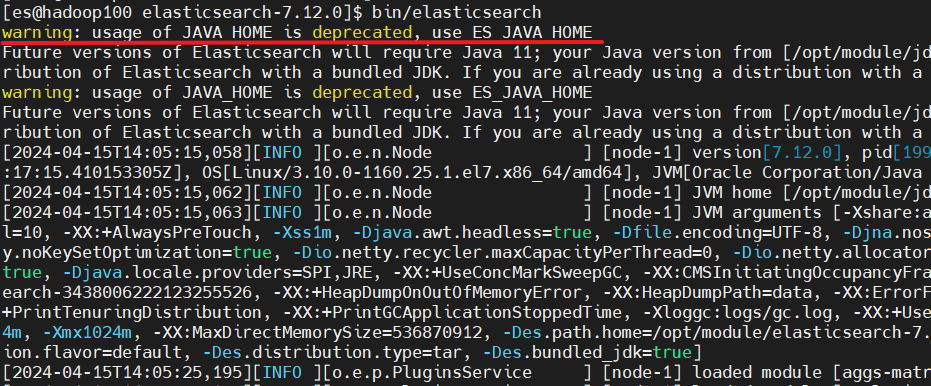
使用es用户启动软件:
[root@linux100 ~]# su es
[es@linux100 ~]$ cd /opt/module/elasticsearch-7.12.0/
[es@linux100 elasticsearch-7.12.0]$ bin/elasticsearch
7.关闭防火墙
查看防火墙状态:systemctl status firewalld
暂时关闭防火墙:systemctl stop firewalld
永久打开防火墙:systemctl enable firewalld.service
永久关闭防火墙:systemctl disable firewalld.service
防火墙的详细操作可参考下文:
Centos7 防火墙详细操作(Linux)
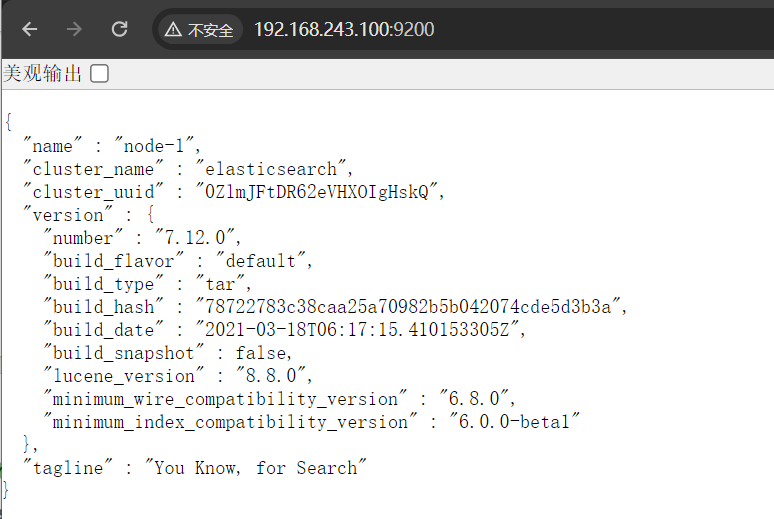
8. 测试软件
在浏览器中输入地址:http://192.168.243.100:9200/
9. 问题处置
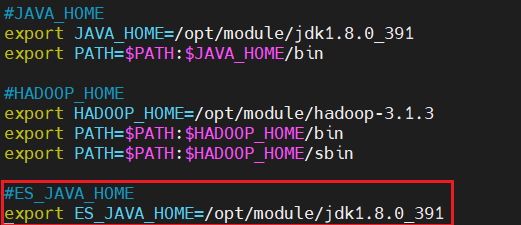
启动预警提示:usage of JAVA_HOME is deprecated, use ES_JAVA_HOME
解决方案:在配置环境变量的地方加上ES_JAVA_HOME配置就不会再预警了。
有些人在/etc/profile中配置,有些人在/etc/profile.d/路径下创建自定义文件配置环境变量。这里采用的是在/etc/profile.d/路径下创建自定义文件my_env.sh配置环境变量:
1[root@hadoop100 ~]$ vim /etc/profile.d/my_env.sh 添加如下红框内容:


![[测试]ChaosBlade: 丢包、延迟、断网、磁盘、cpu占用、内存占用等资源耗尽故障注入利器--编辑中](https://img-blog.csdnimg.cn/direct/2d567cb21fea473bbfcacbba40b42885.png)