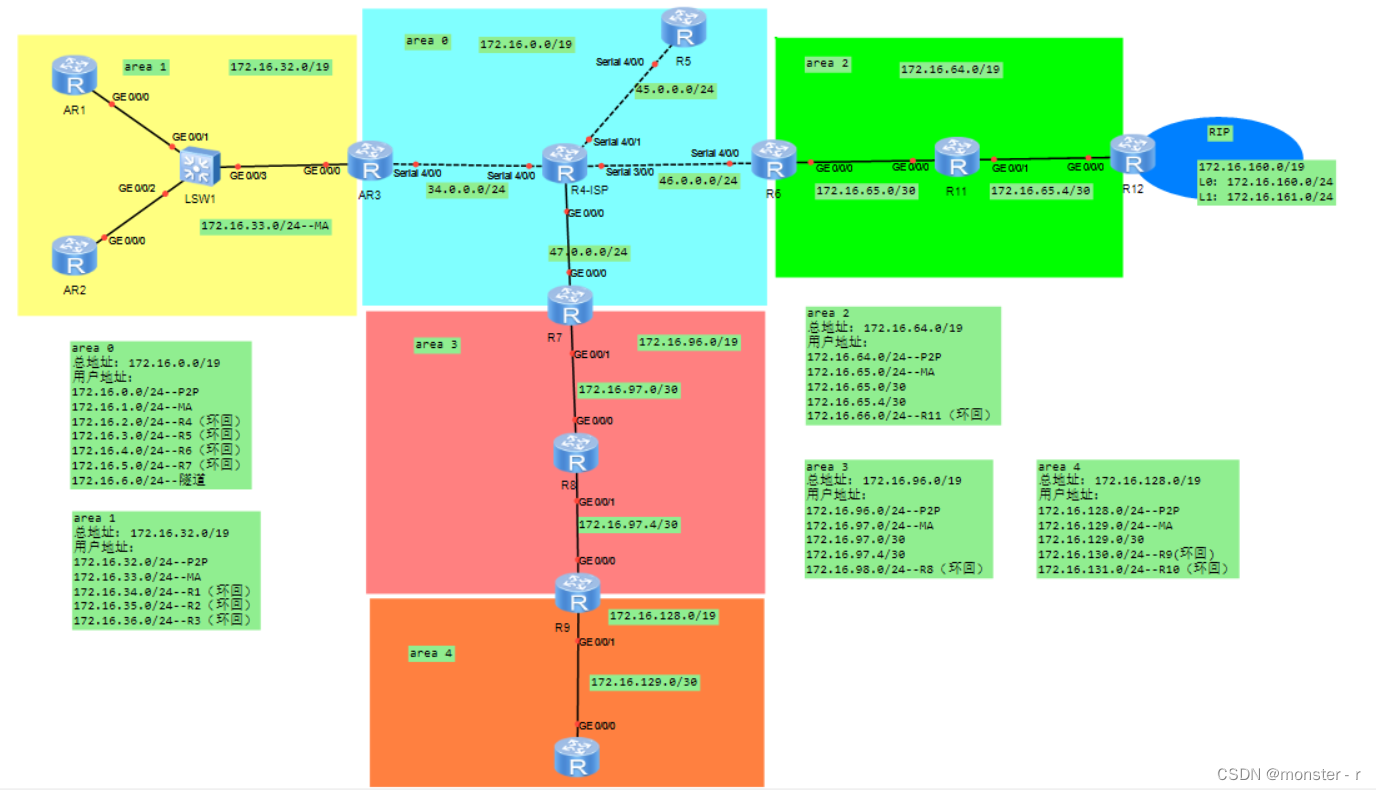
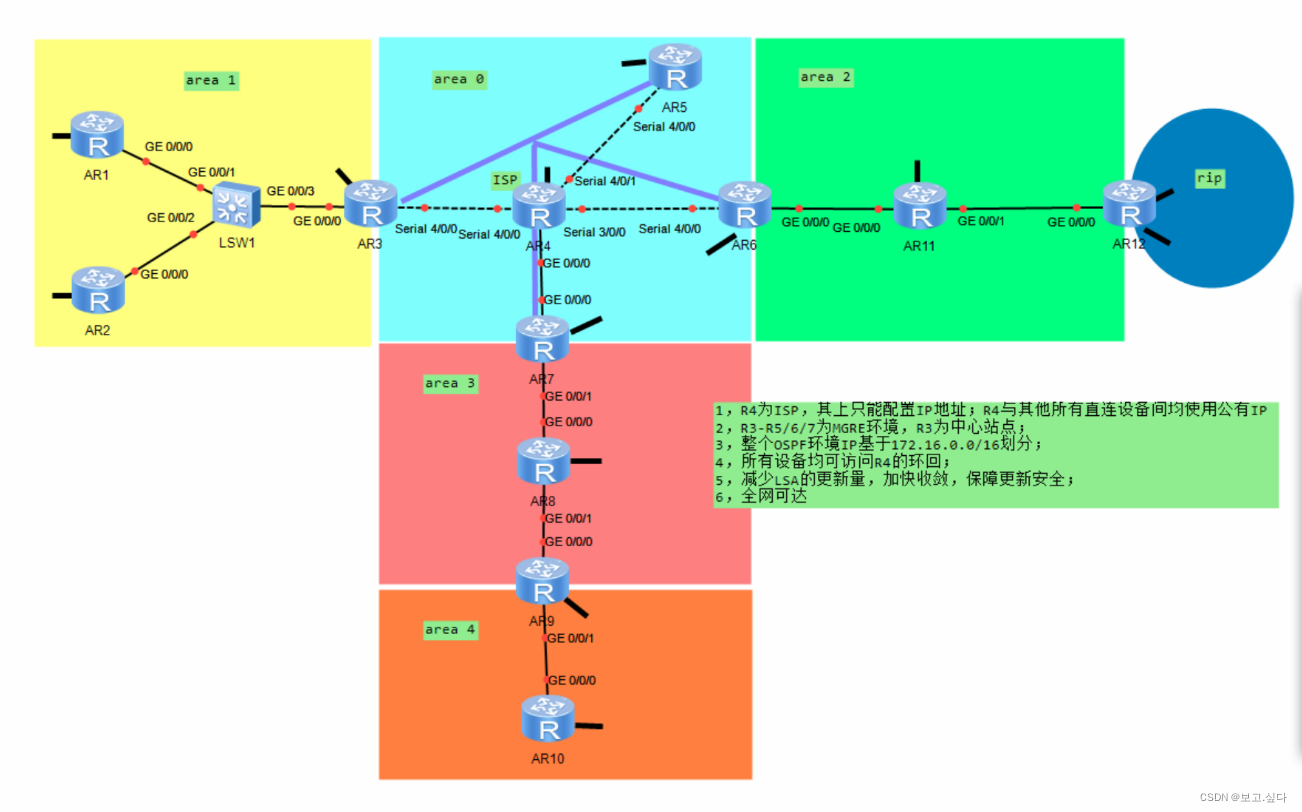
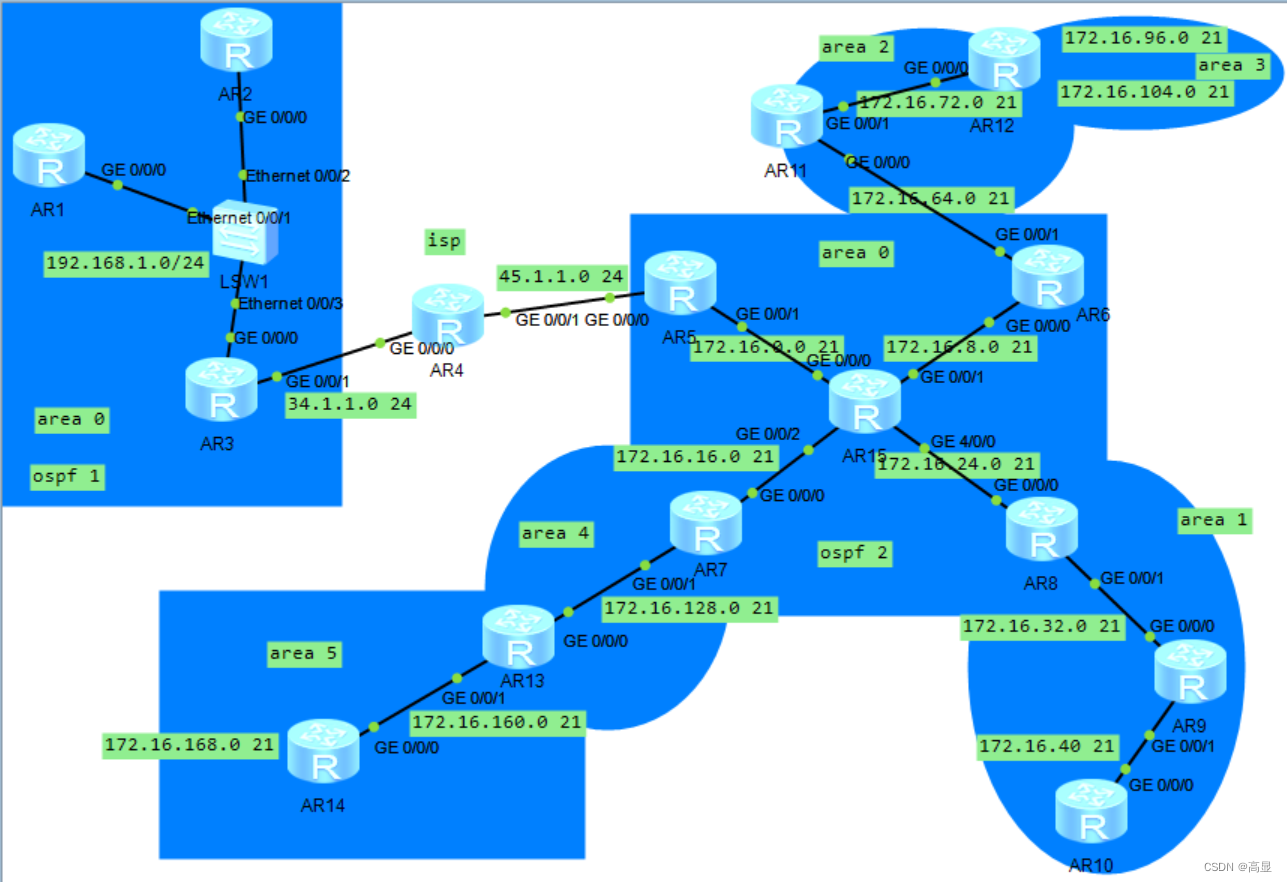
实验拓扑:
实验目的:
1、R4为ISP,其上只配置IP地址;R4与其他所直连设备间均使用公有IP;
2、R3-R5、R6、R7为MGRE环境,R3为中心站点;
3、整个OSPF环境IP基于172.16.0.0/16划分;除了R12有两个环回,其他路由器均有一个环回IP
4、所有设备均可访问R4的环回;
5、减少LSA的更新量,加快收敛,保障更新安全;
6、全网可达
实验思路:
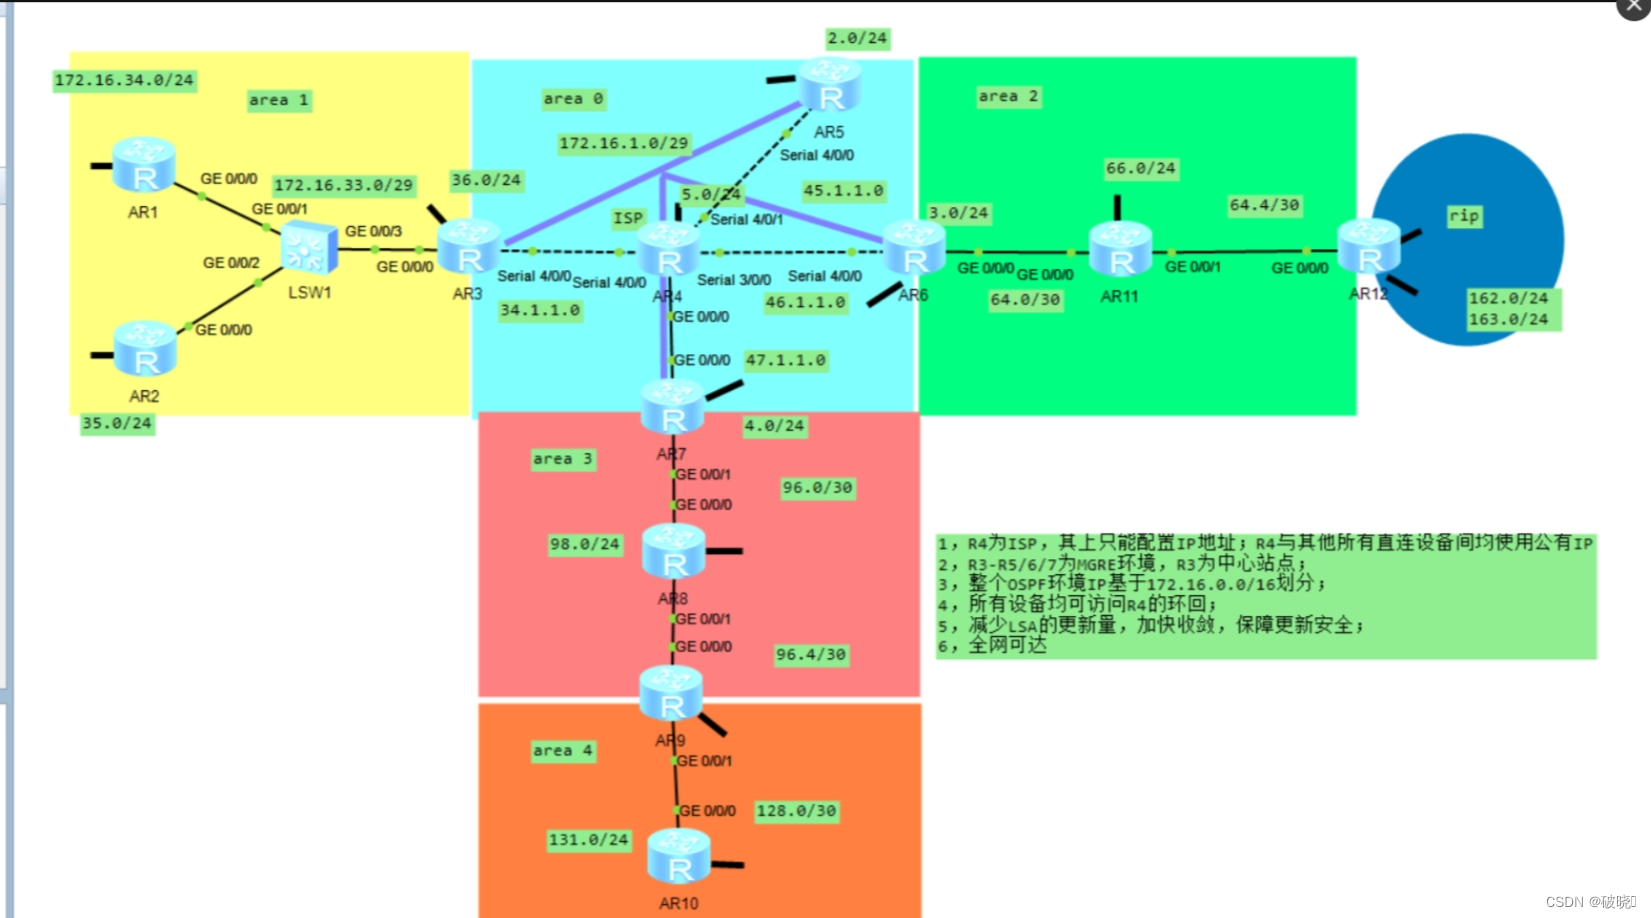
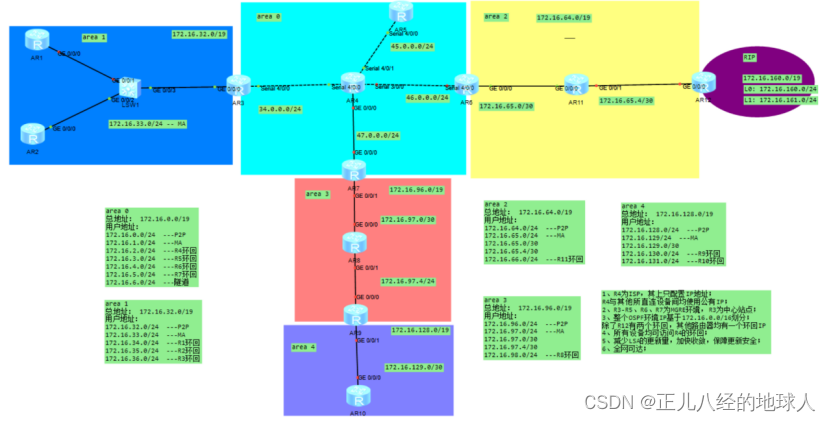
1.划分IP地址(如实验拓扑图所示)
2.配置IP地址
3.配置内网通和公网通,搭建MGRE环境
4.配置nat easy ip能够访问R4的环回
5.ABR/ASBR汇总
6.设特殊区域
7.更改hello时间加快收敛
8.配置认证保证安全
实验配置:
IP配置:
#R1配置
[R1]int g0/0/0
[R1-GigabitEthernet0/0/0]ip add 172.16.33.1 24
[R1-GigabitEthernet0/0/0]int l0
[R1-LoopBack0]ip add 172.16.34.1 24

#R2配置
[R2]int g0/0/0
[R2-GigabitEthernet0/0/0]ip add 172.16.33.2 24
[R2-GigabitEthernet0/0/0]int l0
[R2-LoopBack0]ip add 172.16.35.2 24

#R3配置
[R3]int se4/0/0
[R3-Serial4/0/0]ip add 34.0.0.3 24
[R3]int g0/0/0
[R3-GigabitEthernet0/0/0]ip add 172.16.33.3 24
[R3]int l0
[R3-LoopBack0]ip add 172.16.36.3 24

#R4配置
[R4]int se4/0/0
[R4-Serial4/0/0]ip add 34.0.0.4 24
[R4-Serial4/0/0]int se4/0/1
[R4-Serial4/0/1]ip add 45.0.0.4 24
[R4-Serial4/0/1]int se3/0/0
[R4-Serial3/0/0]ip add 46.0.0.4 24
[R4-Serial3/0/0]int g0/0/0
[R4-GigabitEthernet0/0/0]ip add 47.0.0.4 24
[R4]int LoopBack 0
[R4-LoopBack0]ip add 172.16.2.4 24

#R5配置
[R5]int se4/0/0
[R5-Serial4/0/0]ip add 45.0.0.5 24
[R5]int LoopBack 0
[R5-LoopBack0]ip add 172.16.3.5 24

#R6配置
[R6-GigabitEthernet0/0/0]
[R6-GigabitEthernet0/0/0]ip add 172.16.65.1 30
[R6]int se4/0/0
[R6-Serial4/0/0]ip add 46.0.0.6 24
[R6-Serial4/0/0]int l0
[R6-LoopBack0]ip add 172.16.4.6 24

#R7配置
[R7]int g0/0/0
[R7-GigabitEthernet0/0/0]ip add 47.0.0.7 24
[R7-GigabitEthernet0/0/0]int g0/0/1
[R7-GigabitEthernet0/0/1]ip add 172.16.97.1 24
[R7-GigabitEthernet0/0/1]int l0
[R7-LoopBack0]ip add 172.16.5.7 24

#R8配置
[R8]int g0/0/0
[R8-GigabitEthernet0/0/0]ip add 172.16.97.2 30
[R8-GigabitEthernet0/0/0]int g0/0/1
[R8-GigabitEthernet0/0/1]ip add 172.16.97.5 30
[R8-LoopBack0]ip add 172.16.98.8 24

#R9配置
[R9-GigabitEthernet0/0/0]ip add 172.16.97.6 30
[R9-GigabitEthernet0/0/0]int g0/0/1
[R9-GigabitEthernet0/0/1]ip add 172.16.129.9 24
[R9-GigabitEthernet0/0/1]int l0
[R9-LoopBack0]ip add 172.16.130.9 24

#R10配置
[R10]int l0
[R10-LoopBack0]ip add 172.16.131.10 24
[R10-LoopBack0]int g0/0/0
[R10-GigabitEthernet0/0/0]ip add 172.16.129.10 24

#R11配置
[R11]int g0/0/1
[R11-GigabitEthernet0/0/1]ip add 172.16.65.5 30
[R11-GigabitEthernet0/0/1]int g0/0/0
[R11-GigabitEthernet0/0/0]ip add 172.16.65.2 30
[R11-GigabitEthernet0/0/0]int l0
[R11-LoopBack0]ip add 172.16.66.11 24

#R12配置
[R12]int g0/0/0
[R12-GigabitEthernet0/0/0]ip add  172.16.65.6 30
[R12-LoopBack0]ip add 172.16.160.1 24
[R12-LoopBack1 ]ip add 172.16.161.1 24
MGRE配置:
#R3配置(R3为中心站点)
[R3]int Tunnel 0/0/0
[R3-Tunnel0/0/0]ip add 172.16.6.3 24
[R3-Tunnel0/0/0]tunnel-protocol p2mp
[R3-Tunnel0/0/0]tunnel-protocol gre p2mp
[R3-Tunnel0/0/0]source 34.0.0.3

#R5配置
[R5]int Tunnel 0/0/0
[R5-Tunnel0/0/0]ip add 172.16.6.5 24
[R5-Tunnel0/0/0]tunnel-protocol gre p2mp
[R5-Tunnel0/0/0]source Serial4/0/0

#R6配置
[R6]int Tunnel 0/0/0
[R6-Tunnel0/0/0]ip add 172.16.6.6 24
[R6-Tunnel0/0/0]tunnel-protocol gre p2mp
[R6-Tunnel0/0/0]source Serial4/0/0

#R7配置
[R7]int Tunnel 0/0/0
[R7-Tunnel0/0/0]ip add 172.16.6.7 24
[R7-Tunnel0/0/0]tunnel-protocol gre p2mp
[R7-Tunnel0/0/0]source GigabitEthernet 0/0/0


#NHRP的配置
#中心站点(R3)配置:
[R3]int Tunnel 0/0/0
[R3-Tunnel0/0/0]nhrp network-id 100

#R5配置
[R5]int Tunnel 0/0/0
[R5-Tunnel0/0/0]nhrp network-id 100
[R5-Tunnel0/0/0]nhrp entry 172.16.6.3 34.0.0.3 register

#R6配置
[R6]int Tunnel 0/0/0
[R6-Tunnel0/0/0]nhrp network-id 100
[R6-Tunnel0/0/0]nhrp entry 172.16.6.3 34.0.0.3 register

#R7配置
[R7]int Tunnel 0/0/0
[R7-Tunnel0/0/0]nhrp network-id 100
[R7-Tunnel0/0/0]nhrp entry 172.16.6.3 34.0.0.3 register

#指向R4的静态缺省
[R3]ip route-static 0.0.0.0 0 34.0.0.4
[R5]ip route-static 0.0.0.0 0 45.0.0.4
[R6]ip route-static 0.0.0.0 0 46.0.0.4
[R7]ip route-static 0.0.0.0 0 47.0.0.4
宣告隧道地址:
[R3]ospf 1
[R3-ospf-1]a 0
[R3-ospf-1-area-0.0.0.0]net 172.16.6.0 0.0.0.255

[R5]ospf 1
[R5-ospf-1]a 0
[R5-ospf-1-area-0.0.0.0]net 172.16.6.0 0.0.0.255

[R6]ospf 1
[R6-ospf-1]a 0
[R6-ospf-1-area-0.0.0.0]net 172.16.6.0 0.0.0.255

[R7]ospf 1
[R7-ospf-1]a 0
[R7-ospf-1-area-0.0.0.0]net 172.16.6.0 0.0.0.255
更改接口类型:
[R3]int Tunnel 0/0/0
[R3-Tunnel0/0/0]ospf network-type broadcast

[R5]int Tunnel 0/0/0
[R5-Tunnel0/0/0]ospf network-type broadcast

[R6]int Tunnel 0/0/0
[R6-Tunnel0/0/0]ospf network-type broadcast

[R7]int Tunnel 0/0/0
[R7-Tunnel0/0/0]ospf network-type broadcast
取消分支站点的被选举资格:
[R5-Tunnel0/0/0]ospf dr-priority 0
[R6-Tunnel0/0/0]ospf dr-priority 0
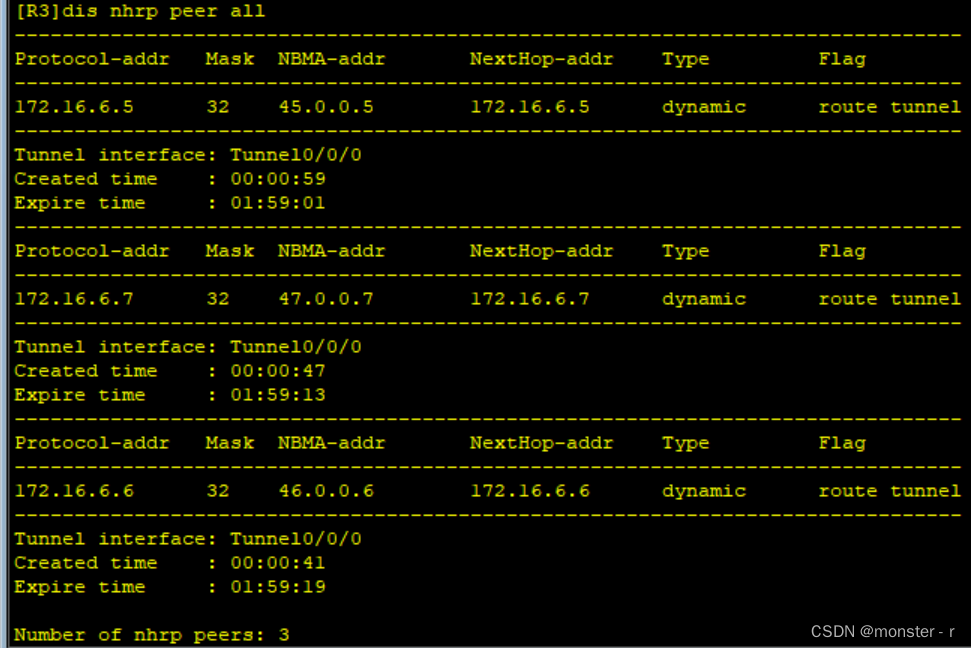
[R7-Tunnel0/0/0]ospf dr-priority 0查看中心站点NHRP表:
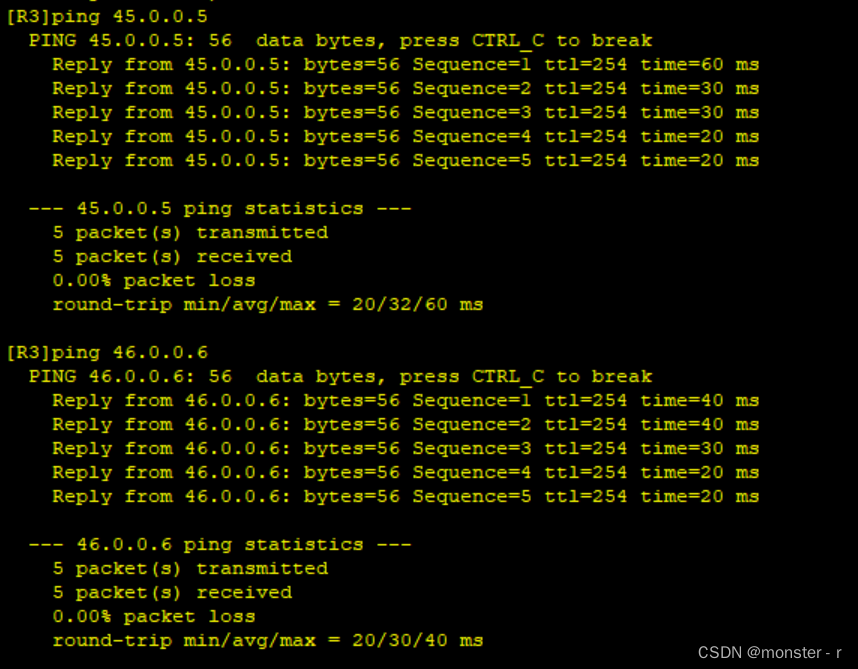
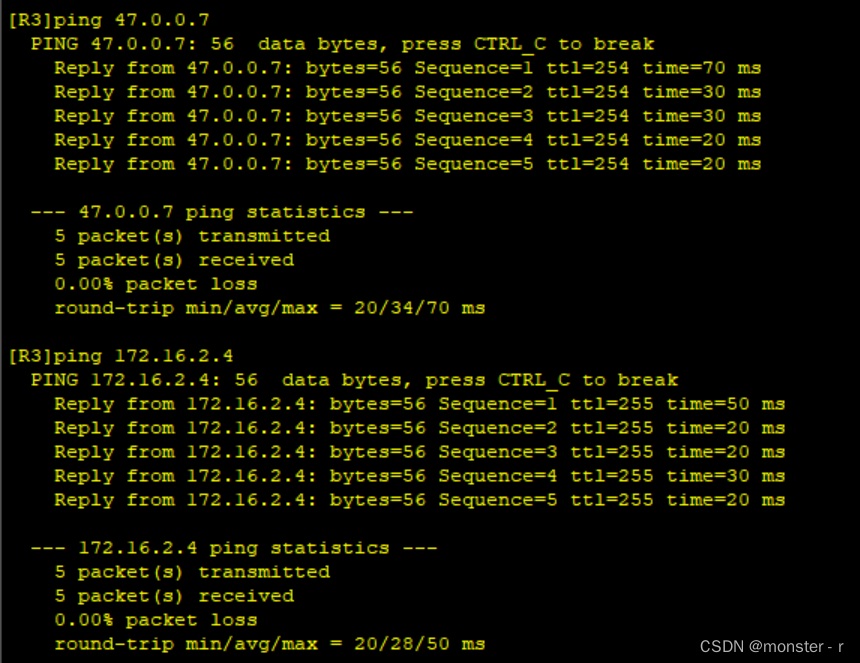
测试公网通:
RIP配置
[R12]rip 1
[R12-rip-1]v 2
[R12-rip-1]undo summary
[R12-rip-1]network 172.16.0.0

#R12中将域外路由引入域内
[R12-ospf-1]import-route rip
OSPF配置
area 1
[R1]ospf 1
[R1-ospf-1]ar
[R1-ospf-1]area 1
[R1-ospf-1-area-0.0.0.1]network 172.16.33.0 0.0.0.255
[R1-ospf-1-area-0.0.0.1]network 172.16.34.1 0.0.0.0

#R2配置
[R2]ospf 1
[R2-ospf-1]area 1
[R2-ospf-1-area-0.0.0.1]net 172.16.33.0 0.0.0.255
[R2-ospf-1-area-0.0.0.1]network 172.16.35.2 0.0.0.0

#R3配置
[R3]ospf 1
[R3-ospf-1]area 1
[R3-ospf-1-area-0.0.0.1]net 172.16.33.0 0.0.0.255
[R3-ospf-1-area-0.0.0.1]net 172.16.36.3 0.0.0.0
area 0
#R5配置
[R5]ospf 1 router-id 5.5.5.5
[R5-ospf-1]a 0
[R5-ospf-1-area-0.0.0.0]net 172.16.3.0 0.0.0.255

#R6配置
[R6]ospf 1 router-id 6.6.6.6
[R6-ospf-1]a 0
[R6-ospf-1-area-0.0.0.0]net 172.16.4.0 0.0.0.255

#R7配置
[R7]ospf 1 router-id 7.7.7.7
[R7-ospf-1]a 0
[R7-ospf-1-area-0.0.0.0]net 172.16.5.0 0.0.0.255
area 2
#R6配置
[R6-ospf-1]a 2
[R6-ospf-1-area-0.0.0.2]net 172.16.65.1 0.0.0.0

#R11配置
[R11-ospf-1]a 2
[R11-ospf-1-area-0.0.0.2]net 172.16.66.0 0.0.0.255
[R11-ospf-1-area-0.0.0.2]net 172.16.65.2 0.0.0.0
[R11-ospf-1-area-0.0.0.2]net 172.16.65.5 0.0.0.0

#R12配置
[R12]ospf 1 router-id 12.12.12.12
[R12-ospf-1]a 2
[R12-ospf-1-area-0.0.0.2]net 172.16.65.6 0.0.0.0
area 3
#R7配置
[R7-ospf-1]a 3
[R7-ospf-1-area-0.0.0.3]net 172.16.97.1 0.0.0.0

#R8配置
[R8]ospf 1 router-id 8.8.8.8
[R8-ospf-1]a 3
[R8-ospf-1-area-0.0.0.3]net 172.16.97.2 0.0.0.0
[R8-ospf-1-area-0.0.0.3]net 172.16.97.5 0.0.0.0
[R8-ospf-1-area-0.0.0.3]net 172.16.98.0 0.0.0.255

#R9配置


#R10配置
[R10-ospf-2-area-0.0.0.4]net 172.16.129.10 0.0.0.0
[R10-ospf-2-area-0.0.0.4]net 172.16.131.0 0.0.0.255
不同进程之间分别引入路由:
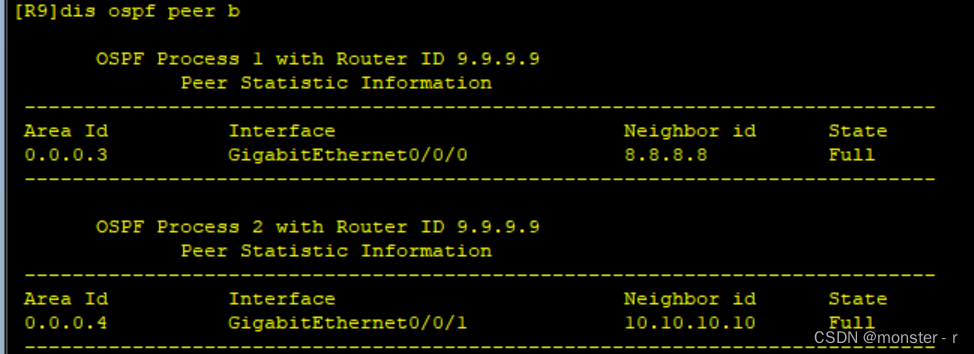
[R9-ospf-1]import-route ospf 2
[R9-ospf-1]q
[R9]ospf 2
[R9-ospf-2]import-route ospf 1
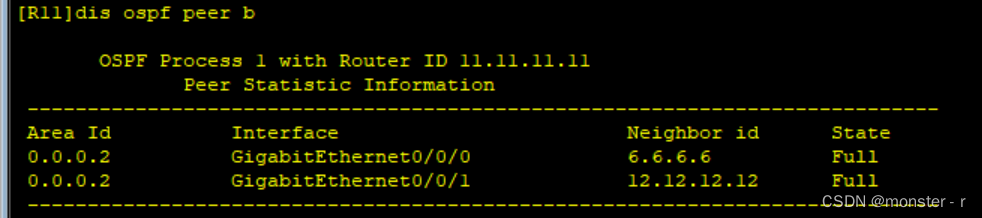
各私网建邻情况:
area 1

area 2
area 3
area 4

配置nat easy ip能够访问R4的环回
[R3]acl 2000
[R3-acl-basic-2000]rule permit source 172.16.0.0 0.0.255.255
[R3]int s 4/0/0
[R3-Serial4/0/0]nat outbound 2000

[R5]acl 2000
[R5-acl-basic-2000]rule permit source 172.16.0.0 0.0.255.255
[R5]int s 4/0/0
[R5-Serial4/0/0]nat outbound 2000

[R6]acl 2000
[R6-acl-basic-2000]rule permit source 172.16.0.0 0.0.255.255
[R6]int s 4/0/0
[R6-Serial4/0/0]nat outbound 2000

[R7]acl 2000
[R7-acl-basic-2000]rule permit source 172.16.0.0 0.0.255.255
[R7]int g0/0/0
[R7-GigabitEthernet0/0/0]nat outbound 2000
私网的ip还是不能够访问公网上R4的环回地址 ,因为公网口的地址并没有宣告进私网(这里需要下发一条默认缺省让其他路由器能够访问公网口----在配置特殊区域后会自动下发默认缺省)
路由聚合
ABR汇总:
area 1
[R3]ospf 1
[R3-ospf-1]a 1
[R3-ospf-1-area-0.0.0.1]abr-summary 172.16.32.0 255.255.224.0

area 2
[R6]ospf 1
[R6-ospf-1]a 2
[R6-ospf-1-area-0.0.0.2]abr-summary 172.16.64.0 255.255.224.0

area 3
[R7]ospf 1
[R7-ospf-1]a 3
[R7-ospf-1-area-0.0.0.3]abr-summary 172.16.96.0 255.255.224.0
ASBR汇总:
[R12]ospf 1
[R12-ospf-1]asbr-summary 172.16.160.0 255.255.224.0

[R9]ospf 1
[R9-ospf-1]asbr-summary 172.16.128.0 255.255.224.0
配置特殊区域
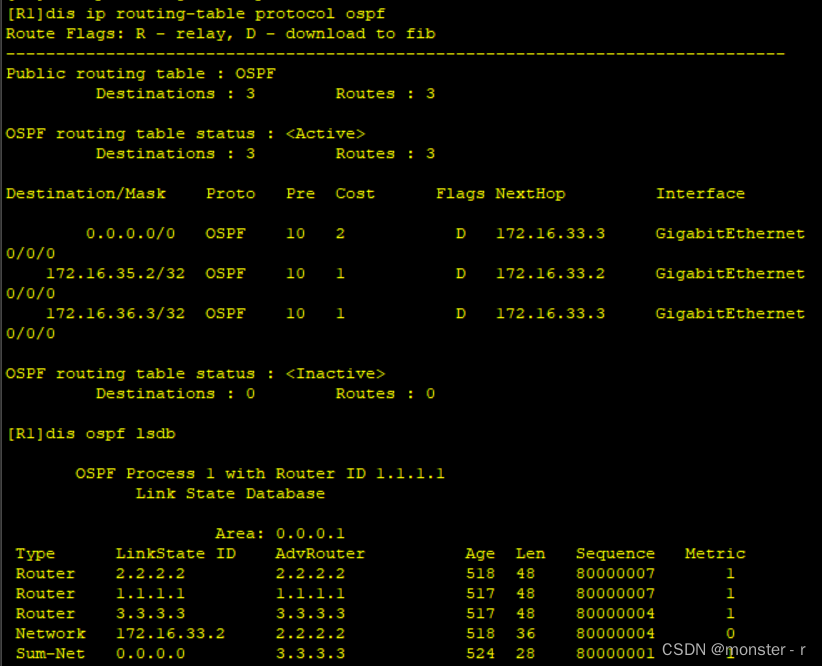
area 1配置为totally stub
[R3]ospf 1
[R3-ospf-1]a 1
[R3-ospf-1-area-0.0.0.1]stub no-summary

[R1]ospf 1
[R1-ospf-1]a 1
[R1-ospf-1-area-0.0.0.1]stub no-summary

[R2]ospf 1
[R2-ospf-1]a 1
[R2-ospf-1-area-0.0.0.1]stub no-summary
设置后的路由表和lsdb表:
area 2配置为totally nssa
[R6]ospf 1
[R6-ospf-1]a 2
[R6-ospf-1-area-0.0.0.2]nssa no-summary

[R11]ospf 1
[R11-ospf-1]a 2
[R11-ospf-1-area-0.0.0.2]nssa no-summary

[R12]ospf 1
[R12-ospf-1]a 2
[R12-ospf-1-area-0.0.0.2]nssa no-summary 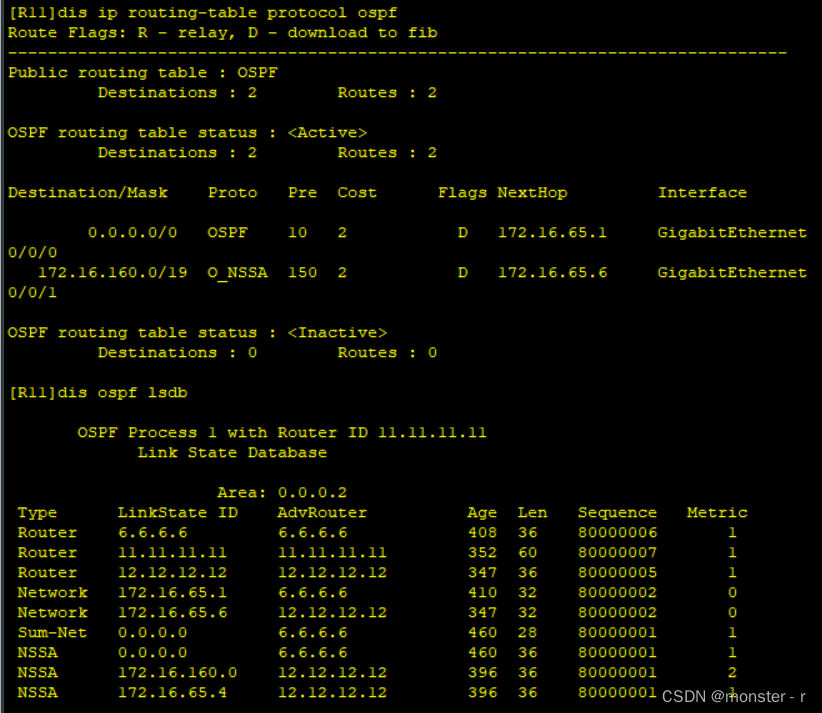
area 3配置为totally nssa
[R7]ospf 1
[R7-ospf-1]a 3
[R7-ospf-1-area-0.0.0.3]nssa no-summary

[R8]ospf 1
[R8-ospf-1]a 3
[R8-ospf-1-area-0.0.0.3]nssa no-summary

[R9]ospf 1
[R9-ospf-1]a 3
[R9-ospf-1-area-0.0.0.3]nssa no-summary 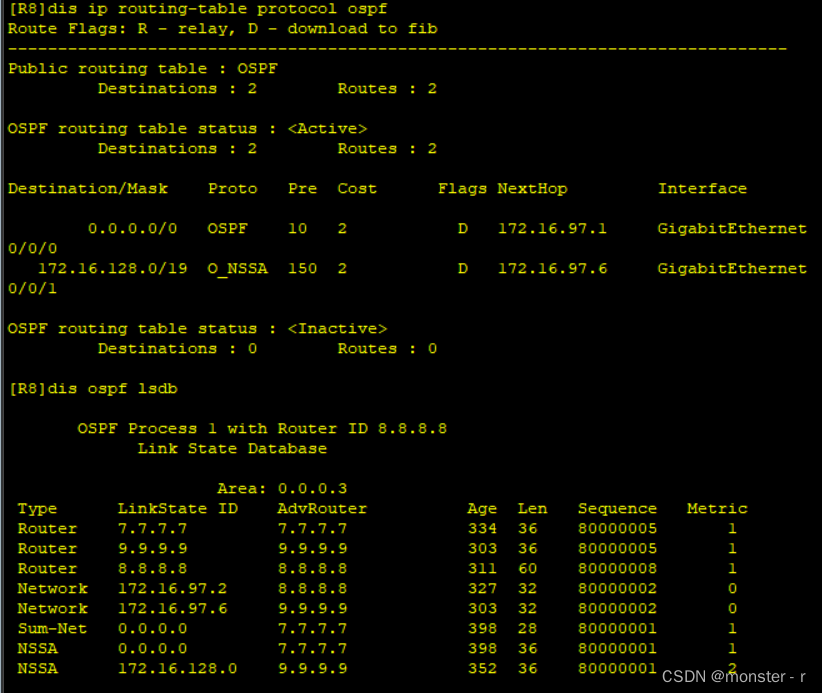
各个区域都依靠缺省路由去访问公网,R10无法学习到其他的路由而导致其无法访问公网
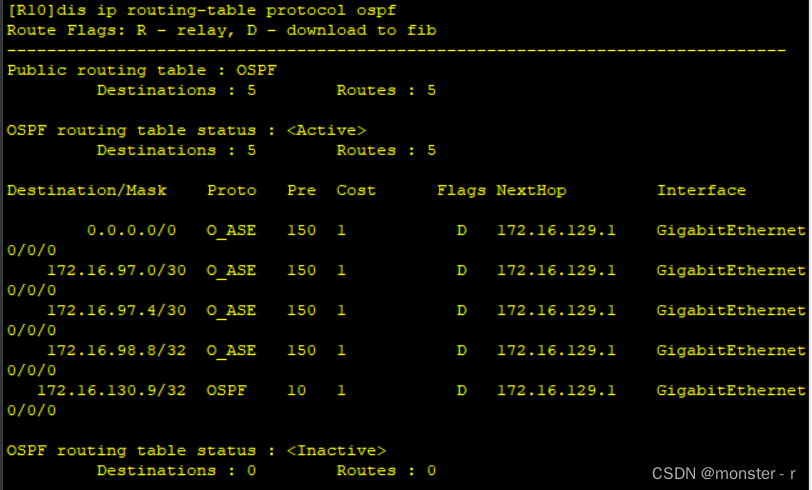
在R9上面给R10下发一条默认缺省:
[R9]ospf 2
[R9-ospf-2]default-route-advertise
从这里看到有一条默认缺省指向R9
加快收敛(修改hello时间或是修改death时间,一般情况修改hello时间,这里以修改hello时间为例)
area 0:
[R3]int t0/0/0
[R3-Tunnel0/0/0]ospf timer hello 5

[R5]int t0/0/0
[R5-Tunnel0/0/0]ospf timer hello 5

[R6]int t0/0/0
[R6-Tunnel0/0/0]ospf timer hello 5

[R7]int t0/0/0
[R7-Tunnel0/0/0]ospf timer hello 5
area 1:
[R1]int g0/0/0
[R1-GigabitEthernet0/0/0]ospf timer hello 5

[R2]int g0/0/0
[R3-GigabitEthernet0/0/0]ospf timer hello 5

[R3]int g0/0/0
[R3-GigabitEthernet0/0/0]ospf timer hello 5
area 2:
[R6]int g0/0/0
[R6-GigabitEthernet0/0/0]ospf timer hello 5

[R11]int g0/0/0
[R11-GigabitEthernet0/0/0]ospf timer hello 5
[R11]int g0/0/1
[R11-GigabitEthernet0/0/1]ospf timer hello 5

[R12]int g0/0/0
[R12-GigabitEthernet0/0/0]ospf timer hello 5
area 3:
[R7]int g0/0/1
[R7-GigabitEthernet0/0/1]ospf timer hello 5

[R8]int g0/0/0
[R8-GigabitEthernet0/0/0]ospf timer hello 5
[R8]int g0/0/1
[R8-GigabitEthernet0/0/1]ospf timer hello 5

[R9]int g0/0/0
[R9-GigabitEthernet0/0/0]ospf timer hello 5
area 4:
[R9]int g0/0/1
[R9-GigabitEthernet0/0/1]ospf timer hello 5

[R10]int g0/0/0
[R10-GigabitEthernet0/0/0]ospf timer hello 5
配置认证保证安全(在ospf下做区域验证或是接口验证,这里以区域验证为例)
area 0:
[R3]ospf 1
[R3-ospf-1]a 0
[R3-ospf-1-area-0.0.0.0]authentication-mode md5 1 cipher 123

[R5]ospf 1
[R5-ospf-1]a 0
[R5-ospf-1-area-0.0.0.0]authentication-mode md5 1 cipher 123

[R7]ospf 1
[R7-ospf-1]a 0
[R7-ospf-1-area-0.0.0.0]authentication-mode md5 1 cipher 123

[R6]ospf 1
[R6-ospf-1]a 0
[R6-ospf-1-area-0.0.0.0]authentication-mode md5 1 cipher 123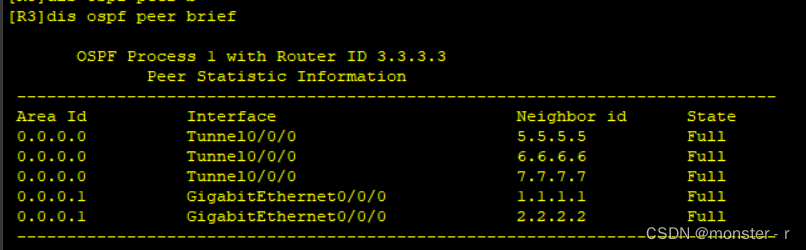
area 1:
[R3]ospf 1
[R3-ospf-1]a 1
[R3-ospf-1-area-0.0.0.1]authentication-mode md5 1 cipher 123

[R1]ospf 1
[R1-ospf-1]a 1
[R1-ospf-1-area-0.0.0.1]authentication-mode md5 1 cipher 123

[R2]ospf 1
[R2-ospf-1]a 1
[R2-ospf-1-area-0.0.0.1]authentication-mode md5 1 cipher 123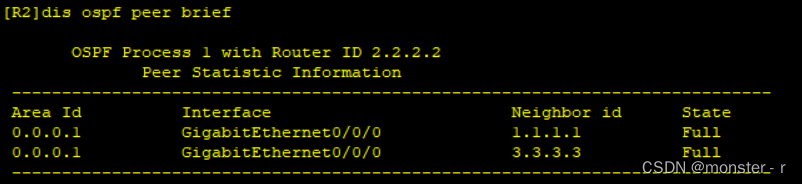
area 2:
[R6]ospf 1
[R6-ospf-1]a 2
[R6-ospf-1-area-0.0.0.2]authentication-mode md5 1 cipher 123

[R11]ospf 1
[R11-ospf-1]a 2
[R11-ospf-1-area-0.0.0.2]authentication-mode md5 1 cipher 123

[R12]ospf 1
[R12-ospf-1]a 2
[R12-ospf-1-area-0.0.0.2]authentication-mode md5 1 cipher 123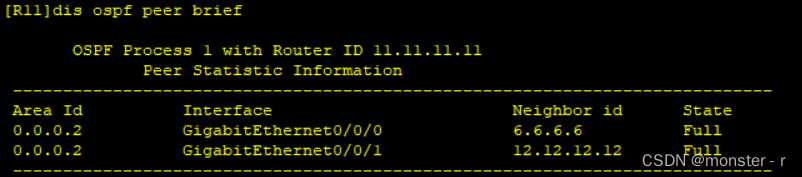
area 3:
[R7]ospf 1
[R7-ospf-1]a 3
[R7-ospf-1-area-0.0.0.3]authentication-mode md5 1 cipher 123

[R8]ospf 1
[R8-ospf-1]a 3
[R8-ospf-1-area-0.0.0.3]authentication-mode md5 1 cipher 123

[R9]ospf 1
[R9-ospf-1]a 3
[R9-ospf-1-area-0.0.0.3]authentication-mode md5 1 cipher 123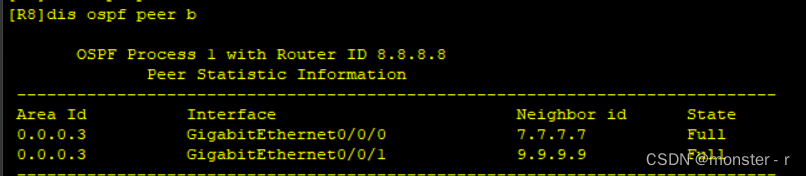
area 4:
[R9]ospf 2
[R9-ospf-2]a 4
[R9-ospf-2-area-0.0.0.4]authentication-mode md5 1 cipher 123

[R10]ospf 2
[R10-ospf-2]a 4
[R10-ospf-2-area-0.0.0.4]authentication-mode md5 1 cipher 123


![[AI OpenAI-doc] 微调](https://img-blog.csdnimg.cn/direct/643695ab775c4aa49e8347592ffaada6.png)


![[C语言]数据的存储_数据类型:整形存储和大小端](https://img-blog.csdnimg.cn/direct/d3166bc06e9b41a8860259edb4e3b60a.png)