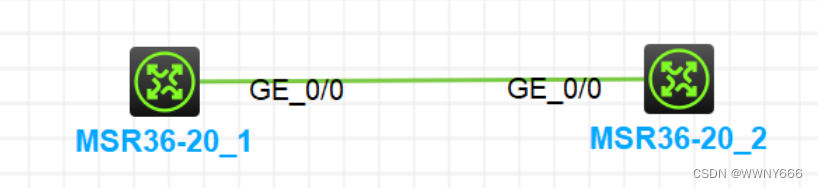
实验拓扑
实验需求
1、配置IP地址,R1的g0/0口是1.1.1.1/24 ,R2的g0/0口是1.1.1.2/24
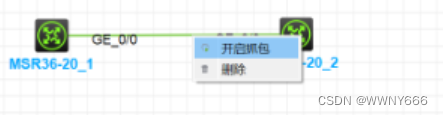
2、在该链路上开启抓包
3、在R1上ping R2
4、开启wireshark,查看抓取的ping包的内容
5、在R2上开启ftp服务
6、在R1上访问R2的FTP
7、在wireshark查看抓取的FTP的登录名和密码
实验解法
为r1配置IP
<H3C>sys
System View: return to User View with Ctrl+Z.
[H3C]sysname r1
[r1]int g0/0
[r1-GigabitEthernet0/0]ip ad
[r1-GigabitEthernet0/0]ip address  1.1.1.1 24
[r1-GigabitEthernet0/0]qu
[r1]di ip in b
*down: administratively down
(s): spoofing  (l): loopback
Interface           Physical Protocol IP address/Mask    VPN instance Description
GE0/0               up       up       1.1.1.1/24         --           --
为r2配置IP
<H3C>sys
System View: return to User View with Ctrl+Z.
[H3C]sysname r2
[r2]int g0/0
[r2-GigabitEthernet0/0]ip ad
[r2-GigabitEthernet0/0]ip address  1.1.1.2 24
[r2-GigabitEthernet0/0]qu
[r2]di ip in b
*down: administratively down
(s): spoofing  (l): loopback
Interface           Physical Protocol IP address/Mask    VPN instance Description
GE0/0               up       up       1.1.1.2/24         --           --
[r2]ping 1.1.1.1
Ping 1.1.1.1 (1.1.1.1): 56 data bytes, press CTRL+C to break
56 bytes from 1.1.1.1: icmp_seq=0 ttl=255 time=1.091 ms
56 bytes from 1.1.1.1: icmp_seq=1 ttl=255 time=0.751 ms
56 bytes from 1.1.1.1: icmp_seq=2 ttl=255 time=0.755 ms
56 bytes from 1.1.1.1: icmp_seq=3 ttl=255 time=0.793 ms
56 bytes from 1.1.1.1: icmp_seq=4 ttl=255 time=0.770 ms
开启抓包
启动Wireshark

随后用R1 ping R2
[r1]ping  -c 1000 1.1.1.2   //-c 指定ping 次数
Ping 1.1.1.2 (1.1.1.2): 56 data bytes, press CTRL+C to break
56 bytes from 1.1.1.2: icmp_seq=0 ttl=255 time=1.203 ms
56 bytes from 1.1.1.2: icmp_seq=1 ttl=255 time=0.591 ms
56 bytes from 1.1.1.2: icmp_seq=2 ttl=255 time=1.021 ms
56 bytes from 1.1.1.2: icmp_seq=3 ttl=255 time=0.765 ms
56 bytes from 1.1.1.2: icmp_seq=4 ttl=255 time=0.726 ms
56 bytes from 1.1.1.2: icmp_seq=5 ttl=255 time=1.223 ms
56 bytes from 1.1.1.2: icmp_seq=6 ttl=255 time=0.908 ms
56 bytes from 1.1.1.2: icmp_seq=7 ttl=255 time=0.859 ms
然后可以在Wireshark中看到抓到的数据包

双击某个ping包,查看数据包详细内容、展开internet protocol ,可以查看到详细信息

在R2上开启FTP 服务,创建用户abc,密码123456789A
[r2]ftp server enable
[r2]loc
[r2]local-us
[r2]local-user abc cl
[r2]local-user abc class man
[r2]local-user abc class manage
New local user added.
[r2-luser-manage-abc]password simple 123456789A
[r2-luser-manage-abc]authorization-attribute user-role level-15
[r2-luser-manage-abc]service-type ftp
使用R1登录FTP服务器
<r1>ftp 1.1.1.2
Press CTRL+C to abort.
Connected to 1.1.1.2 (1.1.1.2).
220 FTP service ready.
User (1.1.1.2:(none)): abc
331 Password required for abc.
Password:
230 User logged in.
Remote system type is UNIX.
Using binary mode to transfer files.
ftp>
回到Wireshark 查看已经抓取到了用户名和密码