注意:本文不仅含有SpringBoot中常见的注解,还有其它框架的注解。因为注解之间会相互配合使用,所以每一个注解的示例与其他的注解都会有部分相似,请选择查看。
文章目录
-
- 01、@SpringBootApplication
- 02、@Configuration
- 03、@EnableAutoConfiguration
- 04、@ComponentScan
- 05、@RestController
- 06、@Controller、@Service和@Repository
- 07、@Component
- 08、@Value
- 09、@Autowired
- 10、@Qualifer
- 11、@Resource
- 12、@Bean
- 13、@ImportResource
- 14、@PropertySource
- 15、@RequestBody和@ResponseBody
- 16、@ControllerAdvice和@ExceptionHandler
- 17、@Transcational
- 18、@MapperScan、@Mapper和@Param
01、@SpringBootApplication
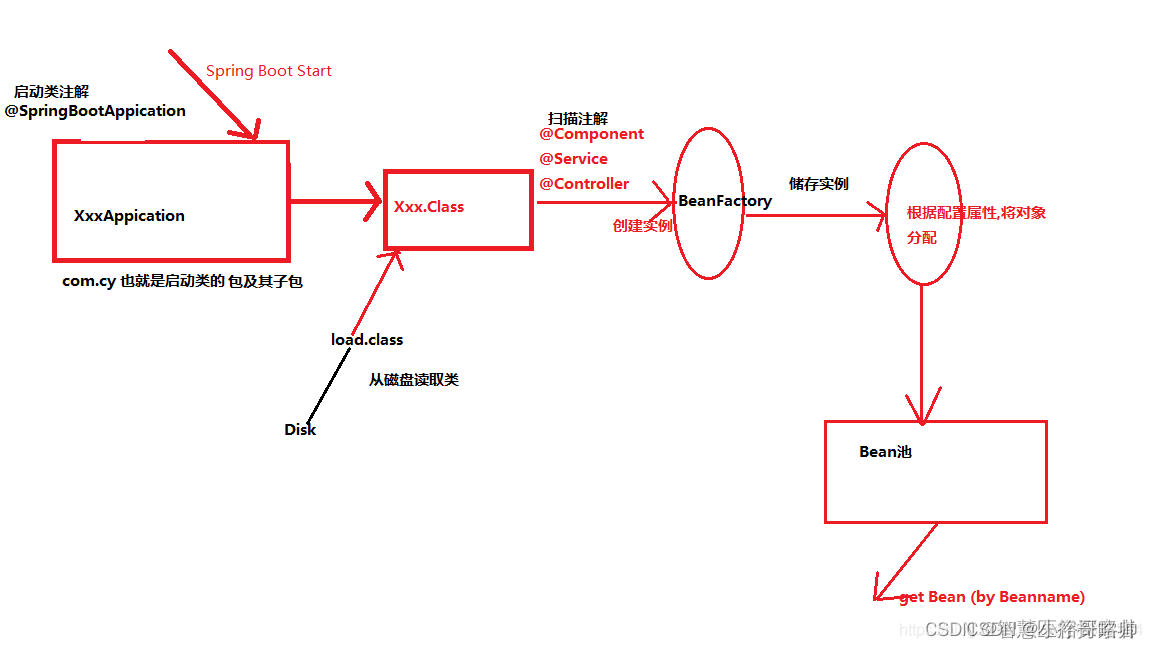
@SpringBootApplication注解是Spring Boot的核心注解之一,用于启动Spring Boot应用程序。这个注解实际上是一个组合注解,它包含了多个常用注解的功能,主要包括@Configuration、@EnableAutoConfiguration和@ComponentScan。
当使用 @SpringBootApplication 注解时,通常会在Spring Boot应用程序的主类上添加这个注解。下面是一个简单的Spring Boot应用程序实例,其中使用了 @SpringBootApplication 注解:
import org.springframework.boot.SpringApplication;
import org.springframework.boot.autoconfigure.SpringBootApplication;

@SpringBootApplication
public class DemoApplication {
    public static void main(String[] args) {
        SpringApplication.run(DemoApplication.class, args);
    }
}
在这个例子中,DemoApplication类被标记为@SpringBootApplication,这意味着:
- 既是一个配置类(@Configuration)。
- 又启用了自动配置(@EnableAutoConfiguration)。
- 指定了组件扫描的路径(@ComponentScan,尽管路径是默认的,即当前包及其子包)。
当你运行main方法时,Spring Boot会自动配置你的应用程序,并启动嵌入式的Web服务器(如果你在pom.xml中包含了Web相关的依赖)。
此外,Spring Boot会根据你的类路径、jar依赖等因素自动配置应用程序。例如,如果在类路径下检测到特定的库(如Spring MVC或Hibernate),Spring Boot会自动配置这些库,并创建必要的Bean。
02、@Configuration
@Configuration注解声明当前类是一个配置类,Spring会自动扫描到添加了@Configuration的类,并读取其中的配置信息。
@Configuration 注解在 Spring 框架中用于指示一个类声明了一个或多个 @Bean 方法,并且这个类可以被 Spring 容器处理,用于生成 Bean 定义和服务请求。
下面是一个简单的例子,展示如何使用 @Configuration 注解来定义 Spring 配置类:
package com.example.demo.config;

import org.springframework.context.annotation.Bean;
import org.springframework.context.annotation.Configuration;

@Configuration
public class AppConfig {

    @Bean
    public MyService myService() {
        return new MyServiceImpl();
    }

    // 可以定义更多的 @Bean 方法来创建其他的 Bean

    // 假设我们有一个 MyService 接口和一个实现类 MyServiceImpl
    interface MyService {
        void doSomething();
    }

    static class MyServiceImpl implements MyService {
        @Override
        public void doSomething() {
            System.out.println("Doing something in MyServiceImpl");
        }
    }
}
在这个例子中,AppConfig 类被标记为 @Configuration,意味着它定义了一个或多个 Bean。myService 方法使用 @Bean 注解进行标记,这告诉 Spring 容器在需要 MyService 类型的 Bean 时,应该调用这个方法并返回其实例。
当你运行 Spring Boot 应用程序时,Spring 容器会自动发现并处理这个配置类,并将 myService 方法返回的 MyServiceImpl 实例注册为一个 Bean,这样你就可以在其他地方通过 @Autowired 或其他注入机制来引用它。
需要注意的是,在 Spring Boot 应用程序中,通常使用 @SpringBootApplication 注解来代替 @Configuration、@EnableAutoConfiguration 和 @ComponentScan 这三个注解的组合。但在某些复杂的场景中,你可能需要更细粒度的控制,此时可以直接使用 @Configuration 注解来定义你的配置类。
此外,确保你的 Spring Boot 应用程序能够扫描到这个配置类。如果你使用的是 @SpringBootApplication,那么通常这个注解会自动处理组件扫描,但如果你使用的是纯 Spring 配置,你可能需要在 @Configuration 类上使用 @ComponentScan 注解来指定扫描的包路径。
03、@EnableAutoConfiguration
@EnableAutoConfiguration注解在 Spring Boot 中用于启用自动配置功能。它告诉 Spring Boot 根据添加的 jar 依赖自动配置你的 Spring 应用程序。Spring Boot 会检查类路径中的 jar 文件、可用的属性设置,以及其他因素,然后基于这些因素自动配置你的应用程序。这样可以大大减少手动配置的工作量,并加快应用程序的开发速度。
下面是一个简单的例子,展示了如何使用 @EnableAutoConfiguration 注解:
package com.example.demo;

import org.springframework.boot.SpringApplication;
import org.springframework.boot.autoconfigure.EnableAutoConfiguration;
import org.springframework.context.annotation.ComponentScan;
import org.springframework.context.annotation.Configuration;

@Configuration
@EnableAutoConfiguration
@ComponentScan(basePackages = "com.example.demo")
public class DemoApplication {

    public static void main(String[] args) {
        SpringApplication.run(DemoApplication.class, args);
    }

}
在这个例子中,DemoApplication 类上使用了 @Configuration、@EnableAutoConfiguration 和 @ComponentScan 注解。
@Configuration注解表明该类是一个配置类,用于定义 Bean。@EnableAutoConfiguration注解告诉 Spring Boot 开启自动配置功能。这意味着 Spring Boot 会根据类路径中的依赖项自动配置你的应用程序。例如,如果你添加了spring-boot-starter-web依赖,Spring Boot 会自动配置嵌入式的 Tomcat 服务器、Spring MVC 等。@ComponentScan注解指定了 Spring 应该扫描哪个包以查找组件、配置和服务。在这个例子中,它会扫描com.example.demo包及其子包。
当运行 main 方法时,Spring Boot 会自动配置你的应用程序,并启动它。如果应用程序中包含了 spring-boot-starter-web 依赖,Spring Boot 会自动配置一个嵌入式的 Tomcat 服务器,并且你可以创建 Controller 来处理 HTTP 请求。
需要注意的是,在大多数情况下,你不需要直接使用 @EnableAutoConfiguration 注解,因为 @SpringBootApplication 注解已经包含了它。@SpringBootApplication 是一个复合注解,它包括了 @Configuration、@EnableAutoConfiguration 和 @ComponentScan,因此在实际应用中,你通常会直接使用 @SpringBootApplication 注解。
04、@ComponentScan
@ComponentScan注解在Spring框架中扮演着至关重要的角色。它主要用于扫描指定包(包括子包)中的类,并将标记有@Controller、@Service、@Repository和@Component注解的类自动注册为Spring容器管理的Bean。
当你在配置类上使用@ComponentScan注解时,Spring会根据你提供的扫描路径(通过basePackages属性指定)来查找这些组件,并将它们加入到应用上下文中,由Spring容器统一进行管理。这意味着你可以通过依赖注入(如@Autowired)在其他部分的代码中引用这些组件。
此外,@ComponentScan注解还有一些其他属性,如basePackageClasses和value,它们也可以用来指定扫描的包。这些属性提供了更多的灵活性,让你能够根据需要来配置组件扫描。
具体示例在03标题位置。
@ComponentScan注解是Spring框架中实现自动装配和依赖注入的关键部分。@ComponentScan注解通常与@Configuration注解一起使用,后者用于定义Bean的配置信息。
在Spring Boot应用程序中,@SpringBootApplication注解实际上已经包含了@ComponentScan的功能,因此大多数情况下你不需要显式地使用@ComponentScan。但在某些复杂的场景中,你可能需要更细粒度的控制,此时可以直接使用@ComponentScan注解来定制你的组件扫描行为。
05、@RestController
@RestController是 Spring MVC 提供的一个特殊控制器注解,它是@Controller和@ResponseBody的组合注解。当类上标注@RestController注解后,这个类中的所有方法都会默认添加@ResponseBody注解,这意味着该类中的所有方法的返回值都会自动地转换为 JSON 或 XML 格式的响应体数据,具体取决于客户端的请求头中的Accept字段和服务器上配置的消息转换器。
@RestController 注解使得开发 RESTful Web 服务变得更加简洁和方便,因为它自动处理了返回值到响应体的转换。
下面是一个使用 @RestController 注解的简单示例:
package com.example.demo.controller;

import org.springframework.web.bind.annotation.GetMapping;
import org.springframework.web.bind.annotation.RestController;

@RestController
public class HelloWorldController {

    @GetMapping("/hello")
    public String hello() {
        return "Hello, World!";
    }

    @GetMapping("/greet/{name}")
    public String greet(String name) {
        return "Hello, " + name + "!";
    }
}
在这个例子中,HelloWorldController 类被标记为 @RestController,这意味着它的所有方法都会返回响应体数据而不是视图名称。
hello方法映射到/hello路径,当访问这个路径时,它会返回一个简单的字符串"Hello, World!"作为响应体。greet方法映射到/greet/{name}路径,它接受一个路径变量name,并返回一个包含该变量值的问候字符串作为响应体。
当你运行 Spring Boot 应用程序并访问 http://localhost:8080/hello 时,你会看到返回的响应体是 "Hello, World!"。同样地,访问 http://localhost:8080/greet/John 会返回 "Hello, John!"。
需要注意的是,在 Spring Boot 应用程序中,你通常不需要显式配置消息转换器,因为 Spring Boot 会自动配置常用的消息转换器,如 MappingJackson2HttpMessageConverter 用于处理 JSON 格式的数据。如果你的项目依赖中包含了 Jackson 库,那么 Spring Boot 就会使用它来处理 JSON 转换。
06、@Controller、@Service和@Repository
在Spring框架中,
@Controller、@Service和@Repository这三个注解分别用于标记不同类型的组件,并在Spring容器中管理这些组件。这些注解都是Spring的立体注解(stereotype annotations),用于指示Spring如何创建和管理对象。
@Controller用于标记MVC控制器类。它通常处理来自用户的请求并返回视图名称或响应体数据。@Service用于标记业务逻辑层的服务类。它通常包含具体的业务逻辑实现。@Repository用于标记数据访问层的组件,通常用于实现数据访问对象(DAO)或数据仓库的接口。
下面是一个简单的示例,展示了如何在一个Spring Boot项目中结合使用这三个注解:
首先,定义一个简单的User实体类:
package com.example.demo.model;

public class User {
    private Long id;
    private String name;
    private String email;

    // 构造方法、getter和setter省略
}
接着,创建一个UserRepository接口,用于数据访问:
package com.example.demo.repository;

import com.example.demo.model.User;
import org.springframework.data.jpa.repository.JpaRepository;
import org.springframework.stereotype.Repository;

@Repository
public interface UserRepository extends JpaRepository<User, Long> {
    // 可以定义自定义的查询方法
}
然后,创建一个UserService类,用于封装业务逻辑:
package com.example.demo.service;

import com.example.demo.model.User;
import com.example.demo.repository.UserRepository;
import org.springframework.beans.factory.annotation.Autowired;
import org.springframework.stereotype.Service;

import java.util.List;

@Service
public class UserService {

    private final UserRepository userRepository;

    @Autowired
    public UserService(UserRepository userRepository) {
        this.userRepository = userRepository;
    }

    public List<User> getAllUsers() {
        return userRepository.findAll();
    }

    // 可以添加更多的业务方法
}
最后,创建一个UserController类,用于处理HTTP请求:
package com.example.demo.controller;

import com.example.demo.model.User;
import com.example.demo.service.UserService;
import org.springframework.beans.factory.annotation.Autowired;
import org.springframework.stereotype.Controller;
import org.springframework.ui.Model;
import org.springframework.web.bind.annotation.GetMapping;

import java.util.List;

@Controller
public class UserController {

    private final UserService userService;

    @Autowired
    public UserController(UserService userService) {
        this.userService = userService;
    }

    @GetMapping("/users")
    public String getAllUsers(Model model) {
        List<User> users = userService.getAllUsers();
        model.addAttribute("users", users);
        return "users"; // 返回视图名称
    }
}
在这个例子中:
UserRepository通过@Repository注解标记为数据访问层的组件。UserService通过@Service注解标记为业务逻辑层的组件,并依赖注入UserRepository来处理数据访问。UserController通过@Controller注解标记为MVC控制器,处理/users路径的GET请求,并调用UserService来获取用户列表。然后,它将用户列表添加到模型中,并返回视图名称"users",以便视图解析器可以渲染相应的视图。
需要注意的是,这个示例假设你正在使用Spring Boot和Spring Data JPA,它们会自动配置许多组件,包括视图解析器(如果你使用的是Thymeleaf或JSP)和JPA实体管理器。在实际项目中,你可能还需要配置数据库连接、事务管理等。此外,视图文件(例如users.html)需要放在适当的目录下,以便视图解析器能够找到并渲染它们。
07、@Component
@Component是 Spring 框架中的一个核心注解,用于标记一个类作为 Spring 组件。当类上标注了@Component注解后,Spring 容器会扫描到该类,并将其作为 bean 实例化、组装和管理。@Component是所有 Spring 管理的组件的通用注解,它实际上是一个泛化的概念,可以用在任何层次上,包括 DAO、Service、Controller 等。
@Component 注解的作用主要有以下几点:
- 自动装配:Spring 容器会自动检测使用
@Component注解的类,并将其实例化为一个 bean,然后将其加入到 Spring 容器中。这样,其他需要使用这个 bean 的地方就可以通过自动装配(如@Autowired)来引用它。 - 组件扫描:Spring 可以通过配置组件扫描(component scanning)来自动发现带有
@Component注解的类。这通常通过在配置类上使用@ComponentScan注解来实现,或者通过 XML 配置来指定扫描的包路径。 - 泛化概念:
@Component是一个泛化的概念,其他几个常见的立体注解(stereotype annotations)如@Repository、@Service和@Controller实际上是@Component的特化(specializations)。这意味着,虽然可以直接使用@Component注解在任何组件上,但为了更好的语义化和代码的可读性,通常我们会根据组件的类型选择使用更具体的注解。 - 与 AOP 集成:Spring AOP(面向切面编程)可以基于
@Component注解的类进行代理,从而实现诸如事务管理、日志记录等横切关注点。 - 配置简化:使用
@Component可以减少 XML 配置的使用,使得 Spring 配置更加简洁和灵活。
下面是一个简单的 @Component 示例:
package com.example.demo.component;

import org.springframework.stereotype.Component;

@Component
public class MyComponent {
    // 类的属性和方法
}
在这个例子中,MyComponent 类被标记为 @Component,因此 Spring 容器会将其识别为一个 bean,并在应用启动时实例化它。其他需要引用 MyComponent 的类可以通过自动装配来注入它。
需要注意的是,虽然 @Component 可以用于任何类型的组件,但为了更好的代码组织和可读性,通常我们会根据组件的职责选择使用更具体的注解,如 @Repository 用于数据访问组件,@Service 用于业务逻辑组件,@Controller 用于 MVC 控制器组件。
08、@Value
@Value是 Spring 框架中的一个注解,用于注入属性值到 bean 的字段或方法中。它通常与 Spring 的表达式语言(SpEL)一起使用,允许你注入各种类型的值,如字符串、数字、布尔值、系统属性、环境变量、配置文件中的属性等。
@Value 注解的主要作用包括:
- 注入配置属性值:允许你直接从配置文件中注入属性值到 Spring 管理的 bean 中。
- 使用 SpEL 表达式:支持 Spring 表达式语言,可以执行复杂的表达式计算。
- 简化配置:减少 XML 配置的使用,使配置更加简洁和灵活。
下面是一个简单的示例,展示了如何使用 @Value 注解来注入属性值:
首先,假设你有一个 application.properties 或 application.yml 配置文件,其中包含一些属性定义:
# application.properties
app.name=MySpringApp
app.version=1.0.0
或者如果你使用的是 YAML 格式的配置文件:
# application.yml
app:
  name: MySpringApp
  version: 1.0.0
然后,你可以创建一个简单的 Java 类,并使用 @Value 注解来注入这些属性值:
package com.example.demo.component;

import org.springframework.beans.factory.annotation.Value;
import org.springframework.stereotype.Component;

@Component
public class AppProperties {

    @Value("${app.name}")
    private String name;

    @Value("${app.version}")
    private String version;

    // 构造方法、getter和setter省略

    @Override
    public String toString() {
        return "AppProperties{" +
                "name='" + name + '\'' +
                ", version='" + version + '\'' +
                '}';
    }
}
在这个例子中,AppProperties 类中的 name 和 version 字段被 @Value 注解标记,Spring 容器会将这些字段的值分别设置为配置文件中 app.name 和 app.version 的值。
为了使用这个 AppProperties 类,你可以在其他的 Spring 组件中通过自动装配来注入它:
package com.example.demo.controller;

import com.example.demo.component.AppProperties;
import org.springframework.beans.factory.annotation.Autowired;
import org.springframework.stereotype.Controller;
import org.springframework.web.bind.annotation.GetMapping;
import org.springframework.web.bind.annotation.ResponseBody;

@Controller
public class AppController {

    private final AppProperties appProperties;

    @Autowired
    public AppController(AppProperties appProperties) {
        this.appProperties = appProperties;
    }

    @GetMapping("/app-info")
    @ResponseBody
    public String getAppInfo() {
        return "App Name: " + appProperties.getName() + ", App Version: " + appProperties.getVersion();
    }
}
在这个 AppController 类中,我们通过 @Autowired 注解自动装配了 AppProperties 类的实例。然后,在 getAppInfo 方法中,我们可以使用 appProperties 来访问配置文件中注入的属性值,并将其作为响应返回给客户端。
需要注意的是,为了使 @Value 注解能够正常工作,你需要确保 Spring 容器能够扫描到包含 @Value 注解的类,并且配置文件(如 application.properties 或 application.yml)应该放在正确的位置,以便 Spring Boot 能够自动加载它们。
09、@Autowired
@Autowired 是 Spring 框架提供的一个注解,用于自动装配 bean。它的主要作用是简化 Spring 配置,自动将依赖注入到需要它的类中。通过 @Autowired,你可以省略繁琐的 XML 配置,使代码更加清晰和简洁。
@Autowired 注解的主要作用包括:
- 自动装配 bean:Spring 容器会自动查找并注入匹配的 bean 到被标注的字段、构造器或方法上。
- 减少手动配置:通过自动装配,可以减少大量的手动配置工作,提高开发效率。
- 支持多种注入方式:可以通过字段注入、构造器注入、方法注入等多种方式使用
@Autowired。
下面是一个简单示例,展示了如何使用 @Autowired 注解来自动装配一个 bean:
首先,定义一个简单的服务类 MyService:
package com.example.demo.service;

import org.springframework.stereotype.Service;

@Service
public class MyService {
    public String getMessage() {
        return "Hello from MyService!";
    }
}
在这个例子中,MyService 类被标记为 @Service,这告诉 Spring 这是一个服务组件,应该将其注册为 Spring 容器中的一个 bean。
接下来,创建一个控制器类 MyController,并使用 @Autowired 来自动装配 MyService:
package com.example.demo.controller;

import com.example.demo.service.MyService;
import org.springframework.beans.factory.annotation.Autowired;
import org.springframework.web.bind.annotation.GetMapping;
import org.springframework.web.bind.annotation.RestController;

@RestController
public class MyController {

    private final MyService myService;

    // 使用构造器注入的方式自动装配 MyService
    @Autowired
    public MyController(MyService myService) {
        this.myService = myService;
    }

    @GetMapping("/hello")
    public String hello() {
        // 调用 MyService 的 getMessage 方法
        return myService.getMessage();
    }
}
在这个 MyController 类中,我们通过构造器注入的方式使用 @Autowired 注解来自动装配 MyService 的实例。当 Spring 容器创建 MyController 的实例时,它会查找一个 MyService 类型的 bean 并将其注入到 MyController 的构造器中。
最后,当你访问 /hello 端点时,MyController 会调用 MyService 的 getMessage 方法,并返回结果。
注意:从 Spring 4.3 开始,如果你在类级别上使用了 @Component 或其子注解(如 @Service、@Repository、@Controller 等),则可以在类中的任何字段上省略 @Autowired 注解,Spring 会自动尝试按类型装配字段。但是,为了代码的清晰性和可读性,很多开发者仍然选择显式地使用 @Autowired 注解。此外,如果你使用的是构造器注入,则必须显式地使用 @Autowired(除非构造器是唯一的,Spring 5.0 及以上版本可以省略)。
10、@Qualifer
@Qualifier 是 Spring 框架中用于消除多个同类型 bean 定义时的歧义性的注解。当 Spring 容器中存在多个同类型的 bean 时,@Autowired 默认情况下可能无法确定应该注入哪一个 bean。在这种情况下,我们可以使用 @Qualifier 注解来指定应该注入哪一个具体的 bean。
@Qualifier 注解的主要作用包括:
- 消除歧义:当存在多个同类型的 bean 时,使用
@Qualifier可以明确指定要注入的 bean。 - 与 @Autowired 配合使用:
@Qualifier通常与@Autowired一起使用,以提供额外的信息来指定要注入的 bean。
下面是一个简单的示例,展示了如何使用 @Qualifier 来消除歧义:
首先,我们定义两个同类型的 bean,它们都是 MessageService 接口的实现:
package com.example.demo.service;

public interface MessageService {
    String getMessage();
}

@Service("greetingService")
public class GreetingServiceImpl implements MessageService {
    @Override
    public String getMessage() {
        return "Hello, this is GreetingService!";
    }
}

@Service("welcomeService")
public class WelcomeServiceImpl implements MessageService {
    @Override
    public String getMessage() {
        return "Welcome, this is WelcomeService!";
    }
}
在这个例子中,GreetingServiceImpl 和 WelcomeServiceImpl 都实现了 MessageService 接口,并且都使用了 @Service 注解来将它们声明为 Spring 容器中的 bean。我们通过给 @Service 注解传递一个字符串值来为这些 bean 指定了不同的名称(“greetingService” 和 “welcomeService”)。
接下来,在需要使用 MessageService 的组件中,我们使用 @Autowired 和 @Qualifier 来注入具体的 bean:
package com.example.demo.controller;

import com.example.demo.service.MessageService;
import org.springframework.beans.factory.annotation.Autowired;
import org.springframework.beans.factory.annotation.Qualifier;
import org.springframework.web.bind.annotation.GetMapping;
import org.springframework.web.bind.annotation.RestController;

@RestController
public class MessageController {

    private final MessageService messageService;

    @Autowired
    public MessageController(@Qualifier("greetingService") MessageService messageService) {
        this.messageService = messageService;
    }

    @GetMapping("/message")
    public String getMessage() {
        return messageService.getMessage();
    }
}
在这个 MessageController 类中,我们通过构造器注入的方式使用 @Autowired 和 @Qualifier 来注入 MessageService 类型的 bean。@Qualifier("greetingService") 注解告诉 Spring 我们想要注入名为 “greetingService” 的 MessageService bean。因此,当调用 /message 端点时,getMessage() 方法将返回由 GreetingServiceImpl 提供的消息。
如果没有使用 @Qualifier,Spring 将无法确定应该注入 GreetingServiceImpl 还是 WelcomeServiceImpl,因为两者都实现了 MessageService 接口,并且都是 Spring 容器中的 bean。使用 @Qualifier 可以明确指定要注入的 bean,从而消除歧义。
11、@Resource
@Resource是 Java EE 5 引入的一个注解,它用于依赖注入。在 Spring 框架中,@Resource可以与@Autowired类似地用于自动装配 bean,但它提供了更多的灵活性,特别是当需要引用特定名称的 bean 时。
@Resource 注解的主要作用包括:
- 自动装配 bean:Spring 容器会自动查找并注入匹配的 bean 到被标注的字段或方法上。
- 支持按名称注入:与
@Autowired默认按类型注入不同,@Resource默认按名称注入。如果找不到与指定名称匹配的 bean,则会回退到按类型注入。 - 指定查找范围:
@Resource注解允许你指定查找 bean 的范围,例如只在当前应用上下文中查找,或者在整个上下文中查找。
下面是一个使用 @Resource 注解进行依赖注入的简单示例:
首先,我们定义一个服务类 MyService 并将其声明为 Spring 容器中的 bean:
package com.example.demo.service;

import org.springframework.stereotype.Service;

@Service("myCustomService")
public class MyService {
    public String getMessage() {
        return "This is a message from MyService!";
    }
}
在这个例子中,我们使用了 @Service 注解来声明 MyService 是一个 Spring 组件,并通过 value 属性给它指定了一个自定义的名称 “myCustomService”。
接下来,在需要使用 MyService 的组件中,我们使用 @Resource 注解来注入这个服务:
package com.example.demo.controller;

import com.example.demo.service.MyService;
import javax.annotation.Resource;
import org.springframework.web.bind.annotation.GetMapping;
import org.springframework.web.bind.annotation.RestController;

@RestController
public class MyController {

    private MyService myService;

    // 使用 @Resource 注解按名称注入 MyService
    @Resource(name = "myCustomService")
    public void setMyService(MyService myService) {
        this.myService = myService;
    }

    @GetMapping("/resource")
    public String getMessageFromResource() {
        return myService.getMessage();
    }
}
在这个 MyController 类中,我们定义了一个 setMyService 方法来注入 MyService。@Resource(name = "myCustomService") 注解告诉 Spring 我们想要注入名为 “myCustomService” 的 bean。因此,当 Spring 容器创建 MyController 的实例时,它会查找名为 “myCustomService” 的 bean 并将其注入到 setMyService 方法中。
当访问 /resource 端点时,getMessageFromResource 方法会调用注入的 MyService 的 getMessage 方法,并返回结果。
注意:在 Spring 中,@Autowired 和 @Resource 通常可以互换使用,但它们的默认行为和查找策略有所不同。如果你更喜欢按名称注入或者需要更多的灵活性,@Resource 可能是一个更好的选择。然而,在 Spring 社区中,@Autowired 通常更受欢迎,因为它与 Spring 的其他特性(如条件化 bean、Java 配置等)结合得更好。
12、@Bean
@Bean注解用于指示一个方法应该产生一个Bean对象,并将其交给Spring容器管理。当使用@Bean注解的方法被Spring容器调用时,它只会执行一次,随后该方法返回的Bean对象会被添加到Spring的IOC容器中。这个Bean对象通常具有一个默认的id,即方法名,但可以通过@Bean的name属性显式指定Bean的名称。
@Bean 通常用于 @Configuration 类中,但也可以用于其他类型的类,如 @Component 、 @Repository 、 @Controller 和 @Service 。使用 @Bean 的方法必须具有返回值,且可以包含任何必要的参数。
@Bean 注解的作用是将一个方法返回的对象注册为一个Bean,使其可以被Spring容器管理,并提供依赖注入和自定义配置的功能。
13、@ImportResource
@ImportResource是 Spring 框架中的一个注解,它允许用户导入传统的 Spring XML 配置文件,以便在基于 Java 的配置中复用已有的 XML 配置。这在将旧有的 XML 配置迁移到基于 Java 的配置时特别有用,因为它允许你逐步迁移而不是一次性重写所有配置。
@ImportResource 的主要作用是将 XML 配置文件中的 bean 定义导入到当前的 Java 配置中,使这些 bean 能够被 Spring 容器管理。
下面是一个简单的示例,演示了如何使用 @ImportResource 注解导入 XML 配置文件:
首先,我们创建一个 XML 配置文件(例如 appContext.xml),其中包含一些 bean 定义:
<!-- appContext.xml -->
<beans xmlns="http://www.springframework.org/schema/beans"
       xmlns:xsi="http://www.w3.org/2001/XMLSchema-instance"
       xsi:schemaLocation="http://www.springframework.org/schema/beans
       http://www.springframework.org/schema/beans/spring-beans.xsd">

    <bean id="xmlConfiguredBean" class="com.example.demo.XmlConfiguredBean">
        <property name="message" value="This bean is configured in XML!"/>
    </bean>

</beans>
在这个 XML 配置文件中,我们定义了一个名为 xmlConfiguredBean 的 bean,它是 com.example.demo.XmlConfiguredBean 类的实例,并设置了一个属性 message。
接下来,我们在 Java 配置类中使用 @ImportResource 注解来导入这个 XML 配置文件:
package com.example.demo.config;

import org.springframework.context.annotation.Configuration;
import org.springframework.context.annotation.ImportResource;

@Configuration
@ImportResource("classpath:appContext.xml")
public class AppConfig {
    // 这里可以定义其他的 @Bean 方法
}
在这个 AppConfig 类中,我们使用 @Configuration 注解将其标记为一个配置类,并使用 @ImportResource 注解来导入 appContext.xml 配置文件。classpath:appContext.xml 指定了 XML 配置文件的位置,它应该位于类路径下。
现在,xmlConfiguredBean 这个 bean 就已经被 Spring 容器管理了,并且可以在其他 Spring 组件中通过自动装配(例如使用 @Autowired)来使用它:
package com.example.demo.service;

import com.example.demo.XmlConfiguredBean;
import org.springframework.beans.factory.annotation.Autowired;
import org.springframework.stereotype.Service;

@Service
public class MyService {

    private final XmlConfiguredBean xmlConfiguredBean;

    @Autowired
    public MyService(XmlConfiguredBean xmlConfiguredBean) {
        this.xmlConfiguredBean = xmlConfiguredBean;
    }

    public String getMessageFromXmlBean() {
        return xmlConfiguredBean.getMessage();
    }
}
在这个 MyService 类中,我们通过构造函数注入的方式自动装配了 xmlConfiguredBean。当 Spring 容器创建 MyService 的实例时,它会找到并注入 xmlConfiguredBean bean。然后,getMessageFromXmlBean 方法就可以调用 xmlConfiguredBean 的 getMessage 方法来获取消息了。
请注意,虽然 @ImportResource 提供了将 XML 配置导入到 Java 配置中的能力,但通常推荐尽可能使用基于 Java 的配置,因为它提供了更强大的类型安全和重构能力。然而,在某些情况下,例如处理遗留代码或第三方库时,使用 @ImportResource 可以帮助实现平滑迁移。
14、@PropertySource
@PropertySource是 Spring 框架中的一个注解,用于加载属性文件到 Spring 的Environment抽象中,使得这些属性可以在整个 Spring 应用中被访问。这对于外部化配置非常有用,因为你可以将配置信息(如数据库连接信息、应用设置等)存储在属性文件中,然后在运行时由 Spring 加载。
@PropertySource 注解通常与 @Configuration 类一起使用,以指示 Spring 应该加载哪些属性文件。加载的属性可以通过 @Value 注解注入到 bean 的字段或方法中,或者通过 Environment 对象来访问。
下面是一个简单的例子,演示了如何使用 @PropertySource 注解加载属性文件:
首先,创建一个属性文件(例如 app.properties),其中包含一些键值对:
# app.properties
app.name=MySpringApp
app.version=1.0.0
database.url=jdbc:mysql://localhost:3306/mydb
database.username=root
database.password=secret
然后,在配置类中使用 @PropertySource 注解来加载这个属性文件:
package com.example.demo.config;

import org.springframework.beans.factory.annotation.Value;
import org.springframework.context.annotation.Configuration;
import org.springframework.context.annotation.PropertySource;

@Configuration
@PropertySource("classpath:app.properties")
public class AppConfig {

    @Value("${app.name}")
    private String appName;

    @Value("${app.version}")
    private String appVersion;

    // 可以在这里定义其他的 @Bean 方法来创建和配置 bean

    public void displayProperties() {
        System.out.println("App Name: " + appName);
        System.out.println("App Version: " + appVersion);
    }
}
在这个 AppConfig 类中,我们使用 @PropertySource 注解来加载 app.properties 属性文件。然后,我们使用 @Value 注解来注入 app.name 和 app.version 属性的值到 appName 和 appVersion 字段中。
最后,你可以在其他组件中注入 AppConfig 类,并调用 displayProperties 方法来打印出这些属性的值:
package com.example.demo;

import com.example.demo.config.AppConfig;
import org.springframework.beans.factory.annotation.Autowired;
import org.springframework.boot.CommandLineRunner;
import org.springframework.stereotype.Component;

@Component
public class AppRunner implements CommandLineRunner {

    private final AppConfig appConfig;

    @Autowired
    public AppRunner(AppConfig appConfig) {
        this.appConfig = appConfig;
    }

    @Override
    public void run(String... args) throws Exception {
        appConfig.displayProperties();
    }
}
当 Spring 应用启动时,AppRunner 类的 run 方法将被调用,从而触发 AppConfig 的 displayProperties 方法,并打印出从 app.properties 文件中加载的属性值。
注意,如果你的应用是基于 Spring Boot 的,通常不需要使用 @PropertySource,因为 Spring Boot 提供了自己的配置机制,包括 application.properties 或 application.yml 文件,这些文件会自动被 Spring Boot 加载。但是,对于非 Spring Boot 应用或需要加载额外属性文件的情况,@PropertySource 就非常有用了。
15、@RequestBody和@ResponseBody
@ResponseBody和@RequestBody是 Spring MVC 中用于处理 HTTP 请求和响应的注解,它们使得开发者能够更方便地处理 JSON 或 XML 格式的数据。
@ResponseBody注解用于将控制器方法的返回值直接写入 HTTP 响应体(Response Body)中,通常用于返回 JSON 或 XML 数据。当方法上标注了@ResponseBody注解后,Spring 会自动使用HttpMessageConverter将返回值转换为合适的格式(如 JSON 或 XML),并写入响应体中。@RequestBody注解用于将 HTTP 请求体(Request Body)中的数据绑定到方法的参数上。它通常用于处理 POST 或 PUT 请求中发送的 JSON 或 XML 数据。当方法的参数上标注了@RequestBody注解后,Spring 会自动使用HttpMessageConverter将请求体中的数据转换为相应的 Java 对象。
下面是一个简单的示例,演示了如何使用 @ResponseBody 和 @RequestBody 注解来处理 JSON 数据。
首先,假设我们有一个简单的用户实体类 User:
public class User {
    private String name;
    private int age;

    // 构造器、getter 和 setter 方法省略
}
然后,我们创建一个控制器 UserController,用于处理与用户相关的请求:
import org.springframework.http.MediaType;
import org.springframework.web.bind.annotation.*;

@RestController
@RequestMapping("/users")
public class UserController {

    // 创建一个用户并返回 JSON 格式的数据
    @PostMapping(consumes = MediaType.APPLICATION_JSON_VALUE, produces = MediaType.APPLICATION_JSON_VALUE)
    @ResponseBody
    public User createUser(@RequestBody User user) {
        // 这里只是简单地返回了传入的用户对象,实际应用中可能会进行更多的处理,比如保存到数据库等
        return user;
    }

    // 获取所有用户信息(这里只是示例,实际上可能返回一个用户列表)
    @GetMapping(produces = MediaType.APPLICATION_JSON_VALUE)
    @ResponseBody
    public User getUser() {
        // 创建一个示例用户对象并返回
        User user = new User();
        user.setName("Alice");
        user.setAge(30);
        return user;
    }
}
在这个示例中:
createUser方法使用@PostMapping注解来处理 POST 请求,并通过@RequestBody将请求体中的 JSON 数据绑定到User对象上。然后,方法返回这个User对象,由于方法上标注了@ResponseBody,Spring 会自动将其转换为 JSON 格式并写入响应体中。getUser方法使用@GetMapping注解来处理 GET 请求,并返回一个User对象。同样,由于方法上标注了@ResponseBody,Spring 会自动将User对象转换为 JSON 格式并写入响应体中。
注意:在实际应用中,你可能还需要配置消息转换器(HttpMessageConverter)来支持 JSON 或 XML 的转换,通常通过添加相关依赖(如 Jackson 或 JAXB)来自动配置。如果你使用的是 Spring Boot,它通常会为你自动配置好这些转换器。
16、@ControllerAdvice和@ExceptionHandler
@ControllerAdvice和@ExceptionHandler在 Spring MVC 中一起使用,用于定义全局的异常处理逻辑。
@ControllerAdvice 是一个类级别的注解,用于指示该类包含全局的异常处理方法。而 @ExceptionHandler 则是一个方法级别的注解,用于标识处理特定类型异常的方法。
@ControllerAdvice:
- 允许定义跨多个控制器的全局异常处理。
- 可以用来添加全局的模型属性。
- 可以用来处理请求和响应体的转换。
@ExceptionHandler:
- 标记一个方法作为特定异常的处理器。
- 当控制器中的方法抛出指定的异常时,Spring MVC 会自动调用相应的
@ExceptionHandler方法。
下面是一个简单的实例,演示了如何使用 @ControllerAdvice 和 @ExceptionHandler 来处理全局异常。
首先,定义一个自定义异常类 CustomException:
public class CustomException extends RuntimeException {
    public CustomException(String message) {
        super(message);
    }
}
然后,创建一个带有 @ControllerAdvice 注解的类,并在其中定义 @ExceptionHandler 方法来处理 CustomException:
import org.springframework.http.HttpStatus;
import org.springframework.http.ResponseEntity;
import org.springframework.web.bind.annotation.ControllerAdvice;
import org.springframework.web.bind.annotation.ExceptionHandler;

@ControllerAdvice
public class GlobalExceptionHandler {

    @ExceptionHandler(CustomException.class)
    public ResponseEntity<Object> handleCustomException(CustomException ex) {
        // 创建统一的错误响应体
        Map<String, Object> responseBody = new HashMap<>();
        responseBody.put("message", ex.getMessage());
        responseBody.put("timestamp", LocalDateTime.now());
        responseBody.put("status", HttpStatus.BAD_REQUEST.value());

        // 返回带有错误信息的响应
        return new ResponseEntity<>(responseBody, HttpStatus.BAD_REQUEST);
    }
}
在上面的代码中,GlobalExceptionHandler 类使用 @ControllerAdvice 注解进行标注,表示这是一个全局异常处理类。handleCustomException 方法使用 @ExceptionHandler 注解标注,并指定它处理 CustomException 类型的异常。当控制器中的方法抛出 CustomException 异常时,Spring MVC 会自动调用 handleCustomException 方法。
最后,在控制器中抛出一个 CustomException 异常来测试异常处理逻辑:
import org.springframework.web.bind.annotation.GetMapping;
import org.springframework.web.bind.annotation.RestController;

@RestController
public class SampleController {

    @GetMapping("/sample")
    public String getSample() {
        throw new CustomException("这是一个自定义异常示例");
    }
}
当用户访问 /sample 路径时,会触发 getSample 方法,该方法会抛出一个 CustomException 异常。由于我们定义了全局异常处理器 GlobalExceptionHandler,并且其中包含了处理 CustomException 的 @ExceptionHandler 方法,Spring MVC 会捕获这个异常,并调用 handleCustomException 方法来处理它。最终,客户端会收到一个包含错误信息的 JSON 响应。
17、@Transcational
@Transactional是 Spring 框架中的一个重要注解,用于声明事务边界。它允许开发者在方法执行前后进行事务管理,确保方法的执行是原子性的,即要么完全执行,要么完全不执行。这对于确保数据的一致性和完整性至关重要。
- 确保数据一致性:通过事务管理,可以确保一系列操作要么全部成功,要么全部失败回滚,从而避免数据不一致的情况。
- 简化代码:通过注解方式声明事务,无需在代码中显式编写事务管理的代码,提高了代码的可读性和可维护性。
- 支持声明式事务管理:与编程式事务管理相比,声明式事务管理更加简洁和方便,开发者只需关注业务逻辑,而无需关心事务管理的细节。
下面是一个使用 @Transactional 注解的简单示例,演示了如何在 Spring 应用程序中进行事务管理。
首先,假设我们有一个 User 实体类和一个 UserRepository 接口:
@Entity
public class User {
    @Id
    @GeneratedValue(strategy = GenerationType.IDENTITY)
    private Long id;
    private String name;
    private String email;
    // getters and setters
}

public interface UserRepository extends JpaRepository<User, Long> {
    // Custom queries can be defined here
}
然后,我们有一个 UserService 类,其中包含一个使用 @Transactional 注解的方法:
import org.springframework.beans.factory.annotation.Autowired;
import org.springframework.stereotype.Service;
import org.springframework.transaction.annotation.Transactional;

@Service
public class UserService {

    @Autowired
    private UserRepository userRepository;

    @Transactional
    public User createUser(String name, String email) {
        User user = new User();
        user.setName(name);
        user.setEmail(email);

        // 假设这里有两个数据库操作,需要确保它们要么都成功,要么都失败
        userRepository.save(user); // 第一次数据库操作

        // 模拟一个可能抛出异常的操作
        if ("invalid-email".equals(email)) {
            throw new RuntimeException("Invalid email address");
        }

        // 第二次数据库操作(这里仅作为示例,实际上可能没有第二次操作)
        // userRepository.updateSomething(user);

        return user;
    }
}
在上面的代码中,createUser 方法被标记为 @Transactional,这意味着该方法内的所有数据库操作都将在一个事务中执行。如果 email 是 "invalid-email",则会抛出一个异常,导致事务回滚,user 不会被保存到数据库中。否则,user 将被成功保存。
注意,默认情况下,@Transactional 注解将事务传播行为设置为 Propagation.REQUIRED,这意味着如果当前没有事务,就新建一个事务,如果已经存在一个事务中,加入到这个事务中。你还可以根据需要调整事务的传播行为、隔离级别、超时时间等属性。
在实际应用中,@Transactional 注解可以应用于类级别或方法级别,根据具体需求进行配置。同时,还需要确保 Spring 的事务管理器(如 DataSourceTransactionManager)已经配置好,并且相关的数据库连接和 JPA 配置也已经正确设置。
18、@MapperScan、@Mapper和@Param
@MapperScan、@Mapper和@Param都是 MyBatis 与 Spring 集成时常用的注解。
@MapperScan注解用于指定 MyBatis 映射器接口所在的包路径。这样,Spring Boot 在启动时会自动扫描并注册这些接口为 MyBatis 的映射器。@Mapper注解用于标记一个接口为 MyBatis 的映射器接口。这样,Spring 容器在启动时会自动将这个接口注册为 MyBatis 的映射器。@Param注解用于指定方法参数的名字,这样在映射文件(XML)中就可以通过这个名字来引用方法参数。
假设我们有一个简单的用户管理功能,包括用户信息的增删改查。
首先,定义用户实体类 User:
public class User {
    private Long id;
    private String name;
    private Integer age;
    // 省略 getter 和 setter 方法
}
然后,定义 MyBatis 映射器接口 UserMapper,并使用 @Mapper 注解标记:
import org.apache.ibatis.annotations.Param;
import org.apache.ibatis.annotations.Select;
import org.apache.ibatis.annotations.Insert;
import org.apache.ibatis.annotations.Update;
import org.apache.ibatis.annotations.Delete;

@Mapper
public interface UserMapper {
    // 查询用户信息
    @Select("SELECT * FROM user WHERE id = #{id}")
    User findById(@Param("id") Long id);

    // 插入用户信息
    @Insert("INSERT INTO user(name, age) VALUES(#{name}, #{age})")
    int insertUser(User user);

    // 更新用户信息
    @Update("UPDATE user SET name = #{name}, age = #{age} WHERE id = #{id}")
    int updateUser(User user);

    // 删除用户信息
    @Delete("DELETE FROM user WHERE id = #{id}")
    int deleteUser(@Param("id") Long id);
}
在上面的代码中,@Param 注解用于指定 findById 和 deleteUser 方法中参数的名字,这样在 MyBatis 的映射文件中可以通过这些名字来引用这些参数。
最后,在 Spring Boot 的主类或者配置类上使用 @MapperScan 注解来指定 MyBatis 映射器接口所在的包路径:
import org.mybatis.spring.annotation.MapperScan;
import org.springframework.boot.SpringApplication;
import org.springframework.boot.autoconfigure.SpringBootApplication;

@SpringBootApplication
@MapperScan("com.example.demo.mapper") // 假设 UserMapper 接口位于这个包下
public class DemoApplication {
    public static void main(String[] args) {
        SpringApplication.run(DemoApplication.class, args);
    }
}
这样,Spring Boot 在启动时会自动扫描 com.example.demo.mapper 包下的接口,并将它们注册为 MyBatis 的映射器。之后,你就可以在业务逻辑中注入 UserMapper 接口来使用它提供的数据库操作方法了。
注意:上述示例中使用了 MyBatis 的注解方式(@Select、@Insert、@Update、@Delete)来定义 SQL 语句。实际上,你还可以在 XML 文件中定义 SQL 语句,并在接口方法中通过方法名或参数引用这些 SQL 语句。这种方式更加灵活,尤其适用于复杂的 SQL 语句。