安装vue
npm i vue-loader -D npm i vue
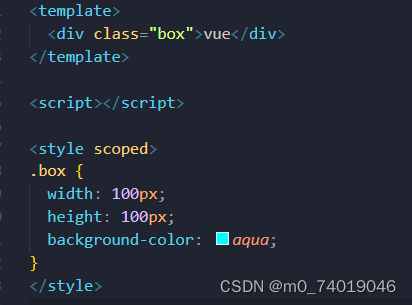
编写一个vue文件:
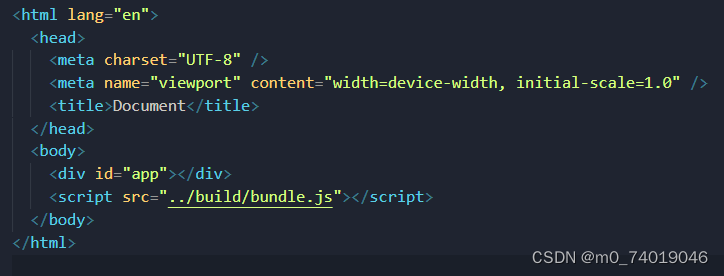
在index.html中设置 一个id为app的div
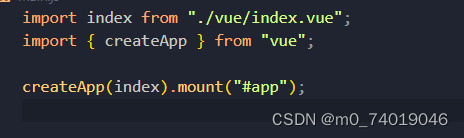
将vue文件挂载到app中
vue比较特殊,除了使用loader外,还使用了plugin
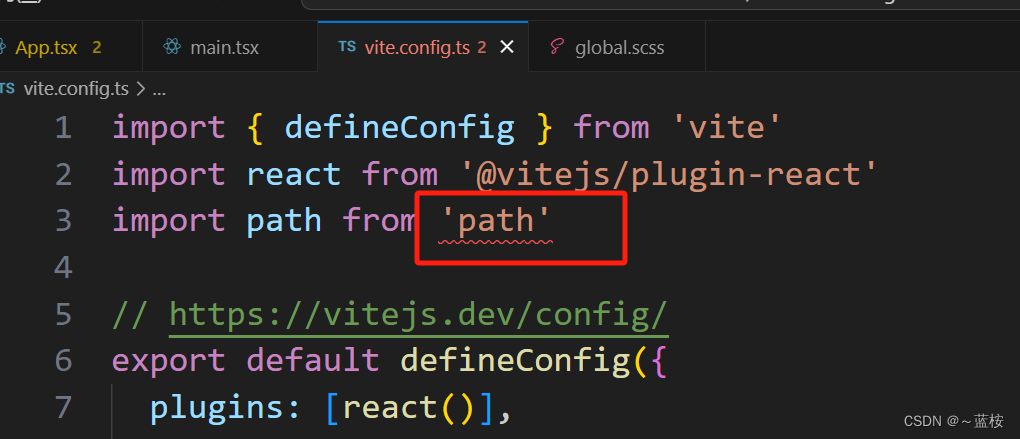
const path = require("path");
const { VueLoaderPlugin } = require("vue-loader");

module.exports = {
  entry: "./src/main.js",
  output: {
    filename: "bundle.js",
    path: path.resolve(__dirname, "./build"),
  },
  module: {
    rules: [
      {
        test:/\.vue/,
        use:"vue-loader"
      }
    ],
  },
  plugins: [new VueLoaderPlugin()],
};
webpack中 resolve模块的解析和拓展名
resolve用于模块的解析,在开发中使用各种的模块依赖,resolve可以帮助我们从它们的require/import语句中找到合适的代码。webpack使用 enhanced-resolve来解析文件路径。
webpack能解析的三种路径:
**绝对路径:**已经获取文件的绝对路径,不会再解析。
相对路径:在这种情况下 使用Import或require导入的资源所处的目录会被当成上下文目录。import/require中的相对路径会和上下文目录的路径拼接,形成绝对路径。
模块路径:(import {createApp} from “vue”)默认是从 node_modules中查找。可以通过设置别名的方式来识别模块路径。
如果一个文件有拓展名会直接打包例如import index from "./vue/index.vue";会直接打包,如果没有(import index from "./vue/index")则需要需要使用resolve.extensions选项来作为文件的拓展名。
resolve中的 extensions和alias
extensions:自动添加拓展名,在导入文件是可以不用带拓展名如import index from "./vue/index.vue"可以写为import index from "./vue/index",他会自动补齐拓展名。
alias:配置路径别名。在导入时可能会有 …/…/这样的,当路径特别长时会很麻烦.
const path = require("path");
const { VueLoaderPlugin } = require("vue-loader");
module.exports = {
  entry: "./src/main.js",
  output: {
    filename: "bundle.js",
    path: path.resolve(__dirname, "./build"),
  },
  resolve: {
    extensions: [".js", ".ts", ".tsx", ".jsx", ".cjs", ".vue"],
    //这里的"./src/vue"路径 是相对于webpack的,以webpack.config.js为基准的。
    // 路径别名:  xxx路径
    alias: {
      "@": path.resolve(__dirname, "./src/vue"),
    },
  },
  module: {
    rules: [],
  },
  plugins: [],
};
plugin
loader只能用于特定模块的转化,plugin插件比loader的用途更广,他还可以进行打包优化,变量的注入等。
cleanwebpackplugin 打包前会自动删除上次打包后的文件
npm i clean-webpack-plugin -D
const path = require("path");
const { VueLoaderPlugin } = require("vue-loader");
const { CleanWebpackPlugin } = require("clean-webpack-plugin");
module.exports = {
  entry: "./src/main.js",
  output: {
    filename: "bundle.js",
    path: path.resolve(__dirname, "./build"),
  },
  resolve: {
    extensions: [],
    alias: { },
  },
  module: {
    rules: [],
  },
  plugins: [new VueLoaderPlugin(), new CleanWebpackPlugin()],
};
打包前还有之前的img(这两个目录是之前使用图片时设置的)目录
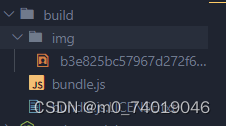
打包后可以看到之前的Img目录已经删除

另外output.clean也可以在打包前清空之前的目录https://www.webpackjs.com/configuration/output/#outputclean

html-webpack-plugin
打包后的文件中他本身因该有一个html文件而不是通过index.html访问
npm i html-webpack-plugin -D
const path = require("path");
const { VueLoaderPlugin } = require("vue-loader");
const { CleanWebpackPlugin } = require("clean-webpack-plugin");
const HtmlWebpackPlugin = require("html-webpack-plugin");
module.exports = {
  entry: "./src/main.js",
  output: {
    filename: "bundle.js",
    path: path.resolve(__dirname, "./build"),
  },
  resolve: {},
  module: {
    rules: [ ],
  },
  plugins: [
    new VueLoaderPlugin(),
    new CleanWebpackPlugin(),
    //可以指定生成的html的模板
    new HtmlWebpackPlugin({
      title: "test项目",
      template: "./src/index.html",
    }),
  ],
};
这个模板中还可以使用一些变量<%= xxx%>,htmlWebpackPlugin.options可以获取在HtmlWebpackPlugin中定义的title
<!DOCTYPE html>
<html lang="en">
  <head>
    <meta charset="UTF-8" />
    <meta name="viewport" content="width=device-width, initial-scale=1.0" />
    <title>Document</title>
    <link rel="icon" href="favicon.ico" />
  </head>
  <body>
    <div id="app"></div>
    <div><%= htmlWebpackPlugin.options.title %></div>
    <script src="../build/bundle.js"></script>
  </body>
</html>
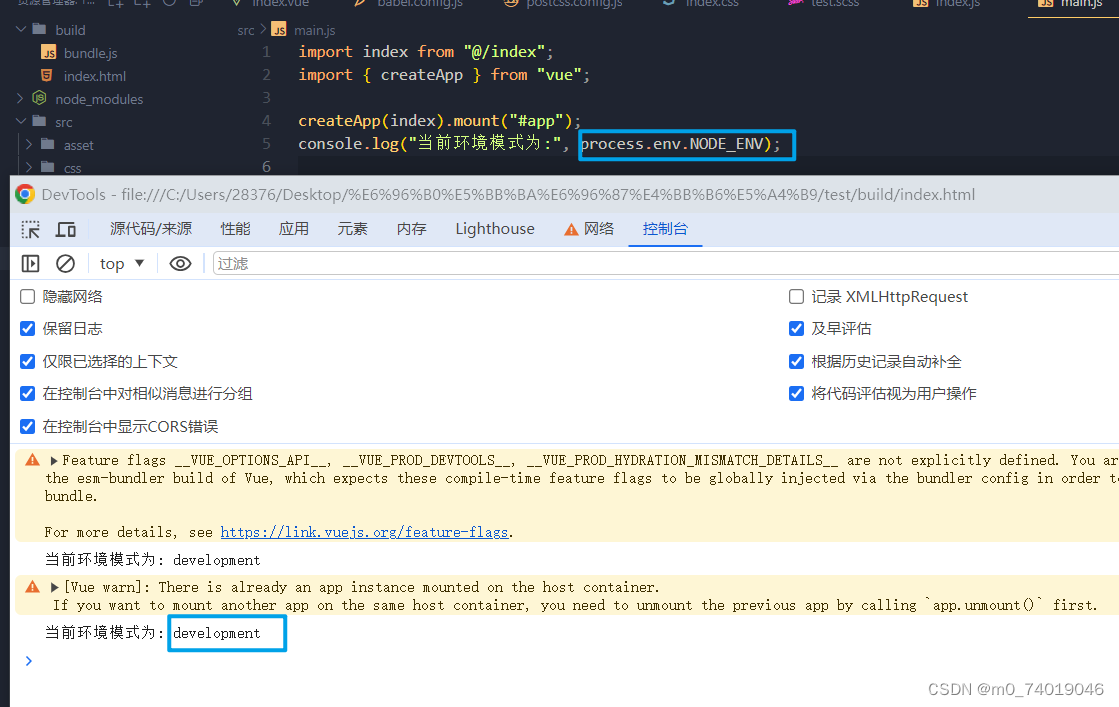
definePlugin
允许在编译时配置一些全局变量,不用安装
const path = require("path");
const { VueLoaderPlugin } = require("vue-loader");
const { CleanWebpackPlugin } = require("clean-webpack-plugin");
const HtmlWebpackPlugin = require("html-webpack-plugin");
const { DefinePlugin } = require("webpack");
module.exports = {
  entry: "./src/main.js",
  output: {
    filename: "bundle.js",
    path: path.resolve(__dirname, "./build"),
  },
  resolve: {},
  module: {
    rules: [],
  },
  plugins: [
    new VueLoaderPlugin(),
    new CleanWebpackPlugin(),
    new DefinePlugin({
      BASE_URL: "'./'",
    }),
    new HtmlWebpackPlugin({
      title: "test项目",
      template: "./src/index.html",
    }),
  ],
};
在html中使用
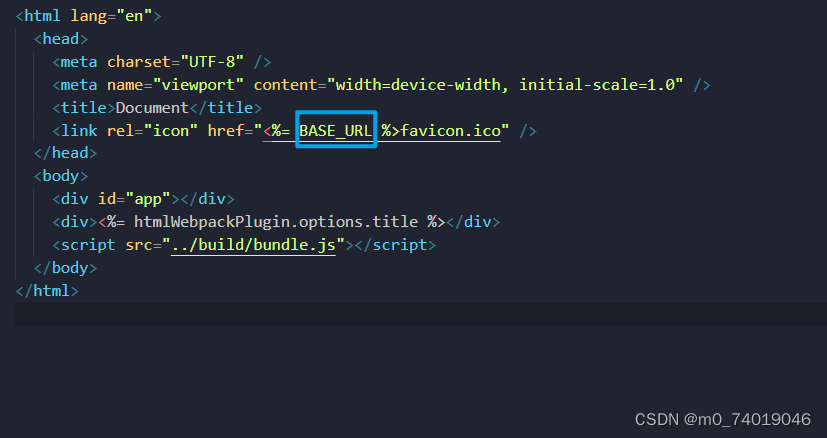
打包后的结果:

还可以在js中使用例如console.log(BASE_URL)
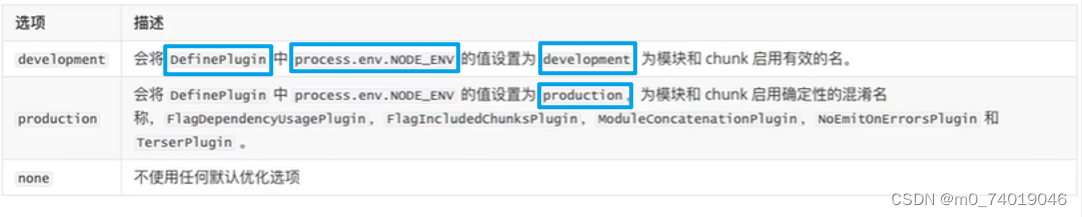
mode
设置开发或生产模式,默认是production。
可选值有 none|production|development
const path = require("path");
const { VueLoaderPlugin } = require("vue-loader");
const { CleanWebpackPlugin } = require("clean-webpack-plugin");
const HtmlWebpackPlugin = require("html-webpack-plugin");
const { DefinePlugin } = require("webpack");
module.exports = {
  mode: "development",
  entry: "./src/main.js",
  output: {
    filename: "bundle.js",
    path: path.resolve(__dirname, "./build"),
  },
  resolve: {},
  module: {
    rules: [],
  },
  plugins: [
    new VueLoaderPlugin(),
    new CleanWebpackPlugin(),
    new DefinePlugin({
      BASE_URL: "'./'",
    }),
    new HtmlWebpackPlugin({
      title: "test项目",
      template: "./src/index.html",
    }),
  ],
};
搭建本地服务器
一般有两种方式访问查看html:
- 使用npm run build 打包后再访问Html
- 使用vscode的插件live server或直接打开html.
这些方式都不能实时的监听页面的变化,改动文件后,要刷新页面或重新打包,webpack提供了三种方式可以完成自动编译:
1.webpack watch mode - webpack-dev-server(常用)
3.webpack-dev-middleware
webpack-dev-serer
npm i webpack-dev-server -D
在配置中加上devServer
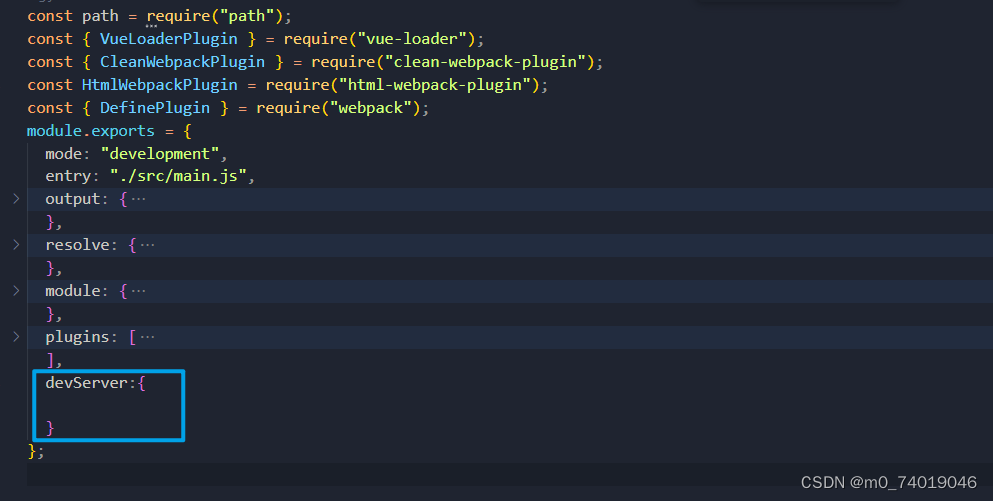
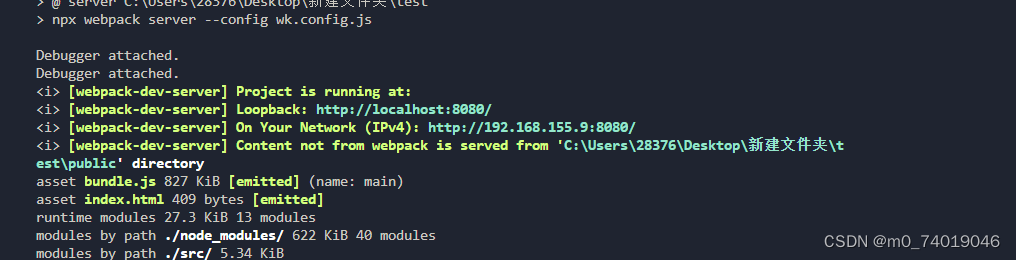
添加server命令
  "scripts": {
    "build": "npx webpack --config wk.config.js",
    "server": "npx webpack server --config wk.config.js "
  },
启动命令后还需要手动打开网址访问
热更新 HMR
Hot Module Replacement:模块热替换,在程序运行的过程中,会替换、添加、删除模块,不用刷新页面。
热更新通过以下方式提高开发速度:

默认情况下已经提供了HMR,只需要开启就行:
  devServer:{
     hot:true
  }
对于一些框架,早已经有了成熟的解决方案,安装脚手架时已经配好不需要再配置。
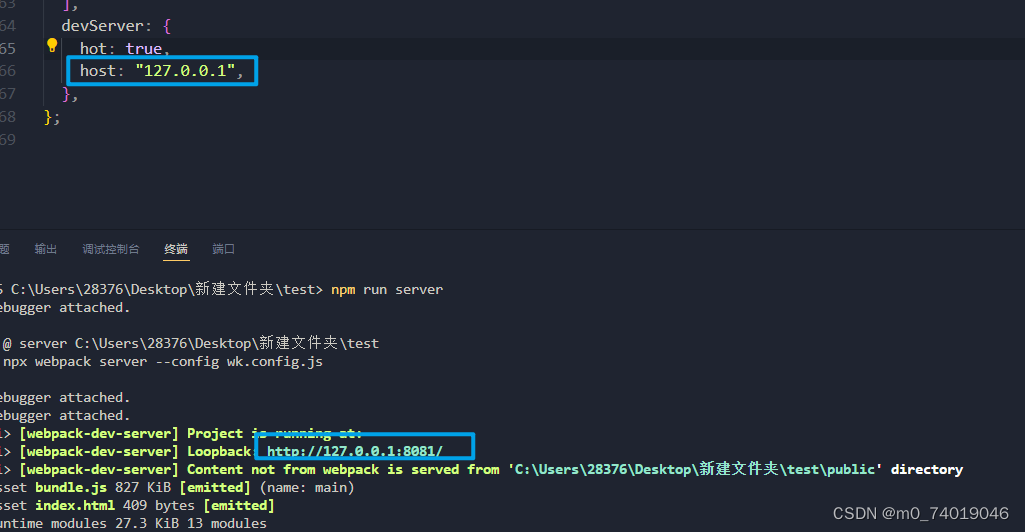
host设置主机地址(了解)
默认时localhost,还可以设置成其他的例如0.0.0.0
localhost和0.0.0.0的区别:

port open compress
port:监听的端口号默认是8080
open: 是否打开浏览器,默认是false
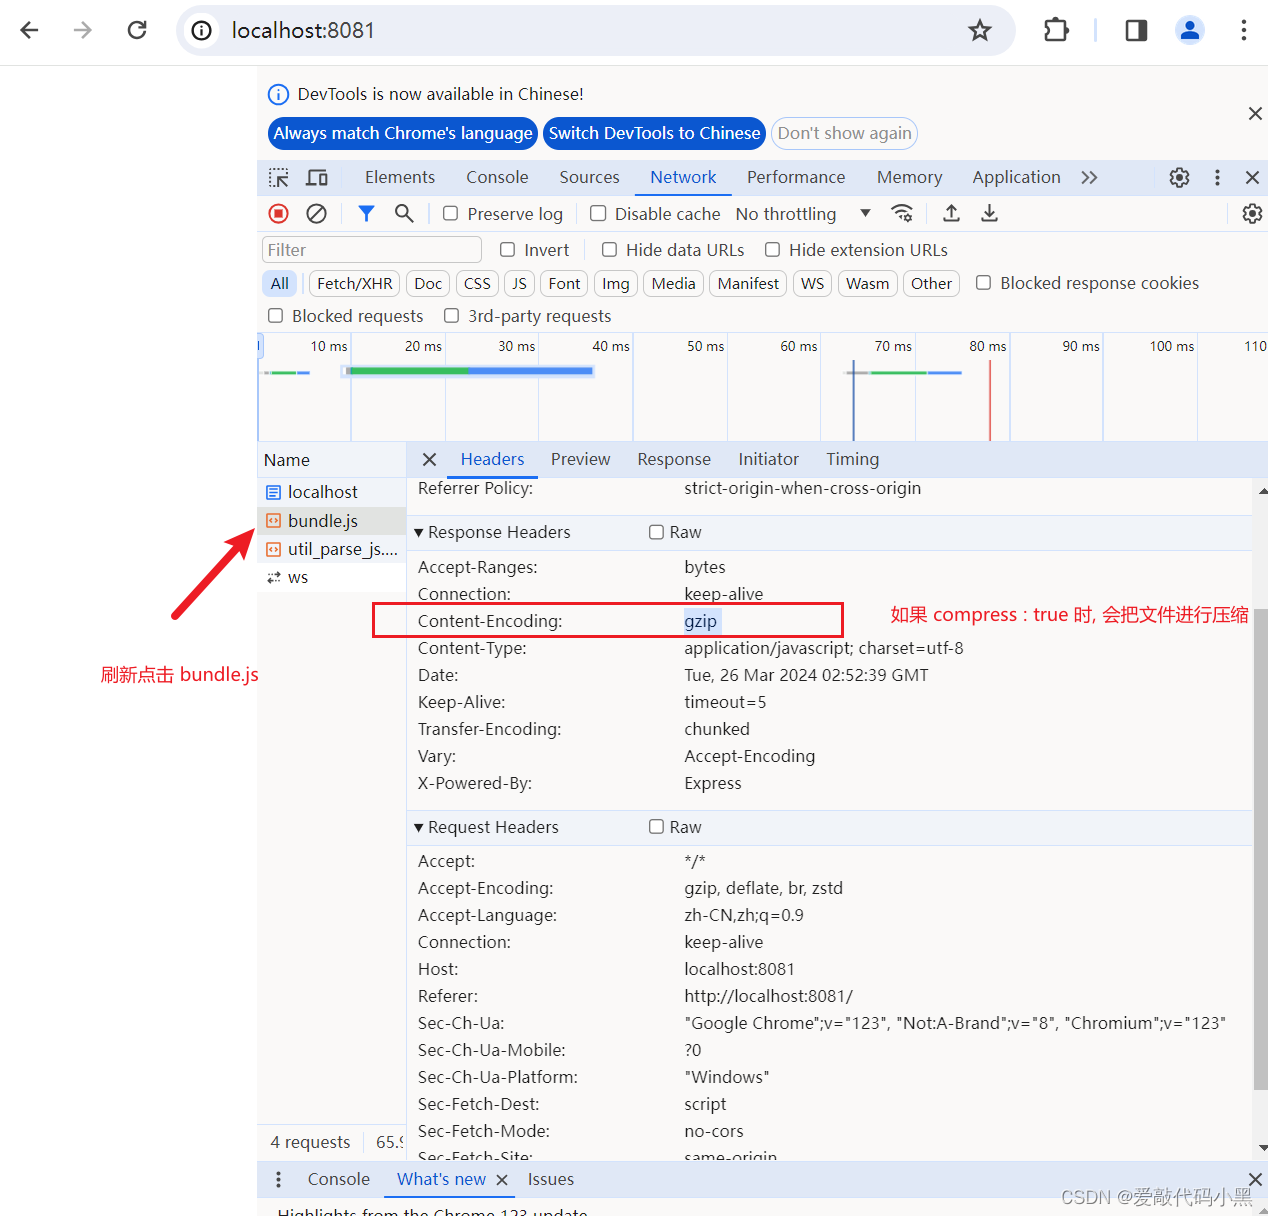
compress:是否为静态文件开启gzip compression
  devServer: {
    hot: true,
    port: "7070",
    host: "127.0.0.1",
    compress: true,
    open: true,
  },
到目前为止所有配置
const path = require("path");
const { VueLoaderPlugin } = require("vue-loader");
const { CleanWebpackPlugin } = require("clean-webpack-plugin");
const HtmlWebpackPlugin = require("html-webpack-plugin");
const { DefinePlugin } = require("webpack");
module.exports = {
  mode: "development",
  entry: "./src/main.js",
  output: {
    filename: "bundle.js",
    path: path.resolve(__dirname, "./build"),
  },
  resolve: {
    extensions: [".js", ".ts", ".tsx", ".jsx", ".cjs", ".vue"],
    alias: {
      "@": path.resolve(__dirname, "./src/vue"),
    },
  },
  module: {
    rules: [
      {
        test: /\.css$/,
        use: ["style-loader", "css-loader", "postcss-loader"],
      },
      {
        test: /\.scss$/,
        use: ["style-loader", "css-loader", "sass-loader"],
      },
      {
        test: /\.(png|jpe?g|gif|svg)$/,
        type: "asset",
        parser: {
          dataUrlCondition: {
            maxSize: 4 * 1024,
          },
        },
        generator: {
          filename: "img/[hash][ext]",
        },
      },
      {
        test: /\.js$/,
        use: {
          loader: "babel-loader",
        },
      },
      {
        test: /\.vue/,
        use: "vue-loader",
      },
    ],
  },
  plugins: [
    new VueLoaderPlugin(),
    new CleanWebpackPlugin(),
    new DefinePlugin({
      BASE_URL: "'./'",
    }),
    new HtmlWebpackPlugin({
      title: "test项目",
      template: "./src/index.html",
    }),
  ],
  devServer: {
    hot: true,
  //  port: "7070",
  ///  host: "127.0.0.1",
  //  compress: true,
  //  open: true,
  },
};