CLI举例:上下行连接路由器(路由引流)
介绍了集群设备,上下行连接路由器的配置举例。
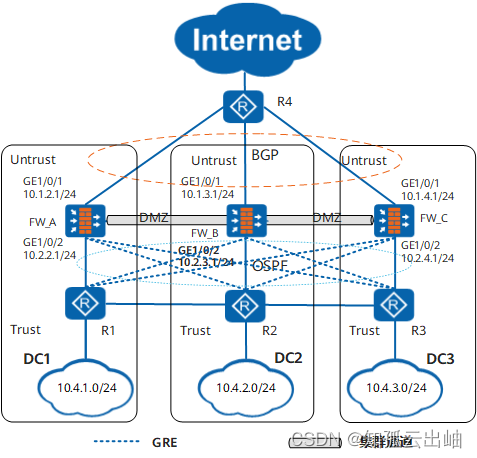
组网需求
如图1所示,上行网络使用BGP,下行网络使用OSPF,多数据中心统一通过路由器R4接入Internet。
希望本数据中心的流量优先由本数据中心FW承担。当某台FW故障时,流量能切换到其他FW上进行。
同时配置路由引流,实现业务组和路由协议联动:当下行流量切换时,路由协议根据业务组的状态调整发布路由的Cost值,使上行流量也同步切换。
数据规划
项目 |
数据 |
说明 |
|---|---|---|
FW_A |
|
|
FW_B |
|
|
FW_C |
|
|
操作步骤
- 完成网络基本配置。包括配置接口IP地址、接口加入安全区域和路由。
以下配置需要在每个集群成员上执行。下面给出FW_A上的配置,FW_B/C的配置请参考。
# 配置各接口的IP地址。 <FW_A> system-view [FW_A] interface GigabitEthernet 1/0/1 [FW_A-GigabitEthernet1/0/1] ip address 10.1.2.1 24 [FW_A-GigabitEthernet1/0/1] quit [FW_A] interface GigabitEthernet 1/0/2 [FW_A-GigabitEthernet1/0/2] ip address 10.1.1.1 24 [FW_A-GigabitEthernet1/0/2] quit [FW_A] interface Eth-Trunk 1 [FW_A-Eth-Trunk1] ip address 10.1.5.1 24 [FW_A-Eth-Trunk1] trunkport GigabitEthernet 1/0/3 to 1/0/4 [FW_A-Eth-Trunk1] quit [FW_A] interface Eth-Trunk 2 [FW_A-Eth-Trunk2] ip address 10.1.6.1 24 [FW_A-Eth-Trunk2] trunkport GigabitEthernet 1/0/5 to 1/0/6 [FW_A-Eth-Trunk2] quit [FW_A] interface Eth-Trunk 3 [FW_A-Eth-Trunk3] ip address 10.1.7.1 24 [FW_A-Eth-Trunk3] trunkport GigabitEthernet 1/0/7 to 1/0/8 [FW_A-Eth-Trunk3] quit # 将各接口加入相应的安全区域。 [FW_A] firewall zone trust [FW_A-zone-trust] add interface GigabitEthernet 1/0/2 [FW_A-zone-trust] quit [FW_A] firewall zone dmz [FW_A-zone-dmz] add interface Eth-Trunk 1 [FW_A-zone-dmz] add interface Eth-Trunk 2 [FW_A-zone-dmz] add interface Eth-Trunk 3 [FW_A-zone-dmz] add interface Tunnel 1 [FW_A-zone-dmz] add interface Tunnel 2 [FW_A-zone-dmz] quit [FW_A] firewall zone untrust [FW_A-zone-untrust] add interface GigabitEthernet 1/0/1 [FW_A-zone-untrust] quit # 配置GRE隧道。 [FW_A] interface Tunnel 1 [FW_A-Tunnel1] ip address 10.1.10.1 255.255.255.0 [FW_A-Tunnel1] tunnel-protocol gre [FW_A-Tunnel1] source 10.2.2.1 [FW_A-Tunnel1] destination 10.2.3.2 [FW_A-Tunnel1] quit [FW_A] interface Tunnel 2 [FW_A-Tunnel2] ip address 10.1.11.1 255.255.255.0 [FW_A-Tunnel2] tunnel-protocol gre [FW_A-Tunnel2] source 10.2.2.1 [FW_A-Tunnel2] destination 10.2.4.2 [FW_A-Tunnel2] quit # 配置OSPF,保证路由可达。 [FW_A] ospf 1 [FW_A-ospf-1] area 0.0.0.1 [FW_A-ospf-1-area-0.0.0.1] network 10.2.2.0 0.0.0.255 [FW_A-ospf-1-area-0.0.0.1] quit [FW_A-ospf-1] quit [FW_A] ospf 2 [FW_A-ospf-2] area 0.0.0.1 [FW_A-ospf-2-area-0.0.0.1] network 10.1.10.0 0.0.0.255 [FW_A-ospf-2-area-0.0.0.1] quit [FW_A-ospf-2] quit [FW_A] ospf 3 [FW_A-ospf-3] area 0.0.0.1 [FW_A-ospf-3-area-0.0.0.1] network 10.1.11.0 0.0.0.255 [FW_A-ospf-3-area-0.0.0.1] quit [FW_A-ospf-3] quit # 配置BGP,保证路由可达。 [FW_A] bgp 10 [FW_A-bgp] router-id 1.1.1.1 [FW_A-bgp] peer 10.1.2.2 as-number 10 [FW_A-bgp] ipv4-family unicast [FW_A-bgp-af-ipv4] undo synchronization [FW_A-bgp-af-ipv4] import-route ospf 1 [FW_A-bgp-af-ipv4] import-route ospf 2 [FW_A-bgp-af-ipv4] import-route ospf 3 [FW_A-bgp-af-ipv4] peer 10.1.2.2 enable [FW_A-bgp-af-ipv4] quit [FW_A-bgp] quit - 开启集群功能。
以下配置需要在每个集群成员上执行。 # 配置集群协商参数。 [FW_A] cluster id 1000 [FW_A] cluster detect-interval 2 [FW_A] cluster timer holding-multiplier 4 [FW_A] cluster timer hello 2 [FW_A] cluster backup node-num 2 [FW_A] cluster preempt delay 70 [FW_A] cluster ip-list node 1 negotiation 10.1.5.1 backup 10.1.6.1 forward 10.1.7.1 [FW_A] cluster ip-list node 2 negotiation 10.1.5.2 backup 10.1.6.2 forward 10.1.7.2 [FW_A] cluster ip-list node 3 negotiation 10.1.5.3 backup 10.1.6.3 forward 10.1.7.3 [FW_A] cluster node bind 1 [FW_A] cluster standby config enable [FW_A] cluster session fast-sync enable [FW_A] cluster enable - 配置业务组,将业务组关联到OSPF进程,实现路由引流。
以下配置请在集群管理主上配置,会自动同步到集群其他成员。 C_No1_M[FW_A] business-group 1 C_No1_M[FW_A-business-group-1] node 1 priority 100 C_No1_M[FW_A-business-group-1] node 2 priority 90 C_No1_M[FW_A-business-group-1] node 3 priority 80 C_No1_M[FW_A-business-group-1] bind ospf 1 C_No1_M[FW_A-business-group-1] quit C_No1_M[FW_A] business-group 2 C_No1_M[FW_A-business-group-2] node 1 priority 80 C_No1_M[FW_A-business-group-2] node 2 priority 100 C_No1_M[FW_A-business-group-2] node 3 priority 90 C_No1_M[FW_A-business-group-2] bind ospf 2 C_No1_M[FW_A-business-group-2] quit C_No1_M[FW_A] business-group 3 C_No1_M[FW_A-business-group-3] node 1 priority 90 C_No1_M[FW_A-business-group-3] node 2 priority 80 C_No1_M[FW_A-business-group-3] node 3 priority 100 C_No1_M[FW_A-business-group-3] bind ospf 3 C_No1_M[FW_A-business-group-3] quit - 配置安全策略。
以下配置请在集群管理主上配置,会自动同步到集群其他成员。 # 配置安全策略,允许内网用户访问外网。 C_No1_M[FW_A] security-policy C_No1_M[FW_A-policy-security] rule name policy_sec1 C_No1_M[FW_A-policy-security-rule-policy_sec1] source-zone trust C_No1_M[FW_A-policy-security-rule-policy_sec1] destination-zone untrust C_No1_M[FW_A-policy-security-rule-policy_sec1] source-address 10.4.0.0 16 C_No1_M[FW_A-policy-security-rule-policy_sec1] action permit C_No1_M[FW_A-policy-security-rule-policy_sec1] quit # 配置安全策略,允许FW与上下行路由器交互OSPF/BGP报文。 C_No1_M[FW_A-policy-security] rule name policy_sec2 C_No1_M[FW_A-policy-security-rule-policy_sec2] source-zone local C_No1_M[FW_A-policy-security-rule-policy_sec2] destination-zone trust untrust C_No1_M[FW_A-policy-security-rule-policy_sec2] action permit C_No1_M[FW_A-policy-security-rule-policy_sec2] quit C_No1_M[FW_A-policy-security] rule name policy_sec3 C_No1_M[FW_A-policy-security-rule-policy_sec3] source-zone trust untrust C_No1_M[FW_A-policy-security-rule-policy_sec3] destination-zone local C_No1_M[FW_A-policy-security-rule-policy_sec3] action permit C_No1_M[FW_A-policy-security-rule-policy_sec3] quit # 配置Local和DMZ的域间安全策略,允许封装后的GRE报文通过域间安全策略。 C_No1_M[FW_A-policy-security] rule name policy2 C_No1_M[FW_A-policy-security-rule-policy2] source-zone local dmz C_No1_M[FW_A-policy-security-rule-policy2] destination-zone dmz local C_No1_M[FW_A-policy-security-rule-policy2] action permit C_No1_M[FW_A-policy-security-rule-policy2] quit C_No1_M[FW_A-policy-security] quit - 配置路由器R1,具体配置命令请参考路由器的相关文档。
R1上接口IP等基础配置略。R2/R3上的配置与R1类似,请参考以下配置。 # 配置GRE隧道。Tunnel 1和FW_B建立GRE隧道;Tunnel 2和FW_C建立GRE隧道。 <R1> system-view [R1] interface Tunnel 1 [R1-Tunnel1] ip address 10.1.12.2 24 [R1-Tunnel1] tunnel-protocol gre [R1-Tunnel1] source 10.2.2.2 [R1-Tunnel1] destination 10.2.3.1 [R1-Tunnel1] quit [R1] interface Tunnel 2 [R1-Tunnel2] ip address 10.1.14.2 24 [R1-Tunnel2] tunnel-protocol gre [R1-Tunnel2] source 10.2.2.2 [R1-Tunnel2] destination 10.2.4.1 [R1-Tunnel2] quit # 配置OSPF。 [R1] ospf 1 [R1-ospf-1] import-route static type 1 [R1-ospf-1] area 0.0.0.1 [R1-ospf-1-area-0.0.0.1] network 10.2.2.0 0.0.0.255 [R1-ospf-1-area-0.0.0.1] quit [R1-ospf-1] area 0.0.0.2 [R1-ospf-1-area-0.0.0.2] network 10.1.12.0 0.0.0.255 [R1-ospf-1-area-0.0.0.2] quit [R1-ospf-1] area 0.0.0.3 [R1-ospf-1-area-0.0.0.3] network 10.1.14.0 0.0.0.255 [R1-ospf-1-area-0.0.0.3] quit [R1-ospf-1] quit - 配置路由器R4。具体配置命令请参考路由器的相关文档。
R4上接口IP等基础配置略。

<R4> system-view
[R4] bgp 10
[R4-bgp] router-id 4.4.4.4
[R4-bgp] peer 10.1.2.1 as-number 10
[R4-bgp] peer 10.1.3.1 as-number 10
[R4-bgp] peer 10.1.4.1 as-number 10
[R4-bgp] quit
结果验证
在集群管理主上执行display cluster negotiation status命令,查看集群协商的状态信息。
C_No1_M<FW_A> display cluster negotiation status

ID    status   health   version   join                 leave
------------------------------------------------------------
3     slave    10000    A         2018/02/20 16:56:14  NA
2     slave    10000    A         2018/02/20 16:56:17  NA
1*    master   10000    A         2018/02/20 16:55:32  NA
以上信息表示集群1000已经建立,存在3个成员,版本一致,健康度均是10000。

在管理主上执行display business-group brief命令,检查业务组信息。

C_No1_M<FW_A> display business-group brief
TotalBG:3   Master:1    Slave:2    Invalid:0   Init:0
BGID   State      TopThree         IP_num  Pre_Preempt  next_master
-------------------------------------------------------------------------------
  1   master      1 2 3               0        NO            -
  2   slave       2 3 1               0        NO            -
  3   slave       3 1 2               0        NO            -
以上信息表示:FW_A作为业务组1的主设备;作为业务组2、3的备设备;每个业务组的排序符合预期。
- 在R4上查看路由表,正常情况下去DC1的下一跳地址是10.1.2.1。当FW_A故障后,通往DC1的下一跳地址变成10.1.3.1,即通过FW_B转发。
配置脚本
本例中,集群成员上的配置基本一致。主要差异在:接口IP和本设备对应集群节点ID。
下面配置文件以FW_A为例,差异部分会加粗显示,请注意替换。
#
cluster id 1000
cluster detect-interval 2
cluster timer holding-multiplier 4
cluster timer hello 2
cluster backup node-num 2
cluster preempt delay 70
cluster standby config enable
cluster session fast-sync enable
cluster preempt
cluster ip-list node 1 negotiation 10.1.5.1 backup 10.1.6.1 forward 10.1.7.1
cluster ip-list node 2 negotiation 10.1.5.2 backup 10.1.6.2 forward 10.1.7.2
cluster ip-list node 3 negotiation 10.1.5.3 backup 10.1.6.3 forward 10.1.7.3
cluster node bind 1
cluster enable
#
 business-group 1
  node 1 priority 100
  node 2 priority 90
  node 3 priority 80
  bind ospf 1
 business-group 2
  node 1 priority 80
  node 2 priority 100
  node 3 priority 90
  bind ospf 2
 business-group 3
  node 1 priority 90
  node 2 priority 80
  node 3 priority 100
  bind ospf 3
#
ospf 1
 area 0.0.0.1
  network 10.2.2.0 0.0.0.255
#
ospf 2
 area 0.0.0.1
  network 10.1.10.0 0.0.0.255
#
ospf 3
 area 0.0.0.1
  network 10.1.11.0 0.0.0.255
#
bgp 10
 router-id 1.1.1.1
 peer 10.1.2.2 as-number 10
 ipv4-family unicast
  undo synchronization
  import-route ospf 1
  import-route ospf 2
  import-route ospf 3
  peer 10.1.2.2 enable
#
firewall zone trust
 set priority 85
 add interface GigabitEthernet 1/0/2
#
firewall zone untrust
 set priority 5
 add interface GigabitEthernet 1/0/1
#
firewall zone dmz
 set priority 50
 add interface Eth-Trunk1
 add interface Eth-Trunk2
 add interface Eth-Trunk3
 add interface Tunnel1
 add interface Tunnel2
#
interface GigabitEthernet 1/0/1
 ip address 10.1.2.1 255.255.255.0
#
interface GigabitEthernet 1/0/2
 ip address 10.2.2.1 255.255.255.0
#
interface GigabitEthernet 1/0/3
 eth-trunk 1
#
interface GigabitEthernet 1/0/4
 eth-trunk 1
#
interface GigabitEthernet 1/0/5
 eth-trunk 2
#
interface GigabitEthernet 1/0/6
 eth-trunk 2
#
interface GigabitEthernet 1/0/7
 eth-trunk 3
#
interface GigabitEthernet 1/0/8
 eth-trunk 3
#
interface Eth-Trunk1
 ip address 10.1.5.1 255.255.255.0
#
interface Eth-Trunk2
 ip address 10.1.6.1 255.255.255.0
#
interface Eth-Trunk3
 ip address 10.1.7.1 255.255.255.0
#
interface Tunnel1
 ip address 10.1.10.1 255.255.255.0
 tunnel-protocol gre
 source 10.2.2.1
 destination 10.2.3.2
#
interface Tunnel2
 ip address 10.1.11.1 255.255.255.0
 tunnel-protocol gre
 source 10.2.2.1
 destination 10.2.4.2
#
security-policy
 rule name policy_sec1
  source-zone trust
  destination-zone untrust
  source-address 10.4.0.0 16
  action permit
 rule name policy_sec2
  source-zone local
  destination-zone local
  destination-zone untrust
  action permit
 rule name policy_sec3
  source-zone untrust
  source-zone trust
  destination-zone local
  action permit
 rule name policy2
  source-zone local
  source-zone dmz
  destination-zone local
  destination-zone dmz
  action permit
#