文件fs模块
读取文件内容
fs.readFile('./file/fs-01.txt', 'utf8', (err, data) => {
  if (err) {
    console.error(err)
    return
  }
  console.log(data)
})
写入内容到文件
const fs = require('fs');

const filePath = "./file/output.txt";

fs.writeFile(filePath, "Hello World", {mode: 0o666,flag: 'a'},(err) => {
    if (err) {
        console.log(err);
    } else {
        console.log("File written successfully");
    }
});
path模块使用
const path = require("path");
const fs = require("fs");

let absolutPath = path.join(__dirname,"file","output.txt");
// 绝对路径
console.log(absolutPath);
// 文件名 output.txt
console.log(path.basename(absolutPath));
// 扩展名 .txt
console.log(path.extname(absolutPath));

fs.readFile(absolutPath,{encoding:'utf-8'},
     (err,data) => {
    if (err){
        console.log('read fail')
        return 0;
    }
    console.log('read success:',data);

    const split = data.split(" ");
    if (split.length < 0){
        return 0;
    }

    let arr = [];
    split.forEach(item=>{
        arr.push(item.replace("=",":"));
    });

    let join = arr.join("\r\n");
    console.log(join);

});
正则表达式匹配
// \s 匹配任意空白字符 \S 匹配任意非空白字符
let styleReg = /<style>[\s\S]*<\/style>/;
http模块
const http = require("http");
const fs = require("fs");
const path = require("path");

let server = http.createServer();
server.on("request",(req,res) => {
    // 设置响应头
    res.setHeader("Content-Type","text/html;charset=utf-8");
    // 响应内容变量
    let content = "<h1>404</h1>";
    // 获取客户端请求的URL地址
    let url = req.url;

    if ("/favicon.ico" === url){
        return 0;
    }else if ("/" === url){
        url = "/index.html";
    }

    const fPath = path.join(__dirname,"file",url);
    console.log(fPath);

    fs.readFile(fPath,"utf-8",(err,data) => {
        if (err){
            console.log("request err:",err);
            res.end(content);
        }else {
            content = data;
            res.end(content);
        }
    })
});

server.listen(8080,() => {
    console.log("server start http://localhost:8080")
});
module使用
定义
console.log("我是m1模块");
// console.log(module);

function sum(a,b){
    return a+b;
}

function sayHello(){
    console.log("sayHello...");
    return 1;
}

const uname= "我是妹妹";

// 暴露模块,最终共享的结果以module.exports为准
module.exports = {
    sum,
    uname,
    sayHello
}
// module.exports.uname = "我是妹妹";
使用
const m1 = require("./m1");

console.log(m1.sum(1,2));
m1.sayHello();
console.log(m1.uname);
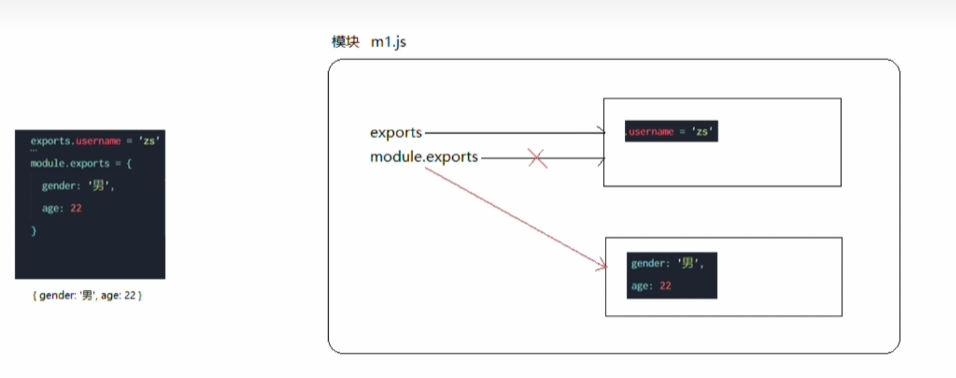
最终共享的结果以module.exports为准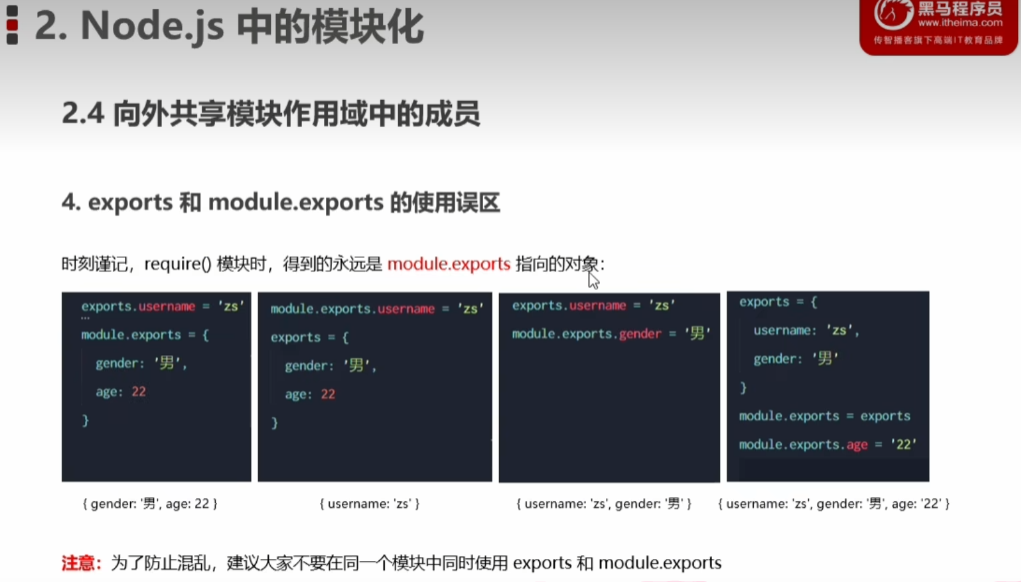
CommonJS规范

npm和包
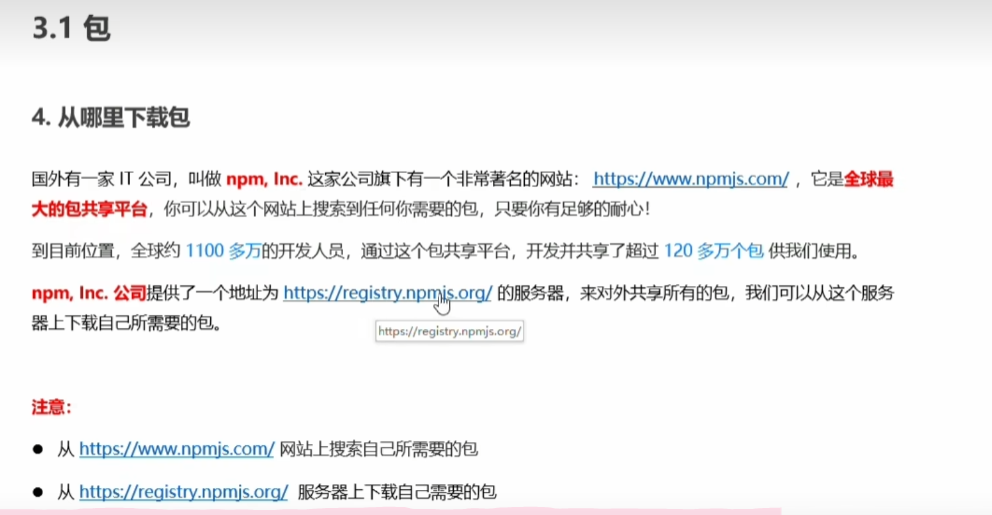
安装cnpm
npm install -g cnpm --registry=https://registry.npm.taobao.org
安装
// 安装最新
npm i/install moment
// 安装指定版本
// 查看版本
// npm view 包名 versions
npm view moment versions
[
'1.0.0', '1.0.1', '1.1.0', '1.1.1', '1.2.0',
'1.3.0', '1.4.0', '1.5.0', '1.5.1', '1.6.0',
'1.6.1', '1.6.2', '1.7.0', '1.7.1', '1.7.2',
'2.0.0', '2.1.0', '2.2.1', '2.3.0', '2.3.1',
'2.4.0', '2.5.0', '2.5.1', '2.6.0', '2.7.0',
'2.8.1', '2.8.2', '2.8.3', '2.8.4', '2.9.0',
'2.10.2', '2.10.3', '2.10.5', '2.10.6', '2.11.0',
'2.11.1', '2.11.2', '2.12.0', '2.13.0', '2.14.0',
'2.14.1', '2.15.0', '2.15.1', '2.15.2', '2.16.0',
'2.17.0', '2.17.1', '2.18.0', '2.18.1', '2.19.0',
'2.19.1', '2.19.2', '2.19.3', '2.19.4', '2.20.0',
'2.20.1', '2.21.0', '2.22.0', '2.22.1', '2.22.2',
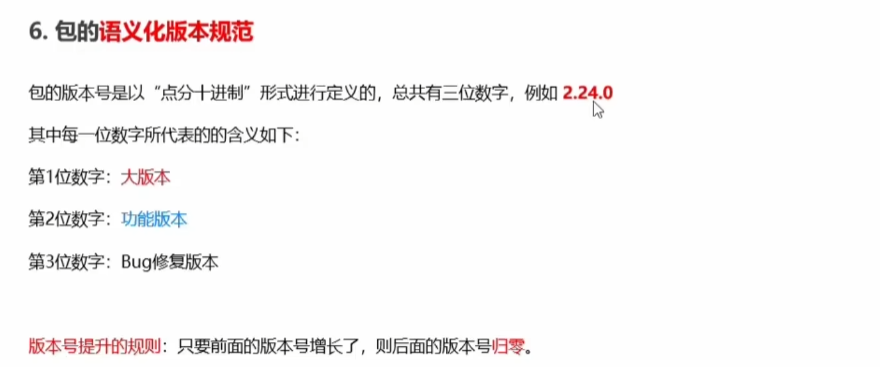
'2.23.0', '2.24.0', '2.25.0', '2.25.1', '2.25.2',
'2.25.3', '2.26.0', '2.27.0', '2.28.0', '2.29.0',
'2.29.1', '2.29.2', '2.29.3', '2.29.4', '2.30.0',
'2.30.1'
]
npm i moment@2.30.0
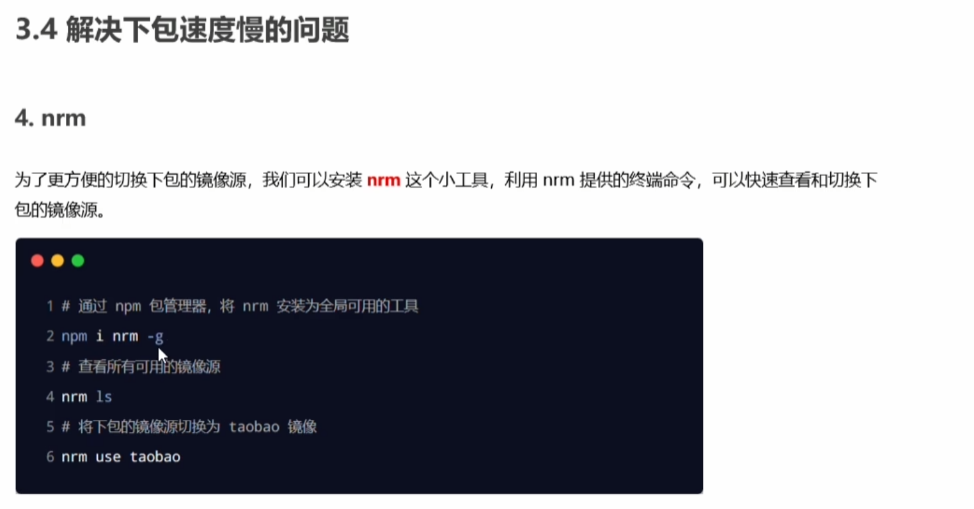
解决包下载慢问题
开发自己的包

发布包到npm
要将包发布到 npm ,可以按照以下步骤进行操作:
- 确保你已经注册了
npm账号。 - 创建一个具有适当结构和功能的包。
- 在项目根目录下运行
npm login命令,使用你的npm账号登录。 - 编辑
package.json文件,确保其中包含必要的信息,如包的名称、描述、版本等。 - 在命令行中进入项目根目录。
- 运行
npm publish命令来发布包。 - 等待发布过程完成。
发布包到 npm 后,其他开发者就可以通过 npm install 命令安装你的包了。
在发布之前,还需要注意以下几点:
- 确保包的质量和稳定性。
- 遵循
npm的最佳实践和规范。 - 仔细阅读
npm的文档,了解相关的规定和限制。 - 对包进行充分的测试。
模块加载机制

express框架
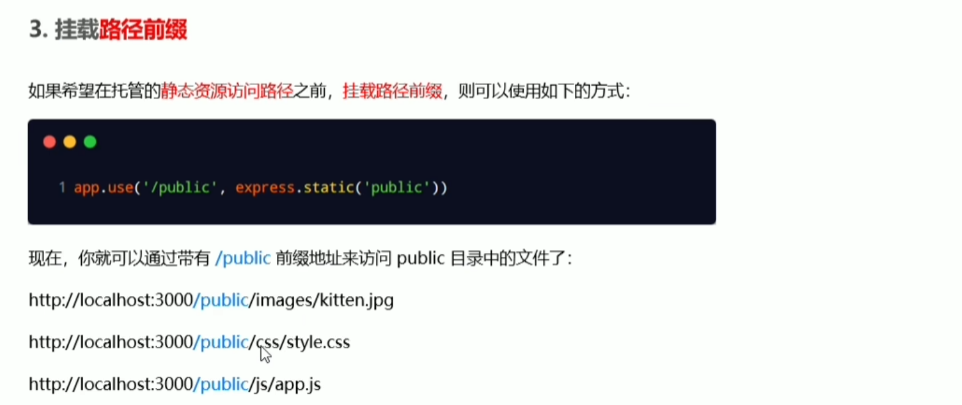
托管静态资源
const express = require("express");
const path = require("path");
const app = express();
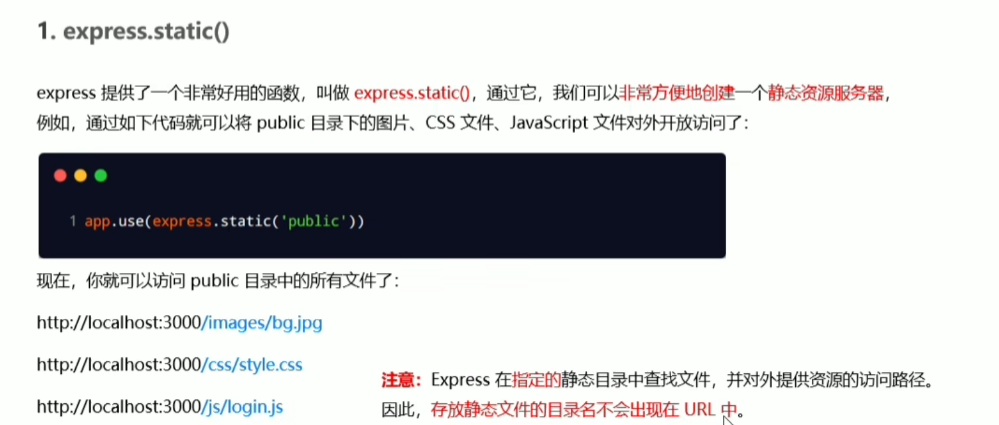
// 托管静态资源
app.use(express.static(path.join(__dirname,"../../public")));
const server = app.listen(8080,()=>{
let address = server.address().address;
let port = server.address().port;
console.log("server express : http://127.0.0.1:%s",port);
});
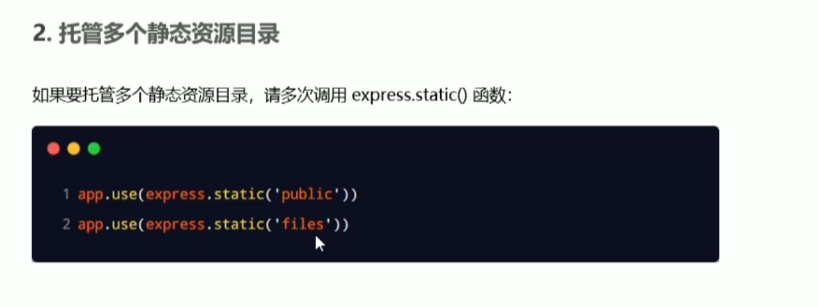
托管多个静态资源
nodemon
Nodemon 是一个用于开发 Node.js 应用程序的实用工具。它的主要功能是在代码更改时自动重新启动 Node.js 服务器,以便你能够实时看到代码更改的效果。
以下是使用 Nodemon 的一般步骤:
- 安装 Nodemon:可以使用包管理工具(如 npm)进行安装。
npm install nodemon
- 在命令行中使用 Nodemon 启动你的 Node.js 应用程序。
nodemon your_script.js
其中 your_script.js 是你的 Node.js 脚本文件。
- Nodemon 会监控你的代码文件更改,并在保存时自动重新启动服务器。
使用 Nodemon 的好处包括:
- 实时反馈:你可以立即看到代码更改的效果,无需手动重新启动服务器。
- 提高开发效率:减少了手动重新启动服务器的时间和麻烦。
- 方便调试:能够快速发现和解决问题。
请注意,Nodemon 还有许多其他配置选项,可以根据你的具体需求进行调整。
模块化路由
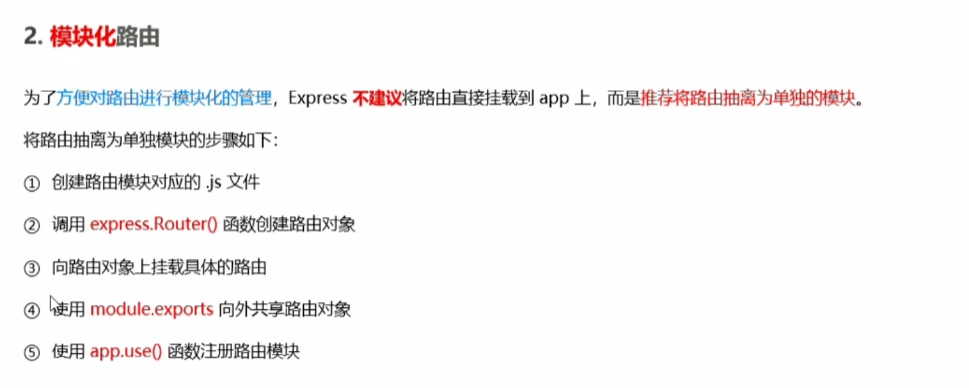
router.js
let express = require("express");

let router = express.Router();

router.get('/user',function (req,res){
    res.send("user");
});

router.post("/about",function (req,res){
    res.send("about");
});

module.exports = router;
// module.exports = {
//     router
// }
index.js
const express = require("express");
const router = require("./router");

const app = express();

//注册路由
app.use(router);
//注册路由,加访问前缀
// app.use("/api",router);

app.listen(8080,()=>{
    console.log("server express : http://127.0.0.1:8080");
});
路由加前缀

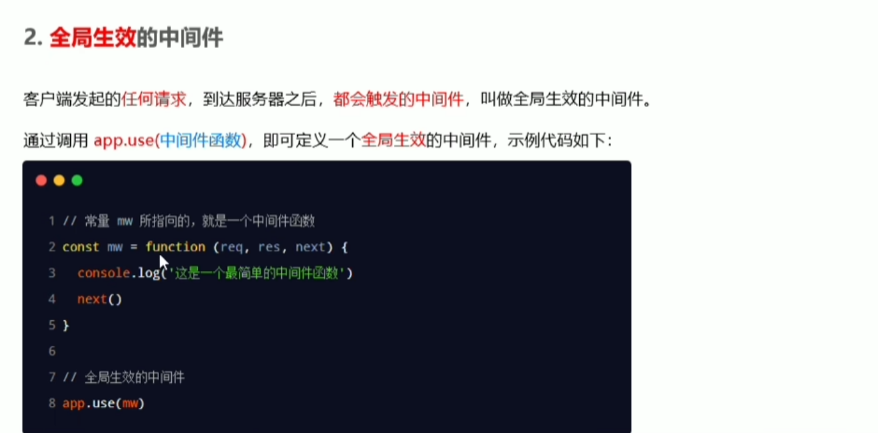
中间件
const express = require("express");
const moment = require("moment");

const router = require("./router");

const app = express();

// 中间件
const requestTime = function (req,res,next){
    req.requestTime = moment(new Date()).format("YYYY-MM-DD HH:mm:ss")
    next()
}
app.use(requestTime)
//注册路由
app.use("/api",router);

app.listen(8080,()=>{
    console.log(moment(new Date()).format("YYYY-MM-DD HH:mm:ss"))
    console.log("server express : http://127.0.0.1:8080");
});
let express = require("express");

let router = express.Router();

router.get('/user',function (req,res){
    // 打印中间件参数
    console.log("requestTime:",req.requestTime)
    res.send("user");
});

router.post("/about",function (req,res){
    res.send("about");
});

module.exports = router;
// module.exports = {
//     router
// }
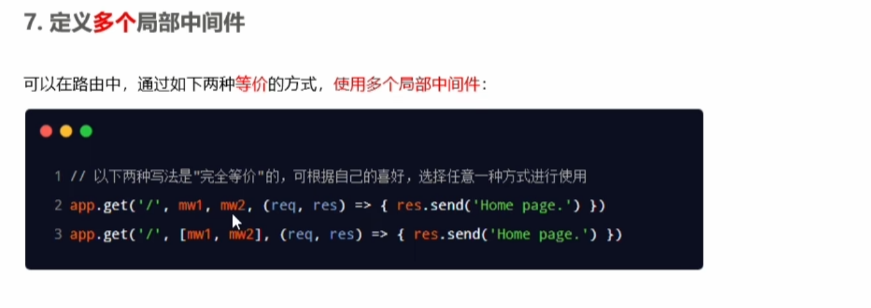
中间件全局生效
中间件局部生效
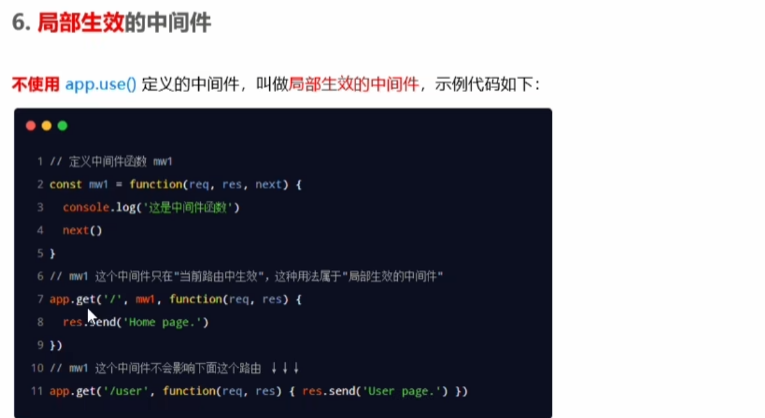
router.get('/middleware',function (req,res,next){
    console.log("局部中间件");
    next();
},function (req,res){
    res.send("middleware");
})
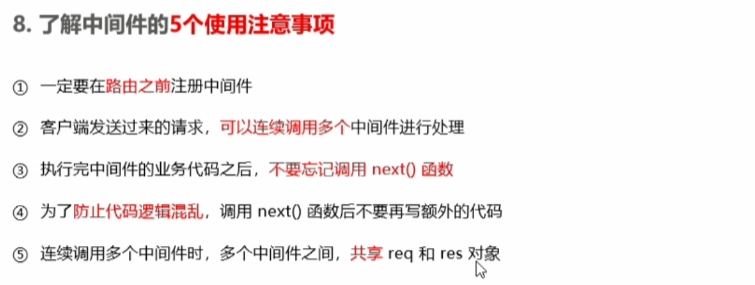
中间件的分类
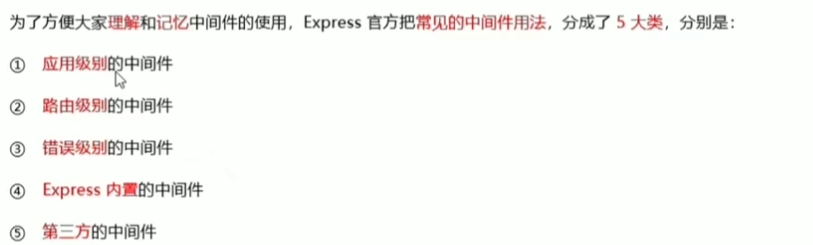
应用级别
绑定在app身上
路由级别
绑定在路由router身上
错误级别
// 错误中间件必须注册在路由之后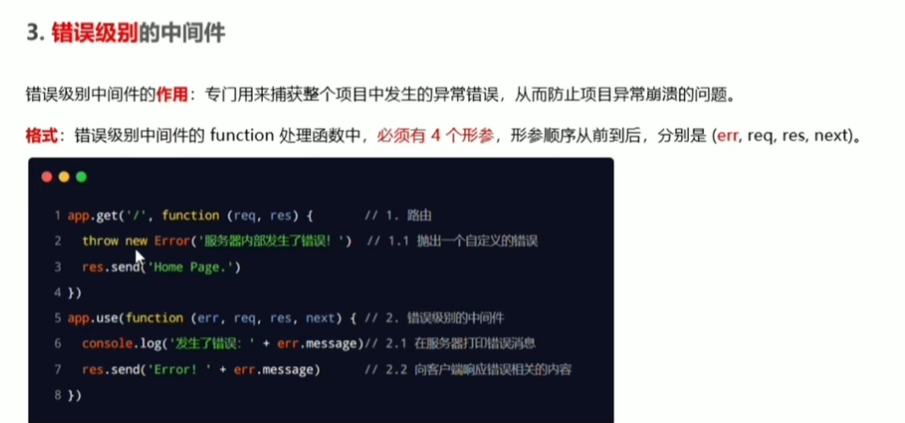
const express = require("express");
const app = express();

app.get('/',(req,res)=>{
    throw new Error("发送错误");
})

app.get('/user',(req,res)=>{
    res.send("user page");
})
// 错误中间件必须注册在路由之后
app.use(function (err,req,res,next){
    console.log("异常级别中间件");
    if (err){
        res.send('err:'+err.message);
        next();
    }
});

app.listen(8080,()=>{
    console.log("server express : http://127.0.0.1:8080");
});
express内置中间件
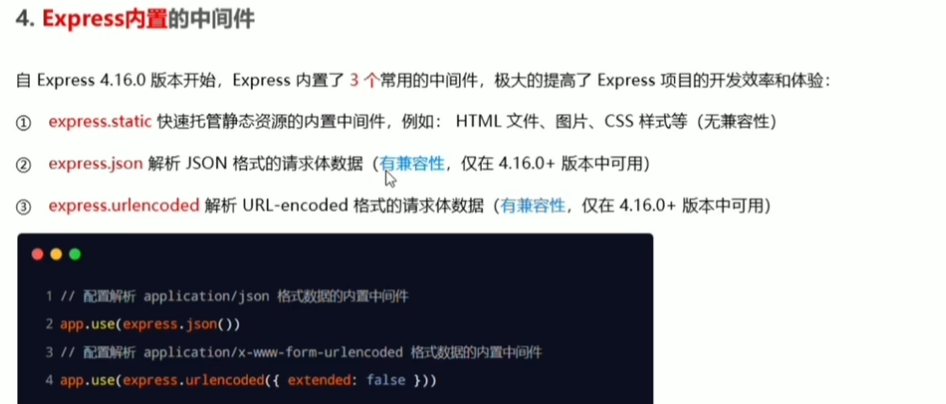
const express = require("express");
const app = express();

//中间件
// 用来解析application/json表单的中间件
app.use(express.json())
// 用来解析x-www-from-urlencoded表单的中间件
app.use(express.urlencoded())

app.post('/user',(req,res)=>{
    let body = req.body;// 如果没有配置解析表单的中间件,body是undefined
    console.log(body)
    res.send("user page");
})


app.listen(8080,()=>{
    console.log("server express : http://127.0.0.1:8080");
});
第三方中间件
const express = require("express");
// const path = require("path");
const bodyParser = require("body-parser");

const app = express();

app.use(bodyParser.json());
app.use(bodyParser.urlencoded({extended:false}))

app.post('/index',function (req,res){
    console.log(req.body);
    res.send("index");
});

app.listen(8080,()=>{
    console.log("server express : http://127.0.0.1:8080");
});
自定义中间件
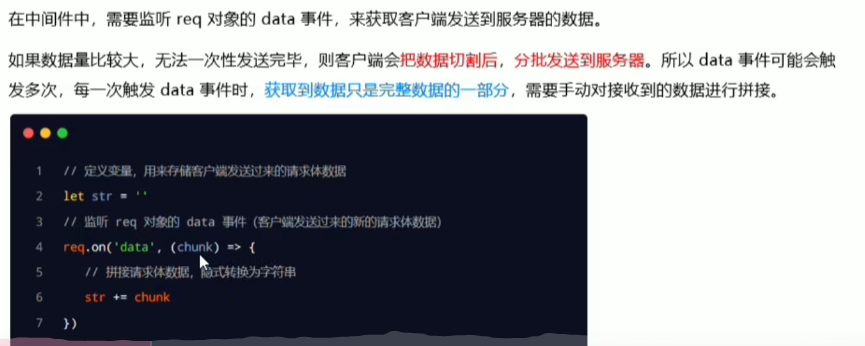
监听req的data事件
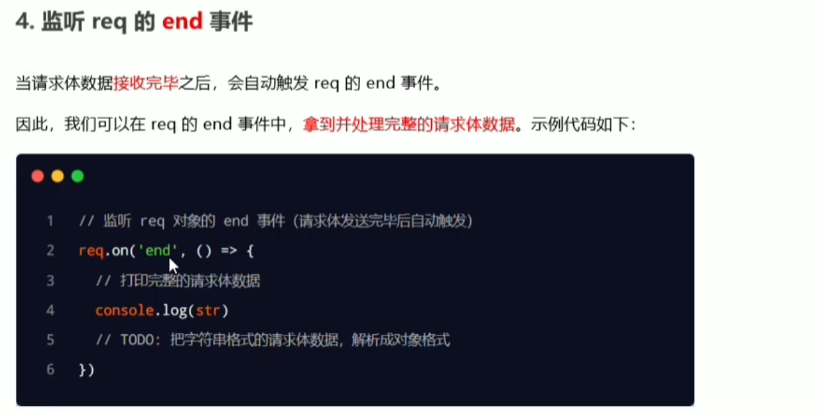
完整代码
const express = require("express");
const querystring= require("querystring");

const app = express();

// 解析表单数据的中间件
app.use(function (req,res,next){
    let formData= "";

    req.on("data",(chunk)=>{
        formData += chunk;
    })

    req.on("end",()=>{
        console.log(formData);
        let body = querystring.parse(formData);
        console.log(body);
        req.body = body;
        next();
    })
})

app.post('/index',function (req,res){
    console.log(req.body);
    console.log(req.body.bookname);
    res.send("index");
});

app.listen(8080,()=>{
    console.log("server express : http://127.0.0.1:8080");
});
练习
apiRouter.js
index.js
cors问题
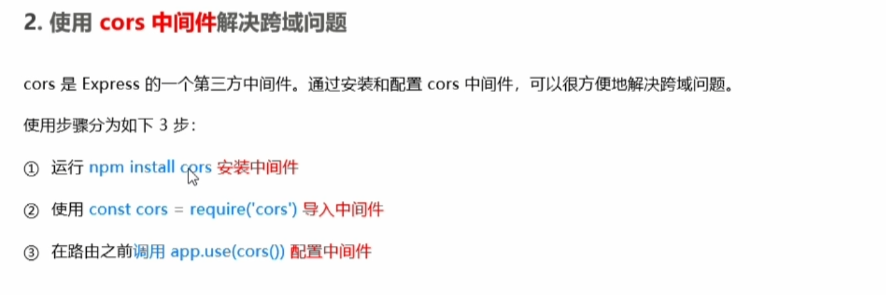
cnpm install cors
const cors = require('cors')
app.use(cors())
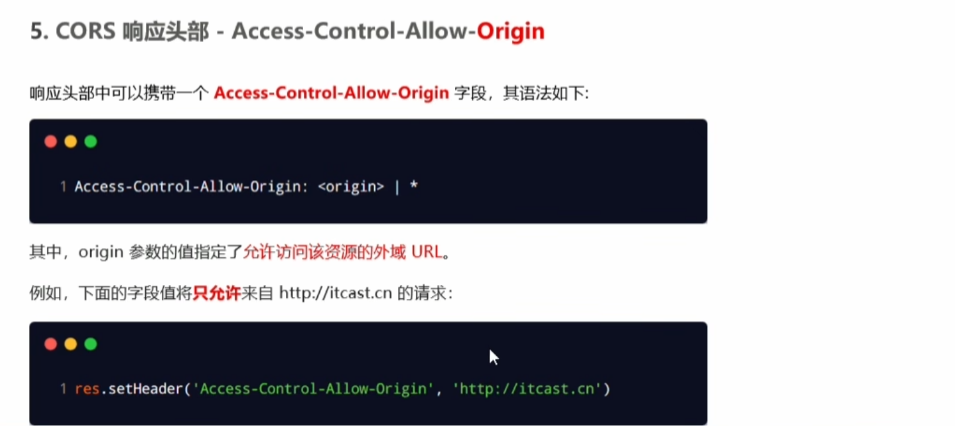
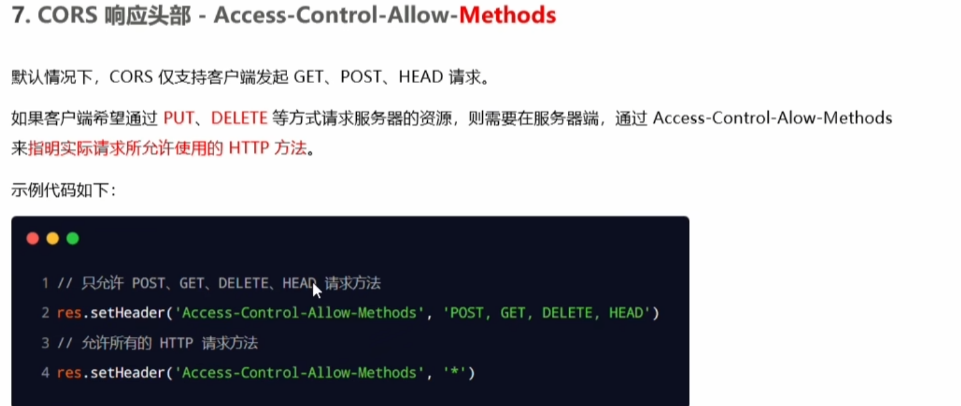
cors三个响应头


jsonp解决跨越
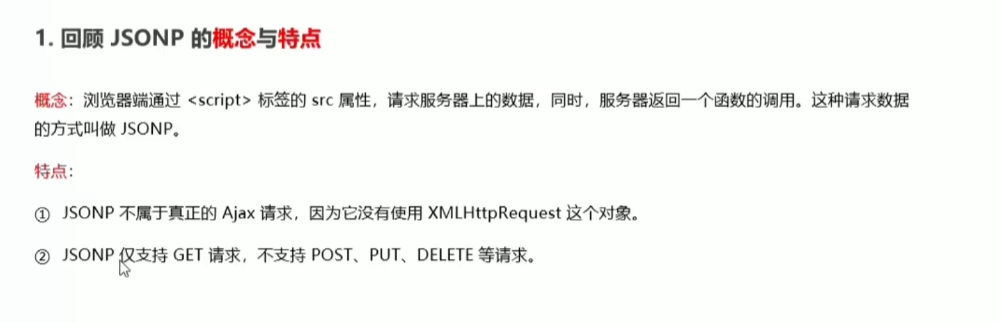
JSONP 是 JSON 的一种使用模式,全称为 JSON with Padding,即“带回调的 JSON”。它可以绕过浏览器的同源策略,进行跨域请求。
JSONP 利用了
express-session会话
// 安装session
// cnpm install express-session

const express = require("express");
// 导入 session
const session = require("express-session");

const app = express();

app.use(express.json())
app.use(express.urlencoded({extended: false}))

// 配置 session
app.use(session({
  secret: 'test123',//任意
  resave: true,//固定
  saveUninitialized: true //固定
}))

app.post('/api/login',(req,res)=>{
  // 验证登录
  if (req.body.username !== 'admin' || req.body.password !== '000000'){
    return res.send({status: 1,msg: "登录失败"});
  }
  // 存储会话
  // 配置了express-session,可以存储session
  req.session.user = req.body;
  req.session.isLogin = true;

  return res.send({status: 0,msg: "登录成功"});
})

app.get('/api/username',(req,res)=>{
  if (!req.session.isLogin){
    return res.send({status: 1,msg: "没有登录"});
  }
  return res.send({
    status: 0,
    msg: "获取成功",
    data: req.session.user.username
  });
})

app.get('/api/logout',(req,res)=>{
  if (!req.session.isLogin){
    return res.send({status: 1,msg: "没有登录"});
  }
  // 清空session
  req.session.destroy();
  return res.send({status: 0,msg: "ok"});
})

app.listen(8080,()=>{
  console.log("server start:http://localhost:8080");
})
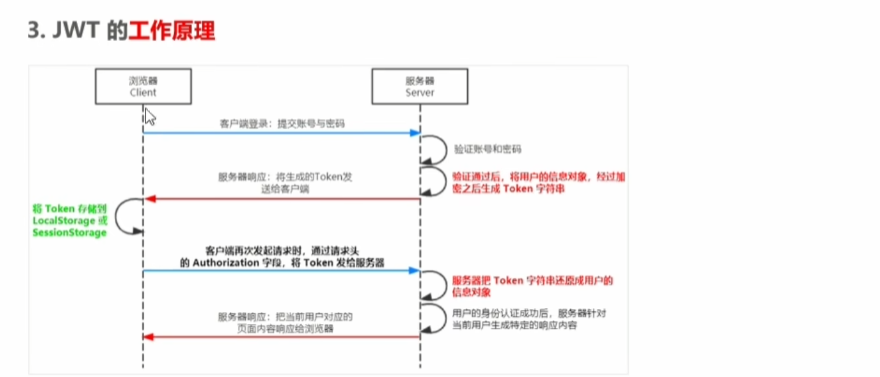
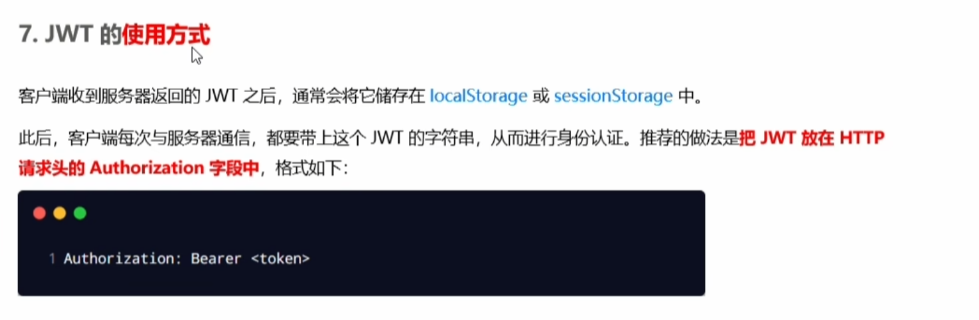
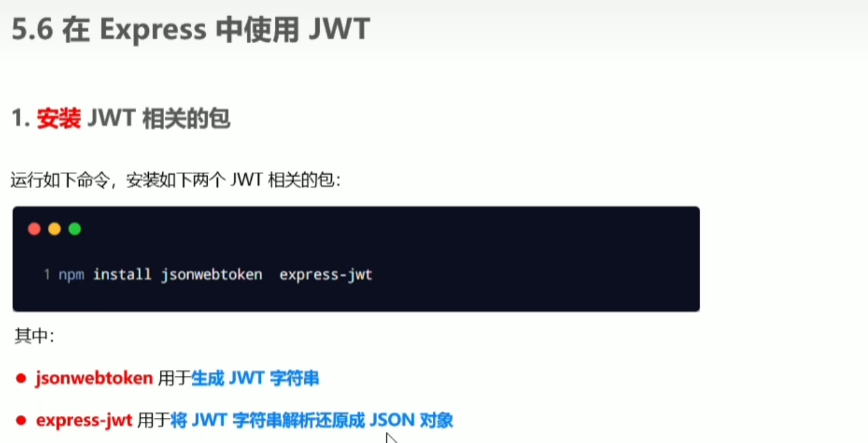
jwt认证


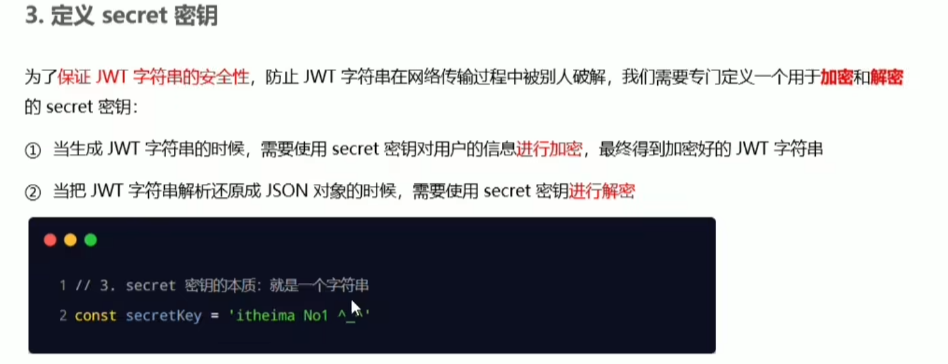
const crypto = require("crypto");
module.exports = {
MD5_SUFFIX: "tangzhenhua",
md5: pwd => {
let md5 = crypto.createHash("md5");
return md5.update(pwd).digest("hex");
},
secretKey: "tangzhenhua",
};
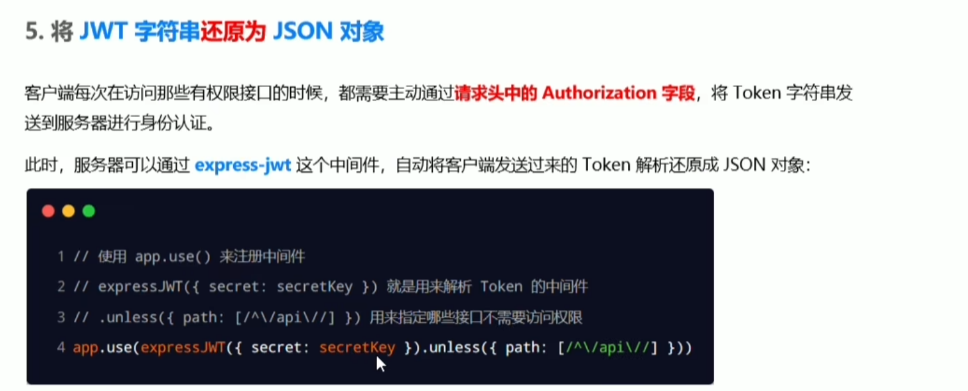
const { secretKey } = require("./salt");
const jwt = require("jsonwebtoken");
const {expressjwt} = require("express-jwt");
// 生成 token
const createToken = payload => jwt.sign(payload, secretKey, { expiresIn: 60 * 60 * 240 });
// 验证 token
const jwtAuth = expressjwt({
secret: secretKey,
algorithms: ["HS256"],
credentialsRequired: true,
});
// 不需要校验的路径
jwtAuth.unless({ path:("/api/login") });
module.exports = { jwtAuth, createToken };
// cnpm install jsonwebtoken express-jwt
const express = require("express");
// jwt相关
let { jwtAuth,createToken } = require("./util");
const app = express();
app.use(jwtAuth);
app.use(express.json())
app.use(express.urlencoded({extended: false}))
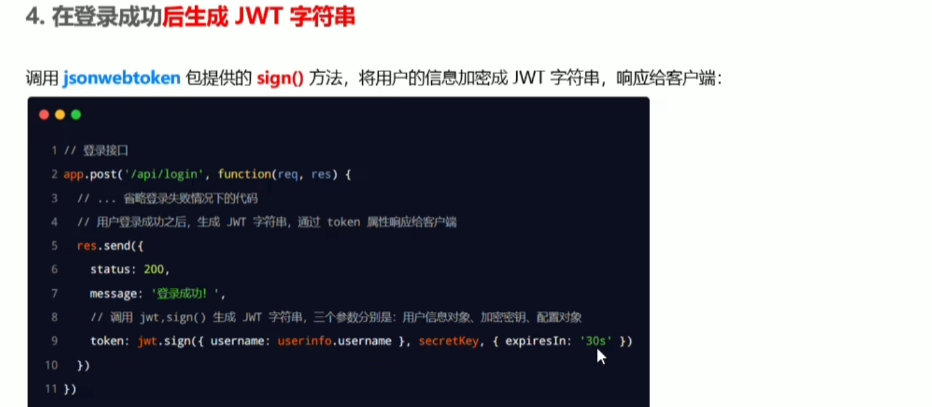
app.post('/api/login',(req,res)=>{
// 验证登录
if (req.body.username !== 'admin' || req.body.password !== '000000'){
return res.send({status: 1,msg: "登录失败"});
}
let token = createToken({username: req.body.username})
console.log("token=",token)
return res.send({
status: 0,
msg: "登录成功",
token: token
});
})
app.get('/admin/getUserInfo',(req,res)=>{
let userInfo = req.user;
return res.send({
status: 0,
msg: "获取成功",
data: userInfo
});
})
// 错误处理中间件,处理 JWT 鉴权失败
app.use((err, req, res, next) => {
if (err.name === 'UnauthorizedError') {
res.status(401).json({error: 'Invalid token'});
}
});
app.listen(8080,()=>{
console.log("server start:http://localhost:8080");
})
MySQL模块
安装mysql
cnpm install mysql
const mysql = require('mysql');
const connection = mysql.createConnection({
    host: 'localhost',
    port: 3306,
    user: 'root',
    password: 'root',
    database: 'test'
});

connection.connect((err) => {
    if (err) throw err;
    console.log('Connected!');

    // 查询
    connection.query('SELECT * FROM users', (err, rows) => {
        if (err) throw err;
        console.log('Data received from MySQL:', rows);
    });

    // 新增
    // let sql = 'insert into users(username, password) values (?,?)';
    // let inserts = ['test', '123456'];
    // sql = mysql.format(sql, inserts);
    // console.log("sql=>",sql);
    // connection.query(sql,function (err,result){
    //     if (err) throw err;
    //     console.log('--------------------------INSERT----------------------------');
    //     console.log('INSERT ID:',result);
    //     console.log('------------------------------------------------------------\n\n');
    // })

    // 更新
    // let updateSql = "update users set username = ? ,password = ? where id = 3";
    // let updateSqlParams = ['crazyfur','654321'];
    // connection.query(updateSql,updateSqlParams,function (err,result){
    //     if (err) throw err;
    //     console.log('--------------------------UPDATE----------------------------');
    //     console.log('UPDATE affectedRows',result.affectedRows);
    //     console.log('------------------------------------------------------------\n\n');
    // })

    // 删除
    let delSql = "delete from users where id = 3";
    connection.query(delSql,(err,result)=>{
        if (err) throw err;
        console.log('--------------------------DELETE----------------------------');
        console.log('DELETE affectedRows',result.affectedRows);
        console.log('------------------------------------------------------------\n\n');
    })

    // 关闭连接
    connection.end((err) => {
        if (err) {
            console.error('Error occurred while closing the connection:', err);
        } else {
            console.log('Connection closed successfully.');
        }
    });
});

项目实战
表单校验
npm install joi
npm i @escook/express-joi
https://blog.csdn.net/doiido/article/details/131967068
定义
const joi = require("joi");

/**
 * string() 值必须是字符串
 * alphanum() 值只能是包含 a-zA-Z0-9 的字符串
 * min(length) 最小长度
 * max(length) 最大长度
 * required() 值是必填项,不能为 undefined
 * pattern( 正则表达式 ) 值必须符合正则表达式的规则
 */


// 用户名的验证规则
const username = joi.string().alphanum().min ( 1 ). max ( 10 ).required ()
// 密码的验证规则
const password = joi.string().pattern( /^\S{6,12}$/ ).required ()
// 注册和登录表单的验证规则对象
exports.reg_login_schema = {
    // 表示需要对 req.body 中的数据进行验证
    body : {
        username ,
        password ,
    },
}
使用
const express = require("express")

const router = express.Router()

const userHandler = require("../router_handler/user")

// 1. 导入验证表单数据的中间件
const expressJoi = require ( '@escook/express-joi' )
// 2. 导入需要的验证规则对象
const { reg_login_schema } = require ( '../schema/user' )
// 3. 使用规则
router.post("/register",expressJoi(reg_login_schema),userHandler.userRegister)
router.post("/login",userHandler.userLogin)

module.exports = router;
mongoose
npm install mongoose
let mongoose = require('mongoose');
mongoose.connect('mongodb://localhost:27017/test').then(()=>{
    console.log("ok")
}).catch(err=>{
    console.log(err);
});

//监听数据库连接状态
mongoose.connection.once('open',()=>{
    console.log('数据库连接成功……')

    const Schema = mongoose.Schema;
    //创建Schema对象(约束)
    let stuSchema = new Schema({
        name: String,
        age: Number,
        gender:{
            type: String,
            default:'male',
            required: true
        },
        addr: String,
    },{timestamps:true})

    //将stuSchema映射到一个MongoDB collection并定义这个文档的构成
    let StuModule = mongoose.model('student',stuSchema);

    new StuModule({
        name: '小明',
        age: 18,
        addr: '北京'
    }).save().then((result)=>{
        console.log(result)
    }).catch(err=>{
        console.log(err);
    })

})

mongoose.connection.once('close',()=>{
    console.log('数据库断开……')
})