一、文件存储
<LinearLayout xmlns:android="http://schemas.android.com/apk/res/android"
    android:orientation="vertical"
    android:layout_width="match_parent"
    android:layout_height="match_parent" >
    <EditText
        android:id="@+id/editText"
        android:layout_width="match_parent"
        android:layout_height="wrap_content"
        android:hint="Type something here"
        />
</LinearLayout>
package com.jpc.filepersistencetest

import android.content.Context
import androidx.appcompat.app.AppCompatActivity
import android.os.Bundle
import android.widget.EditText
import android.widget.Toast
import java.io.BufferedReader
import java.io.BufferedWriter
import java.io.InputStreamReader
import java.io.OutputStreamWriter
import java.lang.StringBuilder

class MainActivity : AppCompatActivity() {
    private lateinit var editText: EditText
    override fun onCreate(savedInstanceState: Bundle?) {
        super.onCreate(savedInstanceState)
        setContentView(R.layout.activity_main)
        editText = findViewById<EditText>(R.id.editText)
        val fileData = load()
        if (fileData.isNotEmpty()) {
            // 调用EditText的setText()方法将内容填充到EditText
            //里,并调用setSelection()方法将输入光标移动到文本的末尾位置以便继续输入
            editText.setText(fileData)
            editText.setSelection(fileData.length)
            Toast.makeText(this, "数据已恢复", Toast.LENGTH_SHORT).show()
        }
    }

    // 在销毁时保存数据到文件中
//    override fun onDestroy() {
//        super.onDestroy()
//        val inputText = editText.text.toString()
//        save(inputText)
//    }

    private fun save(inputText: String){
        // 保存数据到TXT文件中,文件名data
        val output = openFileOutput("data", Context.MODE_PRIVATE)
        val writer = BufferedWriter(OutputStreamWriter(output))
        writer.use {
            it.write(inputText)
        }
    }
    // 从文件中加载数据
    private fun load():String {
        val builder = StringBuilder()
        val input = openFileInput("data")
        val reader = BufferedReader(InputStreamReader(input))
        reader.use {
            reader.forEachLine {
                builder.append(it)
            }
        }
        return builder.toString()
    }
}
二、SharedPreferences存储
不同于文件的存储方式,SharedPreferences是使用键值对的方式来存储数据的。当保存一条数据的时候,需要给这条数据提供一个对应的键,这样在读取数据的时候就可以通过这个键把相应的值取出来。SharedPreferences还支持多种不同的数据类型存储,如果存储的数据类型是整型,那么读取出来的数据也是整型的;如果存储的数据是一个字符串,那么读取出来的数据仍然是字符串。
<Button
        android:id="@+id/btn_save_SharedPreferences"
        android:layout_width="wrap_content"
        android:layout_height="wrap_content"
        android:text="保存数据"
        />
// 指定SharedPreferences的文件名为data,并得到了
        //SharedPreferences.Editor对象。接着向这个对象中添加了3条不同类型的数据,最
        //后调用apply()方法进行提交,从而完成了数据存储的操作
        val btnSave: Button = findViewById<Button>(R.id.btn_save_SharedPreferences)
        btnSave.setOnClickListener{
            val editor = getSharedPreferences("data", Context.MODE_PRIVATE).edit()
            editor.putString("name", "Tom")
            editor.putInt("age", 28)
            editor.putBoolean("married", false)
            editor.apply()
        }
<?xml version='1.0' encoding='utf-8' standalone='yes' ?>
<map>
    <string name="name">Tom</string>
    <boolean name="married" value="false" />
    <int name="age" value="28" />
</map>
SharedPreferences对象中提供了一系列的get方法,用于读取存储的数据,每种get方法都对应了SharedPreferences.Editor中的一种put方法,比如读取一个布尔型数据就使用getBoolean()方法,读取一个字符串就使用getString()方法。这些get方法都接收两个参数:第一个参数是键,传入存储数据时使用的键就可以得到相应的值了;第二个参数是默认值,即表示当传入的键找不到对应的值时会以什么样的默认值进行返回。
val btnRestore = findViewById<Button>(R.id.btn_restore_SharedPreferences)
        btnRestore.setOnClickListener{
            val prefs = getSharedPreferences("data", Context.MODE_PRIVATE)
            val name = prefs.getString("name", "")
            val age = prefs.getInt("age", 0)
            val married = prefs.getBoolean("married", false)
            Toast.makeText(this, "我的信息:${name}-${age}-${married}", Toast.LENGTH_SHORT).show()
        }
1、记住密码功能
<LinearLayout xmlns:android="http://schemas.android.com/apk/res/android"
 android:orientation="vertical"
 android:layout_width="match_parent"
 android:layout_height="match_parent">
 <LinearLayout
 android:orientation="horizontal"
 android:layout_width="match_parent"
 android:layout_height="wrap_content">
 <CheckBox
 android:id="@+id/rememberPass"
 android:layout_width="wrap_content"
 android:layout_height="wrap_content" />
 <TextView
 android:layout_width="wrap_content"
 android:layout_height="wrap_content"
 android:textSize="18sp"
 android:text="Remember password" />
 </LinearLayout>
 <Button
 android:id="@+id/login"
 android:layout_width="match_parent"
 android:layout_height="60dp"
 android:text="Login" />
</LinearLayout>
class LoginActivity : BaseActivity() {
 override fun onCreate(savedInstanceState: Bundle?) {
 super.onCreate(savedInstanceState)
 setContentView(R.layout.activity_login)
 val prefs = getPreferences(Context.MODE_PRIVATE)
www.blogss.cn
 val isRemember = prefs.getBoolean("remember_password", false)
 if (isRemember) {
 // 将账号和密码都设置到文本框中
 val account = prefs.getString("account", "")
 val password = prefs.getString("password", "")
 accountEdit.setText(account)
 passwordEdit.setText(password)
 rememberPass.isChecked = true
 }
 login.setOnClickListener {
 val account = accountEdit.text.toString()
 val password = passwordEdit.text.toString()
 // 如果账号是admin且密码是123456,就认为登录成功
 if (account == "admin" && password == "123456") {
 val editor = prefs.edit()
 if (rememberPass.isChecked) { // 检查复选框是否被选中
 editor.putBoolean("remember_password", true)
 editor.putString("account", account)
 editor.putString("password", password)
 } else {
 // 如果没有被选中,就简单地调用一下clear()方法,
// 将SharedPreferences文件中的数据全部清除掉。
 editor.clear()
 }
 editor.apply()
 val intent = Intent(this, MainActivity::class.java)
 startActivity(intent)
 finish()
 } else {
 Toast.makeText(this, "account or password is invalid",
 Toast.LENGTH_SHORT).show()
 }
 }
 }
}
三、 SQLite数据库存储
显然,文件存储和SharedPreferences存储只适用于保存一些简单的数据和键值对。
但是,Android系统是内置了数据库的,SQLite是一款轻量级的关系型数据库,它的运算速度非常快,占用资源很少,通常只需要几百KB的内存就足够了,因而特别适合在移动设备上使用。SQLite不仅支持标准的SQL语法,还遵循了数据库的ACID事务。
1、创建数据库
package com.jpc.filepersistencetest

import android.content.Context
import android.database.sqlite.SQLiteDatabase
import android.database.sqlite.SQLiteOpenHelper
import android.widget.Toast

class MyDatabaseHelper(private val context: Context, name: String, version: Int):
    SQLiteOpenHelper(context, name, null, version) {

        // 建表语句
        private val createBook = "create table Book (" +
                "id integer primary key autoincrement," +
                "name text," +
                "author text," +
                "price real," +
                "pages integer)"
    override fun onCreate(db: SQLiteDatabase?) {
        db?.execSQL(createBook)
        Toast.makeText(context, "建表成功", Toast.LENGTH_SHORT).show()
    }

    override fun onUpgrade(db: SQLiteDatabase?, oldVersion: Int, newVersion: Int) {

    }
}
// 构建了一个MyDatabaseHelper对象,并且通过构造函数的参
        //数将数据库名指定为BookStore.db,版本号指定为1,然后在“Create Database”按钮的点击
        //事件里调用了getWritableDatabase()方法。
        val btnCreateDataBase = findViewById<Button>(R.id.btn_create_database)
        val databaseHelper = MyDatabaseHelper(this, "BookStore.db", 1)
        btnCreateDataBase.setOnClickListener{
            databaseHelper.writableDatabase
        }
2、升级数据库
SQLiteOpenHelper的构造方法里接收的第四个参数,它表示当前数据库的版本号,之前我们传入的是1,现在只要传入
一个比1大的数,就可以让onUpgrade()方法得到执行了。
package com.jpc.filepersistencetest

import android.content.Context
import android.database.sqlite.SQLiteDatabase
import android.database.sqlite.SQLiteOpenHelper
import android.widget.Toast

class MyDatabaseHelper(private val context: Context, name: String, version: Int):
    SQLiteOpenHelper(context, name, null, version) {

        // 建表语句
        private val createBook = "create table Book (" +
                "id integer primary key autoincrement," +
                "name text," +
                "author text," +
                "price real," +
                "pages integer)"

    private val createCategory = "create table Category (" +
            "id integer primary key autoincrement," +
            "category_name text," +
            "category_code integer)"

    override fun onCreate(db: SQLiteDatabase?) {
        db?.execSQL(createBook)
        db?.execSQL(createCategory)
        Toast.makeText(context, "建表成功", Toast.LENGTH_SHORT).show()
    }

    override fun onUpgrade(db: SQLiteDatabase?, oldVersion: Int, newVersion: Int) {
        // 先删除已经存在的表
        db?.execSQL("drop table if exists Book")
        db?.execSQL("drop table if exists Category")
        // 再重新创建
        onCreate(db)
    }
}
// 第一次创建数据库,版本version为1
        // val databaseHelper = MyDatabaseHelper(this, "BookStore.db", 1)
        // 升级数据库,将版本改为比上一次大的数值,就会调用onUpgrade方法
        val databaseHelper = MyDatabaseHelper(this, "BookStore.db", 2)
        btnCreateDataBase.setOnClickListener{
            databaseHelper.writableDatabase
        }
3、添加数据
调用SQLiteOpenHelper的getReadableDatabase()或
getWritableDatabase()方法是可以用于创建和升级数据库的,不仅如此,这两个方法还都会返回一个SQLiteDatabase对象,借助这个对象就可以对数据进行CRUD操作了。
SQLiteDatabase中提供了一个 insert() 方法,专门用于添加数据。它接收3个参数:第一个参数是表名,我们希望向哪张表里添加数据,这里就传入该表的名字;第二个参数用于在未指定添加数据的情况下给某些可为空的列自动赋值NULL,一般我们用不到这个功能,直接传入null即可;第三个参数是一个ContentValues对象,它提供了一系列的put()方法重载,用于向ContentValues中添加数据,只需要将表中的每个列名以及相应的待添加数据传入即可。
<Button
        android:id="@+id/btn_add_data"
        android:layout_width="wrap_content"
        android:layout_height="wrap_content"
        android:text="向表添加数据"
        />
// 添加数据
        val btnAddData = findViewById<Button>(R.id.btn_add_data)
        btnAddData.setOnClickListener{
            val db = databaseHelper.writableDatabase
            val data1 = ContentValues().apply {
                // 第一条数据
                // 不需要给id赋值,因为id自增
                put("name", "The Da Vinci Code")
                put("author", "Dan Brown")
                put("pages", 454)
                put("price", 16.96)
            }
            // 插入第一条数据
            db.insert("Book", null, data1)
            val values2 = ContentValues().apply {
                // 开始组装第二条数据
                put("name", "The Lost Symbol")
                put("author", "Dan Brown")
                put("pages", 510)
                put("price", 19.95)
            }
            db.insert("Book", null, values2) // 插入第二条数据
        }
4、修改数据
SQLiteDatabase中提供了一个非常好用的update()方法,用于对数据进行更新。这个方法接收4个参数:第一个参数和insert()方法一样,也是表名,指定更新哪张表里的数据;第二个参数是ContentValues对象,要把更新数据在这里组装进去;第三、第四个参数用于约束更新某一行或某几行中的数据,不指定的话默认会更新所有行。
// 修改数据
        val btnUpdate = findViewById<Button>(R.id.btn_update_data)
        btnUpdate.setOnClickListener{
            val db = databaseHelper.writableDatabase
            val contentValues = ContentValues()
            contentValues.put("price", 10.99)
            // 第三、第四个参数来指定具体更新
            //哪几行。第三个参数对应的是SQL语句的where部分,表示更新所有name等于?的行,而?是一
            //个占位符,可以通过第四个参数提供的一个字符串数组为第三个参数中的每个占位符指定相应
            //的内容,arrayOf()方法是Kotlin提供的一种用于便捷创建数组的内置方法
            db.update("Book", contentValues, "name = ?", arrayOf("The Da Vinci Code"))
        }
5、删除数据
SQLiteDatabase中提供了一个delete()方法,专门用于删除数据。这个方法接收3个参数:第一个参数仍然是表名,这个没什么好说的;第二、第三个参数用于约束删除某一行或某几行的数据,不指定的话默认会删除所有行。
// 删除数据
        val btnDelete = findViewById<Button>(R.id.btn_delete_data)
        btnDelete.setOnClickListener{
            val db = databaseHelper.writableDatabase
            // 指定删除条件,即where字句,如果不指定就会删除表中所有的数据
            db.delete("Book", "pages > ?", arrayOf("500"))
        }
6、查询数据
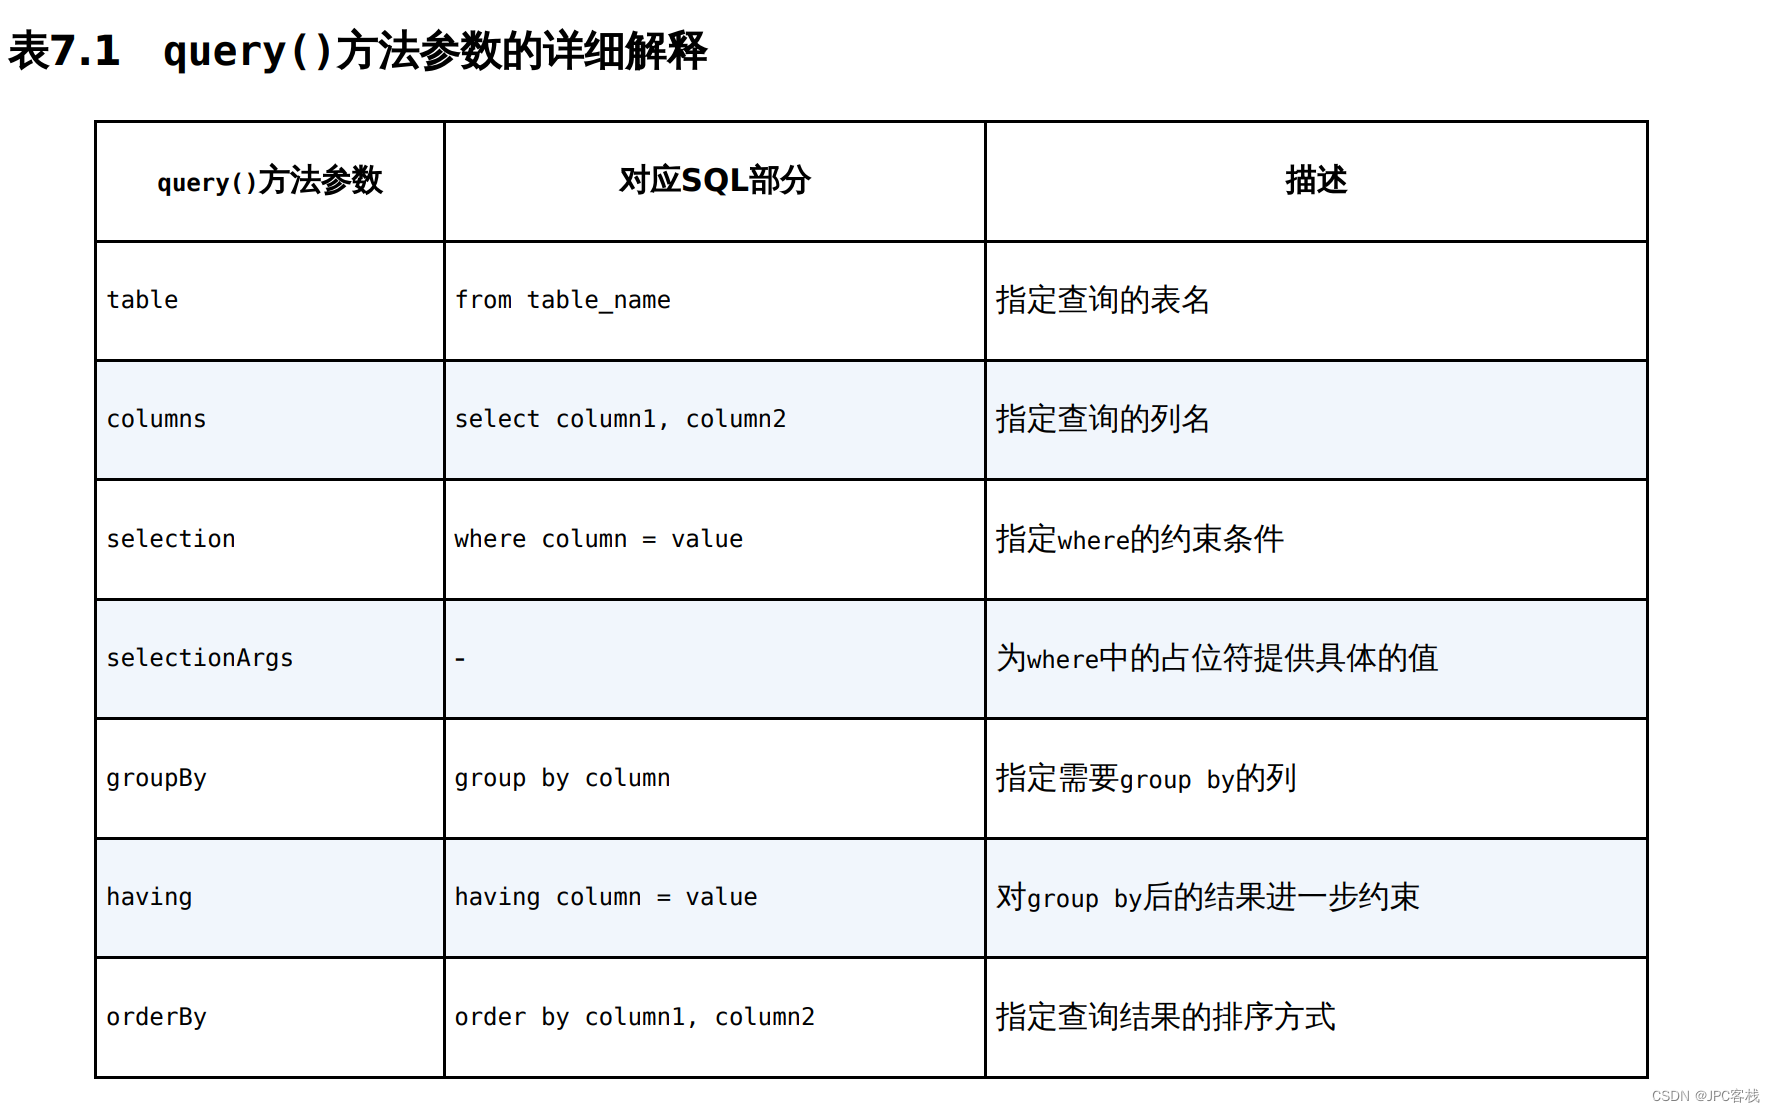
SQLiteDatabase中还提供了一个query()方法用于对数据进行查询。这个方法的参数非常复杂,最短的一个方法重载也需要传入7个参数。那我们就先来看一下这7个参数各自的含义吧。第一个参数不用说,当然还是表名,表示我们希望从哪张表中查询数据。
第二个参数用于指定去查询哪几列,如果不指定则默认查询所有列。第三、第四个参数用于约束查询某一行或某几行的数据,不指定则默认查询所有行的数据。第五个参数用于指定需要去group by的列,不指定则表示不对查询结果进行group by操作。第六个参数用于对group by之后的数据进行进一步的过滤,不指定则表示不进行过滤。第七个参数用于指定查询结果的排序方式,不指定则表示使用默认的排序方式。调用query()方法后会返回一个Cursor对象,查询到的所有数据都将从这个对象中取出。
        // 查询数据
        val btnQuery = findViewById<Button>(R.id.btn_query_data)
        btnQuery.setOnClickListener{
            val db = databaseHelper.writableDatabase
            // 查询Book表中的所有数据
            val cursor = db.query("Book", null, null, null, null, null, null)
            if (cursor.moveToFirst()) {
                do {
                    // 遍历Cursor对象,取出数据并打印
                    // 要检查参数,不然报错
                    var index1 = if (cursor.getColumnIndex("name") >= 0) cursor.getColumnIndex("name") else 0
                    val name = cursor.getString(index1)
                    index1 = if (cursor.getColumnIndex("author") >= 0) cursor.getColumnIndex("author") else 0
                    val author = cursor.getString(index1)
                    index1 = if (cursor.getColumnIndex("pages") >= 0) cursor.getColumnIndex("pages") else 0
                    val pages = cursor.getInt(index1)
                    index1 = if (cursor.getColumnIndex("price") >= 0) cursor.getColumnIndex("price") else 0
                    val price = cursor.getDouble(index1)
                    Toast.makeText(this, "查询到数据:${name}-${author}-${pages}-${price}", Toast.LENGTH_SHORT).show()
                }while (cursor.moveToNext())
            }
            // 需要关闭Cursor对象
            cursor.close()
        }
7、使用SQL语句操作数据库
db.execSQL("insert into Book (name, author, pages, price) values(?, ?, ?, ?)",
 arrayOf("The Da Vinci Code", "Dan Brown", "454", "16.96")
)
db.execSQL("insert into Book (name, author, pages, price) values(?, ?, ?, ?)",
 arrayOf("The Lost Symbol", "Dan Brown", "510", "19.95")
)

db.execSQL("update Book set price = ? where name = ?", arrayOf("10.99", "The Da Vinci Code"))

db.execSQL("delete from Book where pages > ?", arrayOf("500"))

val cursor = db.rawQuery("select * from Book", null)
8、使用事务
class MainActivity : AppCompatActivity() {
 override fun onCreate(savedInstanceState: Bundle?) {
 super.onCreate(savedInstanceState)
 setContentView(R.layout.activity_main)
 val dbHelper = MyDatabaseHelper(this, "BookStore.db", 2)
 ...
 replaceData.setOnClickListener {
 val db = dbHelper.writableDatabase
 db.beginTransaction() // 开启事务
 try {
 db.delete("Book", null, null)
if (true) {
 // 手动抛出一个异常,让事务失败
 throw NullPointerException()
 }
 val values = ContentValues().apply {
 put("name", "Game of Thrones")
 put("author", "George Martin")
 put("pages", 720)
 put("price", 20.85)
 }
 db.insert("Book", null, values)
 db.setTransactionSuccessful() // 事务已经执行成功
 } catch (e: Exception) {
 e.printStackTrace()
 } finally {
 db.endTransaction() // 结束事务
 }
 }
 }
}
9、升级数据库的最佳写法
class MyDatabaseHelper(val context: Context, name: String, version: Int):
 SQLiteOpenHelper(context, name, null, version) {
 private val createBook = "create table Book (" +
 " id integer primary key autoincrement," +
 "author text," +
 "price real," +
 "pages integer," +
 "name text," +
 "category_id integer)"
 private val createCategory = "create table Category (" +
 "id integer primary key autoincrement," +
 "category_name text," +
 "category_code integer)"
 override fun onCreate(db: SQLiteDatabase) {
 db.execSQL(createBook)
 db.execSQL(createCategory)
 }
 override fun onUpgrade(db: SQLiteDatabase, oldVersion: Int, newVersion: Int) {
 if (oldVersion <= 1) {
 db.execSQL(createCategory)
 }
 if (oldVersion <= 2) {
 db.execSQL("alter table Book add column category_id integer")
 }
 }
}
可以看到,首先我们在Book表的建表语句中添加了一个category_id列,这样当用户直接安装第3版的程序时,这个新增的列就已经自动添加成功了。然而,如果用户之前已经安装了某一版本的程序,现在需要覆盖安装,就会进入升级数据库的操作中。在onUpgrade()方法里,我们添加了一个新的条件,如果当前数据库的版本号是2,就会执行alter命令,为Book表新增一个category_id列。这里请注意一个非常重要的细节:每当升级一个数据库版本的时候,onUpgrade()方法里都一定要写一个相应的if判断语句。为什么要这么做呢?这是为了保证App在跨版本升级的时候,每一次的数据库修改都能被全部执行。比如用户当前是从第2版升级到第3版,那么只有第二条判断语句会执行,而如果用户是直接从第1版升级到第3版,那么两条判断语句都会执行。使用这种方式来维护数据库的升级,不管版本怎样更新,都可以保证数据库的表结构是最新的,而且表中的数据完全不会丢失。
10、简化写法
// 简化后的写法
            getSharedPreferences("data", Context.MODE_PRIVATE).edit{
                putString("name", "Tom")
                putInt("age", 28)
                putBoolean("married", false)
            }
// 使用更新的函数
            val values = contentValuesOf("name" to "Game of Thrones", "author" to "George Martin",
                "pages" to 720, "price" to 20.85)
            db.insert("Book", null, values)


![练习 16 Web [极客大挑战 2019]LoveSQL](https://img-blog.csdnimg.cn/direct/a9c41cc42b044f21a2ea98ba7c03775a.png)