深度学习-机器视觉part2
文章目录
一、从卷积到卷积神经网络
二、手撕卷积代码
2.1 动机
通过普通的神经网络可以实现,但是现在图片越来越大,如果通过 NN 来实现,训练的参数太多。例如 224 x 224 x 3 = 150,528,隐藏层设置为 1024 就需要训练参数 150,528 x 1024 = 1.5 亿 个,这还是第一层,因此会导致我们的网络很庞大。
另一个问题就是特征位置在不同的图片中会发生变化。例如小猫的脸在不同图片中可能位于左上角或者右下角,因此小猫的脸不会激活同一个神经元。
2.2 数据集
我们使用手写数字数据集 MNIST 。

每个数据集都以一个 28x28 像素的数字。
普通的神经网络也可以处理这个数据集,因为图片较小,另外数字都集中在中间位置,但是现实世界中的图片分类问题可就没有这么简单了,这里只是抛砖引玉哈。
2.3 卷积操作
CNN 相较于 NN 来说主要是增加了基于 convolution 的卷积层。卷基层包含一组 filter,每一个 filter 都是一个 2 维的矩阵。以下为 3x3 filter:
我们可以通过输入的图片和上面的 filter 来做卷积运算,然后输出一个新的图片。包含以下步骤:
-
- 将 filter 叠加在图片的顶部,一般是左上角
- 然后执行对应元素的相乘
- 将相乘的结果进行求和,得到输出图片的目标像素值
- 重复以上操作在所有位置上
2.3.1 填充(padding)
可以通过在周围补 0 实现输出前后图像大小一致,如下所示:

这叫做 “same padding”,不过一般不用 padding,叫做 “valid” padding。
2.3.2 卷积块
CNN 包含卷基层,卷基层通过一组 filter 将输入的图片转为输出的图片。卷基层的主要参数是 filter 的个数。
对于 MNIST CNN,我使用一个含有 8 个 filter 的卷基层,意味着它将 28x28 的输入图片转为 26x26x8 的输出集:

import numpy as np

class Conv3x3:
    # A Convolution layer using 3x3 filters.

    def __init__(self, num_filters):
        self.num_filters = num_filters

        # filters is a 3d array with dimensions (num_filters, 3, 3)
        # We divide by 9 to reduce the variance of our initial values
        self.filters = np.random.randn(num_filters, 3, 3) / 9
接下来,具体实现卷基层:
class Conv3x3:
    def iterate_regions(self, image):
        h,w = image.shape
        for i in range(h-2):
            for j in range(w-2):
                im_region = image[i:(i+3),j:(j+3)]
                yield  im_region, i, j

    def forward(self, input):
        h,w = input.shape
        output = np.zeros((h-2,w-2,self.num_filters))
        for im_region,i,j in self.iterate_regions(input):
            output[i,j] = np.sum(im_region * self.filters, axis = (1,2))
        return output
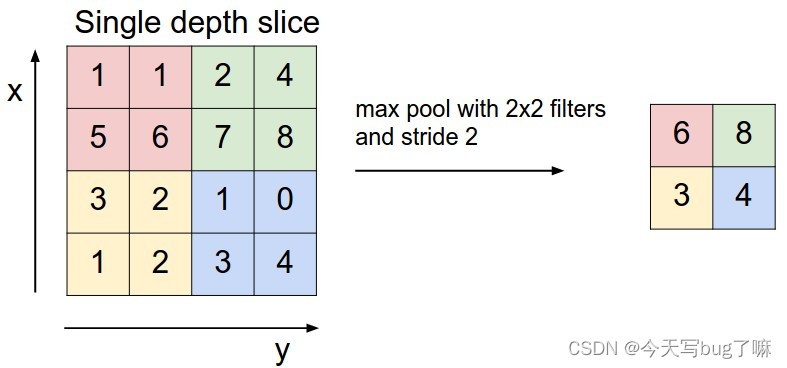
2.3.3 池化
import numpy as np

class MaxPool2:
    # A Max Pooling layer using a pool size of 2.

    def iterate_regions(self, image):
        '''
        Generates non-overlapping 2x2 image regions to pool over.
        - image is a 2d numpy array
        '''
        # image: 26x26x8
        h, w, _ = image.shape
        new_h = h // 2
        new_w = w // 2

        for i in range(new_h):
            for j in range(new_w):
                im_region = image[(i * 2):(i * 2 + 2), (j * 2):(j * 2 + 2)]
                yield im_region, i, j

    def forward(self, input):
        '''
        Performs a forward pass of the maxpool layer using the given input.
        Returns a 3d numpy array with dimensions (h / 2, w / 2, num_filters).
        - input is a 3d numpy array with dimensions (h, w, num_filters)
        '''
        # input: 卷基层的输出,池化层的输入
        h, w, num_filters = input.shape
        output = np.zeros((h // 2, w // 2, num_filters))

        for im_region, i, j in self.iterate_regions(input):
            output[i, j] = np.amax(im_region, axis=(0, 1))
        return output
2.3.4 Softmax
- 用法
我们将要使用一个含有 10 个节点(分别代表相应数字)的 softmax 层,作为我们 CNN 的最后一层。最后一层为一个全连接层,只是激活函数为 softmax。经过 softmax 的变换,数字就是具有最高概率的节点。

- 交叉熵损失函数
交叉熵损失函数用来计算概率间的距离:
H ( p , q ) = − ∑ x p ( x ) l n ( q ( x ) ) H(p,q) = - \sum_xp(x)ln(q(x)) H(p,q)=−x∑p(x)ln(q(x))
其中: p ( x ) p(x) p(x)为真实概率, q ( x ) q(x) q(x)为预测概率, H ( p , q ) H(p,q) H(p,q)为预测结果与真实结果的差距
- 代码
import numpy as np

class Softmax:
    # A standard fully-connected layer with softmax activation.

    def __init__(self, input_len, nodes):
        # We divide by input_len to reduce the variance of our initial values
        # input_len: 输入层的节点个数,池化层输出拉平之后的
        # nodes: 输出层的节点个数,本例中为 10
        # 构建权重矩阵,初始化随机数,不能太大
        self.weights = np.random.randn(input_len, nodes) / input_len
        self.biases = np.zeros(nodes)

    def forward(self, input):
        '''
        Performs a forward pass of the softmax layer using the given input.
        Returns a 1d numpy array containing the respective probability values.
        - input can be any array with any dimensions.
        '''
        # 3d to 1d,用来构建全连接网络
        input = input.flatten()

        input_len, nodes = self.weights.shape

        # input: 13x13x8 = 1352
        # self.weights: (1352, 10)
        # 以上叉乘之后为 向量,1352个节点与对应的权重相乘再加上bias得到输出的节点
        # totals: 向量, 10
        totals = np.dot(input, self.weights) + self.biases
        # exp: 向量, 10
        exp = np.exp(totals)
        return exp / np.sum(exp, axis=0)
2.4 完整CNN
import mnist
import numpy as np

# We only use the first 1k testing examples (out of 10k total)
# in the interest of time. Feel free to change this if you want.
test_images = mnist.test_images()[:1000]
test_labels = mnist.test_labels()[:1000]

conv = Conv3x3(8)                                    # 28x28x1 -> 26x26x8
pool = MaxPool2()                                    # 26x26x8 -> 13x13x8
softmax = Softmax(13 * 13 * 8, 10) # 13x13x8 -> 10

def forward(image, label):
    '''
    Completes a forward pass of the CNN and calculates the accuracy and
    cross-entropy loss.
    - image is a 2d numpy array
    - label is a digit
    '''
    # We transform the image from [0, 255] to [-0.5, 0.5] to make it easier
    # to work with. This is standard practice.

   # out 为卷基层的输出, 26x26x8
    out = conv.forward((image / 255) - 0.5)
    # out 为池化层的输出, 13x13x8
    out = pool.forward(out)
    # out 为 softmax 的输出, 10
    out = softmax.forward(out)

    # Calculate cross-entropy loss and accuracy. np.log() is the natural log.
    # 损失函数的计算只与 label 的数有关,相当于索引
    loss = -np.log(out[label])
    # 如果 softmax 输出的最大值就是 label 的值,表示正确,否则错误
    acc = 1 if np.argmax(out) == label else 0

    return out, loss, acc

print('MNIST CNN initialized!')

loss = 0
num_correct = 0
# enumerate 函数用来增加索引值
for i, (im, label) in enumerate(zip(test_images, test_labels)):
    # Do a forward pass.
    _, l, acc = forward(im, label)
    loss += l
    num_correct += acc

    # Print stats every 100 steps.
    if i % 100 == 99:
        print(
            '[Step %d] Past 100 steps: Average Loss %.3f | Accuracy: %d%%' %
            (i + 1, loss / 100, num_correct)
        )
        loss = 0
        num_correct = 0
此代码为原理代码,使用随机数进行学习和训练,效果不佳,准确率大概为10%左右,还需要改进。
2.5 训练改进
import mnist
import numpy as np

# We only use the first 1k examples of each set in the interest of time.
# Feel free to change this if you want.
train_images = mnist.train_images()[:1000]
train_labels = mnist.train_labels()[:1000]
test_images = mnist.test_images()[:1000]
test_labels = mnist.test_labels()[:1000]

conv = Conv3x3(8)                                    # 28x28x1 -> 26x26x8
pool = MaxPool2()                                    # 26x26x8 -> 13x13x8
softmax = Softmax(13 * 13 * 8, 10) # 13x13x8 -> 10

def forward(image, label):
    '''
    Completes a forward pass of the CNN and calculates the accuracy and
    cross-entropy loss.
    - image is a 2d numpy array
    - label is a digit
    '''
    # We transform the image from [0, 255] to [-0.5, 0.5] to make it easier
    # to work with. This is standard practice.
    out = conv.forward((image / 255) - 0.5)
    out = pool.forward(out)
    out = softmax.forward(out)

    # Calculate cross-entropy loss and accuracy. np.log() is the natural log.
    loss = -np.log(out[label])
    acc = 1 if np.argmax(out) == label else 0

    return out, loss, acc
    # out: vertor of probability
    # loss: num
    # acc: 1 or 0

def train(im, label, lr=.005):
    '''
    Completes a full training step on the given image and label.
    Returns the cross-entropy loss and accuracy.
    - image is a 2d numpy array
    - label is a digit
    - lr is the learning rate
    '''
    # Forward
    out, loss, acc = forward(im, label)

    # Calculate initial gradient
    gradient = np.zeros(10)
    gradient[label] = -1 / out[label]

    # Backprop
    gradient = softmax.backprop(gradient, lr)
    gradient = pool.backprop(gradient)
    gradient = conv.backprop(gradient, lr)

    return loss, acc

print('MNIST CNN initialized!')

# Train the CNN for 3 epochs
for epoch in range(3):
    print('--- Epoch %d ---' % (epoch + 1))

    # Shuffle the training data
    permutation = np.random.permutation(len(train_images))
    train_images = train_images[permutation]
    train_labels = train_labels[permutation]

    # Train!
    loss = 0
    num_correct = 0

    # i: index
    # im: image
    # label: label
    for i, (im, label) in enumerate(zip(train_images, train_labels)):
        if i > 0 and i % 100 == 99:
            print(
                '[Step %d] Past 100 steps: Average Loss %.3f | Accuracy: %d%%' %
                (i + 1, loss / 100, num_correct)
            )
            loss = 0
            num_correct = 0

        l, acc = train(im, label)
        loss += l
        num_correct += acc

# Test the CNN
print('\n--- Testing the CNN ---')
loss = 0
num_correct = 0
for im, label in zip(test_images, test_labels):
    _, l, acc = forward(im, label)
    loss += l
    num_correct += acc

num_tests = len(test_images)
print('Test Loss:', loss / num_tests)
print('Test Accuracy:', num_correct / num_tests)
三、经典CNN模型介绍
未完待续
四、CNN模型的实际应用
未完待续

![[足式<span style='color:red;'>机器人</span>]<span style='color:red;'>Part</span><span style='color:red;'>2</span> Dr. CAN<span style='color:red;'>学习</span>笔记-数学基础Ch0-9阈值选取-<span style='color:red;'>机器</span><span style='color:red;'>视觉</span>中应用正态分布和6-sigma](https://img-blog.csdnimg.cn/direct/da2a8181ad354a1696e704018be21fc4.png#pic_center)