"""
Array Backed Grid

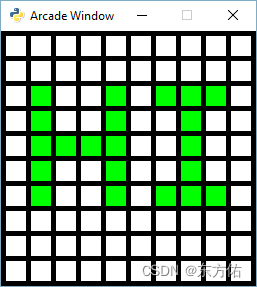
Show how to use a two-dimensional list/array to back the display of a
grid on-screen. We can click each cell in the window to toggle the color
or each individual cell.

This is not the most efficient way to maintain an updated grid
simply because we have to rebuild the shape list from scratch
every time it changes, but it's fast enough for smaller grids
that don't update frequently.

If Python and Arcade are installed, this example can be run from the command line with:
python -m arcade.examples.array_backed_grid_buffered
"""
import arcade

# Set how many rows and columns we will have
ROW_COUNT = 15
COLUMN_COUNT = 15

# This sets the WIDTH and HEIGHT of each grid location
WIDTH = 30
HEIGHT = 30

# This sets the margin between each cell
# and on the edges of the screen.
MARGIN = 5

# Do the math to figure out our screen dimensions
SCREEN_WIDTH = (WIDTH + MARGIN) * COLUMN_COUNT + MARGIN
SCREEN_HEIGHT = (HEIGHT + MARGIN) * ROW_COUNT + MARGIN
SCREEN_TITLE = "Array Backed Grid Buffered Example"


class MyGame(arcade.Window):
    """
    Main application class.
    """

    def __init__(self, width, height, title):
        """
        Set up the application.
        """
        super().__init__(width, height, title)
        self.shape_list = None

        # Create a 2 dimensional array. A two dimensional
        # array is simply a list of lists.
        # This array can be altered later to contain 0 or 1
        # to show a white or green cell.
        #
        # A 4 x 4 grid would look like this
        #
        # grid = [
        #     [0, 0, 0, 0],
        #     [0, 0, 0, 0],
        #     [0, 0, 0, 0],
        #     [0, 0, 0, 0],
        # ]
        # We can quickly build a grid with python list comprehension
        # self.grid = [[0] * COLUMN_COUNT for _ in range(ROW_COUNT)]
        # Making the grid with loops:
        self.grid = []
        for row in range(ROW_COUNT):
            # Add an empty array that will hold each cell
            # in this row
            self.grid.append([])
            for column in range(COLUMN_COUNT):
                self.grid[row].append(0)  # Append a cell

        # Set the window's background color
        self.background_color = arcade.color.BLACK
        # Create shapes from the grid
        self.recreate_grid()

    def recreate_grid(self):
        """
        Create the shapes for our current grid.

        We look at the values in each cell.
        If the cell contains 0 we crate a white shape.
        If the cell contains 1 we crate a green shape.
        """
        self.shape_list = arcade.ShapeElementList()
        for row in range(ROW_COUNT):
            for column in range(COLUMN_COUNT):
                if self.grid[row][column] == 0:
                    color = arcade.color.WHITE
                else:
                    color = arcade.color.GREEN

                x = (MARGIN + WIDTH) * column + MARGIN + WIDTH // 2
                y = (MARGIN + HEIGHT) * row + MARGIN + HEIGHT // 2

                current_rect = arcade.create_rectangle_filled(x, y, WIDTH, HEIGHT, color)
                self.shape_list.append(current_rect)

    def on_draw(self):
        """
        Render the screen.
        """
        # We should always start by clearing the window pixels
        self.clear()

        # Draw the shapes representing our current grid
        self.shape_list.draw()

    def on_mouse_press(self, x, y, button, modifiers):
        """
        Called when the user presses a mouse button.
        """

        # Convert the clicked mouse position into grid coordinates
        column = int(x // (WIDTH + MARGIN))
        row = int(y // (HEIGHT + MARGIN))

        print(f"Click coordinates: ({x}, {y}). Grid coordinates: ({row}, {column})")

        # Make sure we are on-grid. It is possible to click in the upper right
        # corner in the margin and go to a grid location that doesn't exist
        if row >= ROW_COUNT or column >= COLUMN_COUNT:
            # Simply return from this method since nothing needs updating
            return

        # Flip the location between 1 and 0.
        if self.grid[row][column] == 0:
            self.grid[row][column] = 1
        else:
            self.grid[row][column] = 0

        # Rebuild the shapes
        self.recreate_grid()


def main():
    MyGame(SCREEN_WIDTH, SCREEN_HEIGHT, SCREEN_TITLE)
    arcade.run()


if __name__ == "__main__":
    main()
这段代码是一个使用二维列表作为网格的示例。可以点击窗口中的每个单元格来切换单元格的颜色。
首先,给定了网格的行数(ROW_COUNT)和列数(COLUMN_COUNT),以及每个单元格的宽度(WIDTH)、高度(HEIGHT)和边距(MARGIN)。根据这些参数,计算出了窗口的宽度(SCREEN_WIDTH)和高度(SCREEN_HEIGHT)。
接下来是定义游戏类(MyGame)。在__init__方法中,初始化了一些变量,并创建了一个二维列表grid来表示网格,初始时每个单元格的值都设置为0。然后,设置了窗口的背景颜色,并调用recreate_grid方法创建了一个表示网格形状的shape_list。
recreate_grid方法根据grid的值重新创建了shape_list。遍历grid中的每个单元格,根据其值设置颜色,然后根据单元格的行列位置计算出对应的形状的位置和大小,创建一个矩形形状,并将其添加到shape_list中。
在on_draw方法中,清空窗口像素,并绘制shape_list中的形状。
在on_mouse_press方法中,当用户点击鼠标时,根据点击的坐标计算出对应的网格位置,然后根据该位置的值翻转(0变为1,1变为0),最后重新创建shape_list。这样就实现了通过点击切换网格单元格的颜色。
最后,在main函数中创建MyGame对象,并调用arcade.run()函数运行游戏。




![[蓝桥杯练习]通电](https://img-blog.csdnimg.cn/direct/043dbda3de0c4934b5f94f3405d3ec16.png)

![[C++]使用OpenCV去除面积较小的连通域](https://img-blog.csdnimg.cn/direct/32f6b12890d64eb5be897656068901d9.jpeg)

