一、深度API
本小节内容摘自ARCore官方文档。
Depth API 可助力实现对象遮挡、提升沉浸感和新颖的互动体验,从而增强 AR 体验的真实感。
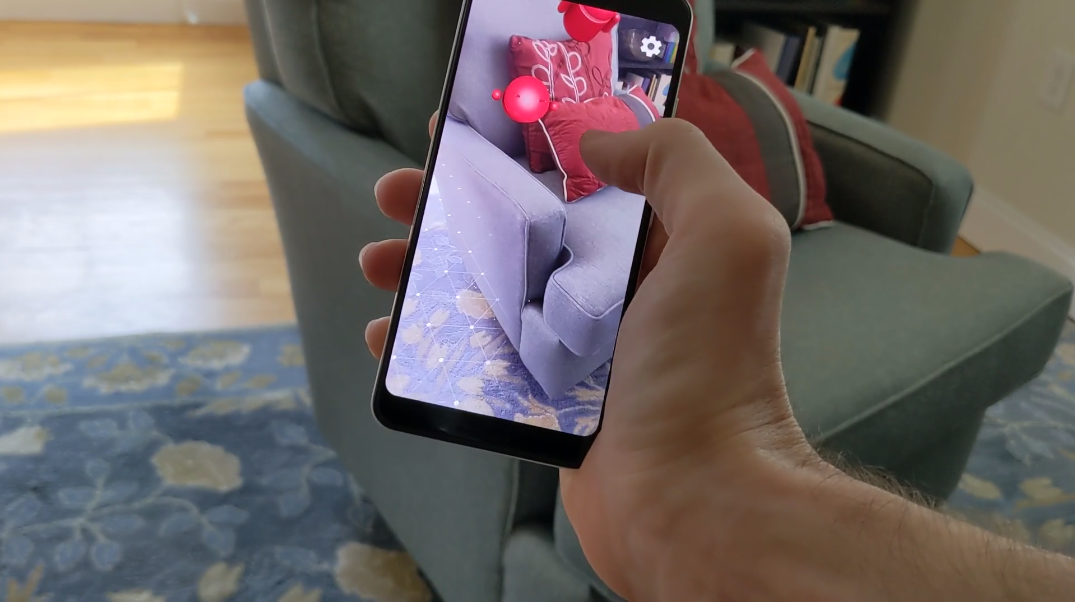
在下图中,右侧画面是采用深度API进行遮挡后的效果,与左侧图相比更加真实。

深度值
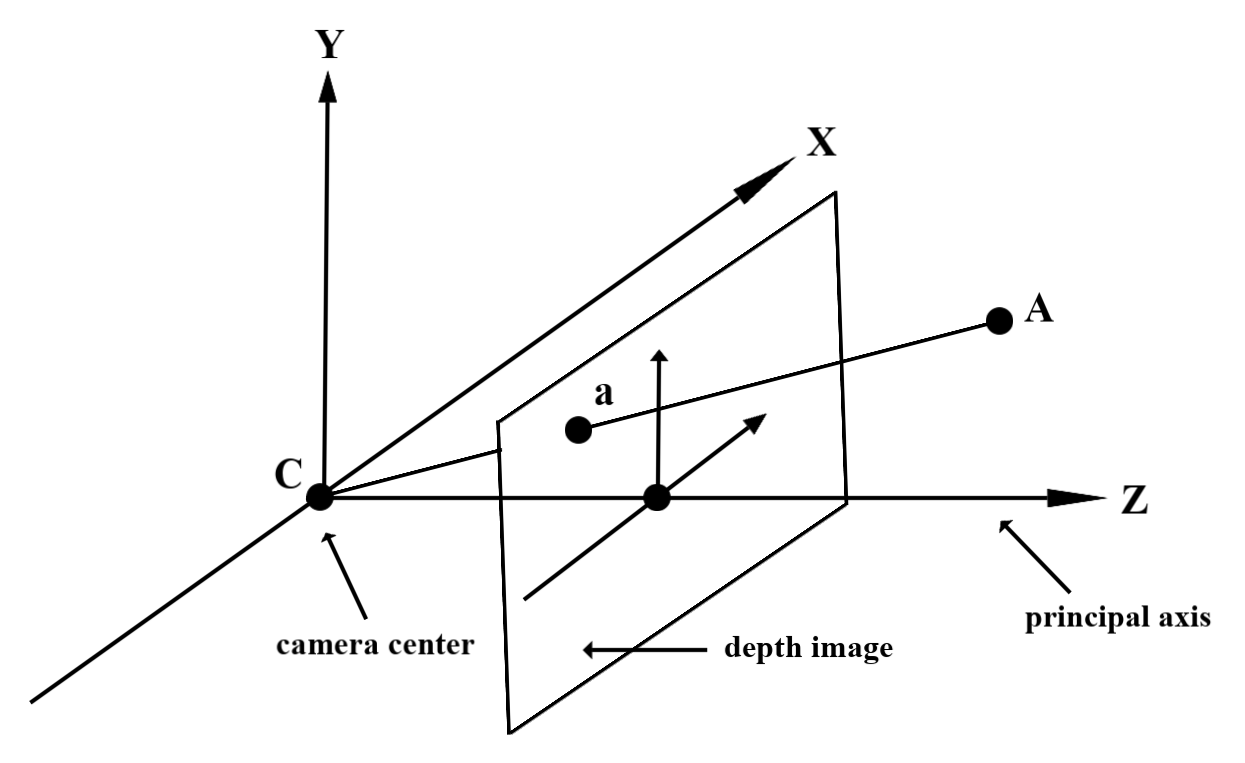
给定实测几何图形上的点 A 和代表深度图像中同一点的 2D 点 a,Depth API 在 a 处给出的值等于投影到主轴上的 CA 的长度。这也可称为 A 相对于相机原点 C 的 z 坐标。使用 Depth API 时,请务必注意,深度值不是光线 CA 本身的长度,而是光线的投影。
应用场景
启用遮挡
遮挡(即准确渲染虚拟物体在现实物体后面)对于沉浸式 AR 体验至关重要。假设有一个虚拟 Andy,用户可能需要放置在包含门边有后备箱的场景中。渲染时没有遮挡,Andy 会不切实际地与树干边缘重叠。如果您使用场景的深度来了解虚拟 Andy 相对于木箱等周围环境的距离,就可以准确地渲染 Andy 的遮挡效果,使其在周围环境中看起来更逼真。

改变场景
您可以渲染虚拟雪花,让其坐在沙发的扶手和枕头上,或者在雾气弥漫的客厅中飘散,让用户进入身临其境的新世界。您可以使用“深度”创建虚拟光线互动、隐藏后方以及重新照亮真实物体的场景。

距离和景深
需要显示距离较远的物体?您可以通过 Depth API 使用距离测量并添加景深效果,例如对场景的背景或前景进行模糊处理。
支持用户与 AR 对象互动
让虚拟内容通过碰撞和物理与现实世界互动,让用户能够通过您的应用“触摸”世界。让虚拟物体绕过现实世界的障碍物,或让虚拟彩弹击中并泼洒到真实的树上。将基于深度的碰撞与游戏物理学相结合,可以打造栩栩如生的体验。
改进点击测试
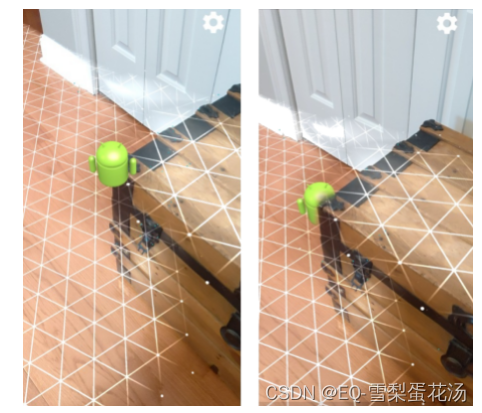
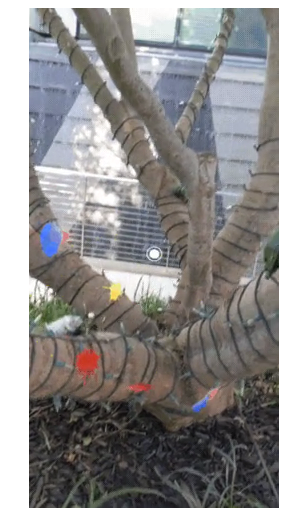
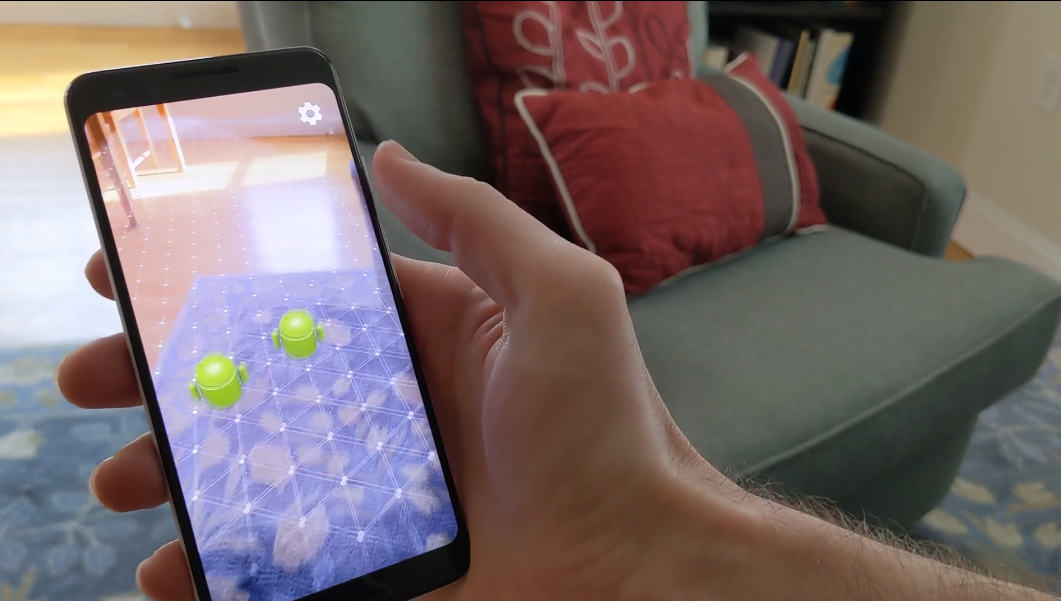
深度可用于改进点击测试结果。平面点击测试仅适用于具有纹理的平面表面,而深度点击测试则更加详细,甚至适用于非平面和低纹理区域。这是因为深度命中测试使用来自场景的深度信息来确定点的正确深度和方向。
在以下示例中,绿色 Andys 代表标准平面命中测试,红色 Andys 代表深度命中测试。
二、 AR Foundation
本小节记录如何在Unity中开发,通过 AR Foundation 使用“深度”功能。
配置安卓权限
这里需要配置安卓清单,以下方式二选一。
自定义AndroidManifest
在清单中添加<users-feature>其值设为“com.google.ar.core.depth>
配置Unity 项目
导航到 Edit > Project Settings > XR Plug-in Management > ARCore。
Depth 默认设置为 Required。修改为optional
启用深度
为节省资源,ARCore 默认情况下不会启用 Depth API。如需在支持的设备上充分利用深度,您必须通过 Camera 和 ARCameraBackground 组件手动将 AROcclusionManager 组件添加到 AR 相机游戏对象。如需了解详情,请参阅 Unity 文档中的自动遮盖。
在新的AR Session中,检查用户的设备是否支持深度,示例如下:
// Reference to AROcclusionManager that should be added to the AR Camera
// game object that contains the Camera and ARCameraBackground components.
var occlusionManager = …

// Check whether the user's device supports the Depth API.
if (occlusionManager.descriptor?.supportsEnvironmentDepthImage)
{
    // If depth mode is available on the user's device, perform
    // the steps you want here.
}
获取深度图像
从AROcclusionManager中获取环境的深度图
// Reference to AROcclusionManager that should be added to the AR Camera
// game object that contains the Camera and ARCameraBackground components.
var occlusionManager = …

if (occlusionManager.TryAcquireEnvironmentDepthCpuImage(out XRCpuImage image))
{
    using (image)
    {
        // Use the texture.
    }
}
提取深度图的距离
如需将 Depth API 用于遮蔽虚拟对象或直观呈现深度数据之外的用途,请从深度图像中提取信息。
Texture2D _depthTexture;
short[] _depthArray;

void UpdateEnvironmentDepthImage()
{
  if (_occlusionManager &&
        _occlusionManager.TryAcquireEnvironmentDepthCpuImage(out XRCpuImage image))
    {
        using (image)
        {
            UpdateRawImage(ref _depthTexture, image, TextureFormat.R16);
            _depthWidth = image.width;
            _depthHeight = image.height;
        }
    }
  var byteBuffer = _depthTexture.GetRawTextureData();
  Buffer.BlockCopy(byteBuffer, 0, _depthArray, 0, byteBuffer.Length);
}

// Obtain the depth value in meters at a normalized screen point.
public static float GetDepthFromUV(Vector2 uv, short[] depthArray)
{
    int depthX = (int)(uv.x * (DepthWidth - 1));
    int depthY = (int)(uv.y * (DepthHeight - 1));

    return GetDepthFromXY(depthX, depthY, depthArray);
}

// Obtain the depth value in meters at the specified x, y location.
public static float GetDepthFromXY(int x, int y, short[] depthArray)
{
    if (!Initialized)
    {
        return InvalidDepthValue;
    }

    if (x >= DepthWidth || x < 0 || y >= DepthHeight || y < 0)
    {
        return InvalidDepthValue;
    }

    var depthIndex = (y * DepthWidth) + x;
    var depthInShort = depthArray[depthIndex];
    var depthInMeters = depthInShort * MillimeterToMeter;
    return depthInMeters;
}
三、示例Demo
这里记录当前ARFoundation关于深度API使用点云的示例Demo。不同的是,这里新增的“点云采集”和“点云导入”功能。
官方示例:arcore-depth-lab
版本信息
        "com.unity.xr.arfoundation": "4.1.5",
        "com.unity.xr.arcore": "4.1.5",
        "com.unity.xr.arkit": "4.1.5"
相机配置
在“AR Session Origin”->“AR Camera"中添加"AROcclusion Manager组件”
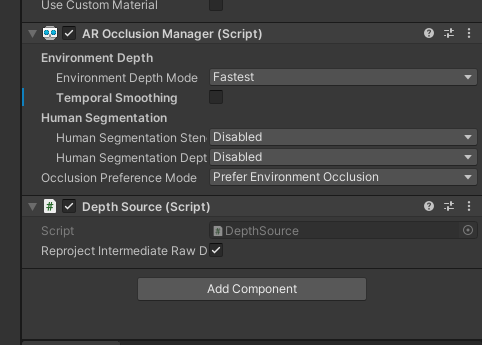
此外在示例demo中,这里挂载了"DepthSource"脚本。(这个脚本一个场景只可有且仅有一个激活)
这个脚本主要作用是处理深度图纹理。
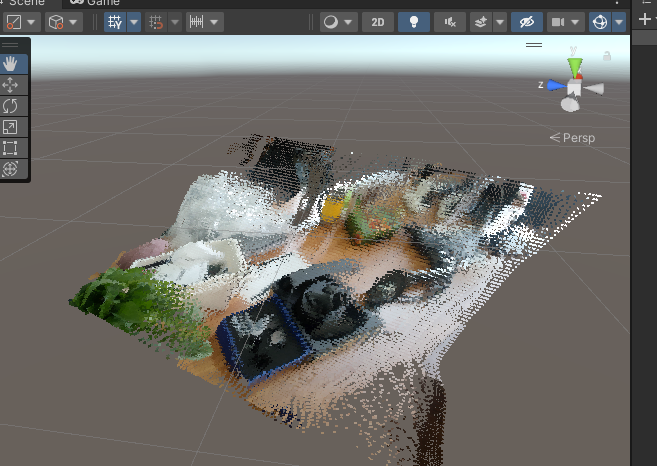
点云采集
示例场景
Demo场景路径:Assests/ARRealismDemos/PointCloud/Scenes/RawPointClouds.unity
点云渲染
场景中找到“RawPointCloudBlender”游戏对象,其挂载的组件如下图:

"PointCloudMaterial"是ARCore示例提供的渲染点云的材质(这个后续会用到)。
“RawPointCloudBlender”是渲染点云的核心脚本,它会在MeshFilter上生成Mesh。
点云保存
在运行时,点云实时渲染的Mesh在“RawPointCloudBlender”->MeshFilter上。
因此这里可直接获取Mesh的顶点数据进行保存。
保存为PTS
   public void SaveMeshToFile(string filePath)
    {
        if (meshFilter == null || meshFilter.sharedMesh == null)
        {
            Debug.LogWarning("MeshFilter or Mesh not assigned.");
            return;
        }

        Mesh mesh = meshFilter.sharedMesh;

        // 获取网格数据
        Vector3[] vertices = mesh.vertices;
        //int[] triangles = mesh.triangles;//点云无需三角顶点索引,
        Color[] colors = mesh.colors;

        int minCount = Math.Min(vertices.Length, colors.Length);

        // 创建保存网格数据的文件
        using (StreamWriter writer = new StreamWriter(filePath))
        {
            // 写入顶点数据
            for (int i = 0; i < minCount; i++)
            {
                //PTS格式前三个是 (x,y,z) 坐标 其中,第四个是“强度”值,最后三个是“颜色值”(R,G,B)
                Vector3 vertex = vertices[i];
                Color c = colors[i];
                //这里暂用ALPHA表示强度值
                writer.WriteLine(vertex.x + " " + vertex.y + " " + vertex.z
                    + " " + (int)(c.a * 255) + " " + (int)(c.r * 255) + " " + (int)(c.g * 255) + " " + (int)(c.b * 255));
            }

        }
    }
保存为OBJ
将上述循环中替换为如下内容:
        // 创建保存网格数据的文件
        using (StreamWriter writer = new StreamWriter(filePath))
        {
            // 写入顶点数据
            foreach (Vector3 vertex in vertices)
            {
                writer.WriteLine("v " + vertex.x + " " + vertex.y + " " + vertex.z);
            }
            //...
        }
点云加载
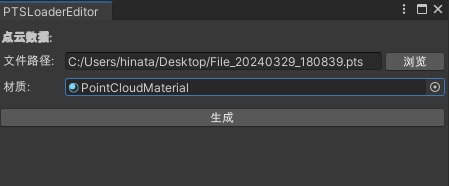
扩展编辑器
编写脚本,新增点云数据导入功能
public class PTSLoaderEditor : EditorWindow
{
    private string ptsFilePath;
    private Material material;

    [MenuItem("EQ/点云数据/\"加载 *.pts\"")]
    public static void ShowWindow()
    {
        EditorWindow.GetWindow(typeof(PTSLoaderEditor));
    }

    private void OnGUI()
    {
        //...
        LoadPointCloud(string filePath);
        //...
    }

    private void LoadPointCloud(string filePath)
    {
        //...

        // 创建点云 Mesh
        Mesh pointCloudMesh = new Mesh();


        for (int i = 0; i < count; i++)
        {
            string[] parts = lines[i].Split(' ');
            if (parts.Length >= 7)
            {
                float x = float.Parse(parts[0]);
                float y = float.Parse(parts[1]);
                float z = float.Parse(parts[2]);
                _vertices[i] = new Vector3(x, y, z);

                byte a = byte.Parse(parts[3]);
                byte r = byte.Parse(parts[4]);
                byte g = byte.Parse(parts[5]);
                byte b = byte.Parse(parts[6]);
                _colors[i] = new Color32(r, g, b, a);

                _indices[i] = i;
            }
        }

#if UNITY_2019_3_OR_NEWER
        pointCloudMesh.SetVertices(_vertices, 0, count);
        pointCloudMesh.SetIndices(_indices, 0, count, MeshTopology.Points, 0);
        pointCloudMesh.SetColors(_colors, 0, count);
#else
        // Note that we recommend using Unity 2019.3 or above to compile this scene.
        List<Vector3> vertexList = new List<Vector3>();
        List<Color32> colorList = new List<Color32>();
        List<int> indexList = new List<int>();

        for (int i = 0; i < count; ++i)
        {
            vertexList.Add(_vertices[i]);
            indexList.Add(_indices[i]);
            colorList.Add(_colors[i]);
        }

        pointCloudMesh.SetVertices(vertexList);
        pointCloudMesh.SetIndices(indexList.ToArray(), MeshTopology.Points, 0);
        pointCloudMesh.SetColors(colorList);
#endif // UNITY_2019_3_OR_NEWER

        //...
    }
}
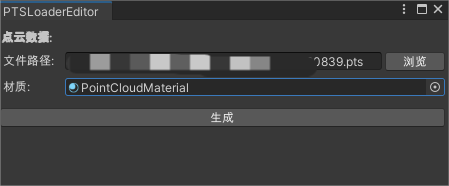
导入点云
在编辑器中操作如下:
“EQ/点云数据/“加载 *.pts””
查看点云
注:这里使用点云材质,可以给点赋予之前传入的颜色值