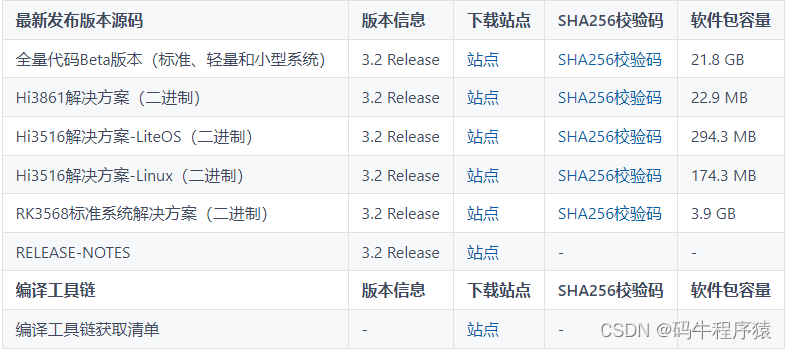
介绍
本篇Codelab基于用户首选项,实现了备忘录新增、更新、删除以及查找等功能。效果如图所示:
相关概念
- 用户首选项:提供Key-Value键值型的数据处理能力,应用持久化轻量级数据,并对其修改和查询。
- Navigator:路由容器组件,支持路由跳转以及子组件嵌入。
环境搭建
软件要求
- DevEco Studio版本:DevEco Studio 3.1 Release。
- OpenHarmony SDK版本:API version 9。
硬件要求
- 开发板类型:润和RK3568开发板。
- OpenHarmony系统:3.2 Release。
环境搭建
完成本篇Codelab我们首先要完成开发环境的搭建,本示例以RK3568开发板为例,参照以下步骤进行:
- 获取OpenHarmony系统版本:标准系统解决方案(二进制)。以3.2 Release版本为例:
2.搭建烧录环境。
- 完成DevEco Device Tool的安装
- 完成RK3568开发板的烧录
3.搭建开发环境。
- 开始前请参考工具准备,完成DevEco Studio的安装和开发环境配置。
- 开发环境配置完成后,请参考使用工程向导创建工程(模板选择“Empty Ability”)。
- 工程创建完成后,选择使用真机进行调测。
代码结构解读
本篇Codelab只对核心代码进行讲解
├──entry/src/main/ets           // 代码区
│  ├──common
│  │  ├──constants
│  │  │  ├──CommonConstants.ets // 常量类
│  │  │  └──StyleConstants.ets  // 样式常量类
│  │  └──utils
│  │     ├──Format.ets          // 日期格式化函数
│  │     └──Logger.ets          // 日志打印类
│  ├──entryability
│  │  └──EntryAbility.ts        // 程序入口类
│  ├──model
│  │  └──NotesDataModel.ets     // 备忘录方法类
│  ├──pages
│  │  ├──NoteHomePage.ets       // 备忘录主页面(列表页)
│  │  └──NotesDetail.ets        // 备忘录详情页
│  ├──view
│  │  ├──BottomBar.ets          // 备忘录编辑页底部栏
│  │  ├──ConfirmDialog.ets      // 自定义弹窗
│  │  └──MemoItem.ets           // 自定义备忘录列表组件
│  └──viewmodel
│     └──NotesInfoViewModel.ets // 备忘录默认数据实体
└──entry/src/main/resources     // 资源文件目录
备忘录初始化
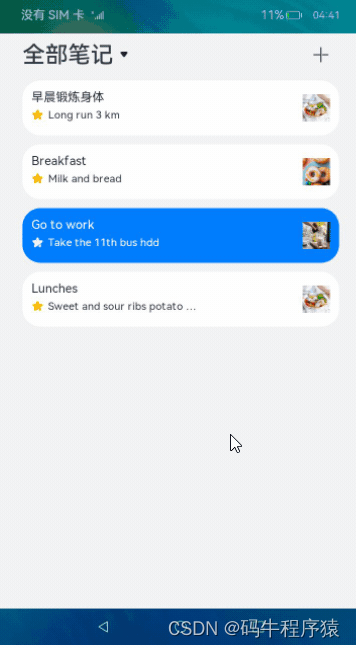
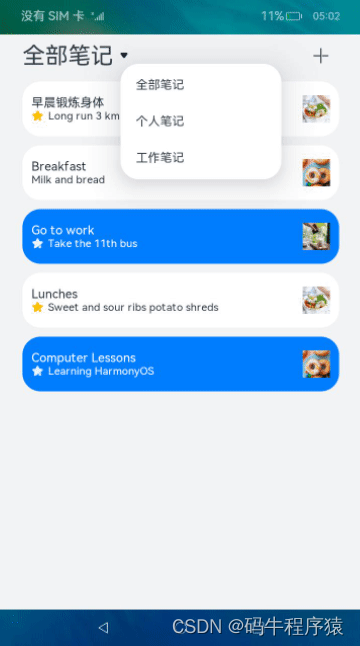
在这个章节中,需要实现备忘录数据的初始化,并且通过List组件将其渲染出来。效果如图所示:
在saveDefaultData方法中先通过getPreferences方法获取preferences实例,然后调用has方法查找数据库中是否存在“noteIdArr”这个key值,如果不存在调用实例的put方法将noteIdArr以及备忘录数据写入,最后通过flush方法进行数据持久化。
// NotesDataModel.ets
import dataStorage from '@ohos.data.preferences';
...
class NotesDataModel {
  private context: common.UIAbilityContext = getContext(this) as common.UIAbilityContext;

  /**
   * 写入备忘录数据.
   */
  async saveDefaultData() {
    try {
      let preferences = await dataStorage.getPreferences(this.context, CommonConstants.PREFERENCE_INSTANCE_NAME);
      let isExist = await preferences.has(CommonConstants.PREFERENCE_NOTE_KEY);
      if (!isExist) {
        preferences.put(CommonConstants.PREFERENCE_NOTE_KEY, JSON.stringify(noteIdArray));
        preferences.flush();
        notesItemArr.forEach((item: NotesInfoBean) => {
          let notes: NotesInfoBean = item;
          let res = preferences.put(item.noteId, JSON.stringify(notes));
          preferences.flush();
          res.then(() => {
            Logger.info('Put the value successfully.' + item.noteId);
          }).catch((err: Error) => {
            Logger.error(`Put the value failed with err: ${err}`);
          })
        })
      }
    } catch (err) {
      Logger.error(`Failed to get preferences. Error = ${err}`);
    }
  }

  /**
   * 基于笔记类型获取对应备忘录数据.
   *
   * @param flag the folder type.
   * @param allNotes all of notes.
   * @returns subNotes.
   */
  getSelectNotes(flag: FolderType, allNotes: Array<NotesInfoBean>): Array<NotesInfoBean> {
    return allNotes.filter((item: NotesInfoBean) => item.folder === flag);
  }
}
在NoteHomePage.ets文件中调用saveDefaultData函数先将本地数据写入数据库,再调用实例的get方法进行查询操作。
// NoteHomePage.ets
import dataStorage from '@ohos.data.preferences';
...
@Entry
@Component
struct NoteHomePage {
  @State folderType: Resource = $r('app.string.notes_all');
  @State allNotes: Array<NotesInfoBean> = [];
  @State selectNotes: Array<NotesInfoBean> = this.allNotes.sort();
  private context: common.UIAbilityContext = getContext(this) as common.UIAbilityContext;
  ...
  build() {
    Column() {
      ...
      List({ space: StyleConstants.MEMO_LIST_SPACE }) {
        ForEach(this.selectNotes, (item: NotesInfoBean) => {
          ListItem() {
            MemoItem({ noteItem: item })
          }
        }, (item: NotesInfoBean) => JSON.stringify(item))
      }
      .margin({ top: $r('app.float.list_container_margin') })
      .height(StyleConstants.NOTE_CONTENT_HEIGHT)
      .width(StyleConstants.FULL_WIDTH)
    }
    .backgroundColor($r('app.color.page_background'))
    .height(StyleConstants.FULL_HEIGHT)
  }

  onPageShow() {
    this.getAllNotes();
  }

  async getAllNotes() {
    await NotesDataModel.saveDefaultData();
    try {
      let preferences = await dataStorage.getPreferences(this.context, CommonConstants.PREFERENCE_INSTANCE_NAME);
      let noteIds = await preferences.get(CommonConstants.PREFERENCE_NOTE_KEY, '');
      while (this.allNotes.length >= 1) {
        this.allNotes.pop();
      }
      JSON.parse(noteIds.toString()).forEach(async (item: NotesInfoBean) => {
        let note = await preferences.get(item.noteId, '');
        this.allNotes.push(JSON.parse(note.toString()));
      })
    } catch (err) {
      Logger.error('Get the value of noteIdArr failed with err:', err);
    }
  }
}
新增备忘录
此章节介绍新增备忘录功能,点击列表页右上角加号进入编辑页,支持输入标题、备忘录内容以及添加图片。效果如图所示:

首先在列表页NoteHomePage.ets中添加跳转逻辑,设置路由参数params,其中operationType字段代表此次操作是新增还是修改。
// NoteHomePage.ets
Navigator({ target: 'pages/NotesDetail', type: NavigationType.Replace }) {
  Row() {
    Image($rawfile('ic_title_add.svg'))
      ...
  }
  .margin({ right: $r('app.float.note_add_margin') })
}
.params({
  notesInfo: {
    'noteId': new Date().getTime().toString(),
    'title': '',
    'folder': FolderType.Personal,
    'content': '',
    'imageArr': [],
    'time': new Date().toTimeString().split(' ')[0],
    'isFavorite': false
  },
  operationType: CommonConstants.ADD_NOTE
})
进入编辑页NotesDetail.ets后可以输入标题、内容以及选择对应的笔记类型等,确认保存后备忘录数据实时更新。
// NotesDetail.ets
build() {
...
TextInput({
text: this.notesInfo.title != '' ? this.notesInfo.title : '',
placeholder: this.notesInfo.title != '' ? '' : $r('app.string.note_title_placeholder')
})
...
.onChange((value: string) => {
if (value !== this.notesInfo.title) {
this.notesInfo.title = value;
this.isDataChanged = true;
}
})
...
TextArea({
text: this.notesInfo.content !== '' ? this.notesInfo.content : '',
placeholder: this.notesInfo.content !== '' ? '' : $r('app.string.note_content_placeholder')
})
.onChange((value: string) => {
if (value !== this.notesInfo.content) {
this.notesInfo.content = value;
this.isDataChanged = true;
}
})
...
}
onBackPress() {
if (this.isDataChanged || this.notesFolder !== this.notesInfo.folder || this.isCollectChange) {
this.saveDialogController.open();
} else {
router.replaceUrl({
url: 'pages/NoteHomePage'
});
}
return true;
}
// ConfirmDialog.ets
if (this.type === CommonConstants.SAVE_DIALOG) {
this.confirm = async () => {
let preferences = await dataStorage.getPreferences(this.context, CommonConstants.PREFERENCE_INSTANCE_NAME);
// 保存备忘录数据实时更新
if (this.operationType === CommonConstants.ADD_NOTE) {
this.noteIdArray.push(new NoteIdBean(this.notesInfo.noteId));
preferences.put(CommonConstants.PREFERENCE_NOTE_KEY, JSON.stringify(this.noteIdArray));
preferences.flush();
}
let newNotes = this.notesInfo;
await preferences.put(this.notesInfo.noteId, JSON.stringify(newNotes));
await preferences.flush();
router.replaceUrl({
url: 'pages/NoteHomePage'
});
}
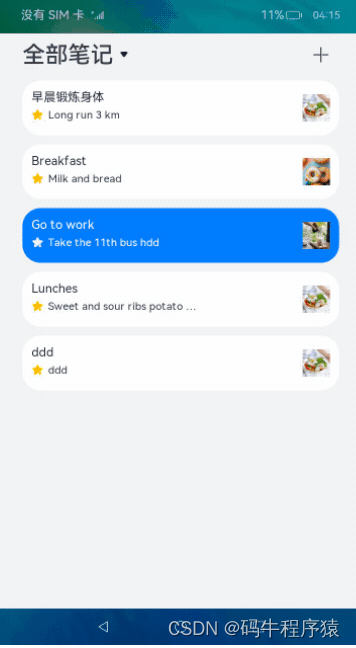
}更新备忘录
此章节介绍更新数据库操作,与新增备忘录逻辑类似。效果如图所示:

首先在NotesDetail.ets中设置isDataChange和isCollectChange属性,来表示对应noteId的备忘录数据是否已更改。如果isDataChange或者isCollectChange为true表示已更改,在返回列表页时会拉起确认弹窗,确认保存后执行put方法去更改备忘录数据。
// NotesDetail.ets
build() {
  Column() {
    ...
    Stack({ alignContent: Alignment.Bottom }) {
      Scroll(this.scroller) {
        Column() {
          TextInput({
            text: this.notesInfo.title != '' ? this.notesInfo.title : '',
            placeholder: this.notesInfo.title != '' ? '' : $r('app.string.note_title_placeholder')
          })
            ...
            .onChange((value: string) => {
              if (value !== this.notesInfo.title) {
                this.notesInfo.title = value;
                this.isDataChanged = true;
              }
            })
          ...
          TextArea({
            text: this.notesInfo.content !== '' ? this.notesInfo.content : '',
            placeholder: this.notesInfo.content !== '' ? '' : $r('app.string.note_content_placeholder')
          })
            .onChange((value: string) => {
              if (value !== this.notesInfo.content) {
                this.notesInfo.content = value;
                this.isDataChanged = true;
              }
            })
          ...
        }
      }
      ...
      BottomBar({
        imageArr: $imageArr,
        notesInfo: $notesInfo,
        operationType: $operationType,
        noteIdArray: $noteIdArray,
        isDataChanged: $isDataChanged
      })
    }
    ...
  }
  .height(StyleConstants.FULL_HEIGHT)
  .backgroundColor($r('app.color.white_color'))
}
...
onBackPress() {
  if (this.isDataChanged || this.notesFolder !== this.notesInfo.folder || this.isCollectChange) {
    this.saveDialogController.open();
  } else {
    router.replaceUrl({
      url: 'pages/NoteHomePage'
    });
  }
  return true;
}

// BottomBar.ets
// 点击收藏
this.clickCollect = () => {
  this.notesInfo.isFavorite = !this.notesInfo.isFavorite;
  this.isFavorite = !this.isFavorite;
  this.collectImgSrc = this.notesInfo.isFavorite ?
    'ic_bottom_star_selected.svg' : 'ic_bottom_star_normal.svg';
}
...
// 点击插入图片
this.clickAddPicture = () => {
  this.imageSrc = this.chooseImage();
  if (this.imageSrc === '') {
    prompt.showToast({
      message: 'Not anymore pictures'
    });
  } else {
    this.imageArr = this.notesInfo.imageArr;
    this.imageArr.push(this.imageSrc);
    this.isDataChanged = true;
  }
}

// ConfirmDialog.ets
if (this.type === CommonConstants.SAVE_DIALOG) {
  this.confirm = async () => {
    let preferences = await dataStorage.getPreferences(this.context, CommonConstants.PREFERENCE_INSTANCE_NAME);
    if (this.operationType === CommonConstants.ADD_NOTE) {
      this.noteIdArray.push(new NoteIdBean(this.notesInfo.noteId));
      preferences.put(CommonConstants.PREFERENCE_NOTE_KEY, JSON.stringify(this.noteIdArray));
      preferences.flush();
    }
    // 保存备忘录数据实时更新
    let newNotes = this.notesInfo;
    await preferences.put(this.notesInfo.noteId, JSON.stringify(newNotes));
    await preferences.flush();
    router.replaceUrl({
      url: 'pages/NoteHomePage'
    });
  }
}
删除备忘录
上述章节介绍了数据库的新增与更新,此章节来介绍删除操作。效果如图所示:
在BottomBar.ets中点击删除按钮,弹出自定义弹窗选择“是否删除”。在ConfirmDialog.ets中添加删除逻辑,删除操作会调用preferences实例的delete方法,将对应noteId的备忘录数据从数据库中删除,最后执行实例的flush方法实现持久化。
// BottomBar.ets
export default struct BottomBar {
  ...
  deleteDialogController: CustomDialogController = new CustomDialogController({
    builder: ConfirmDialog({
      notesInfo: $notesInfo,
      operationType: $operationType,
      noteIdArray: $noteIdArray,
      type: CommonConstants.DELETE_DIALOG
    }),
    autoCancel: true,
    alignment: DialogAlignment.Bottom,
    offset: { dx: $r('app.float.dialog_offset_x'), dy: $r('app.float.dialog_margin_bottom') }
  });
  ...
  build() {
    ...
    Column() {
      Image($r('app.media.ic_bottom_delete'))
        .width($r('app.float.ic_bottom_picture_size'))
        .aspectRatio(1)
      Text($r('app.string.delete_note'))
        .fontSize($r('app.float.font_size_smallest'))
        .margin({ top: $r('app.float.bottom_txt_margin') })
    }
    .onClick(() => {
      this.clickDelete = () => {
        if (this.operationType === CommonConstants.MODIFY_NOTE) {
          this.deleteDialogController.open();
        } else {
          prompt.showToast({
            message: 'The addition operation cannot be deleted'
          });
        }
      }
      this.clickDelete();
    })
    ...
  }
  ...
}

// ConfirmDialog.ets
if (this.type === CommonConstants.SAVE_DIALOG) {
  ...
} else {
  // 删除备忘录数据
  this.confirm = async () => {
    let preferences = await dataStorage.getPreferences(this.context, CommonConstants.PREFERENCE_INSTANCE_NAME);
    await preferences.delete(this.notesInfo.noteId);
    await preferences.flush();
    router.replaceUrl({
      url: 'pages/NoteHomePage'
    });
  }
}
this.confirm();
})
总结
您已经完成了本次Codelab的学习,并了解到以下知识点:
- 使用preferences用户首选项实现一个简易备忘录。
- 使用Navigator实现路由跳转。
为了帮助大家更深入有效的学习到鸿蒙开发知识点,小编特意给大家准备了一份全套最新版的HarmonyOS NEXT学习资源,获取完整版方式请点击→《HarmonyOS教学视频》
HarmonyOS教学视频

鸿蒙语法ArkTS、TypeScript、ArkUI等…视频教程

鸿蒙生态应用开发白皮书V2.0PDF:
获取完整版白皮书方式请点击→《鸿蒙生态应用开发白皮书V2.0PDF》
鸿蒙 (Harmony OS)开发学习手册
一、入门必看
- 应用开发导读(ArkTS)
- .……

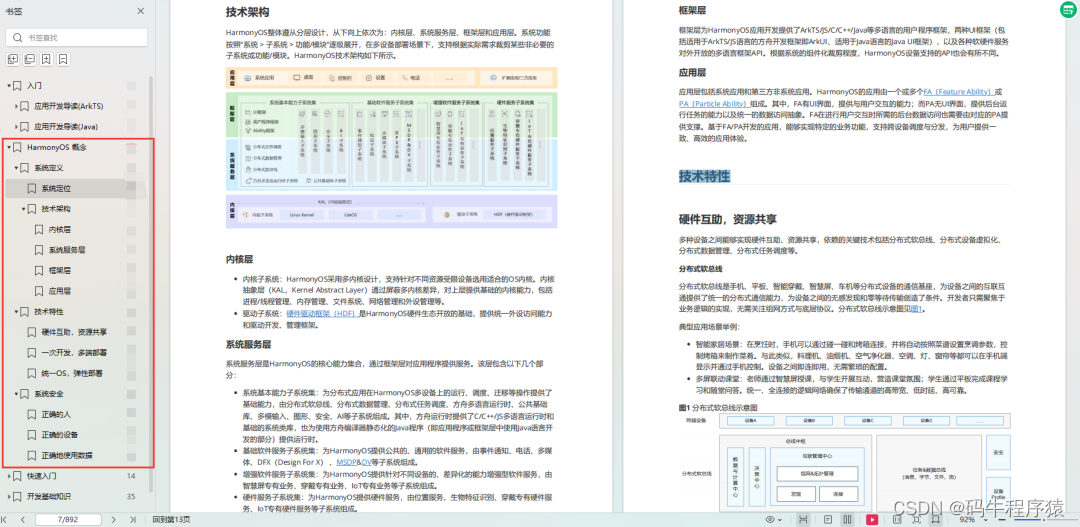
二、HarmonyOS 概念
- 系统定义
- 技术架构
- 技术特性
- 系统安全
- …
三、如何快速入门?《鸿蒙基础入门学习指南》
- 基本概念
- 构建第一个ArkTS应用
- .……

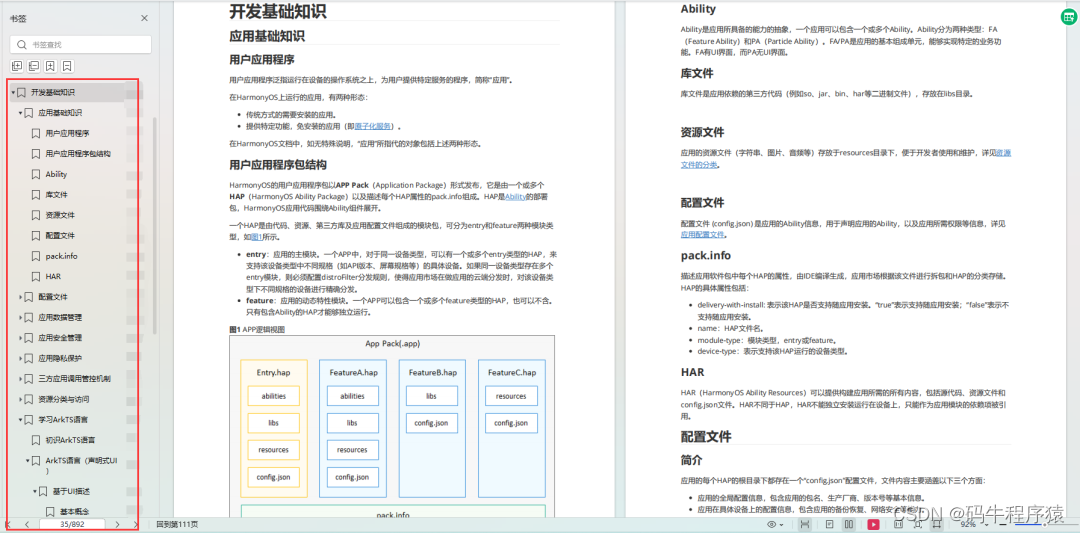
四、开发基础知识
- 应用基础知识
- 配置文件
- 应用数据管理
- 应用安全管理
- 应用隐私保护
- 三方应用调用管控机制
- 资源分类与访问
- 学习ArkTS语言
- .……
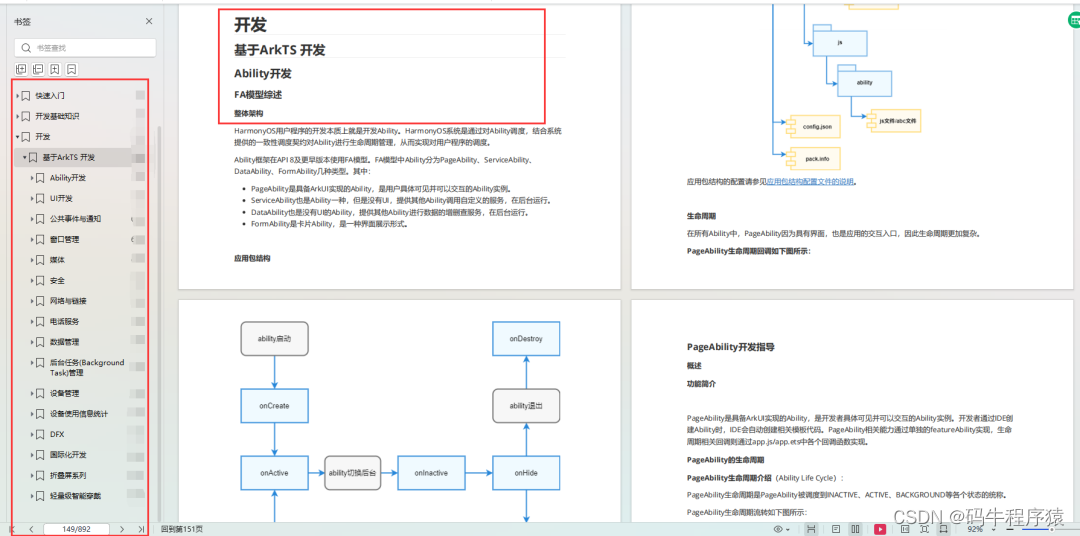
五、基于ArkTS 开发
- Ability开发
- UI开发
- 公共事件与通知
- 窗口管理
- 媒体
- 安全
- 7.网络与链接
- 电话服务
- 数据管理
- 后台任务(Background Task)管理
- 设备管理
- 设备使用信息统计
- DFX
- 国际化开发
- 折叠屏系列
- .……
更多了解更多鸿蒙开发的相关知识可以参考:《鸿蒙 (Harmony OS)开发学习手册》